
Popular categories
Looking for a yarn?


Comments / Questions (7)
![]() NZK wrote:
NZK wrote:
Bonjour êtes vous sur qu'il ne manque pas un rang pour la réalisation des volant, des ml et ms ne font pas le résultats que l'on vois sur la photo! Merci
14.11.2023 - 09:40DROPS Design answered:
Bonjour NZK, veillez à ce que vos mailles en l'air (celles des volants) ne soient pas trop serrées et de la même largeur qu'une double-bride / qu'une maille serrée, ajoutez-en si besoin pour avoir des volants un peu plus froncés. Bon crochet!
14.11.2023 - 10:50
![]() Marianne Sørensen wrote:
Marianne Sørensen wrote:
Vedr. 90-23 poncho: I diagrammet med st og dbl-st, er der luftmasker imellem maskerne ? Foreksempel 1 dbl-st, 1 lm hele omgangen, eller er det dbl-st alene hele omgangen rundt? Det er svært at se på diagrammet. Hilsen Marianne
18.05.2023 - 07:10DROPS Design answered:
Hej Marianne, på de første 6 rækker er det kun st og dbl-st, men på 7.række har du 2 lm imellem hver st :)
23.05.2023 - 09:26
![]() Laura Balzarotti wrote:
Laura Balzarotti wrote:
Buona sera. Sono alla riga uno M1 di aumenti . Nel primo giro taglia s m mi trovo con 69 m.a. ora se la sequenza è tra le prime due m.a. fare una m.a.d. e tra le seguenti due m.a. fare due m.a.d. non arrivo a 92 m.a.d. ma a 101..ho capito male? Grazie!!
15.05.2016 - 21:12DROPS Design answered:
Buonasera Laura. Il giro con aumenti viene lavorato così: 1 m.a.d tra le 2 m successive, 1 m.a.d tra le 2 m successive, 2 m.a.d tra le 2 m successive. Ripete questa sequenza su tutto il giro. Alla fine del giro, le m.a.d sono 92. Buon lavoro!
15.05.2016 - 21:29
![]() Laura wrote:
Laura wrote:
Buon giorno Solo x capire. Il diagramma M1 che viene citato e quello nel.disegno con Diag? E gli.aumenti non sono riportati nello schema giusto? Quindi devo seguire quanto scritto nella spiegazione del.modello? Grazie Saluti laura
13.05.2016 - 14:14DROPS Design answered:
Buongiorno Laura, è esatto, il diag. è M.1 e il disegno a strisce è il diagramma M.2. Buon lavoro!
13.05.2016 - 15:02Aurora Ballesteros wrote:
Hola! Envían el material a México? Todo el kit con el material necesario para hacer este patrón, vivo en México y me gustaría hacerlo igual al de la foto. Gracias
29.05.2015 - 02:28DROPS Design answered:
Hola Aurora, en el apartado TIENDAS DROPS, dentro de INICIO, tienes un apartado RESTO DEL MUNDO donde aparecen 3 tiendas que envían a todo el mundo. Puedes entrar y elegir los productos que necesites.
07.06.2015 - 10:28
![]() Lauren McRoberts wrote:
Lauren McRoberts wrote:
Thank you! Just to clarify, the pattern uses "tc" a lot in the section "Inc:" and "Poncho." Each "tc" should be "dc?" It does also use some "dc", but I don't see any "tr," yet on the diagram, there are "tr." Please let me know. I look forward to the edit. Thank you! This is a beautiful pattern and I can't wait to make it!
20.02.2014 - 14:48
![]() Lauren McRoberts wrote:
Lauren McRoberts wrote:
Where the pattern starts with Inc: What is the "tc?" It is not referenced on the diagram either. Should this be "dc" or "tr?"
19.02.2014 - 19:20DROPS Design answered:
Dear Mrs McRoberts, there is a typo, it should be 11 dc/tr (US-English) in width x 7 rows = 10 x 10 cm. Pattern will be edited. Happy knitting!
19.02.2014 - 21:13
|
||||||||||||||||||||||||||||
DROPS 90-23 |
||||||||||||||||||||||||||||
|
|
||||||||||||||||||||||||||||
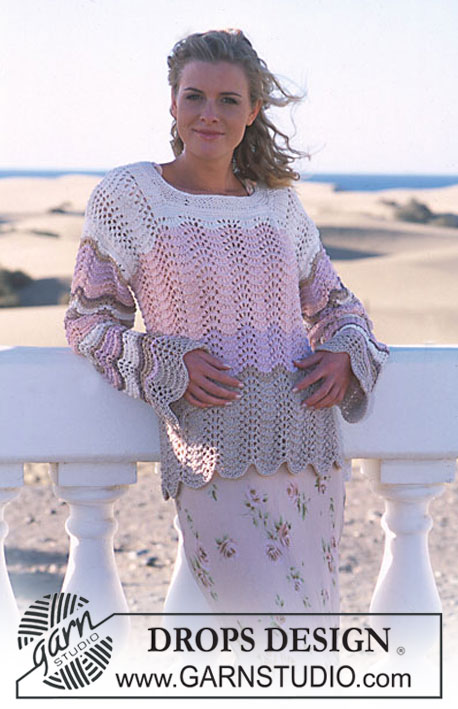
DROPS CROCHETED PONCHO IN MUSKAT
DROPS 90-23 |
||||||||||||||||||||||||||||
|
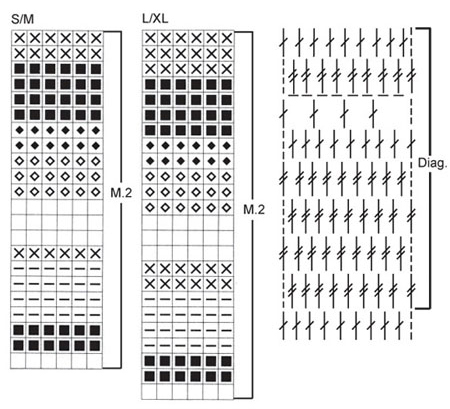
Pattern: See Diagr.1. Start at lower edge of diagram. Stripes: See the charts for Pattern 2 – use the appropriate chart for your size. 1 row of Pattern 2 = 1 row of Diagr 1. Crochet tips-1: Crochet between dc/tr from previous row, not in the dc/tr. Crochet tips-2: At the beginning of every rows replace 1 dc with ch 3 and 1 tr with ch 4. Every rows ends with 1 sl st in the ch 3 or ch 4 at the beginning of row. Poncho: The poncho is crocheted in the round from the neck down – read Crochet tips above. Ch 138 (150) with natural and join into a ring with 1 sl st. 1st row: ch 3 (= 1 dc), * skip over 1 ch, 1 dc in the next ch *, repeat * - * and finish with 1 sl st in the ch 3 at the beginning of row = 69 (75) dc on row. Read the entire section before crocheting: Now crochet Pattern following Diagr.1 in stripes following Pattern 2. Inc: On the 1st row in Diagr.1 inc by crocheting 2 tr between every 3rd dc around row = 92 (100) tr. 2nd and 4th rows crochet without incs. On the 3rd row in Diagr.1 inc by crocheting 2 tr between every 4th tr around row, but 2 (1) times on row inc 1 extra tr = 117 (126) tr. On 5th row in Diagr.1 inc by crocheting 2 dc between every 9th tr on row but 2 (4) times evenly distributed on the row inc 1 extra dc = 132 (144) dc. Incs are now complete, continue with stripes and Pattern. When 6 (7) rows of Pattern 2 remain, divide piece for split at each side = 66 (72) st at each side and crochet back and forth. When Pattern 2 has been crocheted 1 time, the piece measures approx. 33 (36) cm (or continue to desired length), cut yarn and fasten. Crochet a lace edge at lower edge of both sides with light beige as follows: 1st row: * ch 4, skip over 2 dc, 1 sc in the next dc *, repeat from * - * = 22 (24) ch-loops at each side. 2nd row: ch 1, then crochet in each ch-loop: 1 sc, ch 1, 1 hdc, 1 dc, 1 tr, 1 dc, 1 hdc, ch 1 and 1 sc. Lace rows: Crochet 3 lace rows around poncho as follows: start at the top between the natural white and the lilac stripes, fold piece with right side out and in the transition between colors crochet with light beige as follows: 1 sc in 1st tr, * ch 4, skip over 1 tr, 1 sc in the next tr *, repeat * - * around row and finish with ch 4 and 1 sl st in 1st ch at the beginning of row. The next lace row crochet in the same manner with brown, between the peach and the light beige stripes. The last lace row crochet with peach between the beige and the brown stripes. |
||||||||||||||||||||||||||||
Diagram explanations |
||||||||||||||||||||||||||||
|
||||||||||||||||||||||||||||
 |
||||||||||||||||||||||||||||
Have you finished this pattern?Tag your pictures with #dropspattern or submit them to the #dropsfan gallery. Do you need help with this pattern?You'll find 8 tutorial videos, a Comments/Questions area and more by visiting the pattern on garnstudio.com. © 1982-2026 DROPS Design A/S. We reserve all rights. This document, including all its sub-sections, has copyrights. Read more about what you can do with our patterns at the bottom of each pattern on our site. |
||||||||||||||||||||||||||||


With over 40 years in knitting and crochet design, DROPS Design offers one of the most extensive collections of free patterns on the internet - translated to 17 languages. As of today we count 325 catalogs and 12298 patterns - 12288 of which are translated into English (US/in).
We work hard to bring you the best knitting and crochet have to offer, inspiration and advice as well as great quality yarns at incredible prices! Would you like to use our patterns for other than personal use? You can read what you are allowed to do in the Copyright text at the bottom of all our patterns. Happy crafting!
Post a comment to pattern DROPS 90-23
We would love to hear what you have to say about this pattern!
If you want to leave a question, please make sure you select the correct category in the form below, to speed up the answering process. Required fields are marked *.