
Popular categories
Looking for a yarn?


Comments / Questions (10)
![]() Inga Heafey wrote:
Inga Heafey wrote:
I am really enjoying this amazing pattern . Its so fun and rewarding to knit . Thank you so much for making all these wonderful patterns available. It's really fantastic . Thank you
16.10.2022 - 21:36
![]() Michelle Forbes wrote:
Michelle Forbes wrote:
Thank you so much for all your help. I now have a lofely pair of mittens.
05.03.2018 - 14:29
![]() Michelle Forbes wrote:
Michelle Forbes wrote:
Hello I am still confused. Are there not three M1 patterns throughout? One on the side of the mitten and one on either side of thumb gussett? Set Up : M1 (= 2 sts), P2-3, M.2 (= 11 sts), P2-3, M.1 (= 2 sts), P11-13, M.1 (= 2 sts) and finish with P2. Continue in pattern like this
02.03.2018 - 17:45DROPS Design answered:
Dear Mrs Forbes, there were 3 repeats of M.1 until thumb, then you work M.3 over the sts on thumb and after slipping these sts on a st holder, you cast on 2 new sts that are worked P. There are now only 2 repeats of M.1. Happy knitting!
05.03.2018 - 07:54
![]() Michelle Forbes wrote:
Michelle Forbes wrote:
Hello can you help please? If 3 M1's are consistant throughtout, would the final stich count before final decrease round be15, not 16?
02.03.2018 - 13:34DROPS Design answered:
Dear Mrs Forbes, you are decreasing 1 st in both M.1 = 2 sts are decreased = 16 sts remain. Happy knitting!
02.03.2018 - 14:44
![]() Mariethe House wrote:
Mariethe House wrote:
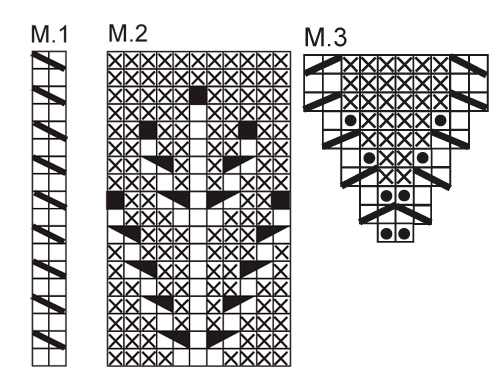
Bonjour Je rencontre un problème avec les augmentations pour le pouce. J'ai compris que le symbole "rond noir" signifiait qu'il fallait tricoter 2 fois la maille à l'endroit MAIS dans le diagramme de la base du pouce, ce point noir apparait avec le symbole de la maille envers: une croix. Là je dois dire que je ne comprends pas bien.Auriez vous la gentillesse de m'expliquer. Merci:o)
27.01.2017 - 22:13DROPS Design answered:
Bonjour Mme House, tricotez ces mailles 2 fois à l'endroit (= alternativement dans le brin avant et le brin arrière), et au rang suivant, tricotez ces mailles soit à l'endroit, soit à l'envers, en fonction du diagramme. Bon tricot!
30.01.2017 - 10:38Wendy Carl wrote:
The pattern is a bit confusing and could have been better understood if displayed on a full grid. Also, should M1 be reversed for the right side of the mitten to create an opposing pattern? The way the instructions are written, it makes creating the mitten MUCH harder than it should be. Can you rewrite it?
07.10.2014 - 16:34DROPS Design answered:
Dear Mrs Carl, M.1 is not worked reversed but you can work it reversed if you rather like it that way. For any individual assistance, please remember you can contact the store where you bought your yarn. Happy knitting!
07.10.2014 - 17:28
![]() Daneyrole wrote:
Daneyrole wrote:
Comment faire le pouce des moufles rops 23-15 je ne comprends pas l'explication merci
06.08.2012 - 11:40DROPS Design answered:
Bonjour Daneyrole, dans notre vidéothèque, vous trouverez une vidéo intitulée "Moufle- tricoter le pouce". Ceci vous aidera certainement. Pour toute aide personnalisée, n'hésitez pas à contacter le magasin où vous avez acheté votre laine, il vous répondra même par mail ou téléphone. Bon tricot !
06.08.2012 - 12:18
![]() Daneyrole wrote:
Daneyrole wrote:
Faut-il tricoter ces gants à l'aide de 4 aiguilles donc pas de couture mais combien de mailles sur chaq aiguille merci
22.06.2012 - 18:58DROPS Design answered:
Bonjour Daneyrole, on répartit les mailles régulièrement sur les aiguilles doubles pointes. Vous pouvez soit multiplier par le nombre d'aiguilles utilisée, soit en fonction du motif. Bon tricot !
25.06.2012 - 08:56
![]() DROPS Deutsch wrote:
DROPS Deutsch wrote:
Der Diagrammtext ist angepasst.
07.02.2012 - 08:37
![]() Christiane wrote:
Christiane wrote:
Hello, I think you need to do a correction in the German Explanation to pattern diagramm - M.1: I think it must be "1" st on cable needle in front of piece as it said in the English version. In the German explanation there is no number of stiches written down. Please tell me if I'm wrong. Chrsitane
07.02.2012 - 08:09
|
|||||||||||||||||||||||||
Cables and Berries Mittens |
|||||||||||||||||||||||||
 |
 |
||||||||||||||||||||||||
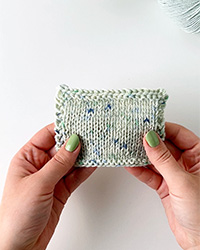
Knitted DROPS mittens with textured pattern in ”Nepal”.
DROPS 123-15 |
|||||||||||||||||||||||||
|
PATTERN: See diagram M.1 to M.3. Diagrams show the pattern from RS and the pattern is worked in the round. DECREASING TIP: Dec as follows 2 sts before M.1: P2 tog into back of loop. Dec as follows after M.1: P2 tog. -------------------------------------------------------- LEFT MITTEN: Cast on 50-50 sts on double pointed needles size 3.5 mm / US 4 with Nepal and K 1 round. Continue in rib, K2/P3. When rib measures 2 cm / ¾" dec all P3 to P2 = 40-40 sts. Continue in the round with K2/ P2 until rib measures 8-9 cm / 3"-3½". Change to double pointed needles size 4 mm / US 6 and K 1 round, AT THE SAME TIME dec 6-2 sts evenly = 34-38 sts. P 1 round, K 1 round and work next round as follows: M.1 (= 2 sts), P2-3, M.2 (= 11 sts), P2-3, M.1 (= 2 sts), P11-13, M.1 (= 2 sts) and finish with P2. Continue in pattern like this – NOTE: work 2 vertical repeats of M.2, then continue to P the 11 sts in "berry motif". When piece measures 11-13 cm / 4½"-5" work M.3 over M.1 at the end of round for thumb (with remaining sts as before). After M.3 there are 42-46 sts on needle. Now slip the 10 sts in M.3 (= thumb sts) on a stitch holder. Continue in pattern in the round as before AT THE SAME TIME cast on 2 new sts behind the thumb on next round (P these sts as you continue) = 34-38 sts. When mitten measures approx 24-26 cm / 9½"-10¼" (4 cm / 1½" remain, try mitten on for correct measurement) dec 1 st each side of M.1 each side – See DECREASING TIP (= 4 dec sts). Repeat the dec on every other round a total of 5 times. AT THE SAME TIME on last round K tog into back of loop the 2 sts in M.1 each side = 12-16 sts left on needle. On next round P2 tog across the round. Cut the thread, pull it through remaining sts, tighten tog and fasten. THUMB: Slip the 10 thumb sts from stitch holder back on double pointed needles size 4 mm / US 6 and pick up 6 sts behind the thumb = 16 sts. Continue in pattern as follows (make sure to have the cables over cables from before): M.1 (= 2 sts), P6, M.1 (= 2 sts) and P6. When the thumb measures approx 4-5 cm / 1½"-2" (1 cm / ½" remain, try mitten on for correct measurement) dec 1 st each side of M.1 – See DECREASING TIP. Repeat the dec on next round AT THE SAME TIME K2 tog into back of loop in M.1 each side = 6 sts left on needle. On next round P2 tog across the round. Cut the thread, pull it through remaining sts, tighten tog and fasten. RIGHT MITTEN: Like left mitten, but mirrored, i.e. work round 1 after the rib and garter st as follows: P2, M.1 (= 2 sts), P11-13, M.1, P2-3, M.2 (= 11 sts), P 2-3 and M.1. And when piece measures 11-13 cm / 4½"-5" work M.3 over M.1 at beg of round for thumb (work remaining sts as before). |
|||||||||||||||||||||||||
Diagram explanations |
|||||||||||||||||||||||||
|
|||||||||||||||||||||||||
 |
|||||||||||||||||||||||||
Have you finished this pattern?Tag your pictures with #dropspattern or submit them to the #dropsfan gallery. Do you need help with this pattern?You'll find 15 tutorial videos, a Comments/Questions area and more by visiting the pattern on garnstudio.com. © 1982-2026 DROPS Design A/S. We reserve all rights. This document, including all its sub-sections, has copyrights. Read more about what you can do with our patterns at the bottom of each pattern on our site. |
|||||||||||||||||||||||||


With over 40 years in knitting and crochet design, DROPS Design offers one of the most extensive collections of free patterns on the internet - translated to 17 languages. As of today we count 320 catalogs and 12106 patterns - 12096 of which are translated into English (US/in).
We work hard to bring you the best knitting and crochet have to offer, inspiration and advice as well as great quality yarns at incredible prices! Would you like to use our patterns for other than personal use? You can read what you are allowed to do in the Copyright text at the bottom of all our patterns. Happy crafting!
Post a comment to pattern DROPS 123-15
We would love to hear what you have to say about this pattern!
If you want to leave a question, please make sure you select the correct category in the form below, to speed up the answering process. Required fields are marked *.