
Popular categories
Looking for a yarn?


Comments / Questions (64)
![]() Shakerah wrote:
Shakerah wrote:
Can I make this bag to sell?
01.11.2025 - 00:43DROPS Design answered:
Hi Shakerah, you can read what you are allowed to do in the Copyright text at the bottom of all our patterns. Happy crocheting!
24.11.2025 - 09:49
![]() Anna Solbakken Vareberg wrote:
Anna Solbakken Vareberg wrote:
Hei! Hvor mange gram bruker man eksakt hvis man bruker én farge?
22.07.2024 - 21:00
![]() Myiesha wrote:
Myiesha wrote:
Hi, I really love this crochet pattern and was wondering if I would be allowed to post a short form video of me using it. I shall credit DROPS DESIGN for creating this and will give a link to this free pattern in my video.
24.05.2023 - 20:54DROPS Design answered:
Dear Myiesha, please send your request at media@garnstudio.com - you will get more informations there. Thank you - happy crocheting!
25.05.2023 - 08:51
![]() Martine DOUZIEH wrote:
Martine DOUZIEH wrote:
Bonjour, j'ai terminé le sac, mais je suis bloquée pour la bordure du haut du sac. Je ne comprends pas : "crocheter entre les groupes de brides à la transition entre l'avant dernier et le dernier tour de groupe de brides" cela est très confus et mériterai une photo de ce détail. Votre tuto est très joli et le rendu avec vos laines est splendide ; Je vous remercie de m'aider car je ne comprends pas., et j'aimerai vraiment terminer le travail.
18.07.2020 - 18:02DROPS Design answered:
Bonjour Mme Douzieh, la bordure se crochète en piquant entre les groupes de brides, autrement dit, commencez à la transition entre les 2 groupes de brides du tour précédent, vous sautez les 5 brides suivantes du tour précédent (= le dernier groupe de 5 b), crochetez 5 brides dans l'espace entre ces 5 premières brides du tour précédent et les 5 brides suivantes du tour précédent, et continuez ainsi, (sautez 5 brides, 5 brides entre les 2 groupes de 5 brides du tour précédent). Bon crochet!
20.07.2020 - 09:27
![]() Monica wrote:
Monica wrote:
Hallo , ik heb het eerste gedeelte af en begin nu met de rand van de tas. Ik weet echt niet hoe te beginnen? Help!!🤔
05.08.2019 - 18:23DROPS Design answered:
Dag Monica,
Als het goed is heb je een aantal toeren met vasten gehaakt. De rand (een soort ruche) aan de bovenkant haak je in de overgang tussen die vasten en het deel met stokjesgroepen. Je begint tussen een stokjesgroep en haakt telkens 5 stokjes (hecht aan met een halve vaste en vervang het eerste stokje met 3 lossen) tussen ieder stokjesgroep op de eerste toer.
06.08.2019 - 15:44
![]() Emelie wrote:
Emelie wrote:
Hej! Jag har lagt upp 140 lm och virkat ett första varv. Använder rätt garn och nål 4. 4 solfjädrar blir 10cm. Mitt arbete är dock totalt 46 cm långt. Men det står väskan är 35 cm. Ska det verkligen vara 140 lm?!
08.03.2019 - 22:06DROPS Design answered:
Hei Emelie. Det som er viktig er at den angitte heklefastheten blir overholdt. Her er den: 4 stavgrupper = 10 cm. Du skal ha 28 stavgrupper, som betyr at vesken er 70 cm rundt hele, og 35 cm tvers over (fra side til side). Størrelsen på heklenålen er kun veiledende, du må bruke den nålen som gir deg 4 stavgrupper = 10 cm. God fornøyelse
12.03.2019 - 15:39
![]() Veronika wrote:
Veronika wrote:
Har jag förstått rätt att st ska vara om/runt mellan st-grupperna? Provade göra så o ser bra ut
10.07.2018 - 23:11DROPS Design answered:
Hei Veronika. Det stemmer at stavgruppene skal hekles mellom stavgruppene i overgangen mellom nest øverste og øverste omgang - som forklart i oppskrift. God fornøyelse videre
13.07.2018 - 11:18
![]() Veronika wrote:
Veronika wrote:
Hej! Förstår inte heller hur man börjar med volangen!!? Hur kan man börja med 5 st i ett hål? Lr ska man göra dom i nån maska lr vad. Blir tokig för fattar inte hur jag ska göra. Kan ni lägga ut en bild lr video på hur man ska göra? I vilken maska ska stolparna sitta i osv? Går ju inte o göra dom i ett hål. Tacksam för svar/hjälp
10.07.2018 - 22:53Ewa wrote:
Har lyckats virka nästan hela väskan men jag förstår inte hur man virkar volangen. Finns det en video som visar hur jag börjar med volangen?
12.05.2015 - 17:19DROPS Design answered:
Hej Ewa, du virkar volangen som väskan, men med 6 st på 2:a varvet och 7 på 3:e varvet istället för 5 st. Lycka till!
18.05.2015 - 09:55
![]() Halima wrote:
Halima wrote:
Even als aanvulling op mijn vraag, ik zie dat de laatste zin een typefout is en dat het toeren moet zijn, toch bdankt voor het patroon, ik vind hem erg leuk, bedankt
13.04.2015 - 17:35
|
|
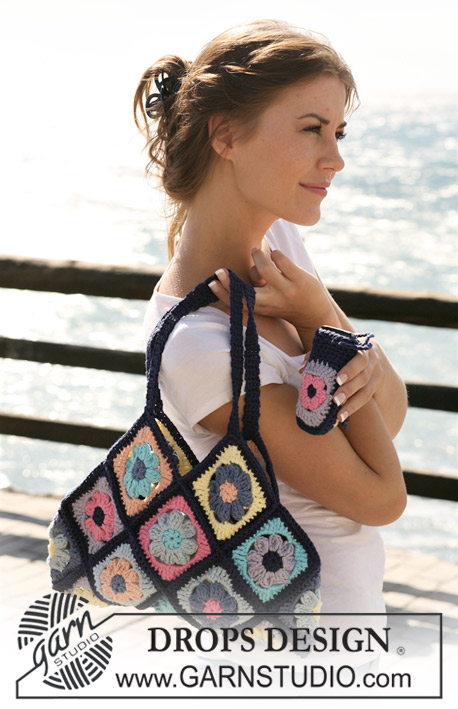
Emmy Lou#emmyloubag |
|
 |
 |
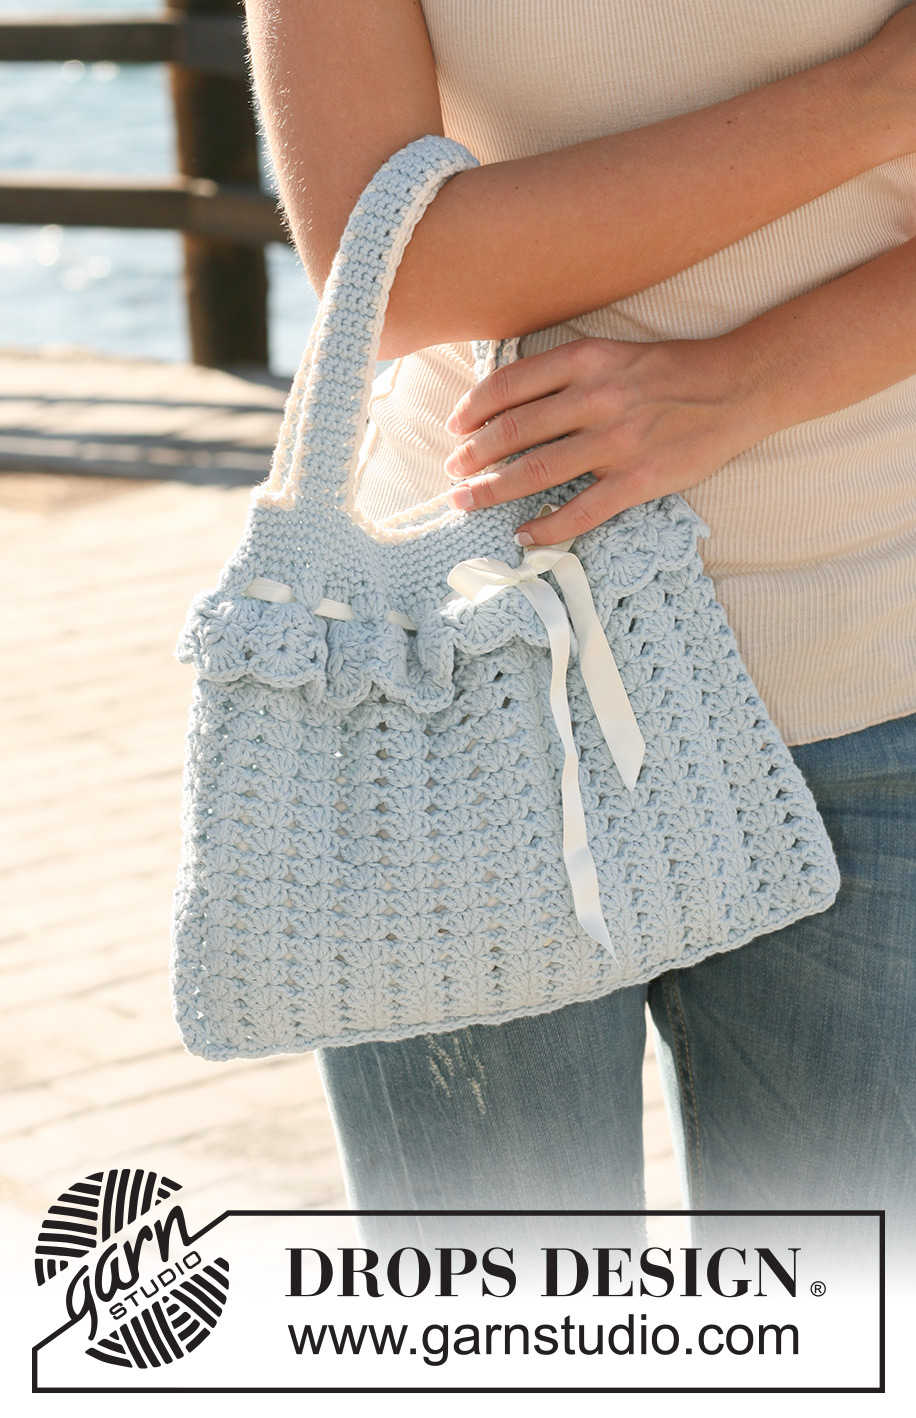
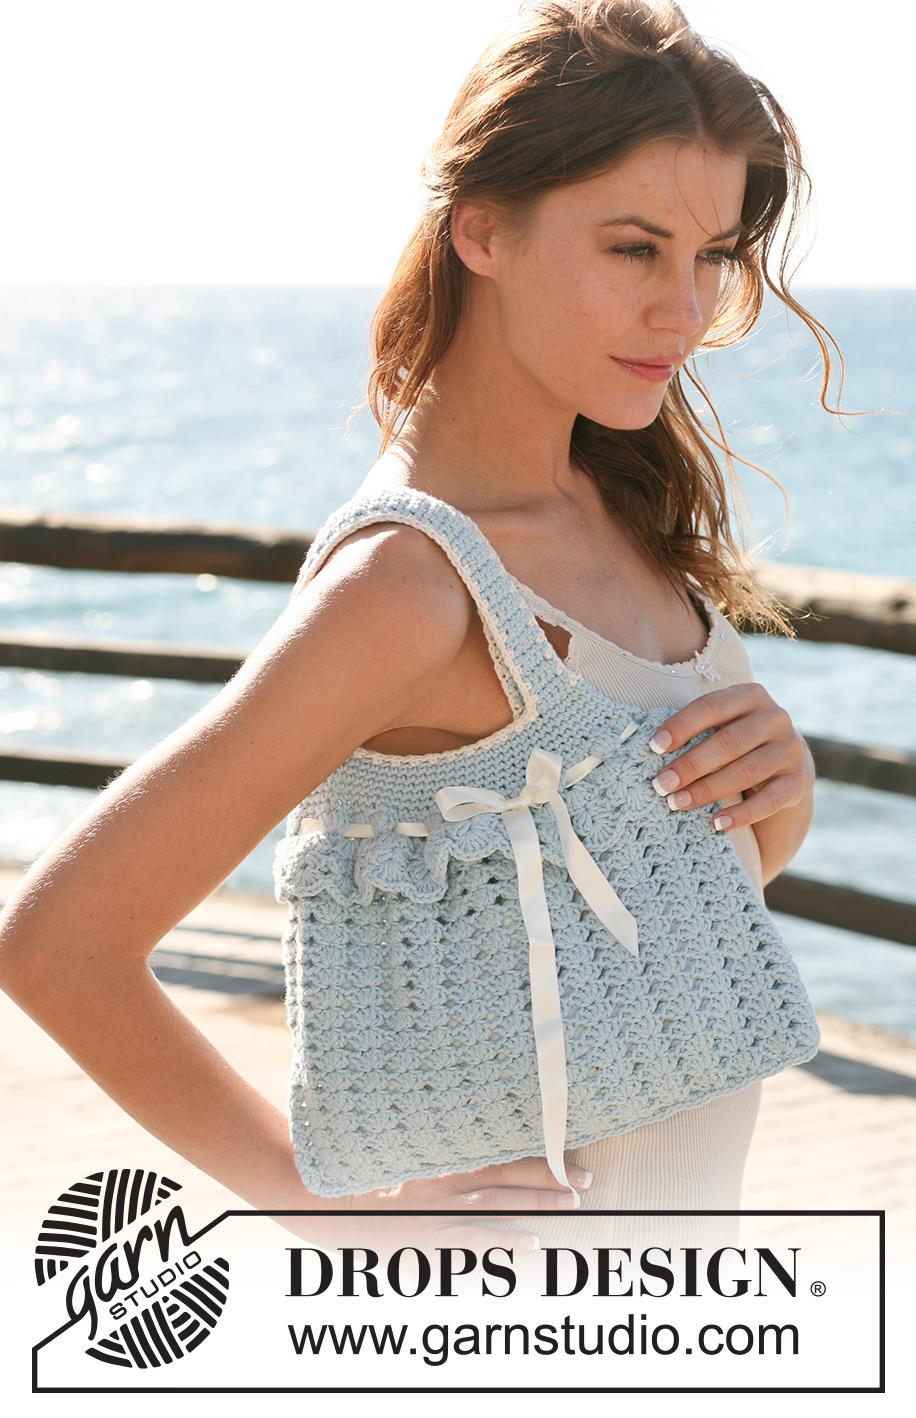
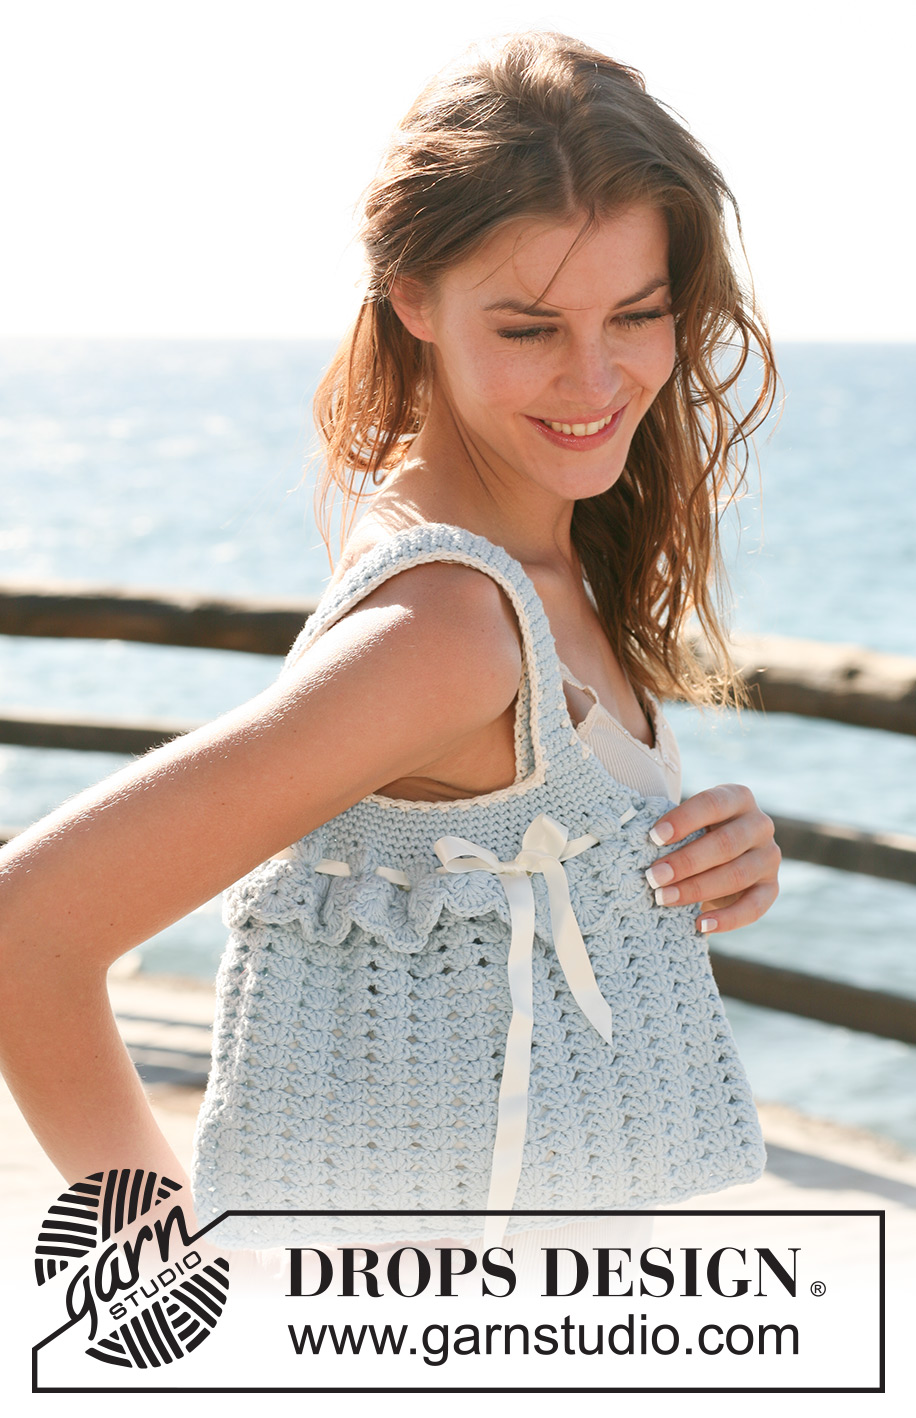
Crochet DROPS bag in ”Paris”.
DROPS 120-9 |
|
|
CROCHET TIP: Replace first dc on round with ch 3. Replace first sc on round with ch 1. -------------------------------------------------------- -------------------------------------------------------- BAG: Ch 140 with light ice blue and form a ring with 1 sl st in first ch. ROUND 1: 5 dc in first ch – See CROCHET TIP, * skip 4 ch, 5 dc in next ch (= 1 dc-group) *, repeat from *-* and finish with skipping 4 ch and crochet 1 sl st at the top of first dc on round = 28 dc-groups. ROUND 2: Crochet sl sts to the middle of the first dc-group, 5 dc in the middle dc on first dc-group, * 5 dc in the middle dc on next dc-group *, repeat from *-* and finish with 1 sl st in first dc. Repeat round 2 until piece measures 21 cm / 8¼". Now crochet next round as follows: 1 sc in first dc, * skip 1 dc, 1 sc in next dc *, repeat from *-* = 70 sc. Crochet 6 rounds with 1 sc in each sc, cut the thread. BORDER AT TOP OF BAG: Hold the bag with the bottom facing away from you. Crochet between the dc-groups in the transition between the one but last and the last round with dc-groups as follows with light ice blue: ROUND 1: Crochet 5 dc between each dc-group round the bag. ROUND 2: Crochet sl sts to the middle of the first dc-group, then 6 dc in the middle dc in each dc-group round the bag. ROUND 3: Crochet sl sts to the middle of the first dc-group, then 7 dc between the 2 middle dc in each dc-group round the bag, cut the thread. STRAP: Ch 6 with light ice blue, turn and crochet 1 sc in 2nd ch from hook, and then 1 sc in each of the last 4 ch = 5 sc. Continue with 1 sc in each sc - turn each row with 1 ch - until strap measures 35 cm / 13¾", cut the thread. Crochet 1 more strap in the same way. ASSEMBLY: Sew a strap to each side of bag, approx 2 cm / ¾" in from the side. Crochet a border along each long side of strap with off-white as follows: 1 sc in first st, * ch 1, skip 1 st, 1 sc in next st *, repeat from *-*. Crochet tog bottom of bag with sc through both layers. Thread the silk ribbon through the last round before the sc at top of bag, and tie a bow. |
|
Have you finished this pattern?Tag your pictures with #dropspattern #emmyloubag or submit them to the #dropsfan gallery. Do you need help with this pattern?You'll find 7 tutorial videos, a Comments/Questions area and more by visiting the pattern on garnstudio.com. © 1982-2026 DROPS Design A/S. We reserve all rights. This document, including all its sub-sections, has copyrights. Read more about what you can do with our patterns at the bottom of each pattern on our site. |
|


With over 40 years in knitting and crochet design, DROPS Design offers one of the most extensive collections of free patterns on the internet - translated to 17 languages. As of today we count 324 catalogs and 12290 patterns - 12280 of which are translated into English (US/in).
We work hard to bring you the best knitting and crochet have to offer, inspiration and advice as well as great quality yarns at incredible prices! Would you like to use our patterns for other than personal use? You can read what you are allowed to do in the Copyright text at the bottom of all our patterns. Happy crafting!
Post a comment to pattern DROPS 120-9
We would love to hear what you have to say about this pattern!
If you want to leave a question, please make sure you select the correct category in the form below, to speed up the answering process. Required fields are marked *.