
Popular categories
Looking for a yarn?


Comments / Questions (62)
![]() Andrea R wrote:
Andrea R wrote:
Jeg hækler med nål 4 … de små granny squares passer perfekt i størrelsen. Den store firkant til ryggen måler dog 23 cm og ikke 22 cm som der står i opskriften. Hvad gør jeg ?
22.10.2022 - 14:28
![]() Uta Grosse wrote:
Uta Grosse wrote:
Ich verstehe die Zunahmen an den Ärmeln nicht.!?
15.03.2022 - 08:10DROPS Design answered:
Liebe Frau Grosse, die Zunahmen werden zuerst an einer Seite dann das nächste Mal an der anderen Seite gehäkelt: um die letzte Luftmaschen am Ende einer Reihe häkeln Sie anstatt (3 Stb, 1 lm): 3 Stb, 1 lm, 3 Stb, 1 lm; dann enden Sie mit 1 lm, 1 Stb in das lezte Stb. Das nächste Mal nehmen Sie genauso zu, aber auf der anderen Seite. Kann das Ihnen helfen?
15.03.2022 - 10:01
![]() Maja wrote:
Maja wrote:
I rygstk. er jeg ikke helt med, når der står at der skal tages 1 st ind i hver side ved at hoppe 1 over. Er lidt i tvivl om jeg skal starte med 3 lm og dernæst springe den næste over, og ligeledes i sidste ende, om jeg skal springe 1 over og dernæst lave 1 st.
22.02.2021 - 22:45DROPS Design answered:
Hej Maja, hvis du skal tage 1 maske ind i siden, så vender du arbejdet 1 maske før den sidste :)
24.02.2021 - 15:40
![]() Janni Olsen wrote:
Janni Olsen wrote:
Hvordan skal man lave den udtagning på ærmerne i stangmaske grupperne . Synes hvis jeg laver den som beskrevet i næst yderste luftmaske så buer den .
15.06.2020 - 21:41DROPS Design answered:
Hej Janni, det er sådan vi har gjort det. Det buer sikkert mindre når du har hæklet et par rækker mere. God fornøjelse!
16.06.2020 - 07:58
![]() Sigal wrote:
Sigal wrote:
Hi, Thanks for the reply: "you will skip the 2nd stitch at the beg of the row and the next to last stich at the end of the same row = 2 dc decreased on row" but looking at your video of decreasing I'm still confused, you do sc there, so just want to make sure. If I have 10 dc in a raw, I do ch 3, skip one dc, 6 dc, skip 1 dc, 1 dc (total 8 dc)? Thank you very much, your patterns are lovely.
21.05.2019 - 08:55DROPS Design answered:
Dear Sigal, that's it, it's how you are intended to work the decreases. Happy crocheting!
21.05.2019 - 10:02
![]() Sigal wrote:
Sigal wrote:
Hi, working on back piece: dec 1 dc each side by skipping the last but one dc each side. Repeat the dec on every other row a total of 6 times... What does it mean the last but one? But what? And Repeat every other row - not every row? Thank you
19.05.2019 - 11:42DROPS Design answered:
Dear Sigal, you will skip the 2nd stitch at the beg of the row and the next to last stich at the end of the same row = 2 dc decreased on row. Work 1 row without decreasing, then repeat these 2 rows 5 more times (= 6 rows with decrease in total). Happy crocheting!
20.05.2019 - 12:23
![]() Sigal Zahavi wrote:
Sigal Zahavi wrote:
Hello, I'm a bit confused, can you please explain to me what is this pattern part for? PATTERN: ROW 1: 3 ch, 2 tr in first ch-loop, * 1 ch, 3 tr in next ch-loop *, repeat from *-* and finish with 1 ch and 1 tr in 3rd ch from beg of previous row, turn piece. Repeat row 1. What do I need to do with it when it's done?
07.05.2019 - 10:38DROPS Design answered:
Dear Mrs Zahavi, when you are working pattern, repeat row 1, ie at the end of 1st row, turn and repeat as previous row and continue like this, it's a 1-row-pattern. Happy crocheting!
07.05.2019 - 13:20
![]() Franziska Haidbauer wrote:
Franziska Haidbauer wrote:
Habe eine frage , wieviel Wolle braucht man für die ganze Jacke. Steht nämlich nicht dabei. LG Franziska Haidbauer
18.04.2019 - 18:30DROPS Design answered:
Liebe Frau Haidbauer, die gesamte Garnmenge in jeder Farbe finden Sie im Kopfsprung für jeder Grösse. 1 Knäuel Alpaca = 50 g, so braucht man z.B. in 1. Größe: 700 g Fb 506 = 14 Knäuel Fb 506 + je 3 Knäuel Fb 517 + Farbe 100 (= 150 g jeder Farbe). Viel Spaß beim häkeln!
23.04.2019 - 11:49
![]() Caroline wrote:
Caroline wrote:
Jag virkar denna i XL och har upptäckt ett fel i beskrivningen i de tre större storlekarna. Eftersom bakstycket mäter 42 cm i alla storlekar innan det delas och framstycke samt halva bakstycke virkas var för sig kommer inte den stora mormorsrutan att täcka rygghålet då bakstycket ska mäta 50 cm innan ärmhålsminskning mot 43 cm i de mindre, samt att ärmhålet mäter 4 cm mer på höjden än i S/M/L. Detta har det inte kompenserats för i mönstret, varför det inte går att få ihop.
16.01.2019 - 00:33
![]() Katja wrote:
Katja wrote:
Hallo, werden die Granny-Squares auch alle mit 2 Fäden gehäkelt oder nur mit einem Faden, und dafür der ganze Rest (Rückenteil, Ärmel etc. - alles was in dunkelgrau ist) mit 2 Fäden? Danke für die Hilfe! Katja
29.11.2018 - 22:00DROPS Design answered:
Liebe Katja, die ganze Jacke wird mit 2 Fäden gehäkelt, am besten nähen Sie die Quadrate auch mit 2 Fäden zusammen. Viel Spaß beim häkeln!
30.11.2018 - 08:18
|
|
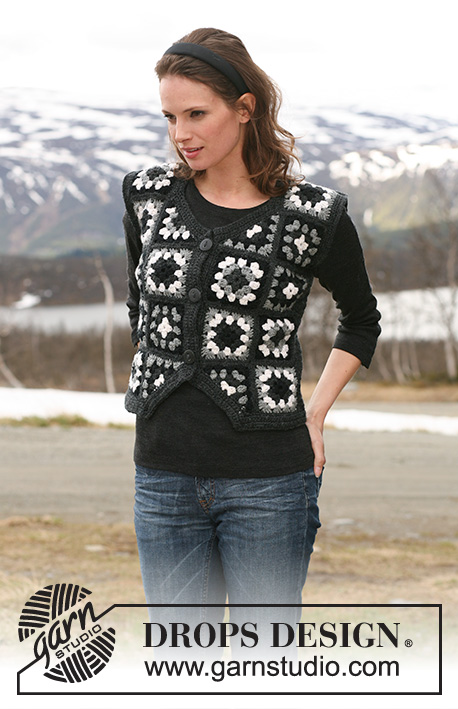
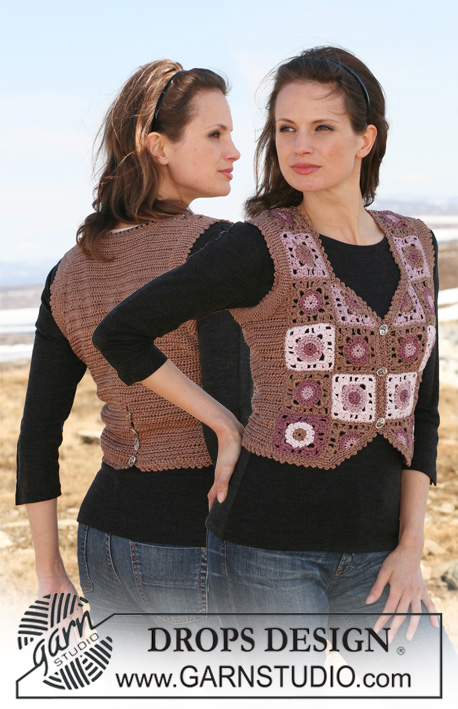
Høstglede |
|
|
|
|
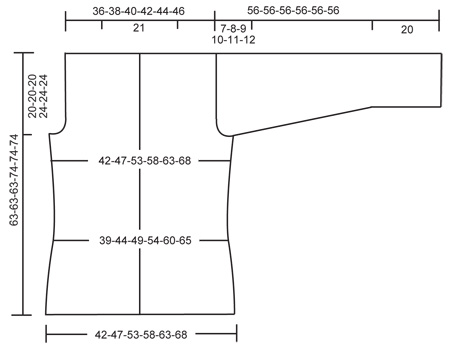
Crochet DROPS jacket in 2 threads ”Alpaca” with squares and dc-pattern. Size S to XXXL.
DROPS 115-36 |
|
|
CROCHET TIP: Replace first dc on row with 3 ch. PATTERN: ROW 1: 3 ch, 2 dc in first ch-loop, * 1 ch, 3 dc in next ch-loop *, repeat from *-* and finish with 1 ch and 1 dc in 3rd ch from beg of previous row, turn piece. Repeat row 1. STRIPES: Crochet 3 rows with dark gray, then 1 row of each color as follows: off-white, medium gray, dark gray, medium gray, dark gray, off-white, medium gray, off-white, dark gray, off-white, dark gray, medium gray, off-white, complete piece in dark gray. DECREASING TIP (sleeve): Dec 1 dc-group (= 3 dc + 1 ch) at the end of row by working row until 1 dc-group remain, turn and work return row. Dec 1 dc-group at beg of row by working sl sts to 2nd dc-group on row and continue as before. ---------------------------------------------------------- ---------------------------------------------------------- JACKET: Crochet 11-11-11-12-12-12 squares for each front piece and 4-5-6-7-8-9 squares for the bottom of back piece = a total of 26-27-28-31-32-33 squares. Also crochet 1 large square for the top of back piece. The rest of front pieces and back piece is worked in rows of dc, and the sleeves are worked in stripes and dc-groups. The whole jacket is crochet in double thread Alpaca. COLORS OF SQUARES: SQUARE A: Beg + round 1 = dark gray, round 2 = medium gray, round 3 = off-white, round 4 = medium gray, round 5 = dark gray. SQUARE B: Beg + round 1 = medium gray, round 2 = off-white, round 3 = dark gray, round 4 = medium gray, round 5 = dark gray. SQUARE C: Beg + round 1 = off-white, round 2 = medium gray, round 3 = dark gray, round 4 = off-white, round 5 = dark gray. SQUARE D: Beg + round 1 = medium gray, round 2 = dark gray, round 3 = off-white, round 4 = medium gray, round 5 = dark gray. NUMBER OF SQUARES: Crochet 6-6-7-9-9-9 squares of A, 6-7-7-8-9-10 squares of B, 7-7-7-7-7-7 squares of C and 7-7-7-7-7-7 squares of D = a total of 26-27-28-31-32-33 squares. SQUARE: Crochet 6 ch with crochet hook size 4 mm / G/6 and form a ring with 1 sl st in first ch. ROUND 1: 3 ch, 2 dc in ring, * 3 ch, 3 dc in ring*, repeat from *-* a total of 3 times and finish with 3 ch and 1 sl st in 3rd ch from beg of round. Turn piece. ROUND 2: 3 ch, 2 dc in first ch-loop, 3 ch, 3 dc in the the same ch-loop, * 1 ch, 3 dc in next ch-loop, 3 ch, 3 dc in the same ch-loop *, repeat from *-* a total of 3 times, finish with 1 ch and 1 sl st in 3rd ch from beg of round. Turn piece. ROUND 3: 3 ch, 2 dc in first ch-loop, 1 ch, * 3 dc in next ch-loop, 3 ch, 3 dc in the same ch-loop, 1 ch, 3 dc in next ch-loop, 1 ch *, repeat from *-* a total of 3 times, 3 dc in next ch-loop, 3 ch, 3 dc in the same ch-loop, 1 ch, finish with 1 sl st in 3rd ch from beg of round. Turn piece. ROUND 4: 3 ch, 2 dc in first ch-loop, 1 ch, * 3 dc in next ch-loop, 3 ch, 3 dc in the same ch-loop, 1 ch, 3 dc in next ch-loop, 1 ch, 3 dc in next ch-loop, 1 ch *, repeat from *-* a total of 3 times, 3 dc in next ch-loop, 3 ch, 3 dc in the same ch-loop, 1 ch, 3 dc in next ch-loop, 1 ch, finish with 1 sl st in 3rd ch from beg of round. Turn piece. ROUND 5: 3 ch, 2 dc in first ch-loop, 1 ch, * 3 dc in next ch-loop, 1 ch, 3 dc in next ch-loop, 3 ch, 3 dc in the same ch-loop, 1 ch, 3 dc in next ch-loop, 1 ch, 3 dc in next ch-loop, 1 ch *, repeat from *-* a total of 3 times, 3 dc in next ch-loop, 3 ch, 3 dc in the same ch-loop, 1 ch, 3 dc in next ch-loop, 1 ch, 3 dc in next ch-loop, 1 ch, finish with 1 sl st in 3rd ch from beg of round. 1 square measures approx 10.5 x 10.5 cm / 4¼" x 4¼". ASSEMBLY: Sew squares tog, edge to edge in outer loops of sts – fig-1a shows left front piece, fig-1b shows right front piece and fig-1c shows back piece – see chart for your size. LARGE SQUARE: Crochet 1 large square in the same way, but after round 5 continue in the round in the same way until there are a total of 12 rounds. Colors for the large square are as follows: Beg + round 1 = dark gray, round 2 = medium gray, round 3 = off-white, round 4 = dark gray, round 5 = medium gray, round 6 = dark gray, round 7 = off-white, round 8 = medium gray, round 9 = dark gray, round 10 = medium gray, round 11 = off-white and round 12 = dark gray. Square measures approx 22 x 22 cm / 8¾" x 8¾". BACK PIECE + SIDE PIECE: Crochet back piece with 2 threads dark gray and crochet hook size 4 mm / G/6. Crochet 76-94-114-132-152-170 dc along the top of the 4-5-6-7-8-9 squares at bottom of back piece/side piece (= approx 19 dc along each square). Continue with 1 dc in each dc back and forth on these sts – replace first dc on row with 3 ch. When piece measures 14 cm / 5½" (includes crochet squares) dec 1 dc each side by skipping the last but one dc each side. Repeat the dec on every other row a total of 6 times = 64-82-102-120-140-158 dc. When piece measures 28 cm / 11" inc 1 dc each side by working 2 dc in the last but one dc each side, and repeat the inc on every other row a total of 6 times = 76-94-114-132-152-170 dc. Continue until piece measures the same as the 4 crochet squares on front piece each side (= approx 42 cm / 16½"). Cut the thread. RIGHT FRONT PIECE + HALF BACK PIECE: Beg along the top of the 4th square on right front piece. Crochet 19 dc on this square, then 19-28-38-47-57-66 dc on back piece/side piece (the large square will be place over the middle 38 dc on back piece) = 38-47-57-66-76-85 dc. Crochet dc back and forth on these sts until piece measures a total of 43-43-43-50-50-50 cm / 17"-17"-17"-19¾"-19¾"-19¾". Now dec for armhole: FRONT PIECE: Crochet on the first 16-20-24-27-30-33 dc (the next 6-7-9-12-16-19 dc = armhole), turn and work return row. Now continue back and forth on these sts, AT THE SAME TIME dec 1 dc towards armhole on every row a total of 3-5-7-8-9-11 times = 13-15-17-19-21-22 dc left on shoulder. Continue until piece measures the same as front piece less 1 square (the last square is to be sewn to neckline on back piece) – armhole measures approx 20-20-20-24-24-24 cm / 8"-8"-8"-9½"-9½"-9½", cut the thread. BACK PIECE: Dec for armhole as described for front piece and continue until armhole measures the same as for front piece LEFT FRONT PIECE + HALF BACK PIECE: Like right front piece + half back piece, but mirrored. SLEEVE: Crochet 55-55-55-63-63-63 ch (includes 3 ch to turn with) with 2 threads dark gray and crochet hook size 4 mm / G/6. ROW 1: 1 dc in 4th ch from hook, 1 dc in next ch, * 1 ch, skip 1 ch, 1 dc in each of the next 3 ch *, repeat from *-* until 2 ch remain, 1 ch, skip the last but one ch and work 1 dc in the last ch = 40-40-40-46-46-46 dc. Continue in PATTERN and STRIPES – see above = 13-13-13-15-15-15 whole dc-groups on row. AT THE SAME TIME when piece measures 20 cm / 8" inc 1 dc-group at one side by working 2 dc-groups in the last but one ch. When piece measures 25 cm / 9¾" inc in the same way at the other side of piece. Repeat the inc on alternately sides on every 4 cm / 1½" until there are a total of 3 inc each side = 19-19-19-21-21-21 whole dc-groups on row. When piece measures 49-48-47-46-45-44 cm / 19¼"-19"-18½"-18"-17¾"-17¼" (less for the larger sizes because of longer sleeve cap and wider shoulder) dec for sleeve cap – SEE DECREASING TIP – as follows: dec 1 dc-group each side on every row until piece measures 56 cm / 22", cut the thread. ASSEMBLY: Sew all seams edge to edge in outer loops of sts with dark gray. Sew back piece/side piece to squares on front piece. Sew the large square to the opening at the top of back piece and sew shoulder seams. Sew the top square on each front piece tog mid back and sew them to neckline on back piece. Sew sleeve seams and set in sleeves. CROCHET BORDER + BUTTONHOLE LOOPS: Crochet with 2 threads dark gray and crochet hook size 4 mm / G/6 up along right front piece, along neckline on back piece, and down along left front piece as follows: 1 sc in each dc and 1 sc in each ch, AT THE SAME TIME on right front piece crochet 5 buttonhole loops. 1 buttonhole loop = 3 ch, skip 1 cm/ ⅜", 1 sc. Place the bottom loop approx 10 cm/ 4" from bottom edge, then approx 8 cm/ 3⅛" between each loop. Sew buttons to left front piece to fit buttonhole loops. |
|
 |
|
 |
|
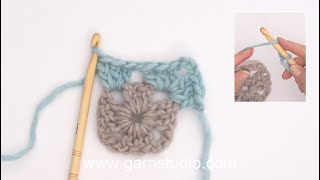
Have you finished this pattern?Tag your pictures with #dropspattern or submit them to the #dropsfan gallery. Do you need help with this pattern?You'll find 11 tutorial videos, a Comments/Questions area and more by visiting the pattern on garnstudio.com. © 1982-2026 DROPS Design A/S. We reserve all rights. This document, including all its sub-sections, has copyrights. Read more about what you can do with our patterns at the bottom of each pattern on our site. |


With over 40 years in knitting and crochet design, DROPS Design offers one of the most extensive collections of free patterns on the internet - translated to 17 languages. As of today we count 325 catalogs and 12298 patterns - 12288 of which are translated into English (US/in).
We work hard to bring you the best knitting and crochet have to offer, inspiration and advice as well as great quality yarns at incredible prices! Would you like to use our patterns for other than personal use? You can read what you are allowed to do in the Copyright text at the bottom of all our patterns. Happy crafting!
Post a comment to pattern DROPS 115-36
We would love to hear what you have to say about this pattern!
If you want to leave a question, please make sure you select the correct category in the form below, to speed up the answering process. Required fields are marked *.