
Popular categories
Looking for a yarn?


Comments / Questions (36)
![]() Conni wrote:
Conni wrote:
Super schön die Jacke, kann man daraus wohl einen Pullover mit der Kapuze stricken? Also Kaputzenpulli und evtl etwas kürzer? Lieben Dank!
17.05.2019 - 08:38DROPS Design answered:
Liebe Conni, gerne können Sie die Anleitung anpassen, um einen Pulli zu stricken, dieses Modell kann vielleicht Ihnen auch mal inspirieren. Viel Spaß beim stricken!
17.05.2019 - 09:05
![]() Lisa wrote:
Lisa wrote:
Another odd pattern. I just finished ribbing and it is all wrong. Says to K2P2 (DoubleRib), end&begin w/K2. Seems the next row should be P2K2 but it isn't. You get a puffy "rib" as written, as well as an 8 stitch garter instead of 6. I took it all out and am going to do as I think it should but you may want to look at this.
16.12.2015 - 23:40DROPS Design answered:
Dear Lisa, you work the bottom edge in rib with 6 sts in garter st on each side, so that you will work from RS: K6, *K2, P2*, repeat from *-* until 8 sts remain, K2 (rib), K6 (edge). On next row from RS work the 6 sts on each side in garter st for front edges and work rib K over K and P over P (= from WS: K6, *P2,K2*, repeat from *-* and finish with P2, K6). Happy knitting!
17.12.2015 - 10:41
![]() Karen wrote:
Karen wrote:
Er det riktig at det er hvite lus på hver 4. pinne? At jeg må bryte den hvite tråden for hver runde med lus? Da tror jeg kanskje det er bedre å lage lus hver 3. pinne, eller hva har dere tenkt? Strikkehilsen fra Karen
04.08.2015 - 10:49DROPS Design answered:
Hej Karen, ja det kan du gøre, det kan der ikke ske noget ved. God fornøjelse!
04.08.2015 - 15:27
![]() Nina wrote:
Nina wrote:
Denne ser jo veldig god ut. Tror jeg skal strikke denne i lilla i steden. Men jeg kunne tenkt meg at den var enda lenger faktisk.
30.06.2012 - 19:26
![]() Eva wrote:
Eva wrote:
Jeg kunne godt tænke mig at strikke denne trøje i en tyndere garn, men ved ikke helt hvordan jeg så regner maske antallet ud... Nogen der kan hjælpe?
15.02.2010 - 14:49
![]() Gitte wrote:
Gitte wrote:
Den er jeg ikke for vild med.
02.08.2009 - 09:23
![]() Inger wrote:
Inger wrote:
Den erikke skøn at skue
22.07.2009 - 16:27
![]() Emma wrote:
Emma wrote:
Tusen tack för hjälpen! Jag får prova med strumpstickor då och se om jag lyckas. I annat fall får det bli med vanliga stickor.
22.07.2009 - 12:53
![]() Marit Rasmussen wrote:
Marit Rasmussen wrote:
Selsagt kan du strikke ermet på annen måte. Når jeg ser oppskr. er det for få masker til å strikke på rundpinne. Du kan str. fram og tilbake på rette pinner, og legge ut i begynnelsen og slutten av hver pinne. Men da får du en søm under ermet til slutt, så jeg ville nok anbefale deg strømpepinner.
21.07.2009 - 19:42
![]() Elisabeth wrote:
Elisabeth wrote:
Ved ikke lige !
16.07.2009 - 23:24
|
|||||||
Welcome to the North#welcometothenorthjacket |
|||||||
 |
 |
||||||
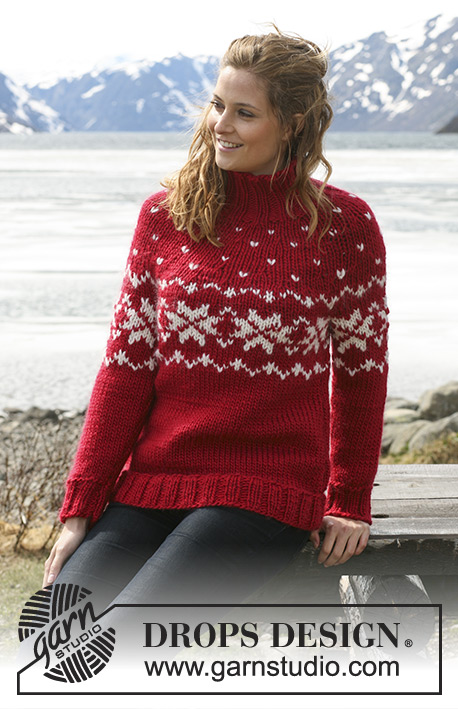
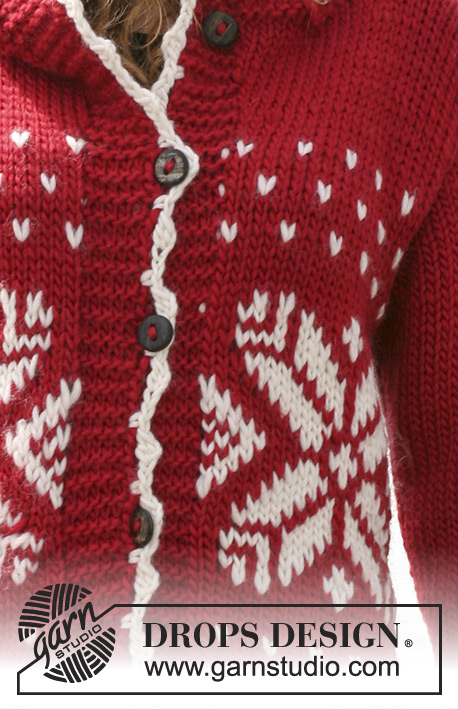
Long DROPS jacket in ”Snow” with Norwegian pattern and hood. Size S to XXXL.
DROPS 114-29 |
|||||||
|
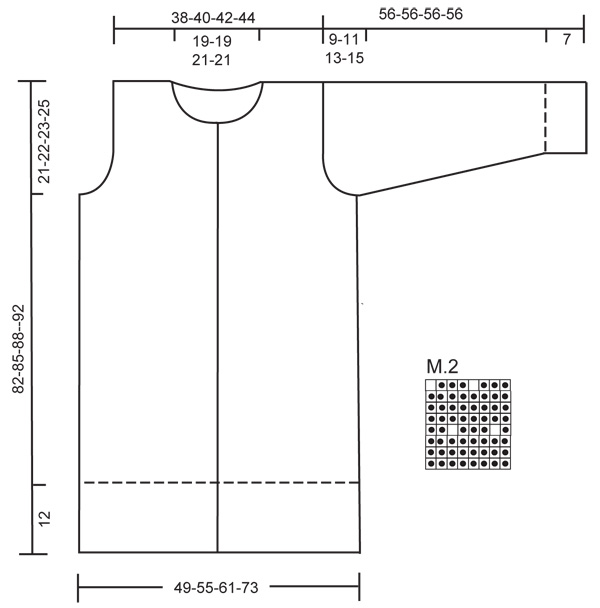
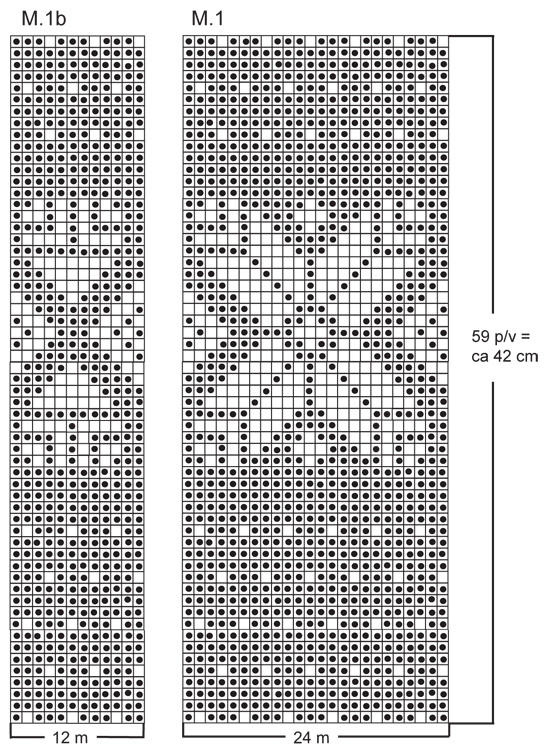
GARTER ST (back and forth on needle): K all rows. PATTERN: See diagram M.1 and M.2 – diagram shows 1 pattern repeat (M.1b is only for mid back in size L). The entire pattern is worked in stockinette st. ---------------------------------------------------------- ---------------------------------------------------------- BODY PIECE: Worked back and forth on circular needle from mid front. Cast on 134-150-166-198 sts (includes 6 front band sts each side) on needle size 7 mm / US 10½ with red. Continue as follows (first row = RS): 6 front band sts in GARTER ST – see above, * K2, P2 * repeat from *-* and finish with K2, and 6 front band sts in garter st. When rib measures approx 12 cm / 4¾" K 1 row from RS with 6 garter sts each side, AT THE SAME TIME dec 25-29-33-41 sts evenly = 109-121-133-157 sts. Change to circular needle size 8 mm / US 11 and continue in stockinette st with 6 garter sts each side. REMEMBER THE GAUGE! When piece measures 23-25-27-29 cm / 9"-9¾"-10⅝"-11⅜" work next row from RS as follows: SIZE S/M, XL and XXL/XXXL: 6 garter sts (worked in red throughout), 4-5-6 repeats of M.1, work first st in M.1 to make pattern identical each side mid front, and finish with 6 red garter sts. SIZE L: 6 garter sts (worked in red throughout), 2 repeats of M.1, 1 repeat of M.1b (= mid back), 2 repeats of M.1, work first st in M.1 to make pattern identical each side mid front, and finish with 6 red garter sts. ALL SIZES: When piece measures 61-63-65-67 cm / 24"-24¾"-25½"-26⅜" (approx 5-6 rows remain of M.1) work next rows as follows from RS: 25-28-31-37 sts (= right front piece), bind off 8 sts for armhole, 43-49-55-67 sts (= back piece), bind off 8 sts for armhole, 25-28-31-37 sts (= left front piece). Complete each piece separately. LEFT FRONT PIECE: = 25-28-31-37 sts. Continue and complete M.1, then complete piece in red. AT THE SAME TIME bind off for armhole at the beg of every row from the side: 2 sts 0-1-2-4 times and 1 st 2-2-2-3 times = 23-24-25-26 sts. When piece measures 76-79-82-86 cm / 30"-31"-32¼"-33⅞" slip the 8-8-9-9 sts towards mid front on a stitch holder for neck. Bind off to shape the neckline at the beg of every row from mid front: 2 sts 1 time and 1 st 3 times = 10-11-11-12 sts left on shoulder. Bind off when piece measures 82-85-88-92 cm / 32¼"-33½"-34⅝"-36¼". RIGHT FRONT PIECE: Like left front piece, but mirrored. BACK PIECE: = 43-49-55-67 sts. Continue and complete M.1, then complete piece in red. AT THE SAME TIME bind off for armhole each side as described for front piece = 39-41-43-45 sts left on needle. When piece measures 80-83-86-90 cm / 31½"-32¾"-33⅞"-35½" bind off the middle 19-19-21-21 sts for neck = 10-11-11-12 sts left on each shoulder. Complete each shoulder separately and bind off when piece measures 82-85-88-92 cm / 32¼"-33½"-34⅝"-36¼". SLEEVE: Worked in the round on double pointed needles. Cast on 32-32-36-36 sts on double pointed needles size 7 mm / US 10½ with red. Work rib K2/P2 for 7 cm / 2¾". Change to double pointed needles size 8 mm / US 11. K 1 round, AT THE SAME TIME dec 8-4-8-4 sts evenly = 24-28-28-32 sts. Insert a marker at beg of round and continue in M.2. After M.2 complete piece in red stockinette st. AT THE SAME TIME when piece measures 14 cm / 5½" inc 1 st each side of marker, and repeat the inc on every 4-4.5-3.5-3.5 cm / 1½"-1¾"-1¼"-1¼" a total of 8-7-8-8 times = 40-42-44-48 sts. When piece measures 47-45-43-41 cm / 18½"-17¾"-17"-16⅛" (less for the larger sizes because of longer sleeve cap and wider shoulder) bind off 6 sts mid under sleeve and complete piece back and forth on needle. Bind off for sleeve cap each side at the beg of every row: 2 sts 1 time, 1 st 2-3-4-6 times, then 2 sts 1 time and 3 sts 1 time. Bind off remaining sts, piece measures approx 55 cm / 21⅝" for all sizes. ASSEMBLY: Sew shoulder seams. HOOD: Pick up 50 to 60 sts round the neck (includes sts on stitch holders at front) on circular needle size 8 mm / US 11 with red. K 1 row from WS, K 1 rows from RS, AT THE SAME TIME inc evenly to 60-64-68-72 sts. Work stockinette st with 6 garter sts each side until hood measures approx 32 cm / 12½", bind off. Sew hood tog at the top. FURTHER ASSEMBLY: Set in sleeves. CROCHET BORDER: Crochet a border with crochet hook size 8 mm / L/11 and off-white up along right front band, round the hood and down along left front band as follows: 1 sc in first st, * 4 ch, 1 dc in first ch (= 1 picot), skip 2-2.5 cm / ¾"-⅞", 1 sc in next st *, repeat from *-*. BUTTONS: Sew buttons to left front band – place the top button at beg of neckline and place the remaining buttons with approx 10-12 cm / 4"-4¾" between each. Use the picots on right front band as buttonholes. |
|||||||
Diagram explanations |
|||||||
|
|||||||
 |
|||||||
 |
|||||||
Have you finished this pattern?Tag your pictures with #dropspattern #welcometothenorthjacket or submit them to the #dropsfan gallery. Do you need help with this pattern?You'll find 21 tutorial videos, a Comments/Questions area and more by visiting the pattern on garnstudio.com. © 1982-2026 DROPS Design A/S. We reserve all rights. This document, including all its sub-sections, has copyrights. Read more about what you can do with our patterns at the bottom of each pattern on our site. |
|||||||


With over 40 years in knitting and crochet design, DROPS Design offers one of the most extensive collections of free patterns on the internet - translated to 17 languages. As of today we count 324 catalogs and 12290 patterns - 12280 of which are translated into English (US/in).
We work hard to bring you the best knitting and crochet have to offer, inspiration and advice as well as great quality yarns at incredible prices! Would you like to use our patterns for other than personal use? You can read what you are allowed to do in the Copyright text at the bottom of all our patterns. Happy crafting!
Post a comment to pattern DROPS 114-29
We would love to hear what you have to say about this pattern!
If you want to leave a question, please make sure you select the correct category in the form below, to speed up the answering process. Required fields are marked *.