DROPS Merino Extra Fine
100% Wool
from 4.55 $ /50g
Get the yarn to make this pattern from 72.80$.

The yarn cost is calculated from the pattern’s smallest size and the yarn’s cheapest product type. Looking for an even better price? You might find it on the DROPS Deals!

DROPS Super Sale

Say It With Flowers

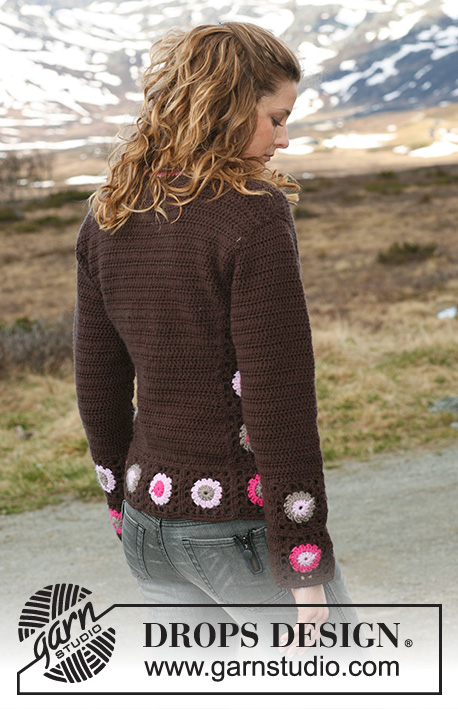
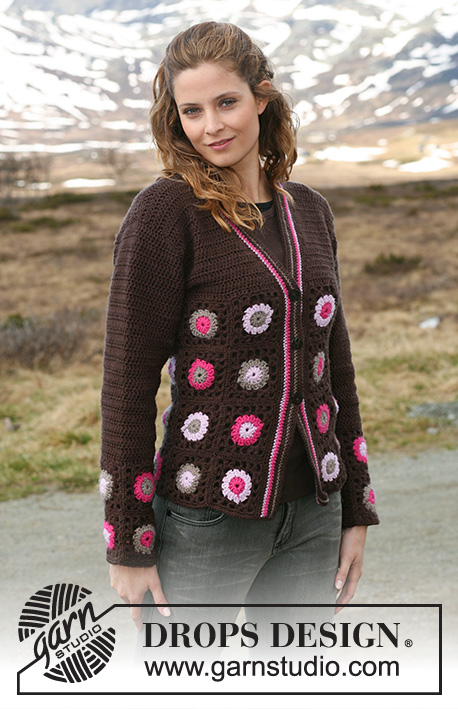
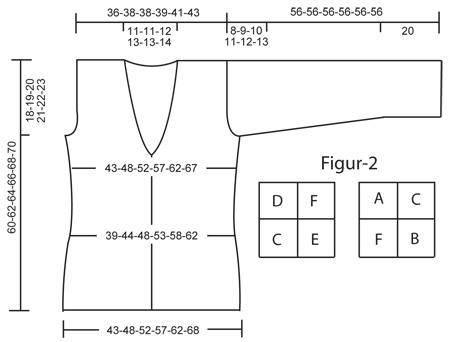
Crochet DROPS jacket in ”Merino Extra Fine” with crochet squares. Size S – XXXL.

DROPS 115-14
Size: S - M - L - XL - XXL - XXXL

Finished measurements:
Bust: 86-96-104-114-124-134 cm / 33 7/8”-37¾”-41”-45”-48¾”-52¾”
Full length: 60-62-64-66-68-70 cm / 23 5/8’’-24 3/8’’-25¼’’-26’’-26¾’’-27½’’

Materials: DROPS MERINO EXTRA FINE from Garnstudio
650-700-750-850-900-1000 g color no 09, dark brown
50 g for all sizes color no 07m, light beige mix
50 g for all sizes color no 16, light pink
50 g for all sizes color no 17, cerise

DROPS CROCHET HOOK size 4.5 mm/US 7 – or size needed to get 16 dc x 9 rows = 10 x 10 cm / 4’’ x 4’’ and 1 square = 9.5 x 9.5 cm / 3¾” x 3¾”.

DROPS Shell buttons no 526: 3 pcs.

-------------------------------------------------------

Alternative Yarn – See how to change yarns here
Yarn Groups A to F – Use the same pattern and change the yarn here
Yarn usage using an alternative yarn – Use our yarn converter here

-------------------------------------------------------

DROPS Merino Extra Fine
100% Wool
from 4.55 $ /50g
Get the yarn to make this pattern from 72.80$.

The yarn cost is calculated from the pattern’s smallest size and the yarn’s cheapest product type. Looking for an even better price? You might find it on the DROPS Deals!

DROPS Super Sale

SAVE 30% on 6 cotton favorites!
Valid until 04.12.2024

Pattern instructions

NOTE: This pattern is written in American English. All measurements in charts are in cm. For conversion from inches to cm - click here. There are different terms for crocheting in American and British English. If this pattern includes crochet, click for "crochet terms" here. For this pattern in British English, please click here.
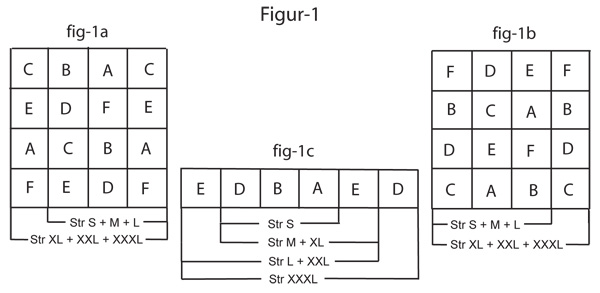
CROCHET TIP:
Replace first dc on round/row with 3 ch and finish each round with 1 sl st in first st from beg of round.

BOBBLE:
1 bobble = 3 dc crochet tog, i.e. wait with the last pull-through on each dc until all 3 dc have been crochet, make YO and pull thread through all 4 loops on hook.

DECREASING TIP-1:
Dec 1 dc by crochet tog the 2 outermost dc as follows: Crochet 1 dc but wait with the last pull-through, crochet 1 dc and when doing the last pull-through pull thread through all 3 loops on hook.

DECREASING TIP-2 (sleeve cap):
Dec at beg of row by working sl sts on the no of dc to be dec.
Dec at the end of row by working row until no of dc to be dec remain, turn piece.
--------------------------------------------------------
--------------------------------------------------------
JACKET:
Crochet 12-12-12-16-16-16 squares for each front piece, 3-4-5-4-5-6 squares for bottom of back piece and 4 squares for each sleeve = 35-36-37-44-45-46 squares in total. The rest of the jacket is worked in rows of dc.

COLOR OF SQUARES:
Crochet squares in 6 different color combinations – work the last 3 rounds on each square in dark brown, work the first 2 rounds as follows:
SQUARE-A: Beg + round 1 = light pink,
round 2 = light beige.
SQUARE-B: Beg + round 1 = cerise,
round 2 = light pink.
SQUARE-C: Beg + round 1 = light beige, round 2 = cerise.
SQUARE-D: Beg + round 1 = cerise, round 2 = light beige.
SQUARE-E: Beg + round 1 = light beige, round 2 = light pink.
SQUARE-F: Beg + round 1 = light pink,
round 2 = cerise.

CROCHET SQUARE AS FOLLOWS:
Work 6 ch with crochet hook size 4.5 mm/US 7 and form a ring with 1 sl st in first ch.
ROUND 1: 12 dc in ring - SEE CROCHET TIP!
ROUND 2: 2 dc in each dc = 24 dc.
ROUND 3: * 1 sc in dc, 4 ch, skip 1 dc, 1 sc in next dc, 2 ch, skip 1 dc, 1 sc in next dc, 2 ch, skip 1 dc *, repeat from *-* a total of 4 times = 12 ch-loops (4 large and 8 small).
ROUND 4: * In large ch-loop crochet [-]: [1 BOBBLE – see above, 2 ch, 1 bobble, 4 ch (= corner), 1 bobble, 2 ch and 1 bobble], 2 ch, 1 dc in sc between the 2 small ch-loops, 2 ch *, repeat from *-* a total of 4 times, finish with 1 sl st at the top of first bobble.
ROUND 5: In all 2-ch-loops crochet 3 sc and in all 4-ch-loops (= corners) crochet 6 sc. Square measures approx 9.5 x 9.5 cm / 3¾” x 3¾”.

NUMBER AND ASSEMBLY OF SQUARES:
SIZE S: Crochet 6 squares of A, B, C, D and F and 5 squares of E = a total of 35 squares.
SIZE M: Crochet 6 squares of each color combination = a total of 36 squares.
SIZE L: Crochet 6 squares of A, B, C, D and F and 7 squares of E = a total of 37 squares.
SIZE XL: Crochet 7 squares of A, B, D and E and 8 squares of C and F = a total of 44 squares.
SIZE XXL: Crochet 7 squares of C, E and F and 8 squares of A, B and D = a total of 45 squares.
SIZE XXXL: Crochet 8 squares of C, D, E and F and 7 squares of A and B = a total of 45 squares.

Sew squares tog from RS in outer loops of sts – See Fig-1 for placement of squares: fig-1a shows left front piece, fig-1b shows right front piece and fig-1c shows back piece.
See Fig-2 for placement of squares on sleeves.

BACK PIECE: see CROCHET TIP:
Crochet along the top of squares on back piece with crochet hook size 4.5 mm/US 7 and dark brown: Crochet 15 dc along each square = a total of 45-60-75-60-75-90 dc. Now continue with 1 dc in each dc, AT THE SAME TIME on row 2 dec 1 dc each side – see DECREASING TIP-1. Repeat the dec on every other row a total of 6 times = 33-48-63-48-63-78 dc.
REMEMBER CROCHET GAUGE!
When piece measures 25 cm / 9 ¾” inc 1 dc each side by working 2 dc in the last but one dc, repeat the inc on every other row a total of 6 times = 45-60-75-60-75-90 dc. When piece measures 38 cm / 15’’ (adjust to measurement of squares on front piece) cut the thread.
Sew front pieces to back piece, edge to edge, both sides.

BODY PIECE:
Now continue on both front piece and back piece with dark brown on crochet hook size 4.5 mm as follows: Crochet 15 dc on each square on first front piece = 45-45-45-60-60-60 dc, then 1 dc in each dc on back piece = 45-60-75-60-75-90 dc and finish with 15 dc on each square on the other front piece = 45-45-45-60-60-60 dc. There is now a total of 135-150-165-180-195-210 dc on row. Insert a marker 33-37-41-45-48-52 dc in from each side (= 69-76-83-90-99-106 dc between markers on back piece).
READ ALL OF THE FOLLOWING SECTION BEFORE CONTINUING!
NECKLINE: When piece measures 40 cm / 15 ¾” dec 1 dc each side towards neck – see DECREASING TIP-1, and repeat the dec on every other row a total of 7-8-9-10-9-10 times.
AT THE SAME TIME when piece measures 42-43-44-45-46-47 cm / 16½’’-17’’-17¼’’-17¾’’-18’’-18½’’ dec for armhole as follows:

RIGHT FRONT PIECE:
Crochet row until 4-4-5-5-6-6 dc remain before marker, turn and work return row. Now dec 1 dc towards armhole on every other row a total of 2-4-6-9-11-13 times – see DECREASING TIP-1. When all dec for armhole and neck are complete there are 20-21-21-21-22-23 dc left on shoulder. Continue with 1 dc in each dc and cut the thread when piece measures a total of 60-62-64-66-68-70 cm / 23 5/8’’-24 3/8’’-25¼’’-26’’-26¾’’-27½’’.

LEFT FRONT PIECE:
Like right front piece, but mirrored.

BACK PIECE:
Crochet on the middle 61-68-73-80-87-94 dc. AT THE SAME TIME dec to armhole each side as described for front piece = 57-60-61-62-65-68 dc. Continue with 1 dc in each dc until piece measures 59-61-63-65-67-69 cm / 23¼’’-24’’-24¾’’-25½’’-26 3/8’’-27 1/8’’, work 1 row on the 20-21-21-21-22-23 dc each side only (the middle 17-18-19-20-21-21-22 dc = neck), cut the thread.

SLEEVE:
First crochet 2 borders to be sewn to each side of squares.
BORDER: Crochet 7-9-9-9-11-11 ch with dark brown, work first row as follows: 1 dc in 4th ch, 1 dc in each of the next 3-5-5-5-7-7 ch = 5-7-7-7-9-9 dc (includes the first 3 ch = 1 dc). Turn and crochet 1 dc in each dc. Continue with 1 dc in each dc until piece measures 19 cm / 7½”, cut the thread. Make 2 borders.
Sew a border to each side of crochet squares, edge to edge.
Now crochet 1 dc in each dc and 15 dc on each square = a total of 40-44-44-44-48-48 dc. Continue back and forth with 1 dc in each dc, AT THE SAME TIME when piece measures 21 cm / 8¼” inc 1 dc each side by working 2 dc in the last but one dc, and repeat the inc on every 4-5-3-2-2-2 row a total of 6-5-7-9-9-10 times = 52-54-58-62-66-68 dc. When piece measures 48-47-46-45-44-43 cm / 19’’-18½’’-18’’-17¾’’-17¼’’-17’’ (less for the larger sizes because of longer sleeve cap and wider shoulder) dec on every row each side – SEE DECREASING TIP-2: 4 dc 1 time each side, then 2 dc each side until piece measures 54 cm / 21¼”, now dec 4 dc 1 time each side, and cut the thread. Sleeve measures approx 56 cm / 22’’.

ASSEMBLY:
Sew sleeves tog in outer loop of sts. Sew shoulder seams in the same way.
FRONT BANDS: Crochet sc with dark brown and crochet hook size 4.5 mm/US 7 up along right front piece, round neck and down along left front piece – approx 16 sc per 10 cm / 4’’. Crochet 2 rows with dark brown, 1 row with light pink, 1 row with cerise, 2 rows with dark brown, 1 row with light beige and 2 rows with dark brown = a total of 9 rows – AT THE SAME TIME on row 6 (= WS) make 3 buttonholes on right front band – place the top one in transition between squares and dc rows and then approx 9 cm / 3½’’ between each. 1 buttonhole = 2 ch, skip 2 sc, on next row crochet 2 sc in ch-loop.
Crochet 1 row of dark brown sc along bottom edge of body piece and sleeves.

Sew sleeves to body piece, edge to edge to avoid a chunky seam. Sew on buttons.

Diagram

All measurements in charts are in cm.

diagram measurements
Do you have a question? See a list of frequently asked questions (FAQ)

Knitting tension is what determines the final measurements of your work, and is usually measured per 10 x 10 cm. It is provided like so: number of stitches in width x number of rows in height - eg: 19 stitches x 26 rows = 10 x 10 cm.

The knitting tension is very individual; some people knit/crochet loosely while others work tightly. You adjust the knitting tension with the needle size, which is why the suggested needle size only serve as a guide! You need to adjust this (up or down) to ensure that YOUR knitting tension matches the knitting tension provided in the pattern. If you work with a different knitting tension than provided you will have a different yarn consumption, and your work will have different measurements than what the pattern suggests.

The knitting tension also determines which yarns can replace each other. As long as you achieve the same knitting tension you can replace one yarn with another.

See DROPS lesson: How to measure your tension/gauge

See DROPS video: How to make a gauge tension swatch

The required amount of yarn is provided in grams, eg: 450 g. To calculate how many balls you’ll need you first need to know how many grams are in 1 ball (25g, 50g or 100g). This information is available if you click on the individual yarn quality on our pages. Divide the amount required with the amount of each ball. For example, if each ball is 50g (the most common amount), the calculation will be as follows: 450 / 50 = 9 balls.

The important thing when changing from one yarn to another is that the knitting/crochet tension remains the same. This is so that the measurements of the finished piece will be the same as on the sketch provided. It is easier to achieve the same knitting tension using yarns from the same yarn group. It is also possible to work with multiple strands of a thinner yarn to achieve the knitting tension of a thicker one. Please try our yarn converter. We recommend you to always work a test swatch.

Please NOTE: when changing yarn the garment might have a different look and feel to the garment in the photo, due to individual properties and qualities of each yarn.

See DROPS lesson: Can I use a different yarn than the one mentioned in the pattern?

All our yarns are categorised into yarn groups (from A to F) according to thickness and knitting tension – group A contains the thinnest yarns and group F the thickest. This makes it easier for you to find alternative yarns to our patterns, should you wish to switch yarn. All yarns within the same group have a similar knitting tension and can easily replace each other. However, different yarn qualities have different structures and properties which will give the finished work a unique look and feel.

Click here for an overview of the yarns in each yarn group

At the top of all our patterns you’ll find a link to our yarn converter, which is a helpful tool should you wish to use a different yarn than suggested. By filling in the yarn quality you wish to replace, the amount (in your size) and number of strands, the converter will present good alternative yarns with the same knitting tension. Additionally it will tell you how much you’ll require in the new qualities and whether you’ll need to work with multiple strands. Most skeins are 50g (some are 25g or 100g).

If the pattern is worked with multiple colours, every colour will have to be converted separately. Similarly, if the pattern is worked with several strands of different yarns (for example 1 strand Alpaca and 1 strand Kid-Silk) you will have to find alternatives for each, individually.

Click here to see our yarn converter

Since different yarns have different qualities and textures we have chosen to keep the original yarn in our patterns. However, you can easily find options among our available qualities by using our yarn converter, or simply pick a yarn from the same yarn group.

It is possible that some retailers still have discontinued yarns in stock, or that someone has a few skeins at home that they would like to find patterns for.

The yarn converter will provide both alternative yarn as well as required amount in the new quality.

If you think it's hard to decide what size to make, it can be a good idea to measure a garment you own already and like the size of. Then you can pick the size by comparing those measures with the ones available in the pattern's size chart.

You'll find the size chart at the bottom of the pattern.

See DROPS lesson: How to read size chart

The needle size provided in the pattern serves only as a guide, the important thing is to follow the knitting tension. And since knitting tension is very individual, you will have to adjust the needle size to ensure that YOUR tension is the same as in the pattern – maybe you’ll have to adjust 1, or even 2 needle sizes, up or down to achieve the correct tension. For this, we recommend that you work test swatches.

Should you work with a different knitting tension than the one provided, the measurements of the finished garment might deviate from the measurement sketch.

See DROPS lesson: How to measure your tension/gauge

See DROPS video: How to make a gauge tension swatch

Working a garment top-down provides more flexibility and room for personal adjustment. For example it is easier to try the garment on while working, as well as making adjustments to length of yoke and shoulder caps.

The instructions are carefully explaining every step, in the correct order. Diagrams are adjusted to the knitting direction and are worked as usual.

The diagram depicts all rows/rounds, and every stitch seen from the right side. It is read from bottom to top, from right to left. 1 square = 1 stitch.

When working back and forth, every other row is worked from the right side and every other row is worked from the wrong side. When working from the wrong side, the diagram will have to be worked reversed: from left to right, knit stitches are purled, purl stitches are knit etc.

When working in the round every round is worked from the right side and the diagram are worked from right to left on all rounds.

See DROPS lesson: How to read knitting diagrams

The diagram depicts all rows/rounds, and every stitch seen from the right side. It is worked from bottom to top, from right to left.

When working back and forth every other row is worked from the right side: from right to left and every other row is worked from the wrong side: from left to right.

When working in the round, every row in the diagram are worked from the right side, from right to left.

When working a circular diagram you start in the middle and work your way outwards, counter clockwise, row by row.

The rows usually start with a given number of chain stitches (equivalent to the height of the following stitch), this will either be depicted in the diagram or explained in the pattern.

See DROPS lesson: How to read crochet diagrams

Instructions for working several diagrams after each other on the same row/round, will often be written like so: “work A.1, A.2, A.3 a total of 0-0-2-3-4 times". This means you work A.1 once, then A.2 is worked once, and A.3 is repeated (in width) the number of times provided for your size – in this case like so: S = 0 times, M = 0 times, L=2 times, XL= 3 times and XXL = 4 times.

The diagrams are worked as usual: begin with the first row in A.1, then work the first row in A.2 etc.

See DROPS lesson: How to read knitting diagrams

See DROPS lesson: How to read crochet diagrams

The total width of the garment (from wrist-to-wrist) will be larger in the larger sizes, despite the actual sleeves being shorter. The larger sizes have longer sleeve caps and wider shoulders, so there will be a good fit in all sizes.

The measurement sketch/schematic drawing provides information regarding the full length of the garment. If it’s a jumper or a jacket the length is measured from the highest point on the shoulder (usually closest to the neckline), and straight down to the bottom of the garment. It is NOT measured from the tip of shoulder. Similarly, the length of yoke is measured from the highest point on the shoulder and down to where yoke is split into body and sleeves.

See DROPS lesson: How to read a schematic drawing

Diagrams are often repeated on the round or in height. 1 repeat is the diagram the way it appears in the pattern. If it says to work 5 repeats of A.1 in the round, then you work A.1 a total of 5 times after/next to each other in the round. If it says to work 2 repeats of A.1 vertically/in height you work the entire diagram once, then begin again at the start and work the entire diagram one more time.

Chain stitches are slightly narrower than other stitches and to avoid working the cast-on edge too tight, we simply chain more stitches to begin with. The stitch count will be adjusted on the following row to fit the pattern and measurement sketch.

The rib edge is more elastic and will contract slightly compared to, for example, stocking stitch. By increasing before the rib edge, you avoid a visible difference in width between the rib edge and the rest of the body.

It’s very easy to cast off too tightly, and by making yarn overs while casting off (and simultaneously casting these off) you avoid a too tight cast off edge.

See DROPS video: How to bind off with yarn overs (yo)

To achieve an even increase (or decrease) you can increase on, for example: every 3rd and 4th row alternately, like so: work 2 rows and increase on the 3rd row, work 3 rows and increase on the 4th. Repeat this until the increase is complete.

See DROPS lesson: Increase or decrease 1 st on every 3rd and 4th row alternately

Should you prefer to work in the round instead of back and forth, you may of course adjust the pattern. You’ll need to add steeks mid-front (usually 5 stitches), and follow the instructions. When you would normally turn and work from the wrong side, simply work across the steek and continue in the round. At the end you’ll cut the piece open, pick up stitches to work bands, and cover the cut edges.

See DROPS video: How to knit steeks and cut open

Should you prefer to work back and forth instead of in the round, you may of course adjust the pattern so you work the pieces separately and then assemble them at the end. Divide the stitches for the body in 2, add 1 edge stitch in each side (for sewing) and work the front and back pieces separately.

See DROPS lesson: Can I adapt a pattern for circular needles into straight needles?

Pattern repeats can vary slightly in the different sizes, in order to get the correct proportions. If you’re not working the exact same size as the garment in the photo, yours might deviate slightly. This has been carefully developed and adjusted so that the complete impression of the garment is the same in all sizes.

Make sure to follow instructions and diagrams for your size!

If you have found a pattern you like which is available in women’s size it’s not very difficult to convert it to men’s size. The biggest difference will be the length of sleeves and body. Start working on the women size that you think would fit across the chest. The additional length will be worked right before you cast off for the armhole/sleeve cap. If the pattern is worked top-down you can add the length right after the armhole or before the first decrease on sleeve.

Regarding additional yarn amount, this will depend on how much length you add, but it is better with a skein too many than too few.

All yarns will have excess fibres (from production) that might come off as lint or shedding. Brushed yarns (ie hairier yarns) have more of these loose, excess fibres, causing more shedding.

Shedding also depends on what is worn under or over the garment, and whether this pulls at the yarn fibres. It’s therefore not possible to guarantee that there will be no shedding

Below are some tips on how to get the best result when working with hairier yarns:

1. When the garment is finished (before you wash it) shake it vigorously so the looser hairs come off. NOTE: do NOT use a lint roller, brush or any method that pulls at the yarn.

2. Place the garment in a plastic bag and put it in your freezer - the temperature will cause the fibres to become less attached to each other, and excess fibres will come off easier.

3. Leave in the freezer for a few hours before taking it out and shaking it again.

4. Wash the garment according to the instructions on the yarn label.

Pilling is a natural process that happens to even the most exclusive of fibers. It's a natural sign of wear and tear that is hard to avoid, and that is most visible in high friction areas of your garment like a sweater's arms and cuffs.

You can make your garment look as new by removing the pilling, using a fabric comb or a pill/lint remover.

Still can't find the answer you need? Then scroll down and leave your question so one of our experts can try to help you. This will be done normally within 5 to 10 working days.
In the meantime, you can read the questions and answers that others have left to this pattern or join the DROPS Workshop on Facebook to get help from fellow knitters/crocheters!

Post a comment to pattern DROPS 115-14

We would love to hear what you have to say about this pattern!

If you want to leave a question, please make sure you select the correct category in the form below, to speed up the answering process. Required fields are marked *.

Comments / Questions (37)

country flag Malene wrote:

Jeg vil gerne høre om farve nr. 17 (cerise) er udgået, da jeg ikke kan finde den i jeres sortiment? Takker på forhånd, Malene

29.09.2022 - 05:53

DROPS Design answered:

Hej Malene, det stemmer farve 17 er desværre udgået, men nu har vi 32 mørk rose eller 34 lyng :)

29.09.2022 - 09:29

country flag Gayathiri Mani wrote:

I tried this cardigan I came out really well. thank you so much for pattern. :)

05.04.2020 - 05:46

country flag Christina wrote:

Sehr schönes Modell! Ich habe es mit Drops Muskat gearbeitet und bin zufrieden mit der Passform (Größe XXXL). Beim nächsten Mal würde ich die beiden Streifen am unteren Teil des Ärmels aber als Dreieck und nicht als Rechteck arbeiten, da der Ärmel am Unterarm sehr gut passt aber am Handgelenk recht weit ist.

03.02.2019 - 11:45

country flag Agneta Hansson wrote:

Jag skall virka denna kofta ,jag virkade en ruta igår och den ser inte ut som på bilden,så mönster måste vara fel

30.07.2014 - 11:23

DROPS Design answered:

Hej Agneta. Mønstret skulle være korrekt, så det kunne også være du har hæklet forkert. Men hvis du kunne forklare hvor det går galt for dig, kan vi kontrollere og evt hjælpe dig videre.

04.08.2014 - 15:58

country flag Sonya wrote:

Could you just help me with the sizing, I am not sure what size XL or XXL etc is in the UK

26.05.2012 - 16:10

DROPS Design answered:

Please have a look at the diagram below.

13.11.2012 - 15:37

Ouazzani wrote:

Modèle romantique et très féminin, superbe avec un jean

19.11.2009 - 16:21

country flag Drops Design wrote:

Hi If your squares measures approx 9.5 x 9.5 cm / 3¾” x 3¾”, then 15 dc should work. That is what we have on the garment in picture.

18.11.2009 - 16:49

Mariam wrote:

In the (back piece) part, I'm supposed to crochet 15 dc at the top of each square, but to be symmetric, I can never crochet 15 only, I have to crochet 18 dc (I guess).. 3 from each (4-ch loop) and 12 dc in between (3 from each 2-ch loop = total 18 dc.. please help me with this, thanks in advance..

18.11.2009 - 16:40

Johanna wrote:

Me gusta como la línea queda con la figura, el color es muy bonito y me gusta como se ve con los jeans.

07.10.2009 - 05:50

country flag Camilla wrote:

Men herregud vad tråkig och ful. Varför gör ni all virkdesign med tema gammal mormors rute filt? när den stickade kollektionen är med i tiden, så tycker man ju att ni borde lyckas lite bättre med den virkade också.

19.09.2009 - 11:18