DROPS Baby Merino
DROPS Baby Merino
100% Wool
from 4.55 $ /50g
Get the yarn to make this pattern from 31.85$.

The yarn cost is calculated from the pattern’s smallest size and the yarn’s cheapest product type. Looking for an even better price? You might find it on the DROPS Deals!

DROPS SS24

Rayon de Soleil

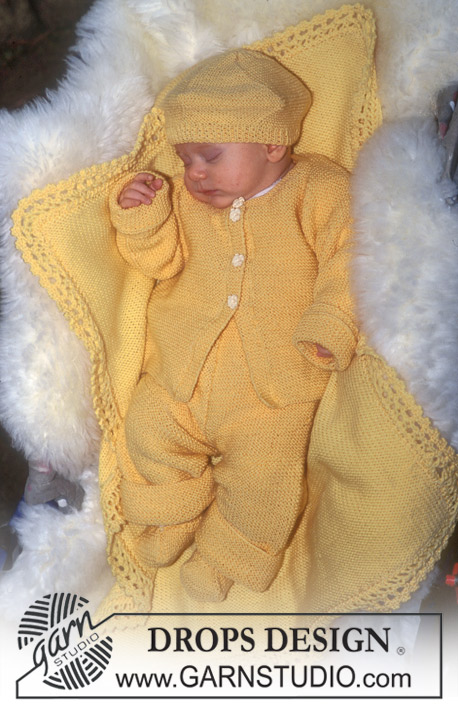
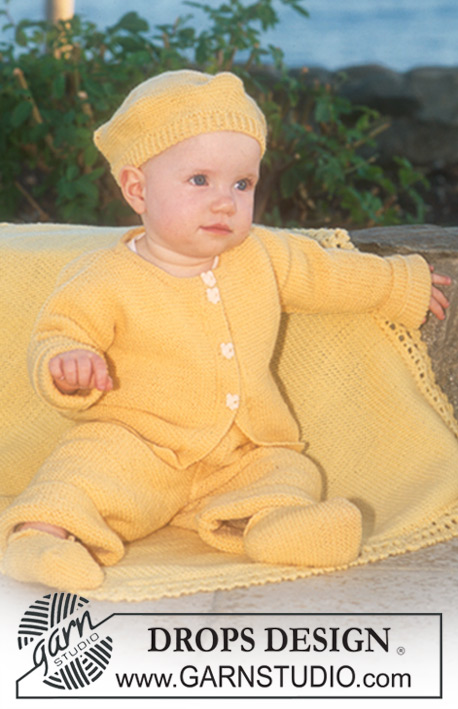
Jacket, pants, hat and socks in BabyMerino and blanket in Karisma Superwash. Theme: Baby blanket

DROPS Baby 10-3
Size: 1/3 – 6/9 – 12/18 - 24 months
All measurements in charts are in cm.

Materials: DROPS Baby Merino from Garnstudio
Jacket:
150-150-200-200 g color no 04, yellow
Pants:
150-150- 200-200 g color no 04, yellow
The whole set:
350-400-450-450 g color no 04, yellow

DROPS CIRCULAR NEEDLES size 2.5 mm / US 1or2

DROPS buttons no 580, off-white, 4 pcs

Elastic for pants approx 50-60 cm / 19 3/4"-23½''

-------------------------------------------------------

Alternative Yarn – See how to change yarns here
Yarn Groups A to F – Use the same pattern and change the yarn here
Yarn usage using an alternative yarn – Use our yarn converter here

-------------------------------------------------------

DROPS Baby Merino
DROPS Baby Merino
100% Wool
from 4.55 $ /50g
Get the yarn to make this pattern from 31.85$.

The yarn cost is calculated from the pattern’s smallest size and the yarn’s cheapest product type. Looking for an even better price? You might find it on the DROPS Deals!

Pattern instructions

NOTE: This pattern is written in American English. All measurements in charts are in cm. For conversion from inches to cm - click here. There are different terms for crocheting in American and British English. If this pattern includes crochet, click for "crochet terms" here. For this pattern in British English, please click here.
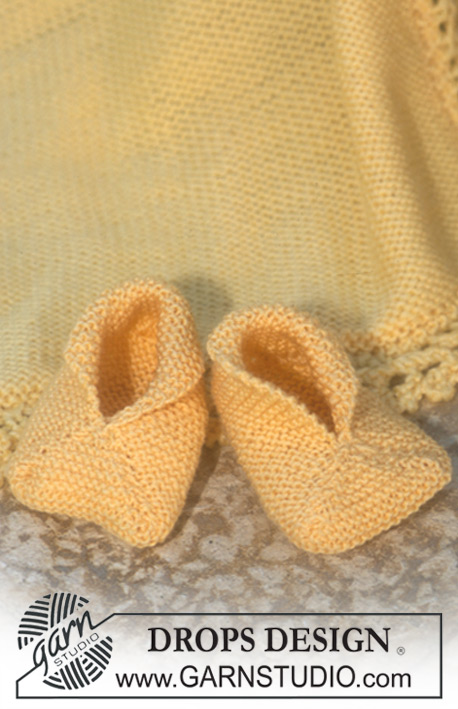
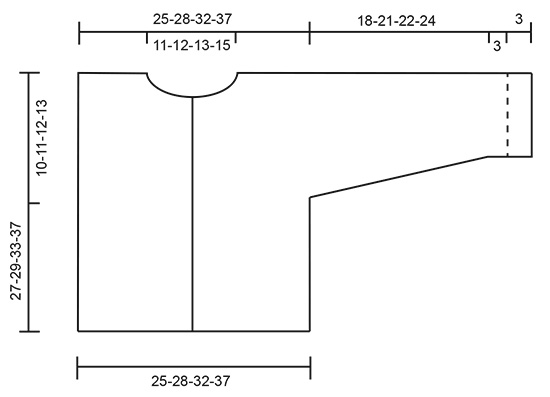
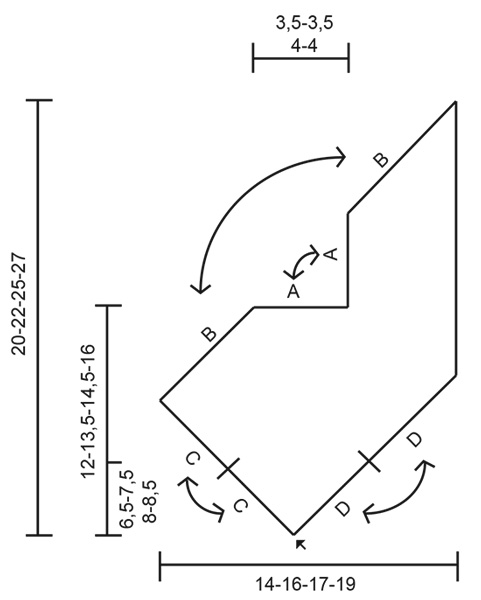
Knitting gauge: 26 sts x 52 rows in garter sts = 10 x 10 cm / 4'' x 4''.

Garter sts (back and forth on needle): Knit all rows.

Buttonhole, jacket:
Make buttonholes on right front edge from the RS: bind off 3rd and 4th st from the edge and cast on 2 new sts on the return row. Make buttonholes as follows:
Size 1/3 months: 11, 16 and 21 cm / 4½",6 1/4" and 8 1/4"
Size 6/9 months: 13, 18 and 23 cm / 5",7",9"
Size 12/18 months: 14, 20 and 26 cm / 5½",8",10 1/4"
Size 24 months: 19, 25 and 31 cm / 7½",9 3/4" and 12 1/4"


JACKET:
All pieces are knitted back and forth on circular needle.
Beg with left front piece, inc for sleeve and knit up to shoulder.
Knit right front piece, put the two front pieces tog and continue with back piece, knitted from top down.

Left front piece:
Cast on 39-43-48-55 sts (includes 1 edge st at side and 6 front band sts) on circular needle size 2.5 mm / US 1or2 and knit garter sts, but knit the 6 front edge sts as follows from the edge: 5 sts in garter, 1 st in stockinette sts (K from RS, P from WS - to mark the transition between front edge and jacket). Remember the knitting gauge.
When piece measures 17-18-21-24 cm / 6 3/4"-7"-8 1/4"-9½", cast on new sts at the side for sleeve on every other row (cast on with double thread at the end of row): 5 sts 0-0-5-11 times, 6 sts 3-3-4-0 times, 7 sts 3-4-0-0 times and 15 sts 1-1-1-1 time = 54-61-64-70 new sts = 93-104-112-125 sts in total.
Continue in garter sts and front edge as before but work the 4th outermost st on sleeve in reversed stockinette sts (K on WS, P on RS).
When piece measures 22-24-27-32 cm / 8 3/4"-9½"-10 5/8"-12½" bind off 10-11-13-15 sts towards mid front for neck and continue to dec 1 st to shape the neckline on every other row 10-10-10-10 times = 73-83-89-100 sts left on shoulder/sleeve.
When piece measures 28-30-34-38 cm / 11"-11 3/4"-13 3/8"-15" put all sts on a holder.

Right front:
Cast on and work as left front, but reversed. Remember buttonholes, see above.

Back piece:
Put both front pieces on the same circular needle as follows: 73-83-89-100 sts from 1 front piece, cast on 28-30-34-38 new sts for neck, 73-83-89-100 sts from the other front piece = 174-196-212-238 sts.
Continue to measure piece from here!
Continue in garter sts but work the 4th outermost st each side in reversed stockinette sts (K from WS, P from RS).
When piece measures 7-7.5-7.5-8 cm / 2 3/4"-2 4/8"-2 7/8"-3 1/8" bind off sts each side on every other row (i.e. at the beg of each row): 15 sts 1-1-1-1 time, 7 sts 3-4-0-0 times, 6 sts 3-3-4-0 times, 5 sts 0-0-5-11 times = 66-74-84-98 sts left on needle.
Continue in garter sts until piece measures 26-28-32-36 cm / 10 1/4"-11"-12½"-14 1/4" and then bind off.

Assembly:
Sew side and sleeve seams inside 1 edge st.

Neck: Pick up approx 80 – 90 sts round the neck on needle size 2.5 mm / US 1or2.
K6 rows in garter sts, at the same time after the 1st row, make a buttonhole over the others on front edge. Bind off after 6 rows in garter sts.
Sew on buttons.
Fold sleeve edges approx 3 cm / 1'' towards the RS.

------------------------------------------------------------------

PANTS:
The pants are worked from bottom up.

Right leg:
Cast on 64-70-72-74 sts (includes 1 edge st each side) on needle size 2.5 mm / US 1or2 and work garter sts back and forth on needle.
When piece measures 8 cm / 3 1/8'' inc 1 st inside the edge st each side, repeat on every 2-4-2-2 cm / 3/4"-1½"-3/4"-3/4" a total of 7-4-8-11 times = 78-78-88-96 sts.
When piece measures 22-24-27-31 cm / 8 3/4"-9½"-10 5/8"-12 1/4" bind off 4 sts each side - bind off in beg of next 2 rows = 70-70-80-88 sts.
Continue to inc on one side of piece (= mid back) inside 1 edge st on every other row:
1 st 7-7-7-7 times, and dec on the other side (= mid front) inside edge st on every other row: 1 st 4-2-9-12 times – dec by K2 tog.
When piece measures 42-46-51-56 cm / 16½"-18"-20"-22" dec 13-13-13-15 sts evenly on next row from RS = 60-62-65-68 sts.
Work 2 cm / 3/4'' in garter sts and then 2 cm / 3/4'' in stockinette sts. Bind off.

Left leg:
Like right leg, but mirrored.

Assembly:
Fold right leg double and sew inner leg seam within 1 edge st – Note! On the lower 4 cm / 1½'' (fold-up) sew with seam on the right side so that it doesn’t show when you fold it. Sew left leg in the same way.
Sew together the pants front and back within 1 edge st and sew the opening between the legs.
Fold the top edge double towards the WS and sew – leave a little opening for the elastic band.
------------------------------------------------------------------

SOCKS:
Cast on 3 sts on needle size 2.5 mm / US 1or2.
Work in garter st, at the same time inc 1 st each side inside 1 st on every other row a total of 17-19-21-23 times = 37-41-45-49 sts.
Piece now measures approx 6.5-7.5-8-8.5 cm / 2½"-2 7/8"-3 1/8"-3 1/4".
Now dec 1 st on one side of piece on every other row a total of 14-16-17-19 times = 23-25-28-30 sts.
Piece now measures approx 12-13.5-14.5-16 cm / 4 3/4"-5 1/4"-5 3/4"-6 1/4".
Bind off 9-9-10-10 sts 1 time on the same side as the other dec = 14-16-18-20 sts left on needle.
Continue in garter st until piece measures 15.5-16-18.5-20 cm / 6 1/8"-6 1/4"-7 1/4"-8".
Now dec 1 st on the same side as the other dec on every other row a total of 14-16-18-20 times = no sts left.
Piece now measures approx 20-22-25-27 cm / 8"-8 3/4"-9 3/4"-10 5/8".
Make another sock.

Assembly:
See diagram. Sew A against A, B against B, C against C and D against D. Sew in the outer loops of the outermost garter sts.
------------------------------------------------------------------

HAT:

To fit head circumference: 42-44-46-48 cm / 16½"-17 1/4"-18"-19"

Cast on 114-116-118-120 sts (includes 1 edge st each side) on needle size 2.5mm/US 1 or 2 and work 2 cm / 3/4'' in Rib (K1/P1) with 1 edge st each side in garter st.
Continue in garter st. On first row dec 7-9-6-8 sts evenly = 107-107-112-112 sts.
Now insert 5 markers in piece as follows from RS: the first after 1 st, the next 4 with 21-21-22-22 sts in between, after the last marker there will be 22-22-23-23 sts left.
Now inc 1 st to the right of all markers on every RS rows a total of 8-8-10-10 times = 147-147-162-162 sts.
When piece measures 6-6-7-7 cm / 2½"-2½"-2 3/4"-2 3/4" K2 tog to the left of all markers on every RS rows a total of 22-23-24-25 times = 37-32-42-37 sts left.
Cut the yarn and pull though remaining sts.
Sew tight. Sew the hat tog mid back inside 1 edge st.
------------------------------------------------------------------

BLANKET:

Size: approx 56 x 76 cm / 22" x 30"

Materials: DROPS Karisma Superwash from Garnstudio
250 g color no 52, yellow

DROPS STRAIGHT NEEDLES size 3.5 and 4.5 mm/ US 4 and 7

Gauge: 20 sts x 38 rows on needle size 4.5 mm / US 7 in garter sts = 10 x 10 cm / 4'' x 4''

Garter sts (back and forth on needle): Knit all rows.

Cast on 100 sts on needle size 4.5 mm / US 7 and knit garter sts.
Bind off when piece measures approx 70 cm / 27½''.

Lace border: Cast on 7 sts on needle size 3.5 mm / US 4 and work as follows:
1st row: K3, make a yo, P2 tog, make 2 yo, K2
2nd row: K3, P1 (yo from previous row), K2, make a yo, K2 tog, K1
3rd row: K3, make a yo, K2 tog, K4
4th row: bind off 2 sts, K3 (there are now 4 sts on right needle and 3 sts on left needle), make a yo, K2 tog, K1.
Repeat row 1-4. Bind off when piece measure approx 2.5 meters, 2.75 yds.
Sew the border to the blanket in the edge sts.
Note! Make sure the border doesn’t pull at the corners.

Diagram

All measurements in charts are in cm.

diagram measurements
Do you have a question? See a list of frequently asked questions (FAQ)

Knitting tension is what determines the final measurements of your work, and is usually measured per 10 x 10 cm. It is provided like so: number of stitches in width x number of rows in height - eg: 19 stitches x 26 rows = 10 x 10 cm.

The knitting tension is very individual; some people knit/crochet loosely while others work tightly. You adjust the knitting tension with the needle size, which is why the suggested needle size only serve as a guide! You need to adjust this (up or down) to ensure that YOUR knitting tension matches the knitting tension provided in the pattern. If you work with a different knitting tension than provided you will have a different yarn consumption, and your work will have different measurements than what the pattern suggests.

The knitting tension also determines which yarns can replace each other. As long as you achieve the same knitting tension you can replace one yarn with another.

See DROPS lesson: How to measure your tension/gauge

See DROPS video: How to make a gauge tension swatch

The required amount of yarn is provided in grams, eg: 450 g. To calculate how many balls you’ll need you first need to know how many grams are in 1 ball (25g, 50g or 100g). This information is available if you click on the individual yarn quality on our pages. Divide the amount required with the amount of each ball. For example, if each ball is 50g (the most common amount), the calculation will be as follows: 450 / 50 = 9 balls.

The important thing when changing from one yarn to another is that the knitting/crochet tension remains the same. This is so that the measurements of the finished piece will be the same as on the sketch provided. It is easier to achieve the same knitting tension using yarns from the same yarn group. It is also possible to work with multiple strands of a thinner yarn to achieve the knitting tension of a thicker one. Please try our yarn converter. We recommend you to always work a test swatch.

Please NOTE: when changing yarn the garment might have a different look and feel to the garment in the photo, due to individual properties and qualities of each yarn.

See DROPS lesson: Can I use a different yarn than the one mentioned in the pattern?

All our yarns are categorised into yarn groups (from A to F) according to thickness and knitting tension – group A contains the thinnest yarns and group F the thickest. This makes it easier for you to find alternative yarns to our patterns, should you wish to switch yarn. All yarns within the same group have a similar knitting tension and can easily replace each other. However, different yarn qualities have different structures and properties which will give the finished work a unique look and feel.

Click here for an overview of the yarns in each yarn group

At the top of all our patterns you’ll find a link to our yarn converter, which is a helpful tool should you wish to use a different yarn than suggested. By filling in the yarn quality you wish to replace, the amount (in your size) and number of strands, the converter will present good alternative yarns with the same knitting tension. Additionally it will tell you how much you’ll require in the new qualities and whether you’ll need to work with multiple strands. Most skeins are 50g (some are 25g or 100g).

If the pattern is worked with multiple colours, every colour will have to be converted separately. Similarly, if the pattern is worked with several strands of different yarns (for example 1 strand Alpaca and 1 strand Kid-Silk) you will have to find alternatives for each, individually.

Click here to see our yarn converter

Since different yarns have different qualities and textures we have chosen to keep the original yarn in our patterns. However, you can easily find options among our available qualities by using our yarn converter, or simply pick a yarn from the same yarn group.

It is possible that some retailers still have discontinued yarns in stock, or that someone has a few skeins at home that they would like to find patterns for.

The yarn converter will provide both alternative yarn as well as required amount in the new quality.

If you think it's hard to decide what size to make, it can be a good idea to measure a garment you own already and like the size of. Then you can pick the size by comparing those measures with the ones available in the pattern's size chart.

You'll find the size chart at the bottom of the pattern.

See DROPS lesson: How to read size chart

The needle size provided in the pattern serves only as a guide, the important thing is to follow the knitting tension. And since knitting tension is very individual, you will have to adjust the needle size to ensure that YOUR tension is the same as in the pattern – maybe you’ll have to adjust 1, or even 2 needle sizes, up or down to achieve the correct tension. For this, we recommend that you work test swatches.

Should you work with a different knitting tension than the one provided, the measurements of the finished garment might deviate from the measurement sketch.

See DROPS lesson: How to measure your tension/gauge

See DROPS video: How to make a gauge tension swatch

Working a garment top-down provides more flexibility and room for personal adjustment. For example it is easier to try the garment on while working, as well as making adjustments to length of yoke and shoulder caps.

The instructions are carefully explaining every step, in the correct order. Diagrams are adjusted to the knitting direction and are worked as usual.

The diagram depicts all rows/rounds, and every stitch seen from the right side. It is read from bottom to top, from right to left. 1 square = 1 stitch.

When working back and forth, every other row is worked from the right side and every other row is worked from the wrong side. When working from the wrong side, the diagram will have to be worked reversed: from left to right, knit stitches are purled, purl stitches are knit etc.

When working in the round every round is worked from the right side and the diagram are worked from right to left on all rounds.

See DROPS lesson: How to read knitting diagrams

The diagram depicts all rows/rounds, and every stitch seen from the right side. It is worked from bottom to top, from right to left.

When working back and forth every other row is worked from the right side: from right to left and every other row is worked from the wrong side: from left to right.

When working in the round, every row in the diagram are worked from the right side, from right to left.

When working a circular diagram you start in the middle and work your way outwards, counter clockwise, row by row.

The rows usually start with a given number of chain stitches (equivalent to the height of the following stitch), this will either be depicted in the diagram or explained in the pattern.

See DROPS lesson: How to read crochet diagrams

Instructions for working several diagrams after each other on the same row/round, will often be written like so: “work A.1, A.2, A.3 a total of 0-0-2-3-4 times". This means you work A.1 once, then A.2 is worked once, and A.3 is repeated (in width) the number of times provided for your size – in this case like so: S = 0 times, M = 0 times, L=2 times, XL= 3 times and XXL = 4 times.

The diagrams are worked as usual: begin with the first row in A.1, then work the first row in A.2 etc.

See DROPS lesson: How to read knitting diagrams

See DROPS lesson: How to read crochet diagrams

The total width of the garment (from wrist-to-wrist) will be larger in the larger sizes, despite the actual sleeves being shorter. The larger sizes have longer sleeve caps and wider shoulders, so there will be a good fit in all sizes.

The measurement sketch/schematic drawing provides information regarding the full length of the garment. If it’s a jumper or a jacket the length is measured from the highest point on the shoulder (usually closest to the neckline), and straight down to the bottom of the garment. It is NOT measured from the tip of shoulder. Similarly, the length of yoke is measured from the highest point on the shoulder and down to where yoke is split into body and sleeves.

See DROPS lesson: How to read a schematic drawing

Diagrams are often repeated on the round or in height. 1 repeat is the diagram the way it appears in the pattern. If it says to work 5 repeats of A.1 in the round, then you work A.1 a total of 5 times after/next to each other in the round. If it says to work 2 repeats of A.1 vertically/in height you work the entire diagram once, then begin again at the start and work the entire diagram one more time.

Chain stitches are slightly narrower than other stitches and to avoid working the cast-on edge too tight, we simply chain more stitches to begin with. The stitch count will be adjusted on the following row to fit the pattern and measurement sketch.

The rib edge is more elastic and will contract slightly compared to, for example, stocking stitch. By increasing before the rib edge, you avoid a visible difference in width between the rib edge and the rest of the body.

It’s very easy to cast off too tightly, and by making yarn overs while casting off (and simultaneously casting these off) you avoid a too tight cast off edge.

See DROPS video: How to bind off with yarn overs (yo)

To achieve an even increase (or decrease) you can increase on, for example: every 3rd and 4th row alternately, like so: work 2 rows and increase on the 3rd row, work 3 rows and increase on the 4th. Repeat this until the increase is complete.

See DROPS lesson: Increase or decrease 1 st on every 3rd and 4th row alternately

Should you prefer to work in the round instead of back and forth, you may of course adjust the pattern. You’ll need to add steeks mid-front (usually 5 stitches), and follow the instructions. When you would normally turn and work from the wrong side, simply work across the steek and continue in the round. At the end you’ll cut the piece open, pick up stitches to work bands, and cover the cut edges.

See DROPS video: How to knit steeks and cut open

Should you prefer to work back and forth instead of in the round, you may of course adjust the pattern so you work the pieces separately and then assemble them at the end. Divide the stitches for the body in 2, add 1 edge stitch in each side (for sewing) and work the front and back pieces separately.

See DROPS lesson: Can I adapt a pattern for circular needles into straight needles?

Pattern repeats can vary slightly in the different sizes, in order to get the correct proportions. If you’re not working the exact same size as the garment in the photo, yours might deviate slightly. This has been carefully developed and adjusted so that the complete impression of the garment is the same in all sizes.

Make sure to follow instructions and diagrams for your size!

If you have found a pattern you like which is available in women’s size it’s not very difficult to convert it to men’s size. The biggest difference will be the length of sleeves and body. Start working on the women size that you think would fit across the chest. The additional length will be worked right before you cast off for the armhole/sleeve cap. If the pattern is worked top-down you can add the length right after the armhole or before the first decrease on sleeve.

Regarding additional yarn amount, this will depend on how much length you add, but it is better with a skein too many than too few.

All yarns will have excess fibres (from production) that might come off as lint or shedding. Brushed yarns (ie hairier yarns) have more of these loose, excess fibres, causing more shedding.

Shedding also depends on what is worn under or over the garment, and whether this pulls at the yarn fibres. It’s therefore not possible to guarantee that there will be no shedding

Below are some tips on how to get the best result when working with hairier yarns:

1. When the garment is finished (before you wash it) shake it vigorously so the looser hairs come off. NOTE: do NOT use a lint roller, brush or any method that pulls at the yarn.

2. Place the garment in a plastic bag and put it in your freezer - the temperature will cause the fibres to become less attached to each other, and excess fibres will come off easier.

3. Leave in the freezer for a few hours before taking it out and shaking it again.

4. Wash the garment according to the instructions on the yarn label.

Pilling is a natural process that happens to even the most exclusive of fibers. It's a natural sign of wear and tear that is hard to avoid, and that is most visible in high friction areas of your garment like a sweater's arms and cuffs.

You can make your garment look as new by removing the pilling, using a fabric comb or a pill/lint remover.

Still can't find the answer you need? Then scroll down and leave your question so one of our experts can try to help you. This will be done normally within 5 to 10 working days.
In the meantime, you can read the questions and answers that others have left to this pattern or join the DROPS Workshop on Facebook to get help from fellow knitters/crocheters!

You might also like...

Post a comment to pattern DROPS Baby 10-3

We would love to hear what you have to say about this pattern!

If you want to leave a question, please make sure you select the correct category in the form below, to speed up the answering process. Required fields are marked *.

Comments / Questions (13)

country flag Mireille wrote:

Désolée, Je me suis trompée et n'ai pas indiqué la bonne catégorie... Donc, quelles sont les quantités à prévoir pour le bonnet et les chaussons. Merci d'avance

12.05.2023 - 00:01

DROPS Design answered:

Bonjour Mireille, nous avons seulement la quantité totale pour l'ensemble et comme nous n'avons plus cet ensemble, nous ne pouvons vérifier exactement, mais comptez 100 g pour les chaussons et le bonnet pour être sûre d'avoir assez. Bon tricot!

12.05.2023 - 11:21

country flag Mireille wrote:

Bonsoir, Quelles sont les quantités de laine à prévoir pour le bonnet et les chaussons ? Merci pour votre réponse

11.05.2023 - 23:58

country flag Marilyn Raymond wrote:

Hi -I think the first query bounced- What is the purpose of the stocking stitch in the Left Front? Is it the panel for button holes and buttons? Why is SS used on the sleeve? Is this the seam? I assume SS is done on the Right Front panel too? What is "double thread" cast on? Video shows only single thread.

15.09.2021 - 21:07

DROPS Design answered:

Dear Marilyn, the pattern tells you exactly that the "1 st in stocking sts is there to mark the transition between front edge and jacket". The button band is the 5 stitch knitted in garter stitch. Double thread cast on is cating on with two yarn, to make the cast on more flexible. Happy Knitting!

16.09.2021 - 00:13

country flag Hanne Overgaard wrote:

Når jeg strikker tøflerne ser min udgave anderledes ud end jeres diagram..har fået en til at kigge på opskrift der mener at der er fejl i opskrift..vil I kigge på det for mig ?

17.08.2021 - 13:12

DROPS Design answered:

Hei Hanne. Dette er en gammel oppskrift (vært publisert i mange mange år), har ikke fått tilbakemeldig på at det er noe feil. Om dere mener det er noe feil er det fint at dere presiserer hva dere mener skal være feil, så skal vi få sett på det. Skrive gjerne hvor i oppskriften og hvilklen str. du strikker. mvh DROPS design

18.08.2021 - 14:48

country flag Sonia Graff wrote:

Rabattre de l'autre coté des diminutions 1x9m=16mpour le botton ,ca ne correspond pas au croquis ou on rabat les 9mailles du coté des diminutions 16xtous les 2rangs =25mailles, n'est ce pas plutot rabattre les 9mailles en face des diminutions?

04.01.2019 - 13:25

DROPS Design answered:

Bonjour Mme Graff, effectivement, on rabat les mailles du même côté que l'on a diminué auparavant, la correction a été faite, merci. Bon tricot!

04.01.2019 - 15:09

country flag Birgit Zublasing wrote:

Wid schlägt man mit doppeltem faden neue maschen an? Gibt es dazu ein video? Vielen dank Lg biggi

30.05.2018 - 10:28

DROPS Design answered:

Liebe Frau Zublasing, schlagen Sie einfach die neuen Maschen (wie im Video unten gezeigt) mit dem Faden von Knäuel + 1 zusätlichen Faden (= separat Knäuel). Viel Spaß beim stricken!

30.05.2018 - 16:23

country flag Louise wrote:

Merci pour vos beaux modèles gratuits.

14.05.2016 - 13:07

country flag Nanou wrote:

Bonjour, Il y a 5 tailles au lieu de 4 pour le pantalon... A quoi correspondent elles ? Merci de votre retour.

25.01.2014 - 13:19

DROPS Design answered:

Bonjour Nanou, les explications du pantalon ont été modifiées (4 tailles comme indiqué). Bon tricot!

04.03.2014 - 10:22

country flag DROPS Design NL wrote:

Beste "WPM", Het patroon is aangepast en de minderingen en meerderingen kloppen nu wel. Hartelijk dank voor het doorgeven. groeten Angelique

15.01.2009 - 18:22

country flag WPM wrote:

Beschrijving van het broekje klopt niet voor de kleinste maat!: 70 steken + 4x1 - 7x1 = 67 en geen 73 ! Moeten er nu minder dan 13 steken geminderd worden bovenaan of zijn 54 steken genoeg voor de taille?

15.01.2009 - 17:27