
Popular categories
Looking for a yarn?


Comments / Questions (82)
![]() Sessa wrote:
Sessa wrote:
Hej, Vill virka hela i Dropps snö, hur många garnnystan i storlek medium? Tack på förhand!
16.03.2026 - 11:00DROPS Design answered:
Hej Sessa. Du kan ersätta 600g DROPS Highlander med 960g (dvs 20 nystan) DROPS Snow. Så behöver du 2 nystan till de virkade kanterna runt plagget i tillägg enligt beskrivningen. Mvh DROPS Design
18.03.2026 - 12:12
![]() Mariangela wrote:
Mariangela wrote:
Inoltre ho letto gli altri commenti e in una risposta avete scritto che il modello è stato aggiornato ma io non vedo nessun aggiornamneto sul sito. inoltre questo aggiornamento riguarda proprio le maniche. dice che quando il lavoro misura 48 cm non bisogna diminuire di 3 mb ma incrociare ( questo è quello che ha tradotto il cell) potete mettere l'aggiornamento sul sito? ho quasi finito la giacca! mi mancano solo le maniche
01.03.2024 - 15:15DROPS Design answered:
Buongiorno Mariangela, le istruzioni sul sito sono corrette, non ci sono aggiornamenti. Anche in caso di correzioni, il modello sul sito viene aggiornato con le correzioni. Per le maniche è corretto, le maglie vanno chiuse. Buon lavoro!
02.03.2024 - 11:29
![]() Mariangela wrote:
Mariangela wrote:
Buongiorno, vorrei chiedere maggiori chiarimenti sulle maniche Non capisco bene come fare larrotondamento delle maniche Ho provato a seguire le istruzioni per la taglia s ma larrotondamenyo della manica mi viene 6 cm più piccola Potete dare maggiori dettagli su come lavorare e soprattutto quanti punti devono rimanere una volta che il lavoro è di 55 cm? Grazie
01.03.2024 - 14:36DROPS Design answered:
Buongiorno Mariangela, le istruzioni sul sito sono corrette. Buon lavoro!
02.03.2024 - 11:29
![]() Pronov wrote:
Pronov wrote:
As the icy embrace of winter sets in, it presents distinctive challenges in upkeeping the impeccable state of our cherished winter wardrobes. Here at Nearest Laundry In this guide, we will delve into the practice of dry cleaning and elucidate why it stands as the paramount solution for maintaining the sophistication of your winter wardrobe
11.11.2023 - 10:14
![]() Carla wrote:
Carla wrote:
Wat is een alternatief voor de drops die er niet meer is?
14.10.2023 - 20:23DROPS Design answered:
Dag Carla,
Bij elk patroon vind je, onder de materialenlijst, een linke naar de garenvervanger. Deze kan voor je berekenen hoeveel garen je nodig hebt van een alternatief garen.
15.10.2023 - 17:20
![]() Julie wrote:
Julie wrote:
Det var da det mest elendige svar, jeg nogensinde har fået på et spørgsmål! I opskriften står der \"30-45 masker\" uden nogen angivelse af hvor mange masker til hvilken størrelse, og jeg spørger derfor hvor mange masker, der skal hækles rundt halsåbningen i de enkelte størrelser. Jeg prøver lige igen og håber at få fat i en medarbejder som magter opgaven. Hvor mange masker skal der hækles rundt i halsen til kraven i de enkelte størrelser?
12.04.2023 - 16:13DROPS Design answered:
Hej Julie, jeg lover at vi alle svarer i bedste mening! Men når der i opskriften står 30 til 45 fm, så er det fordi det ikke kan angives mere tydeligt. Hvis du hækler de 2 mindste størrelse så vil du få omkring 30 masker til at passe. Hvis du hækler en af de 2 midterste vil du få omkring 37 masker og de 2 største størrelser omkring 45 masker og med det sagt så gør det ikke noget hvis du får flere eller færre masker, jeg lover at du selv kan vurdere om det bliver fint :)
13.04.2023 - 11:20
![]() Julie wrote:
Julie wrote:
I opskriften står der "hækl 30-45 fm rundt i halsen" til kraven, men hvordan ved jeg hvor mange masker der er passende i de enkelte størrelser? Og hvordan sidder kraven fast på de fem masker, der er lukket af øverst i knapstolpen?
27.03.2023 - 13:56DROPS Design answered:
Hej Julie, du hækler over forkanten og rundt i halsen, du ser hvilket antal som passer din størrelse :)
12.04.2023 - 14:52
![]() Nadia wrote:
Nadia wrote:
Buongiorno non è chiaro come fare arrotondamento della manica. Per taglia M ogni due righe devo diminuire 2maglie per parte e la seconda riga 1 maglia per parte? Quante volte? E poi ancora 2 maglie per parte ad ogni riga fino ad arrivare a 56 cm? Quante maglie devono rimanere alla fine? Grazie
14.03.2023 - 21:11
![]() Greg wrote:
Greg wrote:
Salve, sto lavorando al dietro (taglia M) e mi trovo, allo scalfo, con i 42 punti, come da modello, ma con 43 cm anziche' i 47 cm indicati nel diagramma. Alla base invece il mio lavoro misura 53 cm proprio come nel diagramma. E' normale o devo calare meno punti in modo da arrivare allo scalfo con un lavoro che misura 47 cm? Grazie
28.12.2021 - 23:54DROPS Design answered:
Buonasera Greg, il suo campione corrispondeva a quello indicato? Può anche provare a portare alle dimensioni corrette il lavoro dopo il bloccaggio finale. Buon lavoro!
29.12.2021 - 22:20
![]() STEFANIA wrote:
STEFANIA wrote:
PER QUANTO RIGUARDA IL DIETRO DEL MODELLO AVREI BISOGNO DI SAPERE SE E' ESATTO CHE LO SCALFO INIZI LO SCALFO DELLE MANICHE A 61 CM DALL' ALTO; NELLE DOMANDE C'E' SCRITTO CHE I MODELLI PARTONO TUTTI DALL' ALTO . RESTO IN ATTESA DI UN RISCONTO SALUTI
16.10.2020 - 15:44DROPS Design answered:
Buongiorno Stefania. Il modello è lavorato dal basso verso l'alto, quindi gli scalfi sono a 61 cm dal bordo inferiore. Buon lavoro!
16.10.2020 - 17:33
|
|
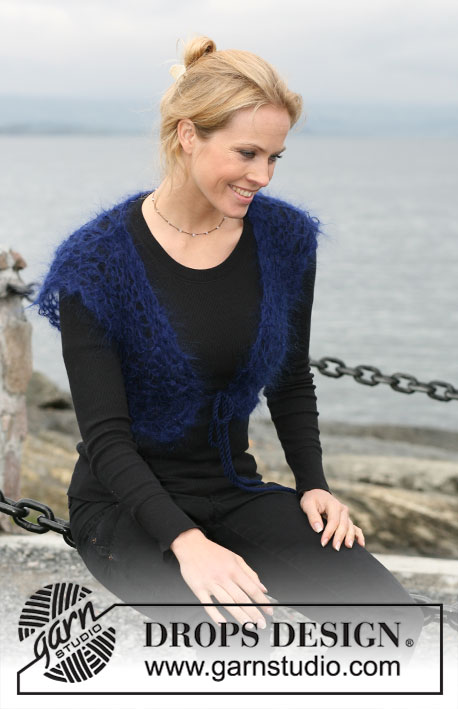
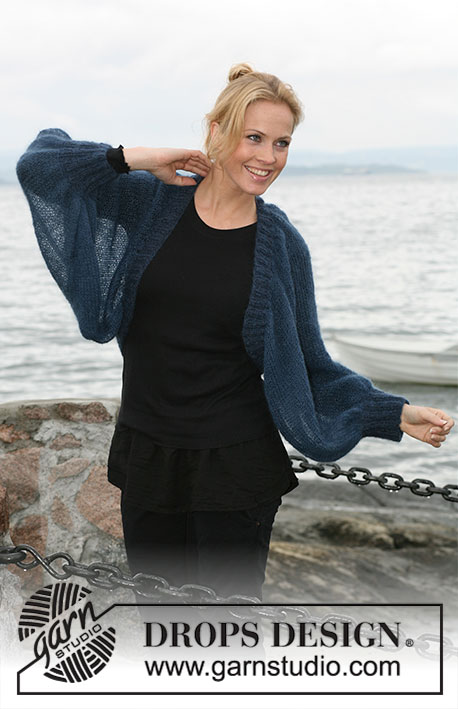
Winter Elegance |
|
|
|
|
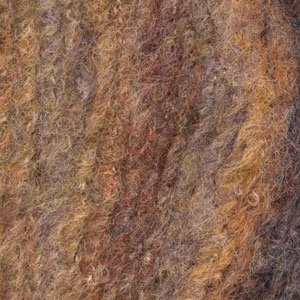
Crochet Drops jacket in ”Highlander” with decorative edges in ”Snow”. Size: S to XXXL
DROPS 102-28 |
|
|
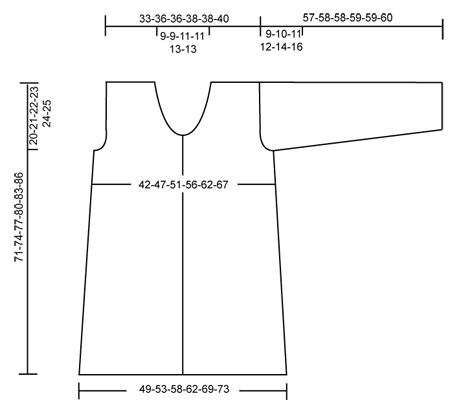
Crochet gauge: 9 sc in width and 11 rows in height with Cloud = 10 x 10 cm [4" x 4"] Crochet info: Turn each row with 1 ch. Decreasing tip - 1 (slanted side): Dec 1 sts on each side crocheting 2 outermost sc tog, by go through the first sc and get yarn, then go through second sc and get yarn, make a yo and pull yarn through all 3 sts on crochet hook. Bind off tip - 2 (armhole, neckline and sleeve top): Bind off at end of row by crocheting up to the number of sc to be bound off remains on row, and then turn piece. Bind off at beg of row by crocheting sl st over number of sc to be bound off. Increasing tips: Increase 1 sts on each side by crocheting 2 sc in first and last sc of row. --------------------------------------- Back piece: Crochet 59-64-70-75-83-88 ch (includes 1 ch to turn with) on crochet hook size 8 mm [US L/11] with Highlander . Crochet 1st row as follows: 1 sc in 2nd ch, 1 sc in each of next 2 ch, skip 1 ch, * 1 sc in each of next 3 ch, skip 1 ch * repeat from *-* and finish off with 1 sc in each of last 2-3-1-2-2-3 ch = 44-48-52-56-62-66 sc. Continuing crochet 1 sc in each sc – read Crochet info. When piece measures 15 cm [6"] dec 1 sc – see Decreasing tip - 1 on each side of every 15th-16th-17th-18th-19th-20th cm [6"-6¼"-6¾"-7"-7½"-8"] 3 times in total = 38-42-46-50-56-60 sc. Read next entire section before crocheting commences! When piece measures 51-53-55-57-59-61 cm [20"-21"-21⅝"-22½"-23¼"-24"] bind off 3 sc on each side for armhole – see Binding off tip - 2. Continuing dec 1 sc on each side on every row 1-2-4-5-8-9 times in total = 30-32-32-34-34-36 sts. When piece measures 69-72-75-78-81-83 cm [27⅛"-28⅜"-29½"-30¾"-32"-32¾"] do not continue crocheting over middle 8-8-10-10-12-12 sc = 11-12-11-12-11-12 sc left on each shoulder (complete each side separately). Crochet until piece measures 71-74-77-80-83-86 cm [28"-29⅛"-30⅜"-31½"-32¾"-33⅞"]. Cut yarn. Left front piece: Crochet 38-40-43-46-51-54 ch (incl 1 ch to turn with) on crochet hook size 8 mm [US L/11] with Highlander . Crochet 1st row as follows: 1 sc in 2nd ch, 1 sc in each of next 2 ch, skip 1 ch, * 1 sc in each of next 3 ch, skip 1 ch * repeat from *-* and finish off with 1 sc in each of last 1-3-2-1-2-1 ch = 28-30-32-34-38-40 sc. Continuing crocheting 1 sc in each sc. When piece measures 15 cm [6"] dec on side as on back = 25-27-29-31-35-37 sc. When piece measures 51-53-55-57-59-61 cm [20"-21"-21⅝"-22½"-23¼"-24"] bind off and dec for armhole like back piece. At the same time when piece measures 59-62-63-66-67-69 cm [23¼"-24⅜"-24¾"-26"-26⅜"-27⅛"] bind off 5 sc towards mid front for neck. Continuing dec 1 sc towards neck on every other row 5-5-6-6-8-8 times in total. When all dec are completed 11-12-11-12-11-12 sts are left on shoulder. Cut thread when piece measures 71-74-77-80-83-86 cm [28"-29⅛"-30⅜"-31½"-32¾"-33⅞"]. Right front piece: Crochet like left front piece. Additionally make 5-6-6-6-6-7 buttonholes as follows: ch 2 over 3rd and 4th sc from mid front, on next row crochet 1 sc in each ch. Make buttonhole when piece measures: Size S: [10 ¼"-13⅜"-16½"-19¾" and 22¾"]. Size M: [10 ¼"-13"-15 ¾"-18½"-21¼" and 24"]. Size L: [10⅝"-13⅜"-16⅛"-19"-21⅝" and 24⅜"]. Size XL: [9 ¾"-13"-16⅛"-19 ¼"-22½" and 25½"]. Size XXL: [10 ¼"-13⅜"-16½"-19¾"-22¾" and 26"]. Size XXXL:[10 ¼"-13"-15 ¾"-18½"-21 ¼"-24" and 26 ¾"]. Sleeve: Ch 27-30-30-31-31-34 (incl 1 ch to turn with) on crochet hook size 8 mm with Highlander . Crochet 1st row as follows: 1 sc in 2nd ch, 1 sc in each of next 2 ch, skip 1 ch, * 1 sc in each of next 3 ch, skip 1 ch * repeat from *-* and finish off with 1 sc in each of last 2-1-1-2-2-1 ch = 20-22-22-23-23-25 sc. Continuing crochet 1 sc in each sc. At the same time when piece measures 8 cm [3⅛"] inc 1 sc on each side – read Increasing tip – on every 7th-7th-6th-5th-4th-4th cm [2¾"-2¾"-2⅜"-2"-1½"-1½"] 6-6-7-8-9-9 times in total = 32-34-36-39-41-43 sc. When piece measures 48-48-47-47-45-44 cm [19"-19"-18½"-18½"-17¾"-17¼"] bind off 3 sc on each side. Then bind off to shape sleeve top on every other row as follows: 2 sc 1-1-1-2-2-2 times and 1 sc 1-1-2-1-2-3 times. Continuing, bind off 2 sc on each side until piece measures 55-56-56-57-57-58 cm [21⅝"-22"-22"-22½"-22½"-22¾"]. Now bind off 3 sc 1 time on each side. Cut yarn. Crochet another sleeve. Decorative pockets: Ch 18-18-20-20-22-22 (incl 1 ch to turn with) on crochet hook size 8 mm [US L/11] with Highlander . Crochet 1st row as follows: 1 sc in 2nd ch, 1 sc in each of next 2 ch, skip 1 ch, * 1 sc in each of next 3 ch, skip 1 ch * repeat from *-* and finish off with 1 sc in each of last 1-1-3-3-1-1 ch = 13-13-15-15-16-16 sc. Continuing crochet 1 sc in each sc until approx 6-6-6-7-7-7 cm [2⅜"-2⅜"-2⅜"-2¾"-2¾"-2¾"] is crochet. Cut yarn. Assembly: Sew shoulder seams in edge sts. Collar: Crochet 30 to 45 sc around neckline with Highlander on crochet hook size 8 mm [US L/11]. Continue with 1 sc in each sc until collar measures approx 12-12-12-14-14-14 cm [4¾"-4¾"-4¾"-5½"-5½"-5½"]. Cut yarn. Crochet edge (around armhole): Crochet around armhole with Snow on crochet hook size 8 mm [US L/11]. Begin mid under sleeve. Crochet 1 sc, * 1 ch, skip approx 1 cm [⅜"], 1 sc in next sts *, repeat from *-* and finish with 1 sl st in sc from beginning of round. Assembly: Sew in sleeves under the edge of Snow. Sew sleeve and side seams in outermost edge to avoid thick seams. Sew on decorative pockets mid on front piece approx 7 to 9 cm [2¾" to 3½"] from edge mid front. Only sew the top edge on the pocket. Sew in buttons. Crochet edges: Crochet around all edges of jacket with Snow on crochet hook size 8 mm [US L/11]. Start mid back of neck. Crochet 1 sc, * 1 ch, skip approx 1 cm [⅜"], 1 sc in next st *, repeat from *-* around collar, down along front piece, around bottom edge and up along front piece and back neck again. Finish round with 1 sl st in the sc from beginning of round. Crochet in same way along sleeve edges and around the open edge on the pockets. Slanted sts: Sew slanted sts with 2 strands Snow under bust line(i.e. approx 32-34-36-38-40-42 cm [12½"-13⅜"-14¼"-15"-15¾"-16½"] down from shoulder) – sts should reach approx 2 x 2 cm [¾" x ¾"]. |
|
 |
|
Have you finished this pattern?Tag your pictures with #dropspattern or submit them to the #dropsfan gallery. Do you need help with this pattern?You'll find 7 tutorial videos, a Comments/Questions area and more by visiting the pattern on garnstudio.com. © 1982-2026 DROPS Design A/S. We reserve all rights. This document, including all its sub-sections, has copyrights. Read more about what you can do with our patterns at the bottom of each pattern on our site. |


With over 40 years in knitting and crochet design, DROPS Design offers one of the most extensive collections of free patterns on the internet - translated to 17 languages. As of today we count 324 catalogs and 12278 patterns - 12268 of which are translated into English (US/in).
We work hard to bring you the best knitting and crochet have to offer, inspiration and advice as well as great quality yarns at incredible prices! Would you like to use our patterns for other than personal use? You can read what you are allowed to do in the Copyright text at the bottom of all our patterns. Happy crafting!
Post a comment to pattern DROPS 102-28
We would love to hear what you have to say about this pattern!
If you want to leave a question, please make sure you select the correct category in the form below, to speed up the answering process. Required fields are marked *.