
Popular categories
Looking for a yarn?


Comments / Questions (72)
![]() Larissa Olfert wrote:
Larissa Olfert wrote:
Ich möchte diese wunderbare Weste häkeln, komme aber mit der Anleitung nicht klar
28.07.2025 - 15:04DROPS Design answered:
Liebe Frau Olfert, wie kann man Ihnen helfen? Schauen Sie mal oben, rechts vom Tab "Anleitung" finden Sie "Videos" und "Lektionnen", die Ihnen schon mal auch helfen können. Gerne können Sie auch mal hier Ihre Frage stellen. Danke im voraus für Ihr Verständnis!
29.07.2025 - 09:01
![]() Kim wrote:
Kim wrote:
Can you tell me which rows to work in pattern for the after row 11 when it says work even in established pattern. Which rows are they referring to?
16.06.2025 - 17:13DROPS Design answered:
Dear Mrs Kim, you have to work as explained for your size, ie M.1 in first sizes (M.1+M.2 in 2 larger sizes), so 9 rows (from row 2 to 10) a total of 2 times in the smaller sizes (18 rows M.1 in total), or (9 rows M.1 + 2 rows M.2)x2 in the 2 larger sizes. Or were you thinking of another diagram? then please just let us know more. Happy crocheting!
19.06.2025 - 10:54
![]() Kim wrote:
Kim wrote:
Left Front: work same as Right Front, reversing shaping what does that mean exactly. Which rows am I starting with and how do I reverse shaping
16.06.2025 - 17:11DROPS Design answered:
Dear Mrs Kim, work diagram exactly the same way, starting with first row frm WS, ie start with A, repeat B reading from the left towards the right and finish with A and, from RS work:: A at the beg of rows from RS, then repeat B and finish with C . But the increases for shoulders will be worked at the right-hand side of piece, seen from RS and the decreases for neck at the left-hand side of piece, seen from RS. Happy crocheting!
19.06.2025 - 10:50
![]() Beate Glowieka wrote:
Beate Glowieka wrote:
Wie häkelt man die Quadrate aneinander gibt es ein Video dazu? So ist es schwer verständlich
10.04.2025 - 10:04DROPS Design answered:
Liebe Frau Glowieka, für die Quadrate sind es nur schriftliche Anleitung, folgen Sie schrittweise die Beschreibung jeder der 7 Runden. Viel Spaß beim Häkeln!
10.04.2025 - 13:47
![]() Anne-Lie Åkerlund Ni wrote:
Anne-Lie Åkerlund Ni wrote:
På höger framstycke, ska man både öka och minska när man virkar den andra rapporten av M1? Hur många maskbågar är det när man virkat klart framstycke?
05.04.2025 - 10:32
![]() Andrea wrote:
Andrea wrote:
Wo kann ich die Diagramme M1, M2 und M3 finden????
10.10.2024 - 06:53DROPS Design answered:
Liebe Andrea, schauen Sie mal ganz unten, rechts von der Maßskizze finden Sie das Diagram, und rechts vom Diagram finden Sie M.1 (9 Reihen), M.2 (2 Reihen) und M.3 (4 Reihen). Viel Spaß beim Häkeln!
10.10.2024 - 09:29
![]() Wilma Meijaard wrote:
Wilma Meijaard wrote:
Zijn er video’s van het haakpatroon enjoy vest
11.06.2024 - 15:53
![]() Beata wrote:
Beata wrote:
Proszę o weryfikację tłumaczenia - po polsku wszędzie są oczka ścisłe, natomiast w wersji angielskiej (i na diagramie!) półsłupki/single crochet. Zdanie "przerabiać w tę i z powrotem od środka przodu" (po połączeniu kwadratów) też mnie zastanawia, chodzi o to, żeby zacząć od brzegu?
22.05.2024 - 21:25DROPS Design answered:
Witaj Beato, w polskim nazewnictwie używa się obydwu pojęć. Proszę zapoznaj się z filmikiem TUTAJ. Co do drugiego pytania - od środka przodu oznacza po prostu od brzegu. Pozdrawiamy!
23.05.2024 - 08:25
![]() Bridie Bailey wrote:
Bridie Bailey wrote:
Hello. Thank you for this lovely pattern! Please can you confirm, for the top piece, do you decrease every 2.5 cm straight away or do the decreases begin on the 6th row (where the increases start)?
16.05.2023 - 00:24DROPS Design answered:
Dear Mrs Bailey, start decreasing after the first 2,5 cm. Happy crocheting !
16.05.2023 - 09:19
![]() Halle wrote:
Halle wrote:
Hello! This is a beautiful pattern. I have a question about how to do the increases on rows 6-11? Where does the extra loop go? I tried watching your video but it is for something very different. Thank you!
08.07.2022 - 07:44DROPS Design answered:
Dear Halle, crochet to the end of the row to the last chain space (= as before), and now crochet 8 chain stitches, 1 sc in the last sc = you have increased one extra ch-space towards armhole. Happy crocheting!
08.07.2022 - 10:04
|
|||||||||||||
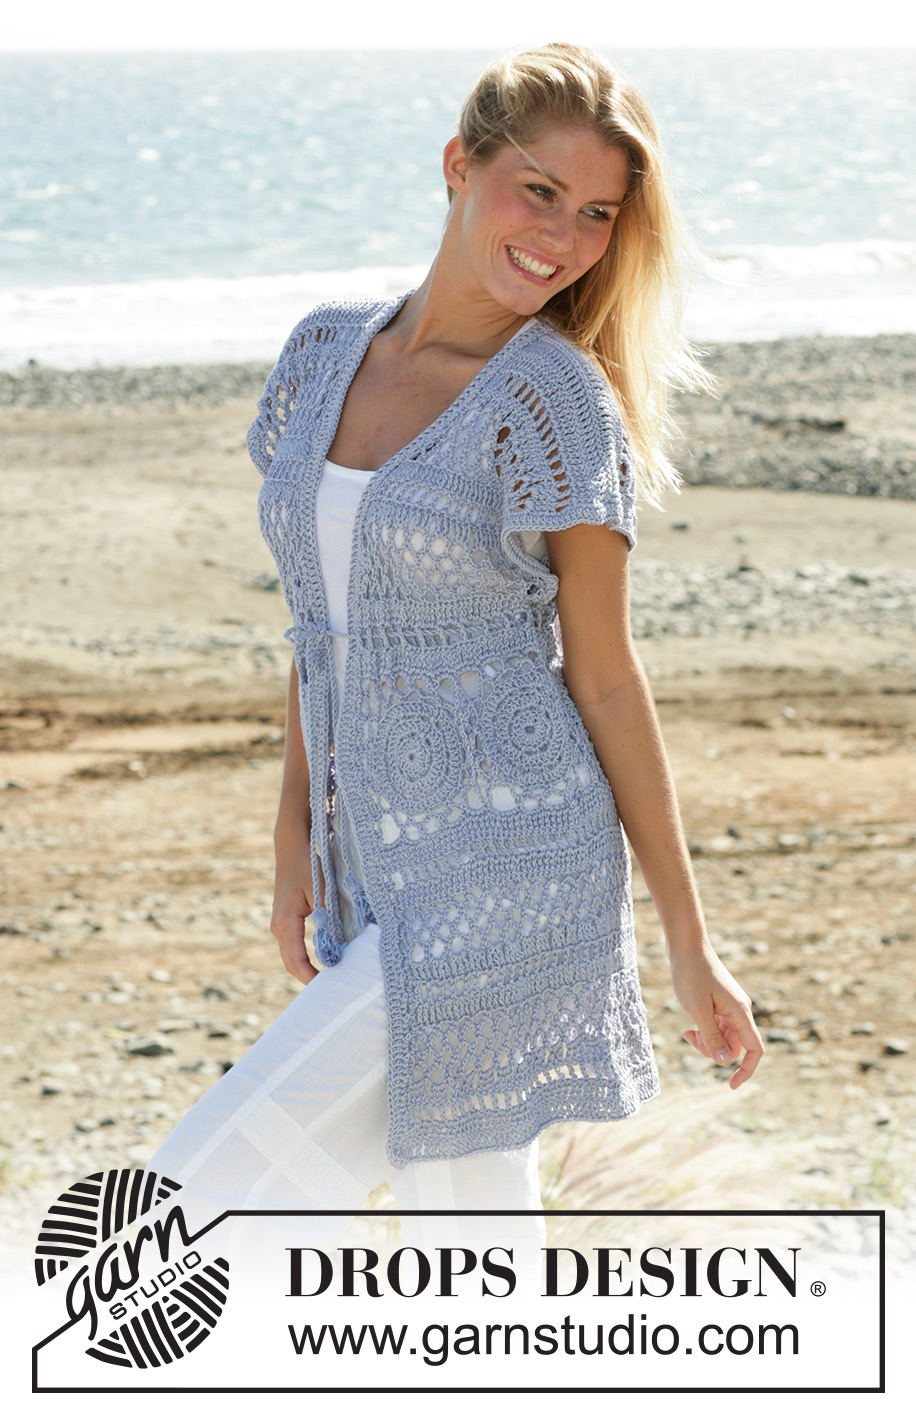
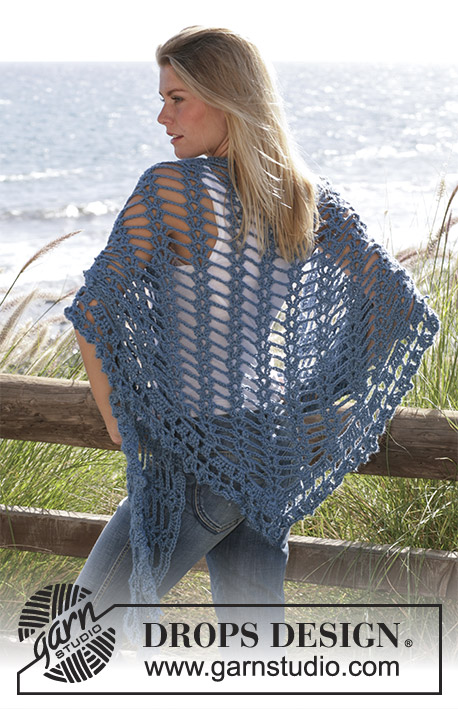
Enjoy#enjoycardigan |
|||||||||||||
|
|
|||||||||||||
DROPS long sleeves less cardigan with wide shoulders crochet in “Muskat”. Sizes XS - XXL
DROPS 99-2 |
|||||||||||||
|
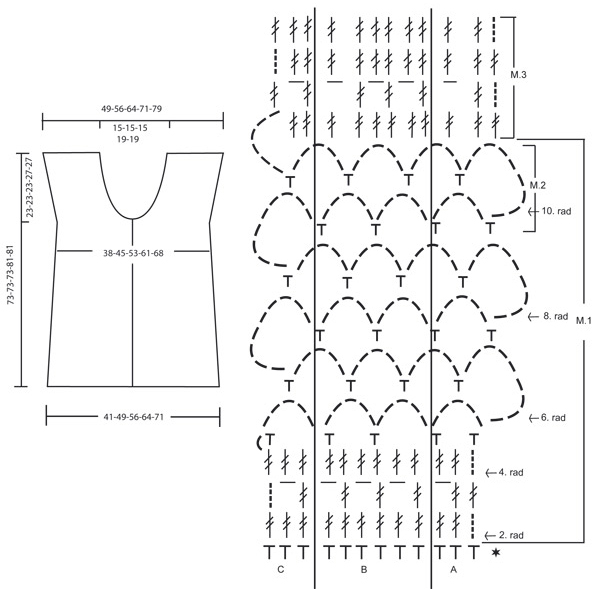
Crochet info: At the beg. of row substitute the dc with 3 ch. Pattern info: See diagram M.1, M.2 and M.3. M.2 is crochet only in size XL and XXL - one time after M.1 Size XS/S–M-L: 1 repeat = M.1 Size XL-XXL: 1 repeat = M.1 + M.2 The diagrams are seen from the RS. English Translations for the wording in the diagrams are given at the bottom of this pattern, and they are given in the vertical order in which they appear in the diagram. Increasing tip: For inc. crochet 1 extra ch-loop at the end of a row with ch-loops. Crochet until finish, then crochet 8 ch, 1 sc in the last sc. Turn and crochet the first sc in the new ch-loop. Bind off tip: For rows with tr: bind off as follows at beg. of row: Substitute 3 tr with 3 sl sts. bind off as follows at the end of row: Turn when there are 3 tr left on row . For rows with ch-loops: bind off as follows from beg. of row: Crochet sl sts over the the last ch-loop from previous row. bind off as follows at the end of row: Turn when 1 ch-loop is left. Crochet squares: 1 crochet square measures approx. 13 x 13 cm [5⅛" x 5⅛"]. Crochet squares: Crochet 5 ch and make a ring with a sl st in first ch. Read crochet info! 1st round: crochet 16 dc in the ring. 2nd round: 1 sc in the first dc, *3 ch, skip 1 dc, 1 sc in the next dc*, repeat from *-* and finish with 3 ch and a sl st in the first sc = 8 ch-loops. 3rd round: *1 dc in each sc, 3 dc in each ch-loop*, repeat from *-* and finish with a sl st in the first dc = 32 dc 4th round: 1 sc in the first dc, *3 ch, skip 1 dc, 1 sc in the next dc*, repeat from *-* and finish with 3 ch and a sl st in the first sc = 16 ch-loops 5th round: *1 dc in each sc and 2 dc in each ch-loop*, repeat from *-* until finish round and finish with a sl st in the first dc = 48 dc 6th round: *1 sc in the first dc, 5 ch, skip 2 dc, 1 sc in the next dc*, repeat from *-* and finish with 5 ch and a sl st in the first sc = 16 ch-loops 7th round: Crochet sl sts until the middle of the first ch-loop *(7 ch, 1 sc in the next ch-loop), repeat from (-)a total of 3 times, 10 ch (=corner), 1 sc in the next ch-loop*, repeat from *-* until finish round. Cut and sew the thread. Crochet a total of 6-7-8-9-10 squares. Put the squares on top of each other 2 by 2 and crochet as follows: 1 sc in the outer most ch-loop of both squares, *5 ch, 1 sc in the next ch-loop of both squares*, repeat from *-* until the squares are crochet tog. as a long string. Continue to crochet the sleeves less cardigan from the squares and down in one piece, and then the top part. Bottom piece: Crochet back and forth from the mid front. All measures should be done from the bottom line of the squares. Front and back piece are done in one piece, i.e. without any side seams. Crochet the first row from the WS. Crochet 120-144-168-192-216 sc in the bottom edge of the string of crochet squares (crochet approx. 20-20-21-21-22 sc in each square) Turn and crochet according to M.1A over the first 3 sc, repeat M.1B over the next 114-138-162-186-210 sc and finish with M.1C. Work M.1 (M.1 + M.2 for size XL and XXL) – read pattern info, 2 times in total. AT THE SAME TIME when M.1 is worked for the 2nd time, on 1st row inc 6 tr evenly distributed = 126-150-174-198-222 tr. Then work according to M.3, AT THE SAME TIME on 1st row inc 6 tr evenly distributed = 132-156-180-204-228 tr. Cut and sew the thread tight. The piece measures approx. 30-30-30-34-34 cm [11 ¾"-11 ¾"-11 ¾"-13⅜"-13⅜"]. Top piece: Crochet the first row from the WS. Crochet 120-144-168-192-216 sc in the top edge of the string of squares. Split the work and finish front and back pieces separately. All measures are done from the top edge of the string of squares. Right front: 1st row = RS. Crochet M.1 (M.1 + M.2 for size XL and XXL) – read pattern info over 30-36-42-48-54 sc at the right side of the piece. (crochet M.1A over the first 3 dc then repeat M.1B over the next 24-30-36-42-48 sc and finish with M.1C). At the same time at the end of the 6th, 8th and 10th row of M.1 inc. for wide shoulder – read increasing tip above. At the same time bind off 3 tr/ 1 ch-loop for the neck shaping on every 2.5 cm [7/8"] a total of 4-4-4-5-5 times – read binding off tip. After a total of 2 vertical repeats of M.1 (M.1 + M.2 for size XL and XXL) are completed crochet M.3. After all dec. and inc. are completed there are 27-33-39-42-48 tr left for each shoulder. Cut and sew the thread tight when the piece measures approx. 30-30-30-34-34 cm [11 ¾"-11 ¾"-11 ¾"-13⅜"-13⅜"]. The total length of the cardigan is approx. 73-73-73-81-81 cm [28 ¾"-28 ¾"-28 ¾"-32"-32"] Left from piece: Crochet as right front but reverse. Note: To get the bind off edges look the same each side, beg. the left front piece at the mid front. 1st row is the WS. Back piece: 1st row =RS. Crochet M.1 (M.1 + M.2 for size XL and XXL) – read pattern info, over the mid 60-72-84-96-108 sc. (Crochet M.1A over the first 3 sc, repeat M.1B over the next 54-66-78-90-102 sc and finish with M.1C). At the same time at the end of the 6th to 11th row inc. for wide shoulder as done for the front pieces. Crochet a total of 2 repeats of M.1 (M.1 + M.2 for size XL and XXL) then crochet M.3 (after all inc. for the wide shoulder there are 78-90-102-114-126 tr) At the same time on the 3rd row of M.3 crochet 1 row but only over the outer most 27-33-39-42-48 tr/ch each side (do not crochet over the mid 24-24-24-30-30 tr/ch= neck line). Crochet the last row of M.3, cut and sew the thread, the piece measures approx. 30-30-30-34-34 cm [11 ¾"-11 ¾"-11 ¾"-13⅜"-13⅜"]. Assembly: Sew the shoulder seams with small neat stitches. Sew approx. 4 cm [1½"] tog. underneath the armhole, i.e. up to where the inc. for the shoulder beg. Crochet edge: Crochet and edge around the armholes and up along the opening of the sleeve less cardigan as follows: Crochet up along one side of the front piece around the neck opening and down along the other front piece: 1st row: Crochet 1 sc, *3 ch, skip over approx. 1-1.5 cm [3/8"-½"], 1 sc*, repeat from *-* until finish. 2nd row: 1 sc in each sc and 2 sc in each ch-loop (in the transitions between the neck and front pieces crochet 4 sc in each ch-loop). 3rd row: 1 dc in each sc. Twisted string: Cut 4 threads Muskat of approx 3 meters [3.2 yds]. Twist them tog until they resist, double thread and let it twist tog. Tie a knot approx 5 cm [2"] from each end of the string. Pull thread up and down through the 2nd round of tr above the crochet squares. Make a tassel for each end: cut 25 threads Muskat of approx. 25 cm [10"] each. Split the string above the knot and pull the threads through the split. Knot the threads tog. and twist 1 of them around the top of the tassel to keep it tog. Cut and sew the thread. |
|||||||||||||
Diagram explanations |
|||||||||||||
|
|||||||||||||
 |
|||||||||||||
Have you finished this pattern?Tag your pictures with #dropspattern #enjoycardigan or submit them to the #dropsfan gallery. Do you need help with this pattern?You'll find 10 tutorial videos, a Comments/Questions area and more by visiting the pattern on garnstudio.com. © 1982-2026 DROPS Design A/S. We reserve all rights. This document, including all its sub-sections, has copyrights. Read more about what you can do with our patterns at the bottom of each pattern on our site. |
|||||||||||||


With over 40 years in knitting and crochet design, DROPS Design offers one of the most extensive collections of free patterns on the internet - translated to 17 languages. As of today we count 325 catalogs and 12298 patterns - 12288 of which are translated into English (US/in).
We work hard to bring you the best knitting and crochet have to offer, inspiration and advice as well as great quality yarns at incredible prices! Would you like to use our patterns for other than personal use? You can read what you are allowed to do in the Copyright text at the bottom of all our patterns. Happy crafting!
Post a comment to pattern DROPS 99-2
We would love to hear what you have to say about this pattern!
If you want to leave a question, please make sure you select the correct category in the form below, to speed up the answering process. Required fields are marked *.