
Popular categories
Looking for a yarn?


Comments / Questions (22)
![]() Monnier wrote:
Monnier wrote:
Bonjour, je ne comprends pas ce que vous appelez les sections : "augmenter une maille dans chacune des 3 sections". Merci d'avance
24.03.2025 - 15:44DROPS Design answered:
Bonjour Mme Monnier, vous devez augmenter le nombre de mailles envers des côtes, autrement dit, les 3 fois 3 mailles envers à la pointe du châle doivent être augmentées à 4 mailles envers - gardez bien 3 mailles envers le long des 2 diagonales. Recommencez ensuite à 5 cm de bordure, vous aurez cette fois 5 mailles envers dans ces 3 sections en mailles envers des côtes, et toujours 3 mailles envers dans les autres le long des 2 diagonales. Bon tricot!
25.03.2025 - 08:51
![]() Marie Arlette Dubernet wrote:
Marie Arlette Dubernet wrote:
Faut il faire une augmentation de chaque côté tous les 2 rgs ou tous les rgs Jusqu'à 5cm . Je ne comprends pas la suite des explications après 5cm Modele drops 100-4
10.01.2025 - 17:09DROPS Design answered:
Bonjour Mme Dubernet, vous augmentez 1 maille de chaque côté à 3 mailles du bord tous les 2 rangs (correction à venir) jusqu'à la fin, et, en même temps, vous augmentez le nombre de mailles envers: à 5 cm vous augmentez pour passer en côtes 3 m endroit, 4 m envers et à 9 cm, vous augmenter pour passer en côtes 3 m endroit, 5 m envers. Bon tricot!
13.01.2025 - 08:29
![]() Anni wrote:
Anni wrote:
I skriver nok å flot, at man blot kan bruge omregneren til at finde alternativt garn. Dette er ikke korrekt. Omregneren kan ikke finde ud af det, når der er tale om to forskellige slags garn. Selvom man angiver at det er to tråde af Vivaldi, kan den ikke finde et alternativ. I bedes derfor angive alternativt garn, tak.
27.12.2018 - 17:56DROPS Design answered:
Hei Anni. Når du skal finne alternativer for 2 garn, må du skrive dem inn hver for deg. Vivaldi tilhører garngruppe C og kan derfor byttes med andre garn i den gruppen (feks Air), men det som gir likest resultat er Brushed Alpaca Silk. Cotton Merino tilhører garngruppe A, og kan byttes med et hvilket som helst garn i denne gruppen, men om du vil ha et bomullsgarn kan du bruke Safran. Du finner en overiskt over garngruppene her. Vi har nå testet begge disse garnene i garnkalkulatoren og det gikk fint- men de må som sagt puttes inn individuelt. God fornøyelse
02.01.2019 - 11:22
![]() Diana wrote:
Diana wrote:
Hi, as both yarns are not available any more I'd like to knit the shawl with just one yarn. Would you be able to let me know what options there are and how many grams I would need?
16.09.2018 - 20:27DROPS Design answered:
Dear Diana, you can use our yarn converter to find an alternative for each yarn - read more about alternatives here. Happy knitting!
17.09.2018 - 09:32
![]() Bill Burris wrote:
Bill Burris wrote:
The way I understand this, after picking up stitches for the ribbing we begin with 3 knit stitches and end with 3 knit stitches all along so that they are always garter stitching at both ends. Do we increase in the garters starting with the first three knits or knit 3, ribbing, knit 3 with an increase inside the three then increase at the other end on the return trip? Also do we increase in the garters on every round?
18.02.2018 - 01:16DROPS Design answered:
Dear Mrs Burris, you will increase after the first 3 sts in garter st on row and before the 3 sts in garter st at the end of row. You increase every other row (this will be added in the pattern) to the end. These new sts will be worked in rib. Then after 5 cm and 9 cm increase also in the 3 bottom P-sections. Happy knitting!
19.02.2018 - 09:39
![]() Bill wrote:
Bill wrote:
Where the instructions say to cast on 7 stitches with 1 strand of each quality, are you knitting with two yarns at the same time?
05.12.2017 - 17:11DROPS Design answered:
Dear Bill, correct, you will work with 2 yarns at the same time all the way, ie with Cotton Viscose and Vivaldi. Happy knitting!
06.12.2017 - 08:49Athanasia wrote:
Hello again! Why is it necessary to chrochet the borders? Can I pick up the stiches without the chrochet part? Thank you
28.04.2017 - 12:57DROPS Design answered:
Dear Athanasia, crocheting the edge first will help you to pick up sts evenly and will also make a nice eyelet row between shawl and ribbing. Happy knitting!
28.04.2017 - 13:52Athanasia wrote:
Hello, I have two questions to make. 1. The crochet is done to the three sides of the shawl or just the two sides where the pick-up stiches are made. 2. I don't understand the incorporation of the stiches at the rib. At 5 cm it says add 2 st. at the bottom 3 purl. Ok, I understand that. The 3 st become 5 add we add 6 st in total. At 9 cm says add 2st at the bottom 3 purl. Does it mean that the 5 st now becomes 7? Thank you
06.04.2017 - 12:47DROPS Design answered:
Dear Athanasia, 1) you crochet the ch-spaces around the shawl, ie along the 3 sides. 2) You will have to inc 1 st each of the the bottom 3 P-sections only, so that you will have P4 after 5 cm in these P-sections and P5 after 9 cm in these P-sections (but still P3 in every other P sections, inc are only made at the bottom tip), pattern will be edited. Happy knitting!
06.04.2017 - 13:53
![]() Mae wrote:
Mae wrote:
Bonjour, Il y a deux choses que je ne comprends pas très bien dans les instructions: 1- quand vous dites "avec 1 fil de chaque qualité" ça veut dire que l'on double le fil? 2 - La bordure, il faut la tricoter à part et l'assembler ensuite? Est-il possible de réaliser ce modèle sans savoir crocheter? Merci de votre aide, Mae
12.12.2016 - 18:46DROPS Design answered:
Bonjour Mae, le châle se réalise entièrement avec 2 fils: 1 fil Cotton Viscose + 1 fil Vivaldi. La bordure se réalise au tricot, en relevant les mailles le long des 2 diagonales du châle. Bon tricot!
13.12.2016 - 08:47Rebekah wrote:
I'm having trouble understanding how to pick up the stitches for the rib border - can anyone help?
29.04.2016 - 11:35DROPS Design answered:
Dear Rebekah, the sts are picked up in the crocheted ch-spaces along the 2 diagonal of the shawl, in each ch-space work as follows; pick up 1 st, YO, pick 1 st (= 3 sts in each ch-space) - make sure your number of sts is divisible with 6 + 3. Happy knitting!
29.04.2016 - 11:44
|
|
Upstate#upstateshawl |
|
|
|
|
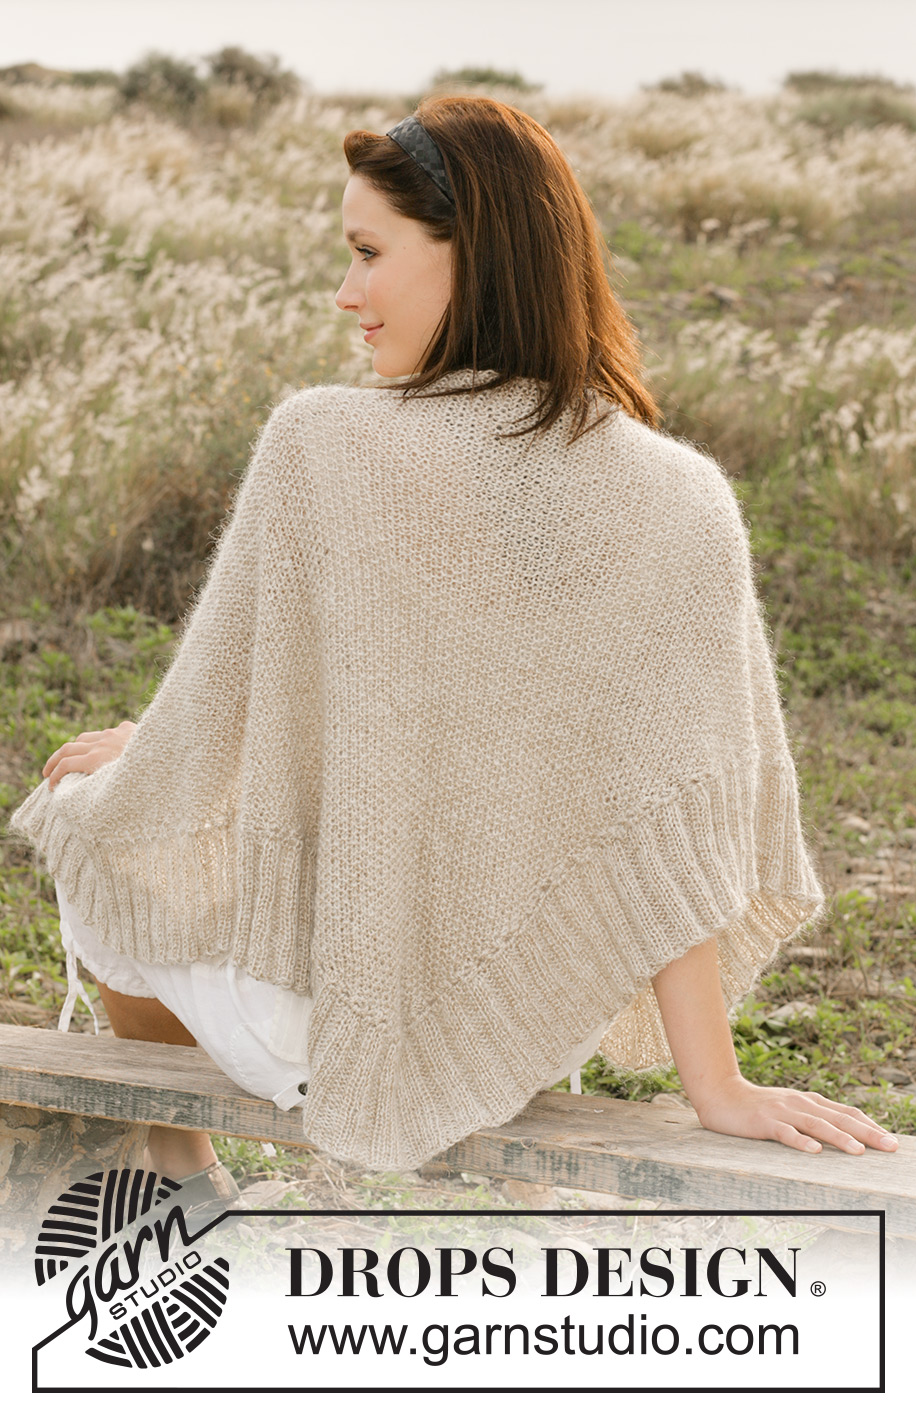
DROPS Shawl knitted in seed stitches with “Vivaldi” and “Cotton Viscose”.
DROPS 100-4 |
|
|
Knitting gauge: 13 sts x 24 rows on needles size 6 mm / US 10 1 thread of each quality in seed sts = 10 x 10 cm / 4" x 4". Seed sts: 1st row: K1, P1. 2nd row: *K over P and P over K*. Repeat the 2nd row. Increasing tips-1: Inc. at the end of each row as follows: K 2 sts into the last sts, incorporate new sts into the pattern. Increasing tips-2: Inc. inside 3 garter sts as follows: Make a yo, on returning row twist and K the yo (to twist the st, knit into back part of st instead of the front part) Measurement tips: Because of the weight of the yarn, all measurements should be made whilst the garment is hanging. Garter sts back and forth: K on all rows. --------------------------------------------------- SHAWL Cast on 7 sts on needle size 6 mm / US 10 with 1 strand of each quality. Work in seed sts at the same time inc. 1 st at the end of each row – read increasing tips 1 - until the piece measures approx. 66 cm / 26" – see measurement tips. The width at the top of the shawl in now approx. 127 cm / 50". Bind off loosely. CROCHET EDGE Crochet an edge with hook size 5mm/ H/8 with 1 strand of each quality down along one side as follows: 1 sc in the first st at the top of one side, *2 ch, skip over 2 sts and 1 sc in the following st*, repeat from *-* = 39-41 ( divisible with 2 + 1) ch–spaces – make sure to finish with a sc at the bottom corner of the casting on edge. Continue to crochet on the casting on edge as follows: *2 ch, skip 1 st, 1 sc in the following st*, repeat from *-* a total of 3 times = 3 ch spaces along the casting on edge. Continue to crochet up along the other side as done for the first side – making sure to finish with 1 sc at the top corner = 39-41 ( divisible with 2+1) ch spaces. Continue to crochet on the binding off edge as follows: *2 ch, skip 2 sts, 1 sc*, repeat from *-* and finish with a sl st in the sc from beg. of round. RIB BORDER Knit along both of the sides with circular needle size 5.5 mm / US 9 and 1 strand of each quality. Pick up 3 sts each ch space as follows: 1 st, 1 yo, 1 st = 243 – 261 sts (divisible with 6 + 3). Now please read all of the next section: Continue the next row as follows (seen from the RS): 3 garter sts – see explanation above, *K3, P3*, repeat from *-* and finish with K3 and 3 garter sts. At the same time inc. 1 st on every other row each side inside the 3 garter sts – read increasing tips 2. Incorporate new sts into the rib as you proceed. When the edge measures 5 cm / 2" inc. 1 st each side - in each of the 3 bottom Purl sections, repeat this inc. when the rib measures 9 cm / 3½" = 5 P sts in each of the 3 bottom purl sections. Bind off loosely when the Rib border measures 12 cm / 4¾". |
|
Have you finished this pattern?Tag your pictures with #dropspattern #upstateshawl or submit them to the #dropsfan gallery. Do you need help with this pattern?You'll find 18 tutorial videos, a Comments/Questions area and more by visiting the pattern on garnstudio.com. © 1982-2026 DROPS Design A/S. We reserve all rights. This document, including all its sub-sections, has copyrights. Read more about what you can do with our patterns at the bottom of each pattern on our site. |


With over 40 years in knitting and crochet design, DROPS Design offers one of the most extensive collections of free patterns on the internet - translated to 17 languages. As of today we count 325 catalogs and 12298 patterns - 12288 of which are translated into English (US/in).
We work hard to bring you the best knitting and crochet have to offer, inspiration and advice as well as great quality yarns at incredible prices! Would you like to use our patterns for other than personal use? You can read what you are allowed to do in the Copyright text at the bottom of all our patterns. Happy crafting!
Post a comment to pattern DROPS 100-4
We would love to hear what you have to say about this pattern!
If you want to leave a question, please make sure you select the correct category in the form below, to speed up the answering process. Required fields are marked *.