
Popular categories
Looking for a yarn?


Comments / Questions (96)
![]() Andrea wrote:
Andrea wrote:
Guten Tag, ich möchte gerne die Jacke Cameron häkeln, allerdings mit anderem Garn. Ich würde Snow gerne durch jeweils einen Faden Drops Belle und einen Faden Alpaca Silk ersetzen. Würde das von der Maschenprobe passen?
13.02.2026 - 11:55DROPS Design answered:
Liebe Andrea, Sie meinen DROPS Brushed Alpaca Silk? Das können Sie mit DROPS Belle kombinieren, Sie erhalten dann nicht ganz die eigentliche Dicke von DROPS Snow, aber es sollte trotzdem funktionieren, da Brushed Alpaka Silk ein Flauschgarn ist und locker verarbeitet werden kann. Achten Sie auf jeden Fall darauf, dass Sie die Maschenprobe einhalten. Viel Spaß beim Häkeln!
18.02.2026 - 15:15
![]() Aude wrote:
Aude wrote:
Bonjour, je suis assez novice mais j'ai cherché, et dans la description de l'échantillon, je ne comprends pas ce que veut dire "4 groupes de brides x 4 rangs de brides". D'autant que d'après ce que je comprends en faisant, un groupe de bride double le nombre de mailles de l'ouvrage, qui s'élargit à chaque rang?! Voulez-vous bien expliquer de manière un peu plus détaillée ce que vois voulez dire, svp?
22.01.2023 - 10:26DROPS Design answered:
Bonjour Aude, 1 groupe de brides correspond à 2 brides entre les 2 brides du groupe de brides précédent, au 1er rang, crochetez ainsi: 3 ml (1ère bride) + 1 bride dans la 4ème ml à partir du crochet, *sautez 2 mailles en l'air, 2 brides dans la maille en l'air suivante*, répétez de *-*. Aux rangs suivants, crochetez 2 brides entre les 2 brides crochetées dans la même maille au rang précédent (comme dans le diagramme). Bon crochet!
23.01.2023 - 09:24
![]() Giulia Pagella wrote:
Giulia Pagella wrote:
Buongiorno, questo modello mi piace molto, purtroppo non è tradotto nella mia lingua. Sareste così gentili da tradurlo? Grazie e complimenti, avete sempre spiegazioni chiare
21.01.2022 - 11:40
![]() Lameche wrote:
Lameche wrote:
Correction en ligne le: 11.10.2016 Correction diagramme DROPS / 97 / 1 Cameron by DROPS Design Gilet Drops au crochet en Eskimo
20.02.2020 - 15:05
![]() Shyanha wrote:
Shyanha wrote:
I'm at the 12 cm point "Crochet 1 extra dc-group at the beginning and at the end of the row," but am unsure how to start and end the next row. Is it ch 3, turn, 1 dc group between the two dc groups from the previous row? We're chaining to extend the row for sleeves; however, I'm not sure about the assembly. Will the sleeves have a seam on the top and then one on the underside that continues down the side to attach the front and back pieces? Thank you!
01.11.2018 - 18:22DROPS Design answered:
Dear Shyanha, at the beg of row you will start the inc row with 3 ch, 3 dc between the first 2 dc, work 2 dc between each dc-group as before and end with 4 dc between the last 2 dc. On next row, crochet 2 dc (=3 ch, 1 dc) between the first 2 dc and continue in pattern as before. Shoulders/sleeve will be then sewn together and under sleeve/side will be crocheted together -see ASSEMBLY. Happy crocheting!
02.11.2018 - 07:46
![]() Ellen Weber wrote:
Ellen Weber wrote:
Ist es richtig das ich in der ersten Reihe in der ich zunehme nur auf einer Seite eine zunahme habe ?
13.09.2018 - 21:15DROPS Design answered:
Liebe Frau Weber, beim Rückenteil nehmen Sie auf beiden Seiten zu, beim Vorderteil nehmen Sie nur auf eine Seite zu. Viel Spaß beim stricken!
14.09.2018 - 08:21
![]() Carola wrote:
Carola wrote:
Hallo, wenn ihr von Stäbchengruppen in dieser Anleitung hier sprecht, bedeutet das, dass ich bei dem 1. Stäbchen einer Gruppe warte mit dem letzen Durchziehen . Erst wenn ich die 2. Masche häkel, ziehe ich den Faden durch alle 2 Schlaufen auf der Nadel? Danke für die Hilfe! Viele Grüße Carola
17.06.2018 - 01:36DROPS Design answered:
Liebe Carola, hier wird einfach 2 Stb in dieselbe M gehäkelt - siehe Häkelinfo-1 (= nicht 2 Stb zs). Viel Spaß beim häkeln!
18.06.2018 - 08:26
![]() Tekla wrote:
Tekla wrote:
Hej, jag undrar, ska man öka i kanterna på varje varv från det att arbetet är 12 cm till att arbetet är ca 35-35-37-38-40 cm? Med vänlig hälsning Tekla
13.05.2018 - 09:09DROPS Design answered:
Hej, ökningarna görs endast en gång i varje sida.
14.05.2018 - 17:27
![]() Patricia Everaert wrote:
Patricia Everaert wrote:
Wordt de kleur 45p, legergroen niet meer verkocht ? Net een mooie kleur, is er anders een alternatief die er dan op trekt om Cameron trui te haken ?
12.04.2017 - 16:47DROPS Design answered:
Helaas is deze kleur er inderdaad niet meer. Om een gemeleerd effect te krijgen zou je er ook voor kunnen kiezen om in plaats van 1 draad Eskimo (garencategorie E), 2 draden van garencategorie C te nemen. Bijvoorbeeld Nepal of Alaska.
16.04.2017 - 13:18
![]() Jette wrote:
Jette wrote:
Når man hækler side- og ærmesømmene sammen, er det så fra ret- eller vrangsiden ?
06.11.2016 - 14:48DROPS Design answered:
Hej Jette. Jeg ville göre det fra retten - det synes jeg selv er det paeneste. Men pröv dig lidt frem og gör det du selv synes er paenest :)
07.11.2016 - 12:17
|
|||||||
Cameron |
|||||||
|
|
|||||||
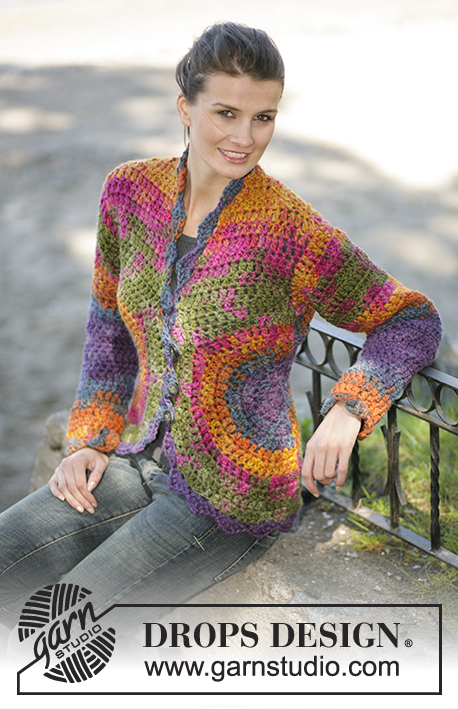
DROPS Crochet cardigan in Snow
DROPS 97-1 |
|||||||
|
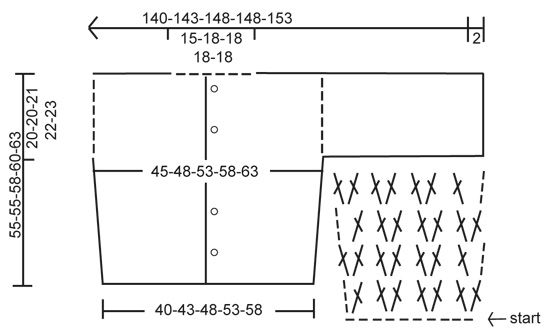
Crochet gauge: 4 dc groups in the width and 4 rows in the height = 10 x 10 cm / 4" x 4". Crochet info-1: At the beginning of dc row substitute the first dc with 3 ch and finish with 1 dc in the 3rd ch from previous row. Crochet info-2: 1 dc-group = 2 dc in the same st. Back piece: Read Crochet info-1! Ch 49-52-58-64-70 (includes 3 ch to turn with) on hook no. 9 mm/M in Army. 1st row: 1 dc in the 4th ch from the hook, *skip 2 ch, 2 dc in the next ch*, repeat from *-* until end of row = 16-17-19-21-23 dc-groups, read Crochet info-2. 2nd row: ch 3 (= 1 dc), 2 dc in between the first 2 dc groups from previous row, *2 dc in between the next 2 dc groups*, repeat from *-* until end of row and finish with 1 dc in the top of the last dc = 16-17-19-21-23 dc-groups on the row. 3rd row: ch 3, 1 dc before the first dc-group, continue to crochet 2 dc in between each dc- group from previous row, finish with 2 dc in the last dc. Repeat 2nd and 3rd row. When the piece measures 12 cm / 4¾" inc. at each side as follows: Crochet 1 extra dc-group at the beginning and at the end of the row = 18-19-21-23-25 dc-groups. When the piece measure approx. 35-35-37-38-40 cm / 13¾"-13¾"-14½"-15"-15¾" (make sure this is a 3rd row) inc. for the sleeves as follows: ch 57-57-57-54-54 at the end of row and cut the yarn. Turn the piece and crochet 1 sl st at the top of the other side and then ch 58-58-58-55-55 at the other side. Now crochet the whole row, from outer most part of one sleeve to the outer most part of the other sleeve as explained in 1st row = 56-57-59-59-62 dc-groups on row. When the piece measures approx 55-55-58-60-63 cm / 21½"-21½"-22¾"-23½"-24¾" fasten off. Front piece: Ch 25-28-31-34-37 (includes 3 ch to turn with) on hook 9 mm/M in Army. Crochet 8-9-10-11-12 dc-groups as explained for the back piece. When the piece measures 25 cm / 9¾" (instead of 12 cm / 4¾" as for the back piece) inc. at the side as done for the back piece = 9-10-11-12-13 dc-groups. When the piece measures 35-35-37-38-40 cm / 13¾"-13¾"-14½"-15"-15¾" ch 58-58-55-52-52 for sleeve at the side (the same side as inc. earlier). Continue as before = 28-29-29-29-30 dc-groups on row. When the piece measure approx. 55-55-58-60-63 cm / 55-55-58-60-63 cm / 21½"-21½"-22¾"-23½"-24¾" fasten off. Crochet one more front piece, but inc. at the opposite side. Cuff: Crochet 2 rows of dc-groups at the bottom of each sleeve with hook 9 mm/M and brown mix – there should be approx. 15-16-16-17-18 dc-groups on the row. Assembly: Sew the shoulder seams edge against edge with small neat stitches – leave 6-7-7-7-7- dc- groups open at the back in the middle for the neck opening. Crochet the sleeve and the side seams tog. with 1 sc and 2 ch as follows: 1 sc in the first st at the bottom of the side of the back piece, ch 2, 1 sc in the first dc at the front piece, ch 2, 1 sc in the first dc at the back piece, ch 2, 1 sc in the next dc at the front piece, ch 2, 1 sc in the next dc at the back piece and so on. Hood: With army crochet 1 sc in the first st at the front of the neck, ch 3, then crochet approx 14-15-15-16-16 dc-groups around the neck the same way as done for the cardigan. Continue with dc-groups until the hood measures approx. 30-30-33-33-33 cm / 11¾"-13", fasten off. Fold the hood double and sew it neatly tog. at the top – sew in the most outer part of the edge. Front edge: With brown mix crochet 1 row with dc-groups up along the front piece, around the hood and down along the other front piece – make sure the edge is not too tight. Sew in the buttons on left front – the top button should be approx. 1-2 cm / ½-¾" from where the hood begins and the lower button approx. 10-12 cm / 4"-4¾" from the bottom edge. (For button holes use the opening in between the dc-groups at the right front piece). Crochet 1 row of sc at the bottom edge for both the back and front pieces. Crochet 1 sc in each st. |
|||||||
Diagram explanations |
|||||||
|
|||||||
 |
|||||||
Have you finished this pattern?Tag your pictures with #dropspattern or submit them to the #dropsfan gallery. Do you need help with this pattern?You'll find 6 tutorial videos, a Comments/Questions area and more by visiting the pattern on garnstudio.com. © 1982-2026 DROPS Design A/S. We reserve all rights. This document, including all its sub-sections, has copyrights. Read more about what you can do with our patterns at the bottom of each pattern on our site. |
|||||||


With over 40 years in knitting and crochet design, DROPS Design offers one of the most extensive collections of free patterns on the internet - translated to 17 languages. As of today we count 325 catalogs and 12298 patterns - 12288 of which are translated into English (US/in).
We work hard to bring you the best knitting and crochet have to offer, inspiration and advice as well as great quality yarns at incredible prices! Would you like to use our patterns for other than personal use? You can read what you are allowed to do in the Copyright text at the bottom of all our patterns. Happy crafting!
Post a comment to pattern DROPS 97-1
We would love to hear what you have to say about this pattern!
If you want to leave a question, please make sure you select the correct category in the form below, to speed up the answering process. Required fields are marked *.