
Popular categories
Looking for a yarn?


Comments / Questions (25)
![]() Barbara wrote:
Barbara wrote:
Ich habe eine Frage zu den Henkeln. Auf dem Bild sieht die Kante so wunderbar glatt aus, wie häkeln ihr die Kante beziehungsweise nehmt dort ab?
30.04.2026 - 18:06DROPS Design answered:
Liebe Barbara, Sie können die letzte Masche am Ende jeder Reihe nicht häkeln bis 8 fM übrig sind, oder die 2 letzten Maschen jeder Reihe zusammenhäkeln, wie Sie am besten möchten. Gerne können Sie noch dazu eine gehäkelte Rand am Ende häkeln. Viel Spaß beim Häkeln!
04.05.2026 - 07:37
![]() Tina Fuchs-Schafranek wrote:
Tina Fuchs-Schafranek wrote:
Tolle Tasche, einfach zu häkeln. Es wurde eine Sofatasche draus Danke für für Anleitung!
22.09.2025 - 12:04
![]() Anastasya wrote:
Anastasya wrote:
Thank you, Tonya, for the explanation. I couldn't figure out what I was doing wrong. Maybe if you change the wording for this sentence, it would be less confusing: “ Round 1: Work double crochets along the one side of the chain-stitch row [as follows]– in the first chain stitch work 2 double crochets, then 1 double crochet in the next 16 chain stitches…”
08.01.2025 - 03:48
![]() Dolfin wrote:
Dolfin wrote:
Quand vous dites : coudre les poignées en ms, qu'est-ce que cela signifie ? Avez-vous un tuto qui montrerait comment faire ? Merci.
19.06.2023 - 21:21DROPS Design answered:
Bonjour Mme Dolfin, crochetez simplement la poignée et le sac ensemble, en mailles serrées, autrement dit posez la poignée contre le bord du sac et crochetez en piquant dans les 2 épaisseurs 1 maille serrée dans chacune des mailles de la poignée - répétez de l'autre côté. Bon crochet!
20.06.2023 - 08:50
![]() Mare wrote:
Mare wrote:
Bonjour je vous remercie des explications données précédemment pour le rang 2 au dessus du pop-corn puis les 2 ms dans l’arceau mais ensuite nous sommes au dessus des 4 B , que faut il faire de ces 4 B avant de refaire un ms dans le pop-corn suivant ? Merci bien. Bonne journée
01.02.2022 - 08:19DROPS Design answered:
Bonjour Mare, ces 4 brides appartiennent au pop-corn: vous crochetez 4 brides, puis enlevez le crochet, piquez-le dans la 1ère des 4 brides puis dans la dernière, faites 1 jeté et écoulez les 2 boucles sur le crochet ; au 2ème rang, vous crochetez 1 maille serrée dans cette maille du pop-corn. Est-ce plus clair ainsi?
01.02.2022 - 09:12
![]() Marie wrote:
Marie wrote:
Bonjour, je ne comprends pas le rang 2 du point pop corn Ou faire la ms dans le pop corn ? Ce que vous appelez ’arceau', est ce le ’trou’ qui suit le pop corn (faire les 2 ms) Après ce ’trou’ il y a les 4 brides... que faut il faire au dessus de ces brides ? Je vous remercie beaucoup pour votre aide. Cordialement
31.01.2022 - 17:31DROPS Design answered:
Bonjour Marie, au 2ème rang, crochetez 1 ms dans le haut du pop corn du rang précédent et 2 mailles serrées dans l'arceau = en piquant sous les 2 mailles en l'air du tour précédent (entre 2 pop corn). Bon crochet!
31.01.2022 - 17:58
![]() Mariaross wrote:
Mariaross wrote:
Quanti gomitoli per realizzare una delle borsette?
01.08.2021 - 14:00DROPS Design answered:
Buonasera Mariaross, per ogni borsa occorrono circa 2 gomitoli dei filati indicati. Buon lavoro!
01.08.2021 - 20:36
![]() Hatice wrote:
Hatice wrote:
Det är jätte fina modeller ni har kan ni vissa lite tydligt hur man virkar väskorna
19.03.2019 - 01:25
![]() Hatice wrote:
Hatice wrote:
Harika modelleriniz var ellerinize sağlık
19.03.2019 - 01:23Maria wrote:
Hi! Thank you for the wonderful work! About this pattern: in the UK version I am looking at, the pattern is for another set of bags (I think 69-25). I 'll get the pattern from another language version ;) but for now I 'm guessing it's the wrong link.
25.01.2017 - 09:28
|
|
Mini Purses |
|
 |
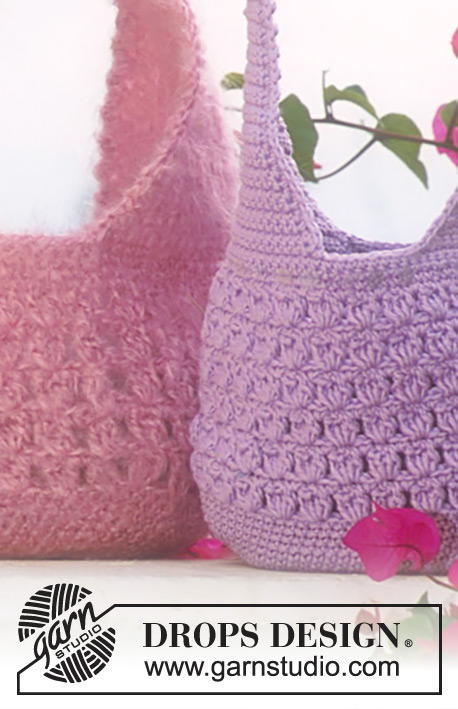 |
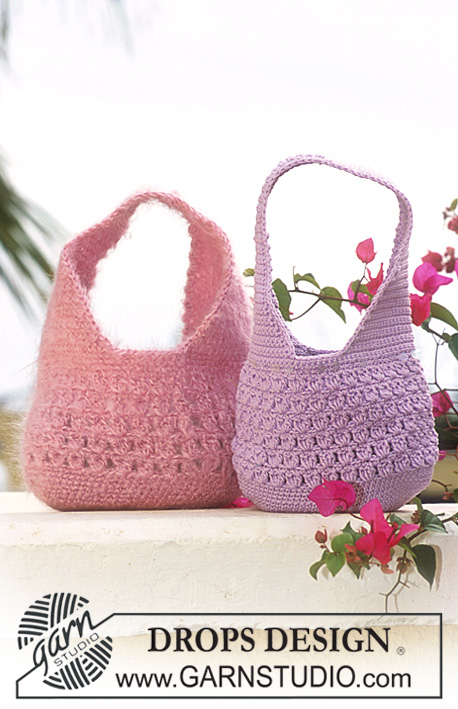
DROPS Crocheted Purse in Muskat or Vienna
DROPS 69-26 |
|
|
Crochet gauge: Muskat: 20 sc x 25 rows = 10 x 10 cm [4" x 4"]. Vienna: 18 sc x 20 rows = 10 x 10 cm [4" x 4"]. Popcorn Pattern: Row 1: Ch 3, 3 dc in the 1st sc, take hook out of loop, put hook in the first dc (the last of the ch 3), then in loop from last dc, yo and pull through both loops on hook (= 1 popcorn), * ch 2, skip over 2 sc, 4 dc in the next sc, make popcorn as explained above *, repeat from * - *, finish with ch 2 and 1 sl st in first popcorn. Row 2: * 1 sc in popcorn, 2 sc in ch-st loop*, repeat from * - *, finish with 1 sl st in first sc. Repeat rows 1 and 2. Purse: Begin at the bottom of purse. Ch 18. Row 1: Crochet sc along one side of the chain – in the first ch make 2 sc, then 1 sc in each of the following 16 ch, in the last ch make 4 sc - put a marker in center of 4 sc (the side) then 1 sc in each of the 16 ch on the other side, finish with 2 sc in the first ch (there are 4 sc in this ch - put a marker in center of these 4 sc – the side). 40 sc on row. Rows 2 through 12: Work 1 sc in each sc from previous row, but in 1 sc at each side of markers crochet 2 sc - this increase 4 sc per row. = 84 sc on row. Then work 4 rows sc, without increasing. Change to Popcorn Pattern - see instructions above for approx. 9 cm [3.5"], then work 3 rows sc. Strap: Work sc back and forth over 32 sc at one side (16 sc each side of marker) - work 1 sc less at end of each row until 8 sc remain, continue on these sc until strap measures approx. 20 cm [7-⅞"] or to desired length. Make second strap on other side. Assembly: Crochet together straps with sc. Sew on sequins around purse in sc over the Popcorn Pattern. |
|
Have you finished this pattern?Tag your pictures with #dropspattern or submit them to the #dropsfan gallery. Do you need help with this pattern?You'll find 5 tutorial videos, a Comments/Questions area and more by visiting the pattern on garnstudio.com. © 1982-2026 DROPS Design A/S. We reserve all rights. This document, including all its sub-sections, has copyrights. Read more about what you can do with our patterns at the bottom of each pattern on our site. |
|


With over 40 years in knitting and crochet design, DROPS Design offers one of the most extensive collections of free patterns on the internet - translated to 17 languages. As of today we count 325 catalogs and 12298 patterns - 12288 of which are translated into English (US/in).
We work hard to bring you the best knitting and crochet have to offer, inspiration and advice as well as great quality yarns at incredible prices! Would you like to use our patterns for other than personal use? You can read what you are allowed to do in the Copyright text at the bottom of all our patterns. Happy crafting!
Post a comment to pattern DROPS 69-26
We would love to hear what you have to say about this pattern!
If you want to leave a question, please make sure you select the correct category in the form below, to speed up the answering process. Required fields are marked *.