
Popular categories
Looking for a yarn?


Comments / Questions (7)
![]() Marie wrote:
Marie wrote:
Ni svarade mig, men jag förstod ingenting. Använder ni inte svenska förstår jag inte.
08.07.2024 - 18:27
![]() Marie wrote:
Marie wrote:
"När arb mäter 52-54-56-58 cm avm till hals genom att virka 1 varv med lm-bågar över endast 4-4-5-5 lm-bågar i varje sida (virka inte över de mittersta 5 bågarna)." Hur kommer man förbi de 5 mittersta bågarna? Luftmaskor eller smygmaskor?
05.07.2024 - 08:41DROPS Design answered:
Hei Marie. Når arb måler 52-54-56-58 cm felles det til hals ved å hekle 1 rad lm-buer over kun 4-4-5-5 lm-buer i hver side (det hekles ikke over de midterste 5 buene). Hekle da først en side i ca 2 cm, klipp tråden og så den andre siden i ca 2 cm. mvh DROPS Design
08.07.2024 - 12:50
![]() Anna Van Ham wrote:
Anna Van Ham wrote:
Ik snap niet hoe ik de mouwkop in de schouders gepast krijg. Nadat ik de voor en achterpanden aan elkaar gehaakt heb houd ik 28 boogjes over als armsgat, terwijl de mouwkop slechts 10 boogjes heeft.
28.06.2017 - 19:38DROPS Design answered:
Hoi Anna, Na het opzetten heb je inderdaad 10 boogjes op de mouw, maar na alle meerderingen voor de mouw heb je voor de kleinste maat (ik weet niet welke maat je maakt...) 14 boogjes op de toer en daarna ga je minderen voor de mouwkop, waardoor er een ronde vorm ontstaat en de totale lengte van de mouwkop (gemeten over de gehele ronding) komt ongeveer overeen met het armsgat en heeft duz ook ongeveer evenveel boogjes als het armsgat.
29.06.2017 - 20:20
![]() Louisa Johnsson wrote:
Louisa Johnsson wrote:
Hej! Är så sugen på att försöka mig på denna fina kofta men kan inte komma på vad "kjm" står för i diagrammet! Tacksam för hjälp!
08.01.2014 - 19:31DROPS Design answered:
Hej Det är detsamma som smygmaska. Lycka till!
09.01.2014 - 14:49
![]() Steph wrote:
Steph wrote:
I don't understand how to make the loop increases.
21.09.2012 - 19:37DROPS Design answered:
Dear Steph, to inc 1 loop each side you have to crochet like this : ch 8, 1 sc in first ch-loop, ch 7, sc in same ch-loop, *ch 7, 1 sc in the next ch-loop *, repeat from * - * across to last 2 ch-loops, (sc, ch7, sc) in next ch-loop, ch7 sc in last ch-loop, turn. Happy Crocheting !
13.11.2012 - 10:45
![]() Drops Design France wrote:
Drops Design France wrote:
Bonjour Jahna, je suis désolée, Les explications en français sont conformes au modèle original et le gilet a déjà été réalisé avec succès. N'hésitez pas à demander de l'aide à votre revendeur, il pourra vous aider.
14.02.2011 - 10:23Jahna P wrote:
Ce modèle n'est pas réalisable. J'ai tenter de toutes la manière possible et j'ai demander également de l'aide. Les explications sont très mal traduite :(
13.02.2011 - 16:46
|
||||||||||
Chocolate Waffle Cone |
||||||||||
|
|
||||||||||
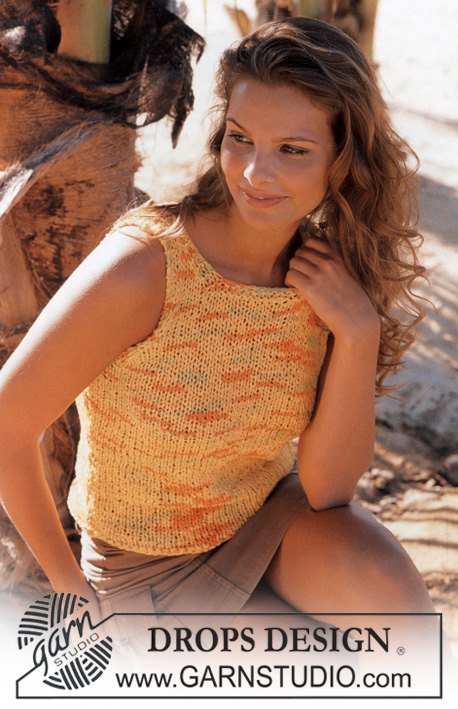
DROPS Crocheted Cardigan in Vivaldi.
DROPS 82-21 |
||||||||||
|
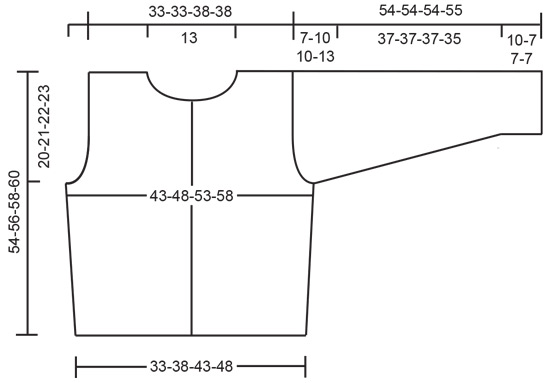
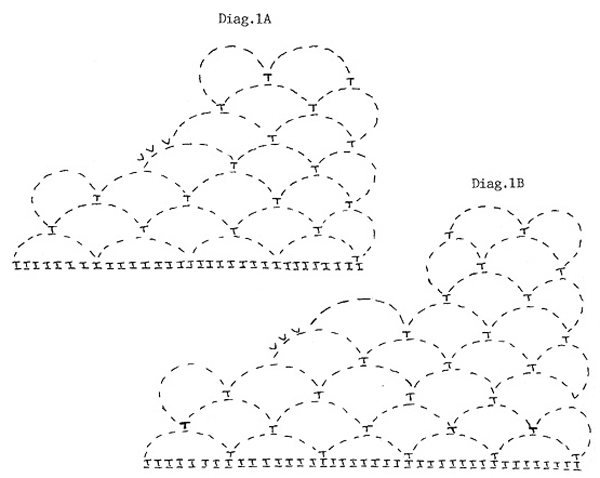
Crochet gauge: 4 ch-loops wide and 6 rows = 10 x 10 cm. Crochet tips for binding off: See diagrams. Back: Ch 105-121-137-153, then crochet 1 sc in each ch (start in the 2nd ch from hook) = 104-120-136-152 sc, turn the work. Crochet the next row as follows: ch 8, skip over 7 sc, 1 sc in the next sc, * ch 7, skip over 7 sc, 1 sc in the next sc *, repeat from * - * = 13-15-17-19 ch-loops, turn the work. Then crochet as follows: ch 8, 1 sc in first ch-loop, * ch 7, 1 sc in the next ch-loop *, repeat from * - * across row and turn the work. Repeat this row. When the piece measures 12 cm inc at each side by crocheting 1 extra ch-loop in the next to outermost ch-loop at each side. Repeat inc when the piece measures 24 cm = 17-19-21-23 ch-loops. When the piece measures 34-35-36-37 cm bind off for armhole as follows: Size XS/S: Crochet until 1 ch-loop remains, turn the work, sl st to the center of first ch-loop, continue with ch-loops and repeat bind off at the other side – follow diagr 1A. Size M + L: Follow bind off instructions for size XS/S1 time, turn piece and crochet back until 1 ch-loop remains, turn the work, continue with ch-loops and repeat bind off at the other side – follow diagr 1B. Size XL: Follow bind off instructions for size XS/S 2 times – follow diagr 1A 2 times. You have now bound off 2-3-3-4 ch-loops at each side = 13-13-15-15 ch-loops on row. Continue as before. When the piece measures 52-54-56-58 cm bind off for the neck by crocheting 1 row over only 4-4-5-5 ch-loops at each side (do not crochet over the center 5 ch-loops). Cut yarn, the piece measures approx. 54-56-58-60 cm. Right front: Ch 57-65-73-81, then crochet 1 sc in each ch (start in 2nd ch from hook) = 56-64-72-80 sc, turn the work. Crochet as on back = 7-8-9-10 ch-loops. When the piece measures 12 and 24 cm inc at the side as on back = 9-10-11-12 ch-loops. When the piece measures 34-35-36-37 cm bind off for armhole at side as on back = 7-7-8-8 ch-loops. When the piece measures 44-46-48-50 cm bind off for the neck by following armhole bind off instructions for size M + L 1 time = 4-4-5-5 ch-loops remain on shoulder. Continue until the piece measures 54-56-58-60 cm, cut yarn. Left front: Crochet the same as the right, reversing shaping. Sleeve: Ch 81-81-89-97, then crochets 1 sc in each ch (start in 2nd ch from hook) = 80-80-88-96 sc, turn the work. Then crochet as on Body = 10-10-11-12 ch-loops. After 6-4-4-4 rows of ch-loops (the piece measures approx. 10-7-7-7 cm) inc by crocheting 1 extra ch-loop in the next to outermost ch-loop at one side, crochet 6-4-4-4 rows and inc in the same manner on the other side. Repeat inc at each side 1-2-2-2 times more with 6-4-4-4 rows between each inc = 14-16-17-18 ch-loops on row. When the piece measures 47-44-44-42 cm bind off for sleeve cap by crocheting 4-6-6-8 rows with 1 ch-loop less at the end of each row. Cut yarn, the piece measures approx. 54-54-54-55 cm. Assembly: Crochet the shoulders together as follows: 1 sl st in first ch-loop on back, ch 4, 1 sc in first ch-loop on front, * ch 4, 1 sc in the next ch-loop on back, ch 4, 1 sc in the next ch-loop on front *, repeat from * - *. Crochet sleeve and side seams in the same manner. Then crochet the sleeves into the body in the same manner. Hood: Crochet approx. 14-18 ch-loops (with ch 7 in each loop as before) around the neck. On the next row inc evenly distributed (by crocheting 2 ch-loops in some of the ch-loops) to 20-22-22-22 ch-loops. Crochet ch-loops over all sts until piece measures approx. 30-34 cm, fold hood in half and crochet together at top in the same manner as shoulder. Cord: Make 2 cords to tie together at front. 1 cord = cut 3 strands each 2 meters long, twist together until tight, fold in half and let it twist up on itself. Tie a knot in each end. The cord will be approx. 60 cm long. Fasten one cord approx. 1 row under neckband and the other approx. 15 cm lower – tie cords around a ch-loop on one front. Tie the cords to the same ch-loop on the other front when worn. |
||||||||||
Diagram explanations |
||||||||||
|
||||||||||
 |
||||||||||
 |
||||||||||
Have you finished this pattern?Tag your pictures with #dropspattern or submit them to the #dropsfan gallery. Do you need help with this pattern?You'll find 4 tutorial videos, a Comments/Questions area and more by visiting the pattern on garnstudio.com. © 1982-2026 DROPS Design A/S. We reserve all rights. This document, including all its sub-sections, has copyrights. Read more about what you can do with our patterns at the bottom of each pattern on our site. |
||||||||||


With over 40 years in knitting and crochet design, DROPS Design offers one of the most extensive collections of free patterns on the internet - translated to 17 languages. As of today we count 325 catalogs and 12298 patterns - 12288 of which are translated into English (US/in).
We work hard to bring you the best knitting and crochet have to offer, inspiration and advice as well as great quality yarns at incredible prices! Would you like to use our patterns for other than personal use? You can read what you are allowed to do in the Copyright text at the bottom of all our patterns. Happy crafting!
Post a comment to pattern DROPS 82-21
We would love to hear what you have to say about this pattern!
If you want to leave a question, please make sure you select the correct category in the form below, to speed up the answering process. Required fields are marked *.