
Popular categories
Looking for a yarn?


Comments / Questions (4)
![]() Gabriela wrote:
Gabriela wrote:
Buenas noches una consulta tenemos las 2 partes del circulo, trabajamos 1 ovoide y tomamos 1 punto de cada lado del otro ovoide que esta en 3 agujas aux cuando tenemos 86 puntos de un ovoide, dejamos los puntos restantes del otro ovoide en espera para el escote. Gracias de antemano
03.04.2023 - 05:43DROPS Design answered:
Hola Gabriela, sí, es correcto.
10.04.2023 - 17:29
![]() Kathy wrote:
Kathy wrote:
Hallo! Ich habe eine Frage zur Größe XXL: im Abschnitt ...in dieser Weise (in Glattstr.) stricken: *3M stricken danach diese M auf 1 Hilfsfaden legen (Faden-2), die restlichen M auf der Ndl stricken, die Arbeit wenden, 3M stricken..... Wenn man das noch 5x wiederholt ergibt das 36 M. Danach soll man noch jeweils 4 M (also insges. 8M) auf Faden 2 und Faden 3 legen. Das wären dann 44 M. Ich verstehe daher nicht wie man auf 26 M kommen soll.
26.06.2018 - 17:12DROPS Design answered:
Liebe Kathy, zuerst werden insgesamt 6 Mal 3 Maschen auf beiden Seiten auf 1 Hilfsnadel gelegt (= 6 x 3 M = 18 M auf beiden Seiten), dann stricken Sie noch 4 Reihe aber jetzt legen Sie 4 M auf beiden Seiten = es werden 2 x 4 M auf beiden Seiten gelegt: 18+8= 26 M sind jetzt auf jedem Hilfsnadel. Viel Spaß beim stricken!
27.06.2018 - 08:17
![]() Mona wrote:
Mona wrote:
Drops 82-8
31.03.2014 - 14:34Johane wrote:
Bonjour. j'apprecie beaucoup votre site. j'ai decele 2 erreurs jusqu'a present durant mon tricot. dans vos explications du cercle. taille XL devrait se lire: arreter ici, sauter les rangs 21 a 22. Plus loin on lit: Tricoter ensuite 4 rangs de plus de la même façon, mais mettre cette fois 4 m de chaque côté en attente sur les arrêts de mailles 2 et 4. on devrait lire: les arrets de mailles 2 et 3.
23.12.2012 - 04:36DROPS Design answered:
Bonjour Johane et merci, ces 2 erreurs ont été corrigées. Bon tricot !
24.12.2012 - 16:06
|
|
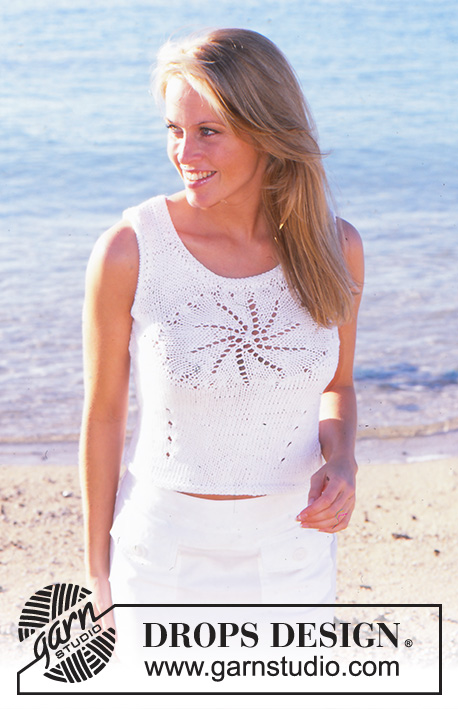
Starburst |
|
 |
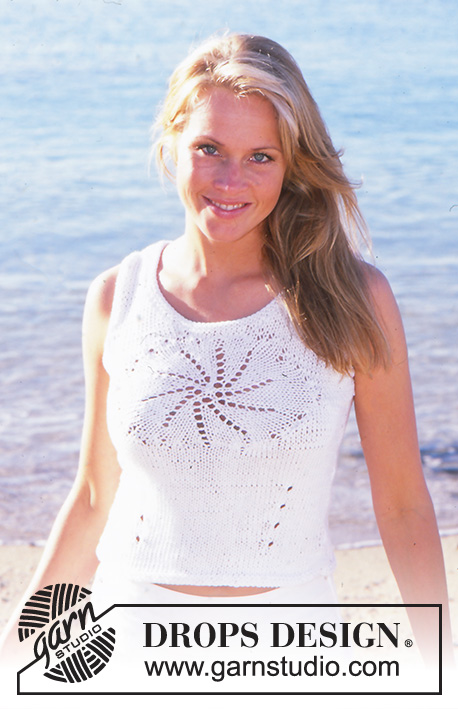 |
DROPS Top in Paris.
DROPS 82-7 |
|
|
Gauge: 17 sts x 22 rows in stockinette st = 10 x 10 cm Knitting tip: To «knit in» the st from the st holder every other row, just put the st onto the needle and knit as the first st of the next row. Front: Start at the center of the circle and knit out. Circle: Cast on 5 sts and divide them onto 4 double-pointed needles; join and place a marker at the join. Row 1 (and all odd-numbered rows): knit. Row 2: * K 1, yo *, repeat * - * = 10 sts. Row 4: * K 1, yo *, repeat * - * = 20 sts. Row 6: * K 2, yo *, repeat * - * = 30 sts. Row 8: * K 3, yo *, repeat * - * = 40 sts. Row 10: * K 4, yo *, repeat * - * = 50 sts. Row 12: * K 5, yo *, repeat * - * = 60 sts. Row 14: * K 6, yo *, repeat * - * = 70 sts. Size S ends here. Skip rows 15-22. Row 16: * K 7, yo *, repeat * - * = 80 sts. Size M ends here. Skip rows 17-22. Row 18: * K 8, yo *, repeat * - * = 90 sts. Size L ends here. Skip rows 19-22. Row 20: * K 9, yo *, repeat * - * = 100 sts. Size XL ends here. Skip rows 21-22. Row 22: * K 10, yo *, repeat * - * = 110 sts. Size XXL ends here. All sizes: Knit 1 row. Put 1 marker at the beginning of the row and 1 marker after 35-40-45-50-55 sts. The circle measures approx. 13-15-16-18-20 cm in diameter. Now continue over only the sts along one half of the circle so that it will appear to be an oval, the other half (= 35-40-45-50-55 sts) put on a st holder (= st holder-1). Knit as follows (in stockinette st): * knit 3 sts, put them then on a st holder (= st holder-2), knit the remaining sts, turn the work, knit 3 sts and put them on a st holder (= st holder-3), knit across row, turn the work *, repeat from * - * 1-2-3-4-5 times more. Then knit 4 rows more in the same manner, but now put 4 sts at each side on st holder-2 and st holder-3. After this is complete there are 14-17-20-23-26 sts on st holder-2 and st holder-3, knit 1 row over the remaining 7-6-5-4-3 sts and put them on one of the st holders. Put the sts from st holder-1 back on needles and knit in the same manner as the other side of the circle. Put all sts back on a short circular needle and knit 1 row, at the same time picking up 1 st between each place where the sts divide the circle in two – pull up a loop between sts and twist and knit the st = 86-100-114-128-142 sts. The oval measures approx. 22-26-29-33-36 cm wide. Put the last 6-6-7-7-8 + the first 6-6-7-7-8 sts on needles on a st holder for neckband (start row at center of one long side of oval). Divide the remaining sts in three parts and put on st holders as follows: 16-19-22-25-28 sts = st holder-1, 42-50-56-64-70 sts = st holder-2, 16-19-22-25-28 sts = st holder-3. Now knit one side of bodice at a time and then the lower part of front. Right side of bodice (as when you are looking at the piece): Cast on 13-13-13-14-14 sts and knit stockinette st (measure the piece from cast-on edge) – at the same time add in sts from st holder-3 (start at right side of st holder) every other row – see Knitting tip: 1 st 2 times, 2 sts 2-2-3-3-3 times, 3 sts 2-3-3-4-5 times and then the remaining 4-4-5-5-5 sts. At the same time when the piece measures 3.5-4.5-5-6-7 cm bind off at side for armhole every other row: 4 sts 1-1-1-2-2 times, 2 sts 1-2-3-3-4 times and 1 st 4-4-5-4-5 times. After all armhole shaping and all sts from st holder-3 are added, there are 19-20-20-21-21 sts on the needles. Now bind off for the neck every other row: 2 sts 2 times and 1 st 6 times = 9-10-10-11-11 sts remain on shoulder. When the piece measures 21-23-24-26-28 cm (from cast-on edge) bind off all sts. Left bodice: Knit the same as the right side but knit in sts from st holder-1, and start at left side of st holder. Lower part of front: Pick up 1 st in each of the 13-13-13-14-14 sts at on one side of the circle. Knit stockinette st and at the same time knit in sts from st holder-2 as follows – see Knitting tip: 1 st 2-1-1-1-1 time, 2 sts 3-4-5-5-5 times, 3 sts 1-2-2-3-4 times and 4 sts 1 time = 28-32-34-38-41 sts. Put sts on a st holder. Repeat on the other side of circle. Then put all sts from lower edge on the same needle as follows: 28-32-34-38-41 sts from one side, the remaining 12-12-14-16-16 sts from st holder-2 and 28-32-34-38-41 sts from the other side = 68-76-82-92-98 sts. Measure the work from here. Place a marker 16-17-18-19-20 sts in from each side. Knit stockinette st. When the piece measures 5 cm knit the next row as follows: * knit to the first marker, yo, slip 1 as if to knit, K 2 tog, psso, knit to 3 sts before the next marker, K 3 tog, yo, knit to end of row *. Repeat from * - * every 6 rows 3 times more so that there will be 4 holes = 60-68-74-84-90 sts. Continue in stockinette st until the piece measures 47-49-51-53-55 cm. Then knit 4 rows garter st and bind off all sts. Back: Cast on 60-68-74-84-90 sts. Knit 4 rows garter st, then knit stockinette st to finished measurements. When the piece measures 10 cm inc 1 st at each side every 4.5 cm 5-4-5-4-5 times = 70-76-84-92-100 sts. When the piece measures 31-32-33-34-35 cm bind off for armhole at each side every other row: 4 sts 1-1-1-2-2 times, 2 sts 1-2-3-3-4 times and 1 st 4-4-5-4-5 times = 50-52-54-56-58 sts. When the piece measures 46-48-50-52-54 cm bind off the center 28-28-30-30-32 sts for the neck. Then bind off 2 sts at each neck edge on the next row = 9-10-10-11-11 sts remain on each shoulder. Bind off when the piece measures 48-50-52-54-56 cm. Assembly: Sew shoulder seams. Sew side seams inside of 1 edge sts. Armhole edge: Pick up approx. 65-85 sts around armhole on short circular needle. Join and knit 4 rows stockinette st, bind off. Fold edge to wrong side and sew in place to picked up sts. Repeat around the other armhole. Neckband: Pick up approx. 90-105 sts around the neck (incl. sts on st holder) on short circular needle. Join and knit 4 rows garter st, bind off. |
|
 |
|
Have you finished this pattern?Tag your pictures with #dropspattern or submit them to the #dropsfan gallery. Do you need help with this pattern?You'll find 18 tutorial videos, a Comments/Questions area and more by visiting the pattern on garnstudio.com. © 1982-2026 DROPS Design A/S. We reserve all rights. This document, including all its sub-sections, has copyrights. Read more about what you can do with our patterns at the bottom of each pattern on our site. |
|


With over 40 years in knitting and crochet design, DROPS Design offers one of the most extensive collections of free patterns on the internet - translated to 17 languages. As of today we count 324 catalogs and 12290 patterns - 12280 of which are translated into English (US/in).
We work hard to bring you the best knitting and crochet have to offer, inspiration and advice as well as great quality yarns at incredible prices! Would you like to use our patterns for other than personal use? You can read what you are allowed to do in the Copyright text at the bottom of all our patterns. Happy crafting!
Post a comment to pattern DROPS 82-7
We would love to hear what you have to say about this pattern!
If you want to leave a question, please make sure you select the correct category in the form below, to speed up the answering process. Required fields are marked *.