
Looking for a yarn?


Comments / Questions (12)
![]() Mia wrote:
Mia wrote:
Jeg forsøker å strikke denne genseren til en mann på 1.80, men det ser ut som vrangborden nederst på bolen blir altfor liten. Jeg strikker str L i Karisma. Finnes det noen mål på hvor stor vranborden burde være?
15.11.2024 - 15:28DROPS Design answered:
Hei Mia, I oppskriften står det at vrangborden skal være 5 cm. Dette er selvfølgelig justerbar og du kan strikke til den høyden du selv ønsker . God fornøyelse!
19.11.2024 - 11:02
![]() Karin Dekker wrote:
Karin Dekker wrote:
I think there is an error in the sleeve pattern. There should be increases of two stitches every 3 or 4th row. It does not add up otherwise.
31.10.2024 - 10:03
![]() Karin wrote:
Karin wrote:
Hej! När ska jag börja minska för vaden på sockorna, när de mäter 30 cm från början av resåren eller med resåren nedvikt? Och ska man då börja med diagram M2 mitt bak istället för M1 eller hur får man ihop det där? Tacksam för svar. Hälsningar Karin
13.01.2024 - 21:59DROPS Design answered:
Hej Karin, Når arbejdet måler 30 cm, ja från början av resåren, minskar du i M.1 på varje sida om M.3
16.01.2024 - 14:06
![]() Ulla-Maria wrote:
Ulla-Maria wrote:
Det står att mönstret till koftan är separat. Vart finns det mönstret? Maskantalet är det samma på small/medium och medium/large på både herr och dam storleken. Om jag vill sticka en kofta i herr medium hur många maskor ska jag då lägga upp? Tack på förhand?
20.02.2021 - 18:02DROPS Design answered:
Hej Ulla-Maria. Nu finns beskrivning för koftan även på den svenska översättningen. De två första numren är för dam och de två sista för herr så det ser ut som om maskantalet som läggs upp är samma för dam och herr men att det sedan skiljer dig i hur långt man ska sticka i de olika delarna. Mvh DROPS Design
22.02.2021 - 11:15
![]() Jacquie Samples wrote:
Jacquie Samples wrote:
You list 2 different size circular needles, one for each yarn suggested, but there is only one size of double-pointed mentioned in the pattern for ribbing, 2.5 mm. If I am using the larger gauge yarn, what size needle do you recommend for the ribbing?
05.07.2014 - 21:51DROPS Design answered:
Dear Mrs Samples, both alternatives are worked with needle size 2.5 mm for ribbing wether you use Karisma (21 sts for 10 cm) or Alpaca (23 sts for 10 cm). Happy knitting!
07.07.2014 - 09:08
![]() Georgette wrote:
Georgette wrote:
Ik mis het telpatroon M 1 , van de ster.
23.01.2014 - 12:32DROPS Design answered:
Hoi Georgette. Het is toegevoegd. Druk eventueel op F5 (vernieuwen) als het er nog niet op staat.
23.01.2014 - 12:41Ellisillus wrote:
Sorry to say, but in the diagram the total body width is missing (it's just the width of the neckhole which is mentioned). Thank you for inserting it!
09.11.2013 - 15:28DROPS Design answered:
Dear Ellisillus, you can calculate the required measurements on the basis of the number of sts for your size and nber of sts for 10 cm. For example for Jacket, size S: (240sts x 10) divided by 23 = 104.5 /2= approx. 52 cm width (flat). Happy knitting!
12.11.2013 - 11:25
![]() Anette wrote:
Anette wrote:
Hei igjen Vi sitter nå å prøver og finne ut av oppskriften, men syns størrelsen kommer frem litt uklart. Slik vi oppfatter det er det er samme maskeantall på dame og herre. Jeg skal ha en genser i medium-dame og lurer på maskeantallet. Overvidden er målt til 110 cm, og lengden fra armhulen er 35 + 5 til vrangbord. Venter på svar. Mvh Anette
17.11.2012 - 21:22DROPS Design answered:
Ja, der er samme maskeantal. Men damemodellen er genseren og herremodellen er jakken. Hvis du gaar ud fra den rette strikkefasthed med Karisma (p 4), saa er vidden efter vrbord 114 cm i small/medium
20.11.2012 - 13:03
![]() Anette wrote:
Anette wrote:
Hei Hvilken garnmengde tilsvarer medium i dame på genseren ?
14.11.2012 - 15:02DROPS Design answered:
Der skal du tage garnmengde nr. to: 600 gr grå og 350 gr natur.
14.11.2012 - 17:27
![]() Drops Design wrote:
Drops Design wrote:
Hvis du dividerer maskeantal med strikkefasthed så får du målet i cm. God fornøjelse! 240m/2,1 = 114 cm i omkreds
15.04.2009 - 11:02
|
|||||||
Lit by Stars |
|||||||
 |
 |
||||||
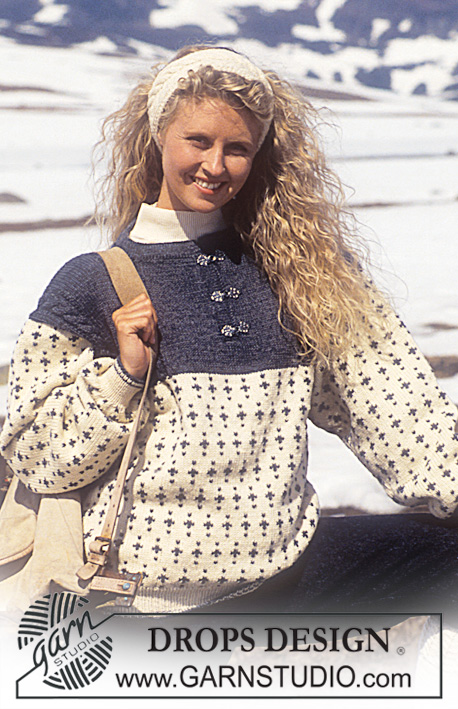
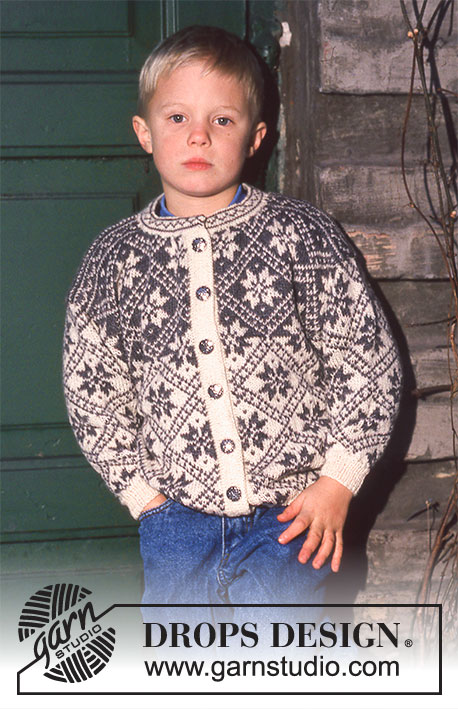
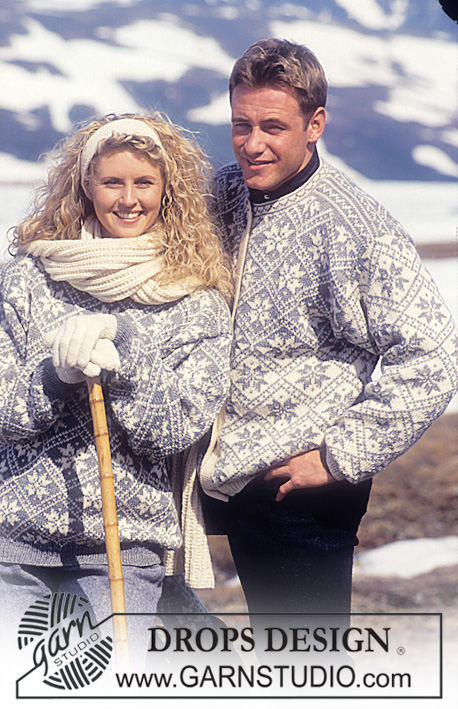
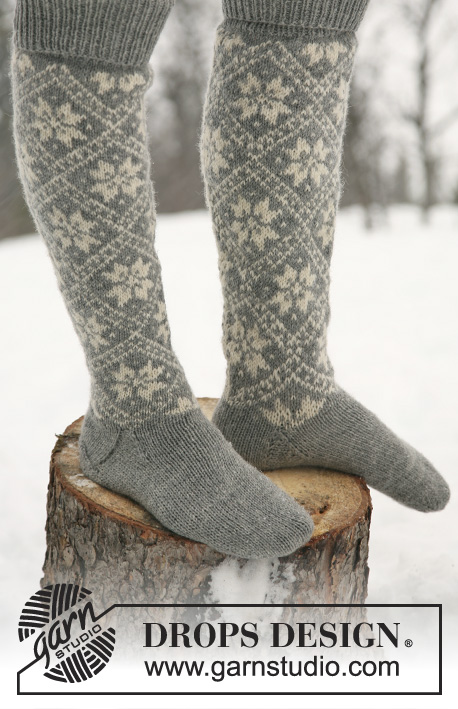
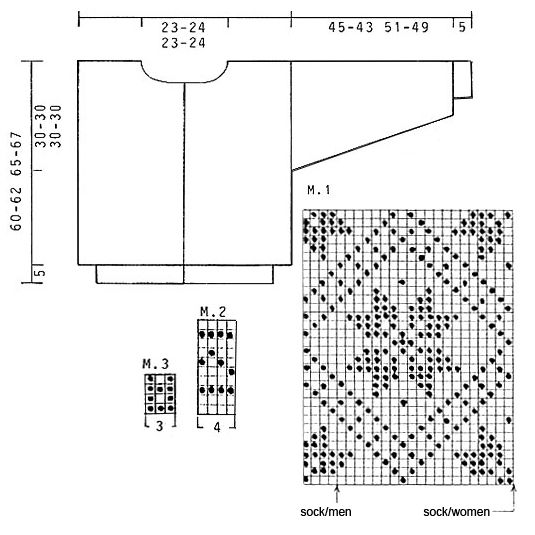
DROPS Sweater or Jacket for men with stars in squares. Head band and socks.
DROPS 32-4 |
|||||||
|
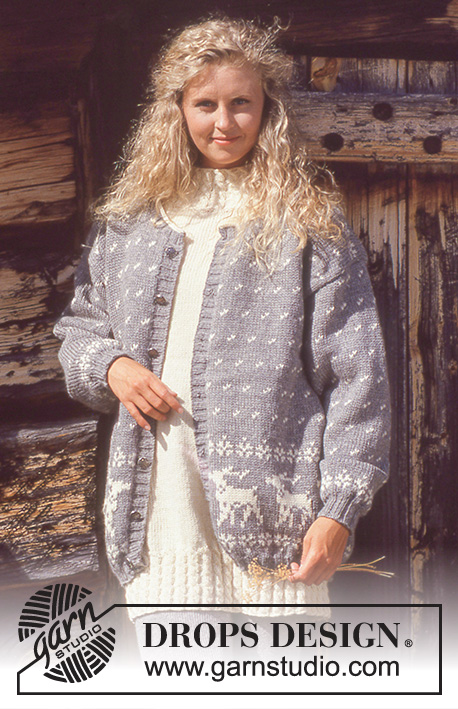
Knitting gauge - Karisma: 21 sts x 26 rows on needle size 4 mm / US 6 and pattern = 4" x 4" (10 x 10 cm) Knitting gauge - Alpaca: 23 sts x 30 rows on needle size 3.5 mm / US 4 and pattern = 4" x 4" (10 x 10 cm) Pattern: Knit entire pattern in stockinette sts. Diagrams are seen from RS. Rib: * K1, P1 * Edge: Knit 3 cm / 1" stockinette sts, P1 round (= folding edge), 3 cm / 1" stockinette sts. ____________________________________________________________________ Jacket body: Knit jacket in the round on circular needles after ridges and cut up for armholes and mid front when knitting is completed. Figures in ( ) = Alpaca. Cast on 198-206 198-206 (232-240 232-240) sts on circular needle size 2.5 (2.5) mm and knit 5 cm / 2" Rib back and forth on needle. Change to circular needle size 4 (3.5) mm at the same time inc 5 sts mid front (these sts are for cutting afterward and should not be knit into the pattern) knit 1 round stockinette sts at the same time inc 42-58 42-58 (32-48 32-48) sts evenly on 1st row = 240-264 240-264 (264-288 264-288) sts. Continuing work M.1. Remember knitting gauge. At the same time when piece measures 30-32 35-37 (30-32 35-37) cm inc 5 sts on each side (these sts are for cutting later and are not knit into pattern). At the same time when piece measures 30-32 35-37 (30-32 35-37) cm (after half a star) change pattern color gray = off white and off white = gray. When piece measures 56-58 61-63 (56-58 61-63) cm bind off 38-40 38-40 (42-44 42-44) sts (+5 sts) mid front for neckline and complete piece knitting back and forth on needle. Now knit M.2 and then complete with gray – at the same time bind off at neckline on every other row: 2 sts 2 times, 1 sts 1 times – At the same time when piece measures 59-61 64-66 (59-61 64-66) cm bind off middle 44-46 44-46 (48-50 48-50) sts mid back for neck and on next row bind off 2 sts at neckline on each side. Bind off when piece measures 60-62 65-67 (60-62 65-67) cm Sweater body: Knit sweater on circular needles and cut up for armhole afterward. Figures in ( ) = Alpaca. Cast on 188-196 188-196 (222-230 222-230) sts with gray on circular needle size 2.5 mm / US 1.5 and knit 5 cm / 2" rib. Change to circular needle size 4 (3.5) mm at the same time inc 52-68 52-68 (41-58 42-58) sts evenly on 1st row = 240-264 240-264 (264-288 264-288) sts. Continuing work M.1: Remember knitting gauge. At the same time when piece measures 30-32 35-37 (30-32 35-37) cm inc 5 sts on each side (these sts are for cutting later and are not knit into pattern). When piece measures 56-58 61-63 (56-58 61-63) cm bind off 38-40 38-40 (42-44 42-44) sts mid front for neckline and complete piece knitting back and forth on needle. Now knit M.2 and then complete with gray – at the same time bind off at neckline on every other row: 2 sts 2 times, 1 sts 1 times – At the same time when piece measures 59-61 64-66 (59-61 64-66) cm bind off middle 44-46 44-46 (48-50 48-50) sts mid back for neck and on next row bind off 2 sts at neckline on each side. Bind off when piece measures 60-62 65-67 (60-62 65-67) cm Sweater and Jacket - Sleeve: Cast on 48-50-50 (54-58 54-58) sts on double pointed needles size 2.5 mm / US 1.5 with same color as body and knit 5 cm / 2" rib. Change to double pointed needles size 4 (3.5) mm and M.1 (place one pattern repeat mid sleeve) at the same time inc 12-12 10-12 (14-10 14-10) sts evenly on 1st row = 60-62 60-62 (68-68 68-68) sts. At the same time inc mid under arm on each side of middle sts, 1 sts 33-32 33-32 (35-36 35-36) on: Karisma Lady: every 3rd row. Karisma Gent: alternating every * 3rd and 4th row * Alpaca Lady S/M + Gent M/L: alternating every * 3rd and 4th row * Alpaca Lady M/L: every 3rd row Alpaca Gent S/M: every 4th row = 126-126 126-126 (138-140 138-140) sts. When piece measures 50-48 56-54 (50-48 56-54) cm knit 2 cm / ¾" stockinette sts with WS out for edge over cutting edge of body. Bind off. Sweater and Jacket Assembly: Sew in a marking thread down in middle of inc sts on each side (+ mid front on jacket). Sew two seams on sewing machine around marking threads, 1st seam = 1/2 sts from 1st st from thread, 2nd seam = 1/2 sts from 1st seam at armhole. Cut up for armhole (+ mid front at jacket). Sew shoulder seams. Jacket: Pick up approx 110 (120) sts along left front band on needle size 2.5 mm / US 1.5 with off white and knit Edge, bind off and fold edge double towards WS of cutting edge on body and sew. Repeat along right but after 1 cm / ⅜" bind off 5 buttonhole evenly on row - 1 buttonhole = bind off 2 sts, cast on 2 new sts on next row. Neckline Jacket: Pick up approx 108 (116) sts around neck line on double pointed needles size 2.5 mm / US 1.5 and knit M.2, P1 round, 9 rounds stockinette sts, bind off, fold edge double towards WS and sew. Sweater neck: Pick up approx 104 (112) sts around neckline on circular needle size 2.5 mm / US 1.5 with gray and knit 2.5 cm / ⅞" Edge in stead of 3 cm / 1", bind off and fold edge double towards WS and sew. Sew sleeves onto body from RS as follows: Sew alternating 1 sts in last garter st round of sleeve before folding edge and 1 sts on body after machine seam. Turn WS out on sweater and sew folding edge from sleeves over cutting edge onto body by hand. Sew in buttons. ________________________________________ Socks: Size: Length: 62 (65) cm. Foot: 23 (26) cm. Materials: DROPS Karisma Superwash from Garnstudio 250-250 250-250 g color no 21, gray 50- 50 50- 50 g color no 1, off white Double pointed needles 2.5 and 3 mm / US 1.5 and 2.5 Knitting gauge: 22 sts x 32 rows on needle size 3 mm / US 2.5 and stockinette sts = 4" x 4" (10 x 10 cm) Rib: * K1, P1 * Dec.tips: *slip next sts loosely, K1 (WS = P1), psso * Heel: 1st row: (RS) Knit until 6 (7) sts rem on row. Turn piece. 2nd row: (WS) Knit until 6 (7) sts rem on row. Turn piece. 3rd row: Knit until 8 sts rem on row, dec 1 st (see explanation). Turn piece. 4th row: Knit until 8 sts rem on row, dec 1 st, turn piece. Then continue knitting so 1 st less on each side before dec 1 st. Continue until 12 (14) sts remains. SOCK Cast on 72 (80) sts on double pointed needles size 2.5 mm / US 1.5 with gray and knit 14 (16) cm Rib. Change to double pointed needles size 3 mm / US 2.5 and knit 2 rounds stockinette sts at the same time inc 4 (4) sts evenly on 1st row = 76 (84) sts. Work M.1. 73 (81) sts of M.1 (start at arrow), M.3 (M.3 = mid back). When piece measures 30 (32) cm begin dec for leg. Dec each side of M.3. Knit 2 sts before M.3 tog (see explanation of dec above) and K2 sts tog after M.3 – repeat on every 5th row (4th row) 14 (16) times in total = 48 (52) sts. When piece measures 54 (56) cm adjust to pattern, slip middle 24 (26) sts on front onto a thread or stitch holder and complete with gray. Then knit 5 (6) cm stockinette sts (heel) over the 24 (26) middle sts back, and then knit heel (see explanation above). Then pick up 12 (13) sts on each side of heel and slip all sts on same needle = 60 (66) sts. Dec continuing as follows: K2 first of uppermost 24 (26) sts tog and last 2 sts af uppermost 24 (26) sts tog on every other row 6 times in total = 48 (54) sts. Knit until foot measures approx 19 (21.5) cm. Insert a marker on each side of foot and dec for toe on each side of marker as follows: K2 sts before tog and K2 sts after tog, repeat 3 times on every other row = 36 (42) sts. Then 7 (9) times on every row = 8 (6) sts. Pull sts tog and sew away thread well. ________________________________________ Head band: Materials: DROPS Karisma from Garnstudio 50-50 50-50 g color no 1, off white Cast on 120 (126) sts on double pointed needles size 2.5 mm / US 1.5 with off white and knit 16 rounds stockinette sts, P1 round, 20 rounds stockinette sts, P1 round, 2 rounds stockinette sts, bind off. Sew edges and bind off edge tog with mattress sts in outermost sts to avoid a thick seam. |
|||||||
Diagram explanations |
|||||||
|
|||||||
 |
|||||||
Have you finished this pattern?Tag your pictures with #dropspattern or submit them to the #dropsfan gallery. Do you need help with this pattern?You'll find 32 tutorial videos, a Comments/Questions area and more by visiting the pattern on garnstudio.com. © 1982-2026 DROPS Design A/S. We reserve all rights. This document, including all its sub-sections, has copyrights. Read more about what you can do with our patterns at the bottom of each pattern on our site. |
|||||||

With over 40 years in knitting and crochet design, DROPS Design offers one of the most extensive collections of free patterns on the internet - translated to 17 languages. As of today we count 320 catalogs and 12106 patterns - 12096 of which are translated into English (US/in).
We work hard to bring you the best knitting and crochet have to offer, inspiration and advice as well as great quality yarns at incredible prices! Would you like to use our patterns for other than personal use? You can read what you are allowed to do in the Copyright text at the bottom of all our patterns. Happy crafting!
Post a comment to pattern DROPS 32-4
We would love to hear what you have to say about this pattern!
If you want to leave a question, please make sure you select the correct category in the form below, to speed up the answering process. Required fields are marked *.