
Categorie popolari
State cercando un filato?


Commenti / Domande (37)
![]() April Stevenson ha scritto:
April Stevenson ha scritto:
Ok so this is a clarification question about the head of the chicken. I understand moving the st marker 12 st ahead before you reach your last stitch. So when you crochet 12 st it reach your new stitch marker spot do you slip stitch into the first stitch on the left the start of the 24 st to create a circle that you work upwards?
15.11.2024 - 20:53DROPS Design ha risposto:
Dear April, you move the marker 12 stitches back, so you will have 12 stitches between the marker and the stitch where you stop (which would be the mid-front of the head). Then, from there, without cutting the thread, work 12 more stitches. The 12 stitches from before + the new 12 stitches = 24 stitches, so now you have the 24 stitches of the head. Then join the round simply with a dc in the stitch with the marker (first stitch of the head) and continue working as indicated over the 24 stitches. Happy crochetting!
17.11.2024 - 20:52
![]() Raquel ha scritto:
Raquel ha scritto:
Cuanto debería medir la pieza desde el centro de la labor (vuelta 1) hasta la última vuelta del cuerpo antes de empezar a hacer la cabeza?
30.10.2024 - 01:10DROPS Design ha risposto:
Hola Raquel, la altura de la labor antes de empezar la cabeza serían 16cm. La base de la pieza son 20 cm de diámetro (desde el centro 10cm). Así que deberías tener 10 cm de media base (plana) y 16 cm de altura.
03.11.2024 - 13:03
![]() Betsy ha scritto:
Betsy ha scritto:
Thank you for this adorable hen pattern. I just finished my first one ( love it so much I want to make another ) I had no trouble following the pattern. I added wattles and gave her white tail feathers.
24.10.2024 - 17:08
![]() Marion Nijman ha scritto:
Marion Nijman ha scritto:
Hallo ik ben nu bij de kop maar snap niet hoe het verder moet ik. Weer niet hoe dat zit met die 24 vasten ik kom op 12 vasten ., ik denk dat er nu rond gehaakt moet worden klopt dat verder bedankt alvast groetjes marion nijman
02.04.2024 - 12:02DROPS Design ha risposto:
Dag Marion,
Op midden voor van de kop zit de markeerder en aan beide kanten daarvan zitten 12 vasten waarover je de kop in de rondte haakt.
03.04.2024 - 20:26
![]() Sandra ha scritto:
Sandra ha scritto:
Hej! Ska de 16 centimetrarna mätas från mitten eller från sista varvet med ökning? Mvh Sandra
06.03.2024 - 10:39DROPS Design ha risposto:
Hei Sandra. Fra siste omgang med økninger. Omgang 1. til 21. med økninger er bunnen, høyden på høna blir da fra siste omgang med økninger. mvh DROPS Design
11.03.2024 - 10:10
![]() Brandie Stewart ha scritto:
Brandie Stewart ha scritto:
I am having a hard time working the head portion of this pattern. When starting the head, it's a new round, I move my stitch marker from its og spot to 12 SC over, then do I start from that marker and crochet 12 more SC then SC in each of those making a 14 count? Or do crochet 12 SC into the last 12 SC to make it stacked?
15.02.2024 - 20:18DROPS Design ha risposto:
Dear Mrs Stewart, the marker is inserted into the 12th sc before the end of the round, now work 1 sc in each of the next 12 sc = the first 12 sc at the beginning of the round and join now in the round working 1 sc in the stitch with the marker = there are 24 sc for head: 12 before marker + 12 after marker. Happy crocheting!
16.02.2024 - 07:44
![]() Ashleigh Cole ha scritto:
Ashleigh Cole ha scritto:
Hello, I’m making the body of the chicken and it more wide and narrow than the one on the picture. I did the same amount of stitches and everything it says in the body category, however, it is more than like a wide basket (a taco shape) than a bag (a u shape) I was wondering if you could tell me what I did wrong or how to fix it?
06.01.2024 - 03:26DROPS Design ha risposto:
Dear Ashleigh, firstly, if the shape is too different, it may be an issue with the gauge. Also, after finishing and assemblying the piece, you will shape as much as possible to your desired shape, so if it isn't finished yet then maybe that is the difference with the one in the photo. Happy crocheting!
08.01.2024 - 00:05
![]() Sandy ha scritto:
Sandy ha scritto:
I had asked the question about working the head of the pattern. My second message indicated that I still didn't understand even with your response. BUT, I figured it out! So happy for myself. LOVING this pattern now that I figured it out. So happy with the results so far. Thank you for your help!
17.03.2023 - 03:05
![]() Sandy ha scritto:
Sandy ha scritto:
Your response to my last question, unfortunately did not answer my question. Do you have a video tutorial for this pattern? I don't understand the directions for the head. It would be helpful for me to see a tutorial. I am not understanding what is meant by moving the market 12 stitches and then turning so the marker is toward me and then working in the round. I am very visual and I am just not getting how to work this step of the pattern. A video would be most helpful. Thank you.
17.03.2023 - 01:27DROPS Design ha risposto:
Dear Sandy, we don't have any video to that pattern sorry, the head is worked following the body part, at the end of the bordy, you moved the marker in the 12th stitch before the last stitch worked, for the head, you will now work 12 sts, these 12 sts + the 12 sts worked at the end of previous round are now a total of 24 sts and you will worke now these 24 stitches in the round, work now 1 st in each of the 24 sts starting with the first of the 12 sts worked at the end of previous round on body, and continue with 1 st in each st for 6 rounds. Hope it can help. Happy crocheting!
17.03.2023 - 08:53
![]() Sandy ha scritto:
Sandy ha scritto:
Is there a video to go with this pattern? It would be helpful to see what you mean with working the head part of the pattern. Thank you.
16.03.2023 - 04:29DROPS Design ha risposto:
Dear Sandy, you work bottom up starting from the bottom of piece, then you will when the basket is done, you will continue in the round over 24 sts only for the head of chicken. Can this help or did I misunderstand your question?
16.03.2023 - 09:14
|
|
Henny Penny#hennypennybasket |
|
 |
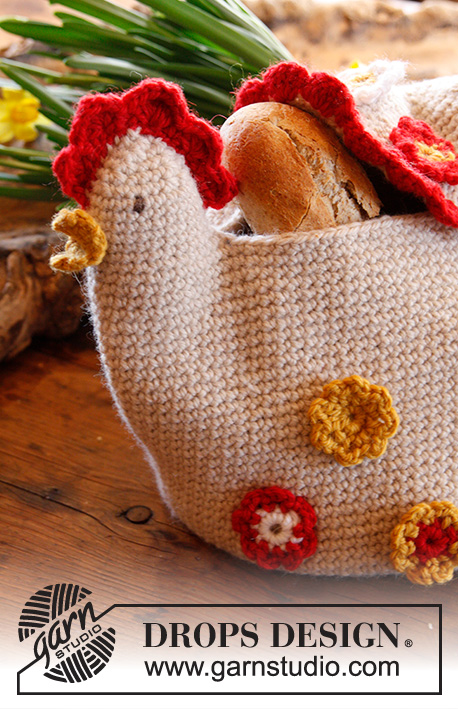 |
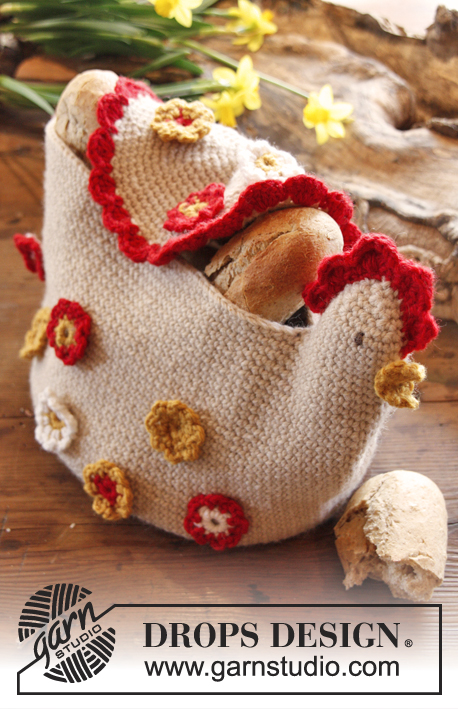
Pasqua DROPS: Cestino DROPS a forma di pollo, all’uncinetto, in "Nepal".
DROPS Extra 0-908 |
|
|
CERCHIO MAGICO: Quando si lavora in tondo, iniziare con questa tecnica (al posto dell’anello di cat) consente di evitare il buco al centro. Tenere l’estremità del filo e avvolgerlo attorno al dito indice per formare un anello. Tenere l’anello con il pollice e il medio della mano sinistra; mettere il filo sull’ indice della mano sinistra. Passare l’uncinetto attraverso l’anello, fare 1 gettato e far passare il filo attraverso l’anello, lavorare 1 cat, poi lavorare a m.b intorno all’anello. Una volta raggiunto il numero di m.b necessario, tirare l’estremità del filo per stringere l’anello. Fissare l’estremità del filo sul rovescio del lavoro. Proseguire a lavorare in tondo, a spirale. LAVORARE ALL’UNCINETTO IN TONDO, A SPIRALE: Dopo aver lavorato l’ultima m.b del giro, proseguire il giro successivo lavorando 1 m.b nella m.b successiva (= 1° m.b del giro precedente). ATTENZIONE: inserire un segno all’inizio del giro tra l’ultima m.b e la 1° m.b del giro; spostare il segno progressivamente verso l’alto, man mano che si procede con il lavoro. SUGGERIMENTO PER GLI AUMENTI: Aumentare 1 m lavorando 2 m.b nella m.b successiva. SUGGERIMENTO PER LE DIMINUZIONI: Diminuire 1 m.b lavorando 2 m.b insieme come segue: * puntare l’uncinetto nella m.b successiva, e prendere il filo * ripetere da *-* ancora 1 volta, fare un gettato e far passare il filo attraverso tutte e 3 m le m sull’uncinetto. -------------------------------------------------------- CESTINO: Si lavora in tondo, a spirale. Iniziare con un CERCHIO MAGICO - vedere le spiegazioni sopra - dalla parte inferiore del cestino, con il colore beige chiaro e l’uncinetto n° 4. GIRO 1: Lavorare 8 m.b nel cerchio magico. Vedere LAVORARE ALL’UNCINETTO IN TONDO, A SPIRALE sopra. GIRO 2: aumentare 1 m.b in ogni m.b - Vedere il SUGGERIMENTO PER GLI AUMENTI sopra = 16 m.b. GIRO 3: * 1 m.b nella m.b successiva, aumentare 1 m.b *, ripetere da *-* su tutto il giro = 24 m.b. GIRO 4: * 1 m.b in ognuna delle 2 m.b successive, aumentare 1 m.b *, ripetere da *-* su tutto il giro = 32 m.b. GIRO 5: * 1 m.b in ognuna delle 3 m.b successive, aumentare 1 m.b *, ripetere da *-* su tutto il giro = 40 m.b. GIRO 6 (e tutti i giri pari): Lavorare 1 m.b in ogni m.b. GIRO 7: * 1 m.b in ognuna delle 4 m.b successive, aumentare 1 m.b *, ripetere da *-* su tutto il giro = 48 m.b. GIRO 9: * 1 m.b in ognuna delle 5 m.b successive, aumentare 1 m.b *, ripetere da *-* su tutto il giro = 56 m.b. GIRO 11: * 1 m.b in ognuna delle 6 m.b successive, aumentare 1 m.b *, ripetere da *-* su tutto il giro = 64 m.b. GIRO 13: * 1 m.b in ognuna delle 7 m.b successive, aumentare 1 m.b *, ripetere da *-* su tutto il giro = 72 m.b. GIRO 15: * 1 m.b in ognuna delle 5 m.b successive, aumentare 1 m.b *, ripetere da *-* su tutto il giro = 84 m.b. GIRO 17: * 1 m.b in ognuna delle 6 m.b successive, aumentare 1 m.b *, ripetere da *-* su tutto il giro = 96 m.b. GIRO 19: * 1 m.b in ognuna delle 7 m.b successive, aumentare 1 m.b *, ripetere da *-* su tutto il giro = 108 m.b. GIRO 21: * 1 m.b in ognuna delle 8 m.b successive, aumentare 1 m.b *, ripetere da *-* su tutto il giro = 120 m.b. Lavorare ora 1 m.b in ogni m.b finché il cestino non misura ca.16 cm in verticale. Dopo aver lavorato l’ ultima m.b dell’ultimo giro, spostare il segno nella 12° m.b dall’uncinetto (a destra dell’ultima m.b, alla fine del giro = centro della testa). Non tagliare il filo. TESTA: Proseguire lavorando 1 m.b in ognuna delle 12 m.b successive, ci sono ora 24 m.b in tutto iniziando a contare dalla m con il segno. Lavorare ora la testa in tondo, su queste 24 m come segue: girare il cestino in modo che la m con il segno sia verso di voi, lavorare 1 m.b in questa m.b (questa m è ora la 1° m.b del giro, spostare il segno verso l’alto man mano che si procede con il lavoro), proseguire con 1 m.b in ognuna delle 23 m.b successive = 24 m.b sul giro. Spostare il segno verso l’alto man mano che si procede con il lavoro. Lavorare ora 1 m.b in ogni m.b per altri 5 giri (= 6 giri in tutto). Diminuire ora come segue: GIRO 1: * 1 m.b in ognuna delle 4 m.b successive, diminuire 1 m.b - VEDERE IL SUGGERIMENTO PER LE DIMINUZIONI sopra *, ripetere da *-* su tutto il giro = 20 m.b. GIRO 2: * 1 m.b in ognuna delle 3 m.b successive, diminuire 1 m.b *, ripetere da *-* su tutto il giro = 16 m.b. GIRO 3: * 1 m.b in ognuna delle 2 m.b successive, diminuire 1 m.b *, ripetere da *-* su tutto il giro = 12 m.b. GIRO 4: * 1 m.b nella m.b successiva, diminuire 1 m.b *, ripetere da *-* su tutto il giro = 8 m.b. GIRO 5: Lavorare tutte le m.b insieme a 2 a 2 = 4 m.b, tagliare il filo. Passare l’estremità del filo attraverso le ultime 4 m.b. CRESTA DEL POLLO: Si lavora avanti e indietro. Avviare 20 cat con il colore rosso, lavorare poi 1 m.bss nella 2° cat dall’uncinetto, poi 1 m.bss in ogni cat = 19 m.bss, girare il lavoro. Saltare la 1° m.bss, nella m.bss successiva lavorare come segue: 1 m.a, 1 m.a.d e 1 m.a, saltare 1 m.bss, 1 m.b nella m.bss successiva, saltare 1 m.bss, nella m.bss successiva lavorare: 2 m.a, 1 m.a.d e 2 m.a, saltare 1 m.bss, 1 m.b nella m.bss successiva, saltare 1 m.bss, nella m.bss successiva lavorare: 2 m.a, 3 m.a.d e 2 m.a, saltare 1 m.bss, 1 m.b nella m.bss successiva, saltare 1 m.bss, nella m.bss successiva lavorare: 2 m.a, 1 m.a.d e 2 m.a, saltare 1 m.bss, 1 m.b nella m.bss successiva, saltare 1 m.bss, nella m.bss successiva lavorare: 1 m.a, 1 m.a.d e 1 m.a, finire con 1 m.bss nell’ultima m.bss; tagliare e fermare il filo. BECCO: Si lavora avanti e indietro. Avviare 2 cat con il colore ocra. RIGA 1: Lavorare 2 m.b nella 2° cat dall’uncinetto = 2 m.b, girare. RIGA 2: Lavorare 1 cat, aumentare 1 m.b in ogni m.b = 4 m.b, girare. RIGHE 3-4: Lavorare 1 cat, 1 m.b in ogni m.b. RIGA 5: 1 cat, lavorare tutte le m.b insieme a 2 a 2 = 2 m.b. RIGA 6: 1 cat, lavorare le 2 m.b insieme = 1 m.b. Tagliare e fermare il filo. CODA: Si lavora avanti e indietro. Avviare 12 cat con il colore rosso, lavorare 1 m.b nella 2° cat dall’uncinetto, poi 1 m.b in ogni cat = 11 m.b, girare. Saltare la 1° m.b, nella m.b successiva lavorare 3 m.a, saltare 1 m.b, 1 m.b nella m.b successiva, saltare 1 m.b, nella m.b successiva lavorare come segue: 1 m.a, 3 m.a.d e 1 m.a, saltare 1 m.b, 1 m.b nella m.b successiva, saltare 1 m.b, nella m.b successiva lavorare 3 m.a, finire con 1 m.bss nell’ultima m.b; tagliare e fermare il filo. ALA: Si lavora in tondo, a spirale. Iniziare con un CERCHIO MAGICO con il colore beige chiaro. Lavorare i giri da 1 a 17 come indicato per il cestino = 96 m.b. GIRO 18: Proseguire con il colore rosso e lavorare come segue: * 1 m.b, saltare 1 m.b, 5 m.a nella m.b successiva, saltare 1 m.b *, ripetere da *-* su tutto il giro; tagliare e fermare il filo. FIORI: Si lavorano in tondo. Lavorare 2 fiori di ciascun tipo. FIORE 1: GIRO 1: Avviare 3 cat con il colore ocra e formare un anello con 1 m.bss nella 1° cat. Lavorare 1 cat, 8 m.b nell’anello di cat, finire con 1 m.bss nella 1° m.b. GIRO 2: Lavorare 1 cat, * 1 m.b nella m.b successiva, 3 cat *, ripetere da *-* su tutto il giro, finire con 3 cat e 1 m.bss nella 1° m.b (= 8 archi di cat). Tagliare e fermare il filo. FIORE 2: Lavorare come indicato per il FIORE 1, ma lavorare il giro 1 con il colore ocra ed il giro 2 con il colore rosso. FIORE 3: Lavorare come indicato per il FIORE 1, ma lavorare il giro 1 con il colore rosso ed il giro 2 con il colore ocra. FIORE 4: Lavorare come indicato per il FIORE 1 ma lavorare il giro 1 con il colore bianco ed il giro 2 con il colore rosso. FIORE 5: Lavorare come indicato per il FIORE 1 ma lavorare il giro 1 con il colore ocra ed il giro 2 con il colore bianco. CONFEZIONE: Cucire la cresta sulla testa, cucire la coda sull’altro lato del cestino. Cucire il becco sulla parte anteriore della testa e ricamare gli occhi con il colore marrone medio. Mettere l’ala sul cestino e cucire su un lato. Usare l’ala come coperchio. Cucire i fiori sul cestino e sul coperchio. Imbottire la testa con un po’ di cotone idrofilo, carta o materiale per imbottitura. |
|
Avete terminato questo modello?Allora taggate le vostre foto con #dropspattern #hennypennybasket o inviatele alla #dropsfan gallery. Avete bisogno di aiuto con questo modello?Troverete 9 video tutorial, una sezione per i commenti/domande e molto altro guardando il modello su www.garnstudio.com © 1982-2025 DROPS Design A/S. Ci riserviamo tutti i diritti. Questo documento, compreso tutte le sue sotto-sezioni, è protetto dalle leggi sul copyright. Potete leggere quello che potete fare con i nostri modelli alla fine di ogni modello sul nostro sito. |
|


Con oltre 40 anni di esperienza nel design di modelli di maglia e uncinetto, DROPS Design offre la più estesa collezione di modelli gratuiti su internet - tradotti in 17 lingue. Ad oggi vi possiamo fornire 314 cataloghi e 11820 modelli - 9090 dei quali sono tradotti in Italiano.
Ci stiamo impegnando molto per darvi il meglio che vi possiamo offrire in termini di maglia e uncinetto, ispirazioni e consigli così come filati di grande qualità ad un prezzo incredibile! Volete utilizzare i nostri modelli per qualcosa d'altro oltre al vostro uso personale? Potete leggere tutto ciò che è consentito nel testo sul Copyright in basso su tutte le pagine dei nostri modelli. Buon lavoro!
Lasciare un commento sul modello DROPS Extra 0-908
Noi saremmo felici di ricevere i tuoi commenti e opinioni su questo modello!
Se vuoi fare una domanda, fai per favore attenzione a selezionare la categoria corretta nella casella qui sotto per velocizzare il processo di risposta. I campi richiesti sono indicati da *.