
Categorie popolari
State cercando un filato?


Commenti / Domande (29)
![]() Sanne ha scritto:
Sanne ha scritto:
Op de foto lijkt de tuniek getailleerd, maar op het getekende patroon is het een A-lijn. Wat is het model van deze tuniek? Naald 7 geeft grote gaten, terwijl het op de foto niet zulke grote gaten zijn. Klopt naald 7? Er staat dat je bovenaan de schouderbandjes 4 toueren in ribbelsteek moet breien, maar op de foto is dat niet terug te zien. Is de foto de correcte foto bij dit patroon?
09.05.2023 - 15:55DROPS Design ha risposto:
Dag Sanne,
Het is een a-lijn tuniek en niet getailleerd. Je, de naalddikte klopt, maar maak altijd een proeflapje om te controleren of de stekenverhouding klopt en pas eventueel de naalddikte aan totdat je op de juiste verhouding komt. Ik denk dat de ribbelsteken wegvallen op de foto.
11.05.2023 - 21:10
![]() Kim Adams ha scritto:
Kim Adams ha scritto:
I am making this top in XL. I have cast off a total of 6 stitches per side to begin the arm hole. For the back , the instructions say to bind off 2 stitches 3 times at the beg of each row (for a total of 6 fewer stitches ) then 1 stitch at the beg of each row 2 times (for a total of 2 fewer stitches). This would mean 8 fewer stitches. Your directions say that I should have 53 (16 fewer). Please explain? If I am to bind off at the beginning AND end of each row - do you have a tutorial??
04.08.2020 - 01:01DROPS Design ha risposto:
Dear Mrs Adams, you are supposed to cast off the stitches for the armhole on each side, ie 2 sts a total of 3 times on each side (= 2 sts at the beg of the next 6 rows) then 1 st 2 times on each side (= 1 st at the beg of next 4 rows) = you will have cast off 8 sts on each side. Happy knitting!
04.08.2020 - 09:37
![]() Maria Grazia Vitturini ha scritto:
Maria Grazia Vitturini ha scritto:
Nel misurare il campione (filato Bomull, ferro 7 mm) non sono sicura di quanto deve essere tesa la maglia, dato che l'effetto è una rete piuttosto lassa. Forse dovrei stirarlo?
07.07.2015 - 15:07DROPS Design ha risposto:
Buongiorno Maria Grazia, i capi lavorati ai ferri non andrebbero mai stirati, deve trattare il campione come il capo finale, bloccandolo con degli spilli. La tensione deve essere quella del capo finale, senza tirare troppo il lavoro. Buon lavoro!
07.07.2015 - 15:16
![]() Maria Grazia Vitturini ha scritto:
Maria Grazia Vitturini ha scritto:
Nel misurare il campione (filato Bomull, ferro 7 mm) non sono sicura di quanto deve essere tesa la maglia, dato che l'effetto è una rete piuttosto lassa. Forse dovrei stirarlo?
07.07.2015 - 14:57DROPS Design ha risposto:
Buongiorno Maria Grazia, i capi lavorati ai ferri non andrebbero mai stirati, deve trattare il campione come il capo finale, bloccandolo con degli spilli. La tensione deve essere quella del capo finale, senza tirare troppo il lavoro. Buon lavoro!
07.07.2015 - 15:16
![]() Maria Grazia Vitturini ha scritto:
Maria Grazia Vitturini ha scritto:
Buongiorno, ho realizzato il capo con il filato e i ferri indicati ma, prima di completare il dietro, ho esaurito il filato e le misure non corrispondono. Credo che il problema sia dovuto alla difficoltà incontrata nel misurare il con esattezza il campione. Potete darmi un suggerimento? Grazie in anticipo. Maria Grazia Vitturini
07.07.2015 - 13:06DROPS Design ha risposto:
Buongiorno Maria Grazia, che difficoltà ha incontrato nel misurare il campione? Se il campione corrisponde a quello indicato la quantità di filato indicata è sufficiente a realizzare il modello. Il filato è quello suggerito? Buon lavoro!
07.07.2015 - 14:20
![]() Ardelicia ha scritto:
Ardelicia ha scritto:
Guten Abend, ich habe da eine Verständnisfrage zur Größe S. Nachdem man 7 mal nach jeweils 6 1/2 cm M abnimmt, wird dann nach insgesamt 50 cm die Arbeit geteilt. Alledings ergeben doch die ersten 6 cm + (7 * 6 1/2 cm) insgesamt 51,5 cm. Wie kann man denn dann nach 50 cm die Arbeit teilen? Vielen Dank für die Antwort schonmal im voraus.
01.05.2014 - 21:20DROPS Design ha risposto:
Liebe Ardelicia, die erste Abnahme machen Sie ja bereits nach einer Gesamthöhe von 6 cm. Dann nehmen Sie noch weitere 6 x nach jeweils 6,5 cm ab, das macht 39 cm. 6 cm + 39 cm = 45 cm bei insgesamt 7 Abnahmen.
02.05.2014 - 00:29
![]() Heidi Andersen ha scritto:
Heidi Andersen ha scritto:
Det står pinne 7? men da blir det jo kjempestore masker, og det står jo 5.5, men syntes også det blir stort, hva gjør jeg?
17.04.2014 - 19:08DROPS Design ha risposto:
Hei Heidi. Denne skal strikkes meget löst og du skal bruge den pind som skal til for at faa 14 m x 17 p glattstrikke paa 10x10 cm. Vi anbefaler pinde 7, men strik en pröve og se hvad du skal bruge. God fornöjelse.
22.04.2014 - 17:16
![]() Nita Krygier ha scritto:
Nita Krygier ha scritto:
Got to the point where I need to decrease from 180 st. to 110. Confused about what alternate means. Every other marker? Or alternate right and left sides of marker? Thanks.
24.03.2014 - 19:13DROPS Design ha risposto:
Dear Mrs Krygier, you will dec 1 st at each marker (=10 dec/dec round) a total of 7 times every 6.5-8cm (see size). On 1st dec round dec on the right side of every marker, on 2nd dec round, dec on the left side of every marker. Repeat alternately on the right and on the left side of every marker until all dec are done. Happy knitting!
25.03.2014 - 09:06
![]() Gwen Shaw ha scritto:
Gwen Shaw ha scritto:
Please can you advise re sizing, what is L or XL. I don't know which size to knit, Thank you.
18.05.2013 - 08:25DROPS Design ha risposto:
Dear Mrs Shaw, to figure out which size to make, the best is to measure a garment that you already have and like the size of and compare with the chart. Happy knitting!
18.05.2013 - 09:02
![]() Carol Singer ha scritto:
Carol Singer ha scritto:
Does decease 1 stitch to the right and to the left alternately of all markers mean to the right and left on same row or to the right of all markers on one row and then the left of all markers on the next decease row?
20.04.2013 - 22:37DROPS Design ha risposto:
Dear Mrs Singer, it means to dec on the same row eg for 1st dec k2 tog before all markers and for 2nd dec, k2 tog after all markers and repeat these 2 dec. Happy knitting!
22.04.2013 - 09:02
|
|
Aliz#aliztunic |
|
|
|
|
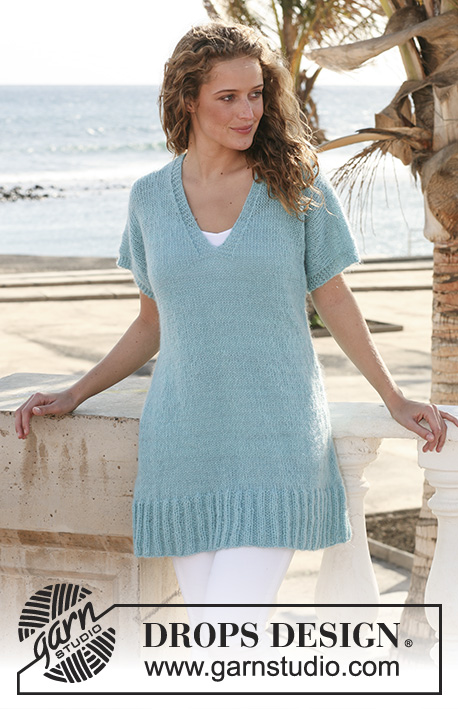
Tunica DROPS lavorata ai ferri in ” Bomull-Lin”. Taglie: S - XXXL.
DROPS 112-10 |
|
|
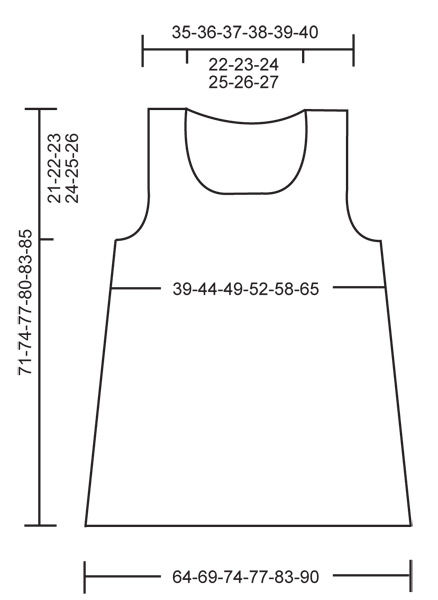
M LEGACCIO (in tondo): Lavorare 1 giro dir, 1 giro rov. M LEGACCIO (avanti e indietro sui f): Lavorare tutti i f a dir. SUGGERIMENTO PER LE DIMINUZIONI: Diminuire 1 m lavorando 2 m insieme a dir. -------------------------------------------------------- TUNICA: Lavorata in tondo con i f circolari. Avviare 180-190-210-220-230-250 m con i f circolari n° 7 mm con 1 capo di Bomull-Lin. Lavorare 4 giri a m legaccio – LEGGERE SOPRA – e continuare a m rasata. FARE ATTENZIONE ALLA TENSIONE DEL LAVORO! Quando il lavoro misura 6 cm inserire 10 segnapunti nel lavoro con 18-19-21-22-23-25 m tra ogni segnapunti. Diminuire 1 m alla destra e alla sinistra di tutti i segnapunti in modo alternato ogni 6,5-7-7,5-7,5-8-8 cm per un totale di 7 volte – LEGGERE IL SUGGERIMENTO PER LE DIMINUZIONI = 110-120-140-150-160-180 m. Ora inserire 2 nuovi segnapunti, 1 all’inizio del giro e 1 dopo 55-60-70-75-80-90 m (per indicare i lati). Quando il lavoro misura 50-52-54-56-58-59 cm intrecciare 3 m a ogni lato dei segnapunti e finire ogni parte in modo separato. DIETRO: = 49-54-64-69-74-84 m. Continuare a m rasata, ALLO STESSO TEMPO intrecciare per lo scalfo a ogni lato all’inizio di ogni f: 2 m 0-1-2-3-3-4 volte e 1 m 0-0-2-2-4-6 volte = 49-50-52-53-54-56 m. Quando il lavoro misura 67-70-73-76-79-81 cm intrecciare le 29-30-32-33-34-36 m centrali per il collo e finire ogni lato in modo separato. Intrecciare 1 m sulla scollatura sul f successivo = 9-9-9-9-9-9 m rimasta sulla spalla. Quando il lavoro misura 69-72-75-78-81-83 cm lavorare 4 f a m legaccio – LEGGERE SOPRA – e intrecciare. Il lavoro misura circa 71-74-77-80-83-85 cm. DAVANTI: = 49-54-64-69-74-84 m. Continuare a m rasata, ALLO STESSO TEMPO intrecciare per lo scalfo come descritto per il dietro. ALLO STESSO TEMPO quando il lavoro misura 55-58-61-63-66-68 cm intrecciare le 11-12-14-15-16-18 m centrali per il collo e finire ogni lato in modo separato. Intrecciare per modellare la scollatura all’inizio di ogni f dal centro davanti: 2 m 3 volte e 1 m 4 volte. Alla fine di tutte le diminuzioni ci sono 9-9-9-9-9-9 m rimaste sulla spalla. Quando il lavoro misura 69-72-75-78-81-83 cm lavorare 4 f a m legaccio e intrecciare. Il lavoro misura circa 71-74-77-80-83-85 cm. CONFEZIONE: Cucire i margini delle spalle. BORDO ALL’UNCINETTO: Lavorare un bordo attorno alla scollatura e agli scalfi con l’uncinetto n° 3 mm e 2 capi di Bomull-Lin come segue: 1 m.b, * 2 cat, saltare circa 1 cm, 1 m.b *, ripetere *-* e finire con 1 m.bss nella 1° m.b. |
|
 |
|
Avete terminato questo modello?Allora taggate le vostre foto con #dropspattern #aliztunic o inviatele alla #dropsfan gallery. Avete bisogno di aiuto con questo modello?Troverete 18 video tutorial, una sezione per i commenti/domande e molto altro guardando il modello su www.garnstudio.com © 1982-2026 DROPS Design A/S. Ci riserviamo tutti i diritti. Questo documento, compreso tutte le sue sotto-sezioni, è protetto dalle leggi sul copyright. Potete leggere quello che potete fare con i nostri modelli alla fine di ogni modello sul nostro sito. |


Con oltre 40 anni di esperienza nel design di modelli di maglia e uncinetto, DROPS Design offre la più estesa collezione di modelli gratuiti su internet - tradotti in 17 lingue. Ad oggi vi possiamo fornire 325 cataloghi e 12298 modelli - 9569 dei quali sono tradotti in Italiano.
Ci stiamo impegnando molto per darvi il meglio che vi possiamo offrire in termini di maglia e uncinetto, ispirazioni e consigli così come filati di grande qualità ad un prezzo incredibile! Volete utilizzare i nostri modelli per qualcosa d'altro oltre al vostro uso personale? Potete leggere tutto ciò che è consentito nel testo sul Copyright in basso su tutte le pagine dei nostri modelli. Buon lavoro!
Lasciare un commento sul modello DROPS 112-10
Noi saremmo felici di ricevere i tuoi commenti e opinioni su questo modello!
Se vuoi fare una domanda, fai per favore attenzione a selezionare la categoria corretta nella casella qui sotto per velocizzare il processo di risposta. I campi richiesti sono indicati da *.