
Vous cherchez un fil?


Commander Aiguilles à tricoter et crochets
Cliquez sur le bouton COMMANDER va vous rediriger vers le site de Boutique Kalidou
Le coût du fil est calculé pour la taille la plus petite du modèle et dans le type de laine la moins chère. Vous cherchez un meilleur prix? Vous pourrez en trouver dans les DROPS Deals!

Saturn Rings
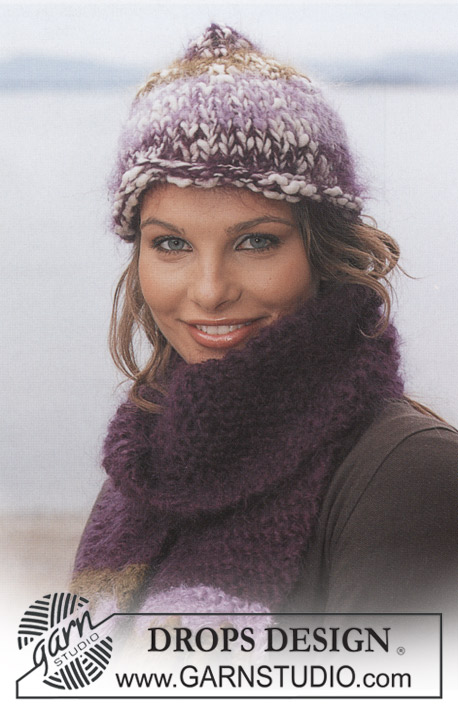
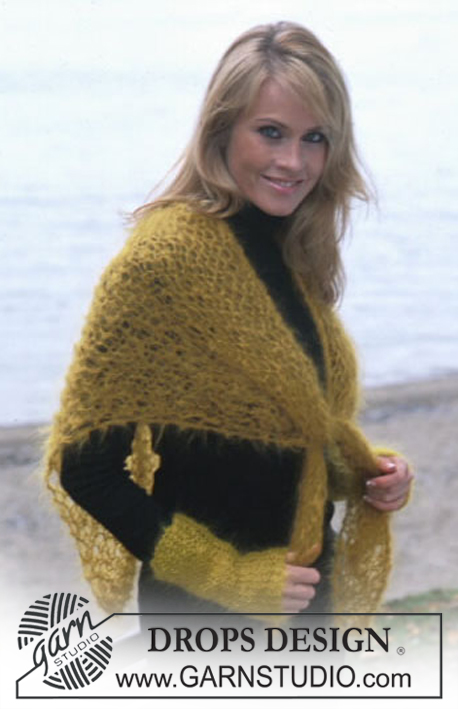
Bandeau Drops en Alaska et Châle en Vienna
BANDEAU
Taille : unique
Fournitures :
DROPS Alaska de Garnstudio
50 g coloris n° 50, brun
Aiguilles drops n° 4,5 (+ ou – grosses pour obtenir l’échantillon)
-------------------------------------------------------
Alternative – Découvrez ici comment changer des fils
Groupes de fils A à F – Utilisez le même modèle et changer le fil ici.
Utilisation d'une alternative – Découvrez notre convertisseur ici.
-------------------------------------------------------
Commander Aiguilles à tricoter et crochets
Cliquez sur le bouton COMMANDER va vous rediriger vers le site de Boutique Kalidou
Le coût du fil est calculé pour la taille la plus petite du modèle et dans le type de laine la moins chère. Vous cherchez un meilleur prix? Vous pourrez en trouver dans les DROPS Deals!
- Français
- Česky
- Dansk
- Deutsch
- Eesti keel
- English (UK/cm)
- English (US/in)
- Español
- Íslenska
- Italiano
- Magyar
- Nederlands
- Norsk
- Polski
- Português
- Suomi
- Svenska
- English (UK/cm), Bulgaria
- English (UK/cm), Croatia
- English (UK/cm), Greece
- English (UK/cm), Latvia
- English (UK/cm), Lithuania
- English (UK/cm), Romania
- English (UK/cm), Slovenia
- Česky, Slovakia
Explications
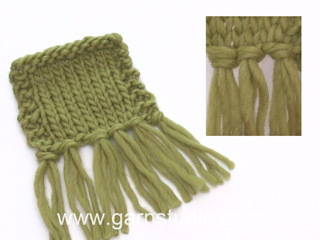
BANDEAU:
Commencer par le milieu dos.
Monter 19 mailles, et tricoter en côtes ainsi :
R 1 (endroit) : 1 m lis au point mousse, *2 m end, 1 m env* répéter de *à* 5 fois, terminer par 2 m end, 1 m lis au point mousse
R 2 (envers) : 1 m lis au point mousse, *2 m env, 1 m end* répéter de *à* 5 fois , terminer par 2 m env, 1 m lis au point mousse
Faire toutes les augmentations sur l’endroit.
A 8 cm de hauteur totale, augmenter 1 m envers dans toutes les sections envers = 24 mailles
A 14 cm de hauteur totale, augmenter 1 m envers dans toutes les sections 2 m envers = 29 m
A 18 cm de hauteur totale, augmenter 1 m envers dans toutes les sections 3 m envers = 34 m
A 21 cm de hauteur totale, augmenter 1 m envers dans toutes les sections 4 m envers = 39 m
A 24 cm de hauteur totale, placer un marqueur = c’est le milieu du tour de tête.
Ensuite, inverser la mise en forme, mesurer à partir du marqueur
A 3 cm de hauteur du marqueur, diminuer 1 m envers dans toutes les sections 5 m envers = 34 m
A 6 cm de hauteur du marqueur, diminuer 1 m envers dans toutes les sections 4 m envers = 29 m
A 10 cm de hauteur du marqueur, diminuer 1 m envers dans toutes les sections 3 m envers = 24 m
A 16 cm du marqueur, diminuer 1 m envers dans toutes les sections 2 m envers = 19 m
A 48 cm de hauteur totale, joindre au rang de montage ( ne pas rabattre les mailles avant de coudre).
---------------------------------------------------
CHÂLE DROPS en VIENNA
Dimensions :
Longueur milieu dos : environ 100 cm
Largeur en haut : environ 205 cm.
Fournitures :
DROPS Vienna de Garnstudio
200 g coloris n° 43, brun clair
Aiguilles Drops n° 15, + ou – grosses pour obtenir l’échantillon
ÉCHANTILLON
5 m x 9 rangs = 10 x 10 cm au point mousse (tricoté très souplement)
CHÂLE
Monter 4 m et tricoter au point mousse, augmenter 1 m de chaque côté tous les 2 rangs en tricotant 2 fois la même m. Continuer à augmenter jusqu’à obtenir 50 mailles. L’ouvrage mesure environ 102 cm.
Diminuer maintenant sur les mêmes côtés que les augmentations – diminuer tous les 2 rangs en tricotant les 2 premières/dernières m ensemble à l’endroit. Continuer à diminuer jusqu’à obtenir 4 mailles. L’ouvrage mesure environ 205 cm. rabattre toutes les mailles.
Franges : nouer des franches le long des 2 côtés du châle, à environ 4-5 cm les unes des autres – commencer par la pointe.
Couper 6 fils de 35 cm de long, plier en 2, passer la boucle obtenue dans la m au bord du châle, et passer les extrémités des fils à travers la boucle.
Que pouvez-vous faire avec nos modèles? Vous pouvez partager en ligne les modèles DROPS, en utilisant les photos originales, fournitures, nom et numéros. Mais vous N'ÊTES PAS AUTORISÉ à reproduire numériquement les explications de quelques sortes que ce soit. Les magasins de laine peuvent volontiers utiliser la base de données de modèles DROPS pour promouvoir la vente de leur assortiment. Vous pouvez imprimer les explications, faire autant de copies que vous le souhaitez. La seule chose que nous vous demandons est de n'apporter aucune modification / aucun ajout au document original imprimé. Et les explications doivent être, conformément à la politique DROPS, distribuées gratuitement aux clients.
Les éditeurs qui souhaitent publier nos modèles dans des livres ou magazines imprimés peuvent nous contacter pour plus d'informations. La vente de vêtements élaborés sur la base des modèles DROPS est autorisée dans la mesure où ils sont réalisés à l'unité ou sur commande. Toute autre utilisation de nos modèles à des fins commerciales est interdite. Il doit être clairement indiqué que le vêtement a été réalisé sur la base d'un modèle DROPS DESIGN. L'utilisation d'étiquettes pour des vêtements dont DROPS DESIGN est un élément est subordonné à l'addition du texte suivant: "Un modèle DROPS DESIGN réalisé par...". Il n'est pas autorisé de couper ni modifier les photos et le logo doit être parfaitement visible.
Nous nous réservons le droit de retirer l'autorisation d'utilisation de nos modèles à tout moment, sans en donner de raison.
Chacun de nos modèles a des tutoriels vidéo spécifiques pour vous aider.


Ces tutoriels photo étape par étape pourraient également vous aider:


Pourquoi est-ce que la tension/l'échantillon au tricot/crochet, c'est tellement important?
La tension est ce qui détermine les mesures finales de votre ouvrage, elle se mesure e général pour 10 x 10 cm. Elle est indiquée ainsi: nombre de mailles en largeur x nombre de rangs en hauteur - ex.: 19 mailles x 26 rangs = 10 x 10 cm.
La tension est une affaire très personnelle, certains tricotent/crochètent plutôt lâche alors que d'autres vont serrer davantage. Ce sont les aiguilles qui vont vous permettre d'ajuster la tension, la taille indiquée l'est seulement à titre indicatif! Vous devrez éventuellement changer d'aiguilles (pour des plus grosses ou des plus fines) pour que VOTRE tension corresponde bien à celle indiquée dans les explications. Si vous travaillez avec une tension différente de celle indiquée, la consommation de fil ainsi que les différentes mesures que des schémas et des explications en seront affectés
La tension détermine également quels fils peuvent être utilisés. Tant que vous obtenez la même tension/le même échantillon, vous pouvez remplacer un fil par un autre.
Voir leçon DROPS: "Comment mesurer votre tension/l'échantillon"
Voir DROPS video: "Comment faire un échantillon"
Comment trouver le nombre de pelotes nécessaire?
La quantité de fil est indiqué au poids, en grammes, par ex.: 450 g. Pour calculer le nombre de pelotes qu'il faut, on doit d'abord connaître le poids d'une pelote (25 g, 50 g ou 100 g). Cette information est disponible sous le nuancier de chaque qualité. On divise le poids total nécessaire par le poids de chaque pelote. Par exemple, si une pelote pèse 50 g (le plus souvent), on va calculer ainsi: 450/50 = 9 pelotes.
Est-ce que je peux utiliser un autre fil que celui proposé dans le modèle?
Ce qui est important quand on change de fil est de bien garder la même tension/ le même échantillon tricot/crochet pour que l'ouvrage terminé aient bien les mêmes mesures que celui du schéma. Il est facile d'obtenir la même tension avec des fils du même groupe de fils. Il est également possible d'utiliser plusieurs fils plus fins pour obtenir la même tension qu'un plus épais. Essayez notre convertisseur. Nous recommandons de toujours faire au préalable un échantillon.
ATTENTION: Quand on change le fil , l'ouvrage pourra avoir un aspect différent de celui de la photo, en raison des propriétés et caractéristiques de chaque fil.
Voir leçon DROPS: Est-ce que je peux utiliser un fil différent de celui mentionné dans les explications?
Les groupes de fils, qu'est-ce que c'est?
Tous nos fils sont classés par groupes (de A à F) en fonction de leur épaisseur et de leur échantillon - le groupe A comporte les fils les plus fins et le groupe F les plus épais. Vous pouvez ainsi trouver plus facilement des alternatives pour nos modèles, pour les réaliser avec un autre fil. Tous les fils d'un même groupe ont une tension similaire et peuvent se remplacer les uns les autres. Toutefois, des qualités de fils différentes ont des structures et caractéristiques différentes qui donneront à l'ouvrage fini un look et un effet unique.
Cliquez ici pour afficher le tableau des fils classés par groupe.
Comment utiliser le convertisseur?
En haut de chacun de nos modèles, vous trouverez un lien pour notre convertisseur. C'est un outil utile si vous souhaitez utiliser un fil différent de celui proposé. Choisissez le nom de la qualité que vous souhaitez remplacer, la quantité (dans votre taille) et le nombre de fils. le convertisseur présente de bonnes alternatives ayant la même tension. Il vous indique en plus la quantité nécessaire dans les nouvelles qualités proposées et si vous devrez les tricoter avec plusieurs fils. La plupart de nos pelotes font 50g (certaines font 25g ou 100g).
Si le modèle comporte plusieurs couleurs, il faudra convertir chaque couleur séparément. De même, si le modèle se tricote avec plusieurs fils de différentes qualités (par exemple 1 fil Alpaca et 1 fil Kid-Silk), il faudra trouver des alternatives pour chacune d'elles.
Pourquoi montrez-vous des modèles dans des laines épuisées?
Parce que des laines différentes ont des qualités et des textures différentes, nous avons choisi de conserver le fil original dans nos modèles. Toutefois, vous pouvez facilement trouver des alternatives dans notre gamme actuelle en utilisant notre convertisseur, ou bien en prenant simplement un fil du même groupe de fils.
Il est possible que certains magasins aient encore en stock le fil épuisé, ou que quelqu'un aient encore quelques pelotes inutilisées à la maison et souhaiterait trouver des modèles adaptés.
Le convertisseur proposera aussi bien de nouvelles alternatives que la quantité requise dans la nouvelle qualité.
Quelle taille dois-je tricoter?
Si vous avez du mal à décider quelle taille faire, il peut être sage de mesurer un vêtement que vous avez et dont vous aimez la forme. Choisissez ensuite la taille en comparant ces mesures à celles du schéma du modèle.
Vous trouverez le schéma avec les mesures en bas des explications.
Découvrir la leçon DROPS : Comment lire le schéma des mesures
Pourquoi je n'ai pas le bon échantillon avec les aiguilles proposées?
La taille des aiguilles indiquée dans les explications n'est qu'une proposition. L'important est de bien avoir la bonne tension/le bon échantillon. Comme la tension est quelque chose de très personnel, il vous faudra ajuster la taille des aiguilles pour que VOTRE tension soit bien la même que dans le modèle - vous devrez peut-être utiliser une aiguille d'1 voir 2 tailles au-dessus ou au-dessous pour obtenir le bon échantillon. C'est pourquoi nous recommandons de tricoter des échantillons.
Si votre tension est différente de celle indiquée, les mesures de l'ouvrage terminé seront différentes de celles du schéma.
Voir leçon DROPS: Comment mesurer votre tension/l'échantillon
Voir vidéo DROPS: Comment faire un échantillon
Qu'est-ce qu'un modèle top-down (de haut en bas)?
Réaliser un vêtement de haut en bas donne plus de flexibilité pour un ajustement personnalisé. Il est ainsi plus facile par exemple d'essayer le vêtement en cours de réalisation et d'ajuster ainsi également la longueur de l'empiècement ou des manches.
Les explications décrivent bien chaque étape, dans le bon ordre. Les diagrammes sont ajustés au sens du tricot et se réalisent comme d'habitude.
Comment tricoter un diagramme tricot?
Le diagramme représente tous les rangs/tours, et chaque maille, vue sur l'endroit. Il se lit de bas en haut, et de droite à gauche = 1 carré = 1 maille. .
Quand on tricote en allers et retours, on tricote un rang sur deux sur l'endroit et un rang sur deux sur l'envers. Quand on tricote sur l'envers, on doit lire les diagrammes dans le sens inverse: de gauche à droite, les mailles endroit (vu sur l'endroit) se tricotent à l'envers et les mailles envers (vu sur l'endroit) se tricotent à l'endroit etc.
Quand on tricote en rond, chaque tour se lit de droite à gauche et les diagrammes se lisent de droite à gauche tous les tours.
Voir leçon DROPS: Comment lire des diagrammes tricot
Comment lire un diagramme crochet?
Les diagrammes représentent tous les rangs/tours et chaque maille vu sur l'endroit. Ils se lisent de bas en haut et de droite à gauche.
Quand on crochète en allers et retours, on crochète un rang sur deux sur l'endroit: de droite à gauche, et un rang sur deux sur l'envers: de gauche à droite.
Quand on crochète en rond, chaque rang du diagramme se lit sur l'endroit, de droite à gauche.
Quand on crochète un diagramme rond, on commence par le milieu et on continue, dans le sens des aiguilles d'une montre, rang après rang.
Les rangs commencent en général par un nombre de mailles en l'air (correspondant à la hauteur de la maille suivante), cette information figure soit dans le diagramme soit dans les explications du modèle.
Voir leçon DROPS: Comment lire un diagramme crochet
Comment tricoter plusieurs diagrammes simultanément sur un même rang?
Quand on doit tricoter plusieurs diagrammes l'un après l'autre sur un même rang/tour, on lire souvent ceci: “tricoter A.1, A.2, 0-0-2-3-4 fois A.3 au total". On va ainsi devoir tricoter 1 fois A.1 en largeur, puis 1 fois A.2 en largeur, puis on répète A.3 (en largeur) le nombre de fois indiqué pour la taille - dans le cas présent, en taille S: 0 fois, en taille M = 0 fois, en taille L = 2 fois, en taille XL = 3 fois et en taille XXL = 4 fois.
Les diagrammes se tricotent comme d'habitude: on commence par le 1er rang de A.1, puis le 1er rang de A.2, etc.
Voir leçon DROPS: Comment lire des diagrammes tricot
Voir leçon DROPS: Comment lire des diagrammes crochet
Pourquoi les manches sont-elles plus courtes dans les grandes tailles?
La longueur totale du vêtement (d'un poignet à l'autre) sera plus long dans les grandes tailles, malgré des manches plus courtes. Dans les grandes tailles, l'arrondi des manches est plus long et les épaules plus larges, ainsi, la coupe sera bonne pour toutes les tailles.
Où sont mesurées les longueurs du vêtement?
Le schéma des mesures donne la longueur totale du vêtement. S'il s'agit d'un pull ou d'un gilet, la longueur totale est prise à partir du point le plus haut de l'épaule (généralement près du col) jusqu'au bas du vêtement. Il N'est PAS mesuré à partir de la pointe de l'épaule. De même, la longueur de l'empiècement est mesurée à partir du plus haut point de l'épaule jusqu'à la division de l'empiècement pour le dos/le devant et les manches.
Les mesures d'un gilet ne sont jamais prises le long des bordures devants, sauf indication contraire. On mesure toujours la longueur juste avant/après les mailles des bordures devant.
Voir leçon DROPS: Comment lire le schéma des mesures
Qu'est-ce qu'un motif à répéter?
Les diagrammes sont souvent à répéter en rond ou en hauteur. 1 motif correspond au diagramme tel qu'il apparaît dans le modèle. S'il est indiqué de tricoter 5 motifs de A.1 en rond, vous allez faire 5 fois A.1 au total l'un après l'autre tout le tour (en largeur). S'il est indiqué de faire 2 motifs de A.1 en hauteur, vous faites le diagramme une fois en hauteur, puis, vous le recommencez au début et vous le réalisez encore une fois.
Pourquoi l'ouvrage commence par plus de mailles en l'air que crochetées?
Les mailles en l'air sont souvent légèrement plus serrées que les autres mailles et, pour éviter que le montage ne soit trop serré, on crochète simplement quelques mailles en l'air en plus au début. Le nombre de mailles sera ajusté au rang suivant pour tomber juste avec les explications et les mesures du schéma.
Pourquoi augmenter avant la bordure en côtes quand on tricote de haut en bas?
La bordure en côtes est plus élastique et contracte légèrement l'ouvrage en largeur par rapport au jersey par exemple. On augmente avant la bordure en côtes pour que la différence entre la bordure côtes et le reste de l'ouvrage soit moins visible.
Pourquoi augmenter quand on rabat?
On a parfois tendance à resserrer quand on rabat, en faisant des jetés au moment de rabattre les mailles (et en les rabattant en même temps comme des mailles normales), on évite que les mailles rabattues ne soient trop serrées.
Voir vidéo DROPS: Comment rabattre avec des jetés
Comment augmenter/diminuer alternativement tous les 3 et 4 rangs?
Pour réussir des augmentations (ou des diminutions) régulières, on peut par exemple augmenter alternativement tous les 3 et 4 rangs, c'est-à-dire que l'on va procéder ainsi: on tricote 2 rangs et on augmente au 3ème rang, on tricote 3 rangs et on augmente au 4ème rang. On répète jusqu'à ce que toutes les augmentations soient faites.
Voir leçon DROPS: Augmenter ou diminuer alternativement tous les 3 et 4 rangs
Comment tricoter un gilet ou une veste en rond plutôt qu'en rangs?
Vous préférez tricoter en rond plutôt qu'en allers et retours? Il vous faudra naturellement ajuster les explications. Il vous faudra ajouter des mailles "steek" au milieu devant (généralement 5 mailles) et suivre les explications. Au lieu de tourner pour tricoter sur l'envers, continuez simplement en tricotant les mailles steek, en rond. À la fin, vous couperez l'ouvrage, relèverez les mailles pour les bordures des devants et couvrirez les bords découpés.
Voir vidéo DROPS: Comment tricoter des mailles steek et découper le tricot
Est-ce que je peux tricoter un pull en allers et retours au lieu d'en rond?
Si vous préférez tricoter en allers et retours au lieu d'en rond, vous pouvez naturellement ajuster les explications pour tricoter les pièces séparément et les assembler ensuite à la fin. Divisez le nombre de mailles par 2, ajoutez 1 maille lisière de chaque côté (pour les coutures) et tricotez le devant et le dos séparément.
Voir leçon DROPS: Puis-je adapter un modèle sur aiguille circulaire pour des aiguilles droites?
Pourquoi le modèle est-il différent de celui que je vois en photo?
Les portions de point fantaisie peuvent varier légèrement en fonction des tailles, pour conserver les bonnes proportions. Si vous ne tricotez pas la taille du vêtement photographié, le vôtre pourra être un peu différent. Les explications sont conçues pour que l'impression globale du vêtement soit la même dans toutes les tailles. Suivez simplement les indications et les diagrammes pour votre taille!
Comment adapter un vêtement femme pour un homme?
Si vous avez trouvé un modèle femme, il n'est pas très difficile de le convertir pour homme. La plus grande différence réside dans la longueur des manches et du corps. Commencez par tricoter la taille femme qui correspond le mieux par rapport au tour de poitrine. Ajoutez la longueur additionnelle juste avant de rabattre pour les emmanchures/l'arrondi de la manche. Si le modèle est tricoté de haut en bas, vous pouvez ajuster la longueur juste après les emmanchures ou avant la première diminution des manches.
La quantité supplémentaire de fil nécessaire dépendra de la longueur que vous ajouterez, il vaut toujours mieux prévoir une pelote de trop plutôt qu'une en moins.
Comment empêcher un vêtement de perdre ses fibres?
Tous les fils ont un excès de fibres (depuis la fabrication) qui peuvent ainsi pelucher ou perdre des fibres. Les fils "brushed" (ceux qui ont des "poils" les plus longs) ont davantage de ces fibres lâches en excès, ce qui en résulte davantage de perte.
Bien qu'il ne soit pas possible de garantir qu'une laine brushed sera à 100% sans perte de fibres, il est possible de minimiser ce phénomène drastiquement en suivant ces étapes:
1. Quand le vêtement est terminé (avant le lavage), secouez-le vigoureusement pour que les poils les plus longs partent. NOTE: NE PAS utiliser un rouleau adhésif ni de brosse ou toute autre méthode qui tirera sur le fil.
2. Placez le vêtement dans un sac plastique au freezer - la température va agir sur les fibres qui sont moins attachées les unes aux autres et les fibres excédantes tomberont plus facilement..
3. Laissez quelques heures au freezer puis sortez-le et secouez-le à nouveau.
4. Lavez le vêtement en suivant les indications de l'étiquette de la laine.
Pourquoi mon vêtement fait-il des bouloches?
Les bouloches sont un processus naturel qui arrive aux fibres même les plus exclusives. C'est un signe naturel d'usure qu'il est difficile d'éviter et qui est le pus souvent visible dans les zones de frottement du vêtement comme les bras et les poignets d'un pull.
Vous pouvez redonner l'aspect du neuf à votre vêtement en éliminant les bouloches à l'aide d'un peigne à tissu ou d'un appareil anti-bouloches/ anti-peluches.
Pendant ce temps, vous pouvez lire les questions et réponses précédentes sur ce même modèle, ou bien rejoindre le groupe DROPS Workshop sur Facebook pour recevoir de l'aide d'autres tricoteuses ou crocheteuses!
Vous pourriez aussi aimer...


Poster un commentaire sur le modèle DROPS 86-10
Nous aimerions connaître votre avis sur ce modèle !
Si vous souhaitez poser une question, merci de bien vouloir vérifier que vous avez choisi la bonne catégorie dans le formulaire ci-dessous afin d'accélérer la réponse. Les champs obligatoires sont indiqués par une *.
|
|
Saturn Rings |
|
|
|
|
Bandeau Drops en Alaska et Châle en Vienna
DROPS 86-10 |
|
|
ÉCHANTILLON : 18 m x 23 rangs = 10 x 10 cm BANDEAU: Commencer par le milieu dos. Monter 19 mailles, et tricoter en côtes ainsi : R 1 (endroit) : 1 m lis au point mousse, *2 m end, 1 m env* répéter de *à* 5 fois, terminer par 2 m end, 1 m lis au point mousse R 2 (envers) : 1 m lis au point mousse, *2 m env, 1 m end* répéter de *à* 5 fois , terminer par 2 m env, 1 m lis au point mousse Faire toutes les augmentations sur l’endroit. A 8 cm de hauteur totale, augmenter 1 m envers dans toutes les sections envers = 24 mailles A 14 cm de hauteur totale, augmenter 1 m envers dans toutes les sections 2 m envers = 29 m A 18 cm de hauteur totale, augmenter 1 m envers dans toutes les sections 3 m envers = 34 m A 21 cm de hauteur totale, augmenter 1 m envers dans toutes les sections 4 m envers = 39 m A 24 cm de hauteur totale, placer un marqueur = c’est le milieu du tour de tête. Ensuite, inverser la mise en forme, mesurer à partir du marqueur A 3 cm de hauteur du marqueur, diminuer 1 m envers dans toutes les sections 5 m envers = 34 m A 6 cm de hauteur du marqueur, diminuer 1 m envers dans toutes les sections 4 m envers = 29 m A 10 cm de hauteur du marqueur, diminuer 1 m envers dans toutes les sections 3 m envers = 24 m A 16 cm du marqueur, diminuer 1 m envers dans toutes les sections 2 m envers = 19 m A 48 cm de hauteur totale, joindre au rang de montage ( ne pas rabattre les mailles avant de coudre). --------------------------------------------------- CHÂLE DROPS en VIENNA Dimensions : Longueur milieu dos : environ 100 cm Largeur en haut : environ 205 cm. Fournitures : DROPS Vienna de Garnstudio 200 g coloris n° 43, brun clair Aiguilles Drops n° 15, + ou – grosses pour obtenir l’échantillon ÉCHANTILLON 5 m x 9 rangs = 10 x 10 cm au point mousse (tricoté très souplement) CHÂLE Monter 4 m et tricoter au point mousse, augmenter 1 m de chaque côté tous les 2 rangs en tricotant 2 fois la même m. Continuer à augmenter jusqu’à obtenir 50 mailles. L’ouvrage mesure environ 102 cm. Diminuer maintenant sur les mêmes côtés que les augmentations – diminuer tous les 2 rangs en tricotant les 2 premières/dernières m ensemble à l’endroit. Continuer à diminuer jusqu’à obtenir 4 mailles. L’ouvrage mesure environ 205 cm. rabattre toutes les mailles. Franges : nouer des franches le long des 2 côtés du châle, à environ 4-5 cm les unes des autres – commencer par la pointe. Couper 6 fils de 35 cm de long, plier en 2, passer la boucle obtenue dans la m au bord du châle, et passer les extrémités des fils à travers la boucle. |
|
|
Vous avez réalisé ce modèle ou un autre de nos collections? Taguez vos photos dans les réseaux sociaux avec #dropsdesign pour que nous puissions les voir! Vous avez besoin d'aide pour ce modèle ?Vous trouverez tutoriels vidéo, une rubrique commentaires/questions et plus encore en vous rendant sur la page du modèle sur garnstudio.com © 1982-2024 DROPS Design A/S. Tous droits réservés. Ce document, y compris ces sous-sections, est protégé par les droits d'auteur (copyright). Apprenez-en davantage sur ce que vous pouvez faire avec nos modèles en bas de chacune des pages de notre site. |


Avec plus de 40 ans dans la conception de modèles tricot et crochet, DROPS Design offre l'une des plus vastes collections de modèles gratuits sur internet - traduits dans 17 langues. À ce jour, on compte 304 catalogues et 11422 modèles en français.
Nous nous efforçons de vous apporter le meilleur de ce que le tricot et le crochet peuvent vous offrir, inspiration et conseils mais également des fils de haute qualité à des prix incroyables! Vous souhaiteriez utiliser nos modèles autrement que pour un usage personnel? Vous pouvez lire ce que vous êtes autorisés à faire dans le Copyright en bas de page de chacun de nos modèles. Bon tricot!
Commentaires / Questions (115)
Do I do the first two rows actually like they are written after doing the first increase row?
23.03.2024 - 00:43DROPS Design answered:
Dear June, in this pattern you have a rib pattern, where you will repeat the rib explained in rows 1 and 2. However, as you increase, the rib will slightly change. For example, in the first increase at 3", you increase from P1 in the rib to P2 from the RS (by purling 2 stitches in 1 purl stitch). Then, on the WS knit over the new purl stitches (so the new rib will look like K2, P2 from the RS and P2, K2 from the WS). As you continue increasing you will add P stitches from the RS, which are knitted from the WS (so K2, P3 from the RS and P2, K3 from the WS; then K2, P4 from the RS and P2, K4 from the WS). Continue increasing like this. Happy knitting!
25.03.2024 - 00:00When the piece messages 3 ins what do I do now?
23.03.2024 - 00:30DROPS Design answered:
Dear June, in the first increase at 3", you will work as follows from the RS: K 1 (edge st knit in garter st), * K 2, P 2 (that is, purl 2 stitches in the P1 to increase 1 purl stitch) * repeat a total of 5 times – finish row with K 2 and K 1 (edge st knit in garter st). Due to these increases, in the WS the rib also changes: from P2, K1 to P2, K2 (you don't increase in this row, just work over the increased stitches in the previous row). Happy knitting!
25.03.2024 - 00:00Bonjour, pour le bandeau, est ce que les diminutions se font sur l'endroit du travail comme pour les augmentations ? Merci pour votre réponse
27.12.2022 - 19:55DROPS Design answered:
Bonjour Mme Saidah, tout à fait, on doit diminuer le nombre de mailles envers, vu sur l''endroit, on va tricoter ainsi 2 m ens à l'envers sur l'endroit. Bon tricot!
02.01.2023 - 10:33Any chance of doing a video tutorial on you-tube. I really like this headband, but am confused with the written pattern.
01.12.2022 - 01:02DROPS Design answered:
Dear Brenda, you will find videos relative to the techniques used in that pattern at the bottom of the pattern, feel free to ask your question here so that we can help you further in the part of the pattern you don't understand. Happy knitting!
01.12.2022 - 11:46I am on the first increase row to 24 stitches and following the established rib pattern but there are not enough stitches to complete the rib pattern! What do I do?
11.10.2021 - 01:08DROPS Design answered:
Hi Kathy, You increase all P1 to P2 (5 stitches increased) which gives you 24 stitches. You now have 1 stitch in garter stitch, 5 x K2, P2 (20 stitches), K2 and 1 stitch in garter stitch = 24 stitches. Happy knitting!
11.10.2021 - 07:04Hallo! Ich bin ziemliche Anfängerin und komme mit der Anleitung nicht ganz zurecht. Betrifft das Fertigstellen des Stirnbands mit den Maschen auf einem Hilfsfaden. Habe leider auch kein passendes Videotutorial dazu finden können. Wie lange muß der Hilfsfaden sein? und wird er mithineingenäht? Danke im Voraus für die Hilfe!
01.01.2021 - 22:03DROPS Design answered:
Liebe Iris, die stillgelegten Maschen werden wie in diesem Video zusammen mit der Anschlagskante - wie in diesem Video zusammen genäht, dh so eine "Mischung" je nach den Maschen. Viel Spaß beim zusammennähen!
04.01.2021 - 14:43This increase is called a make 1 in English. If you’d written it like this many here wouldn’t have had so many problems, make 1 is a term used when you increase by picking up the loop between stitches. Hope this helps.
27.10.2020 - 21:20Hi, wow many thanks for your helpful video reply. I really appreciate it. Love your site. Well wishes, Kirsty
28.06.2020 - 20:24Hi, Sorry to ask but how do you increase stitches please? I've done basic knit purl only, very new to knitting. Could knit shrug cardi as basic one. But when this lovely pattern talks about increasing 1 stitch to 2 etc im lost sorry. Anyone able to describe simply how to do this? Many thanks, Kirsty, Scotland
24.06.2020 - 08:02DROPS Design answered:
Dear Kirsty, you will increase in the purl-sections in rib - this video shows how to increase in purl stitches. Happy knitting!
24.06.2020 - 13:49To all the knitters who commented and asked questions, and to all the staff who answered the questions, I say THANK YOU. Without your help I may not have worked the pattern out by myself, but I am so glad I did. It is simple, when the light bulb goes off. I would suggest you look at the questions and answers until it makes sense. I do so LOVE this pattern . Thanks again everyone. Regards and happy knitting.
10.06.2020 - 15:30