
Popular categories
Looking for a yarn?


|
|||||||||||||||||||||||||
Moo |
|||||||||||||||||||||||||
 |
 |
||||||||||||||||||||||||
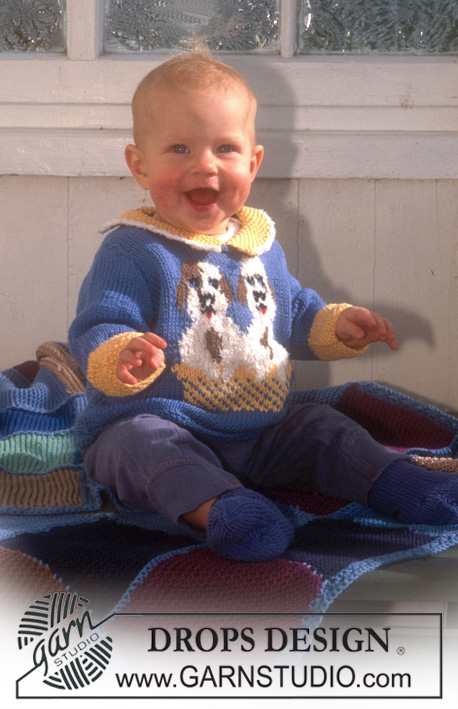
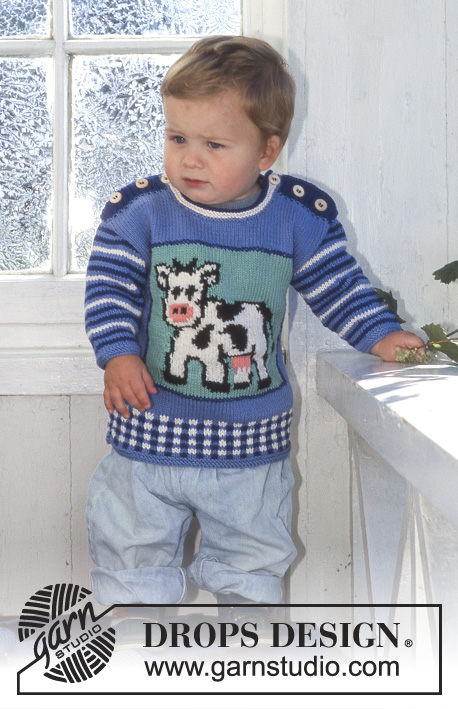
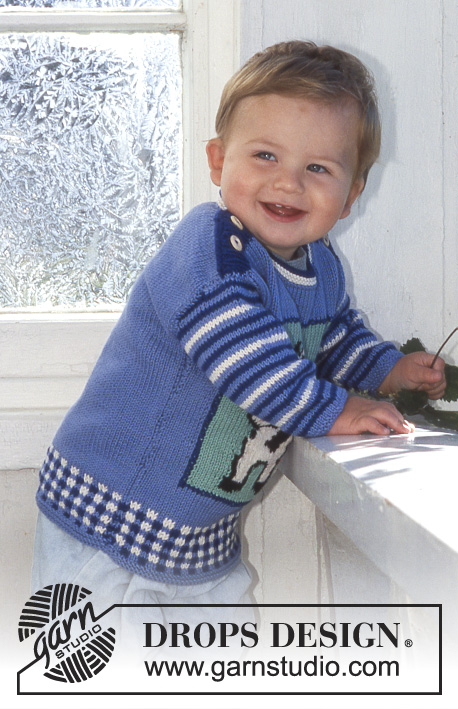
Sweater in Muskat with cow, stripes and squares.
DROPS Baby 6-24 |
|||||||||||||||||||||||||
|
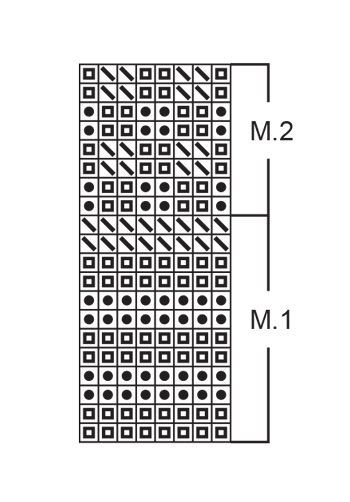
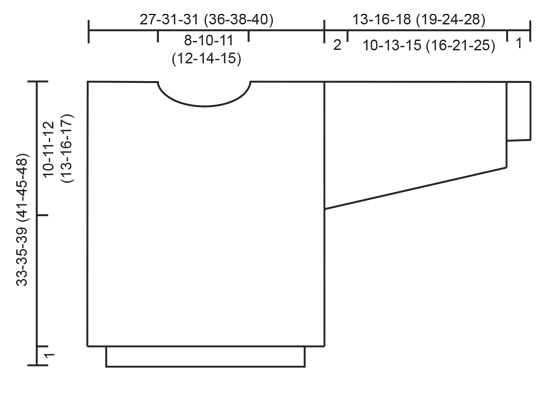
Gauge: 22 sts and 30 rows on larger needles in stockinette st = 10 x 10 cm . Garter Stitch, when knitting flat: Knit all sts, all rows. Garter Stitch, when knitting in the round: *Rnd 1, knit. Rnd 2, purl *. Repeat from * - *. Rib: *knit 1, purl 1*. Repeat from *-*. Pattern: See charts. The pattern is seen from the right side and is worked entirely in stockinette st. Front: Cast on 62-70-70 (82-86-90) sts (including 1 st at each edge for seam) on smaller needles with jeans blue and knit 4 rows garter st. Change to larger needles and knit Pattern M.2 until the work measures 5-6-8 (8-8-8) cm knit as follows: 5-9-9 (15-17-19) sts jeans blue, Pattern M.3a and M.3b, 5-9-9 (15-17-19) sts jeans blue (the royal blue border is put in afterwards in cross stitch). Use small balls or bobbins of dark mint on each side of the cow so that you do not float the yarn behind the cow. When Pattern M.3a and M.3b is finished continue to knit stockinette st and jeans blue. When the work measures 28-30-33 (35-39-41) cm bind off the center 6-10-10 (12-18-22) sts for the neck. Bind off at each neck edge every other row: 3 sts 1 time, 2 sts 1 time and dec 1 st 1-1-2 (2-1-1) times. When the work measures 31.5 - 33.5 - 37.5 (39.5 - 43.5 - 46.5) cm , change to royal blue and smaller circular needles and knit 3 cm rib for the buttonband - but after 1 cm make 2 buttonholes evenly distributed (1 buttonhole = bind off 2 sts and inc 2 new sts on the next row over the bound off sts). Finish with 2 rows garter st. The work measures 34.5 - 36.5 - 40.5 (42.5 - 46.5 - 49.5) cm and the rib measures 3 cm . Repeat on the other shoulder. Now embroider a row of cross sts around Pattern M.3a and M.3b with royal blue. Back: = Cast on and knit as on the front, but after Pattern M.2 continue knitting with stockinette st and royal blue (do not knit Pattern M.3a and M.3b). When the work measures 31.5 - 33.5 - 37.5 (39.5 - 43.5 - 46.5) cm , bind off the center 14-18-20 (22-26-30) sts for the neck. On the next row change to royal blue and smaller needles and knit 3 cm rib for the button band and at the same time bind off 2 sts at the neck edge on the following row. Finish with 2 rows garter st, bind off all sts. The work measures approx. 34.5 - 36.5 - 40.5 (42.5 - 46.5 - 49.5) cm . Sleeves: Cast on 34-34-36 (38-38-42) sts on smaller double pointed needles with jeans blue; join and place a marker at the join. Knit 4 rows garter st. Change to larger needles and knit Pattern M.1 to finished dimensions. At the same time, after the garter st edge, inc 1 st each side of marker 5-7-9 (10-16-16) times: Sizes 0/3 + 6/9 mos.: every 5th row Size 12/18 mos.: alternately every 4th and 5th row Sizes 2 + 5/6 years: every 4th row Size 3/4 years: alternately every 3rd and 4th row = 44-48-54 (58-70-74) sts. When the work measures 11-14-16 (17-22-26) cm bind off 3 sts each side of marker. Bind off at each side every other row: 4-5-5 (6-7-8) sts 3 times. Bind off all sts. The work measures approx. 13-16-18 (19-24-28) cm . Assembly: Pick up approx. 50-60 sts around the neck in the front and over the sides of the buttonbands on each shoulder on smaller needle with jeans blue and knit 2 rows garter st, change to white and knit 4 rows garter st, change to royal blue and knit 2 rows garter st and at the same time, after the 1st "ridge" make 1 buttonhole in line with the buttonholes in the buttonbands. Pick up approx. 40-50 sts around the neck in the back and over the sides of the buttonbands on each shoulder on smaller needle with jeans blue and knit 2 rows garter st, change to white and knit 4 rows garter st, change to royal blue and knit 2 rows garter st, bind off all sts. Sew shoulder seams. Sew in the sleeves. Sew on buttons. |
|||||||||||||||||||||||||
Diagram explanations |
|||||||||||||||||||||||||
|
|||||||||||||||||||||||||
|
|||||||||||||||||||||||||

|
|||||||||||||||||||||||||
|
|||||||||||||||||||||||||
|
Have you made this or any other of our designs? Tag your pictures in social media with #dropsdesign so we can see them! Do you need help with this pattern?You'll find tutorial videos, a Comments/Questions area and more by visiting the pattern on garnstudio.com. © 1982-2024 DROPS Design A/S. We reserve all rights. This document, including all its sub-sections, has copyrights. Read more about what you can do with our patterns at the bottom of each pattern on our site. |
|||||||||||||||||||||||||


With over 40 years in knitting and crochet design, DROPS Design offers one of the most extensive collections of free patterns on the internet - translated to 17 languages. As of today we count 304 catalogues and 11422 patterns - 11422 of which are translated into English (UK/cm).
We work hard to bring you the best knitting and crochet have to offer, inspiration and advice as well as great quality yarns at incredible prices! Would you like to use our patterns for other than personal use? You can read what you are allowed to do in the Copyright text at the bottom of all our patterns. Happy crafting!
Comments / Questions (10)
Hej! När jag har jort alla ökningar och avmaskningarna på armen (2 år) Hur många maskor blir det kvar på armen att avmaska på slutet.
25.11.2022 - 12:50DROPS Design answered:
Hej Anita, du har 58 masker, lukker 6 masker af og så 6 masker af i hver side 3 gange. 58-6-18-18 = 16 masker tilbage :)
30.11.2022 - 13:57Ik ben een beginner met breien. Heeft u een makkelijk patroon van een trui voor een kind van 1 jaar.
12.02.2021 - 14:49DROPS Design answered:
Dag Anneke,
In de categorie 'Baby' vind je alle babypatronen en daar zitten ook makkelijke patronen bij, bijvoorbeeld patroon 36-13 of 31-18.
16.02.2021 - 15:35Pensez vous qu il soit possible d adapter la taille de ce pull à une taille adulte? Si oui comme t puis je faire? Merci pour votre reponse
19.01.2019 - 13:54DROPS Design answered:
Bonjour Mme Genre, c'est probablement possible, mais nous ne sommes malheureusement pas en mesure de pouvoir adapter chacun de nos modèles à chaque demande. Pour toute assistance complémentaire, merci de bien vouloir contacter - même par mail ou téléphone - votre magasin DROPS. Bon tricot!
21.01.2019 - 10:06Jeg kan ikke finde diagram til flg: Baby 6-24,/ Baby/ 2 - 4, og DROPS BABY 2-9. Er de udgået
03.12.2017 - 01:40DROPS Design answered:
Hei Tove. Diagrammene finner du nederst på siden. Diagrammene til Baby 2-9 manglet, men de er nå lagt til. mvh Drops design
05.12.2017 - 11:41Hoi Drops Design, Inmiddels heb ik de koe in wit ingebreid en ben aan het mazen geslagen. Horizontaal gaat dat prima, maar verticaal geeft geen mooi resultaat...en er zitten nogal wat verticale lijnen in het patroon! Ik heb de tutorial voor mazen wel 10x bekeken en ik doe niks fout. Is dit materiaal (heel gladde katoen) wel geschikt om te mazen?
10.02.2016 - 17:58DROPS Design answered:
Hoi Marijke. Wij hebben nog niet eerder klachten of problemen hiermee gehad. Als je het zelf niet mooi vindt, dan kies een ander garen om mee te mazen ;-)
11.02.2016 - 14:09Ik vraag me af of de beschrijving overeenkomt met de wijze waarop het voorbeeld gemaakt is. Ik ben een goede breister, maar de koe helemaal in kleur inbreien is bijna onmogelijk - op een gegeven moment zit je met zeven bolletjes wol. Na elke naald moet je de boel uit de knoop halen. Het resultaat is niet mooi: het trekt aan alle kanten. Ik denk dat je de koe beter geheel in wit kunt inbreien, en dan later de zwarte lijnen en vlekken, en de uier en neus er op mazen.
08.02.2016 - 17:32DROPS Design answered:
Hoi Marijke. De trui zou gebreid moeten zoals beschreven, ik weet het niet zeker omdat het een oud patroon is. Maar vind je het prettiger om de st later op te mazen, dan mag dat natuurlijk :-)
09.02.2016 - 13:54Ik zou graag willen weten of ik dit patroon ook groter kan krijgen. Mijn moeder wil de koe voor mij op een baby dekentje haken of breien en zij weet niet hoe zij de afbeelding moet vergroten. Ik hoop dat u mij hierop antwoord kan geven. Met vriendelijke groet, Marleen
10.01.2015 - 11:08DROPS Design answered:
Hoi Marleen. Ik kan je helaas niet helpen om het motief groter te maken, maar je kan het motief uitprinten en zelf groter tekenen - eventueel het aantal steken verdubbelen. De uiteindelijke grootte van de koe hangt er ook vanaf hoe dik het garen is,
13.01.2015 - 14:23På hver pinne fra mitten feller du: 1 gang 3 masker, 1 gang 2 masker og 1-1-2 (2-1-1) gang 1 maske.
24.10.2011 - 12:21Forstår ikke helt hvordan jeg skal felle til hals på forstk.. Hva menes med: Videre felles det til hals på hver 2.p: 3 m x 1, 2 m x 1 og 1 m x 1-1-2 (2-1-1). ?
21.10.2011 - 20:55Jeg mangler en vejledning i at strikke med flere farver. Det er en god video I har lagt på, hvordan man strikker med 2 farver. Men er ved at strikke koen på denne drengetrøje, og det er sku en udfordring.Både at holde styr på alle nøglerne, men specielt den sorte tråd på koens ben, skal den med til kanten for ikke at stramme osv. Har I en video med vejledning til bla denne trøje. Kan se I har mange spændende mønstre på trøjerne, men det er svært at strikke uden det kommer til at stramme.
15.05.2011 - 22:49