
Popular categories
Looking for a yarn?


|
||||
Tamzyn |
||||
 |
 |
|||
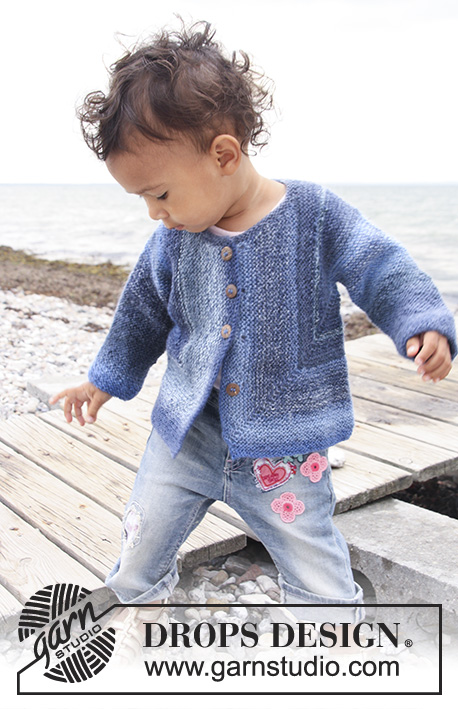
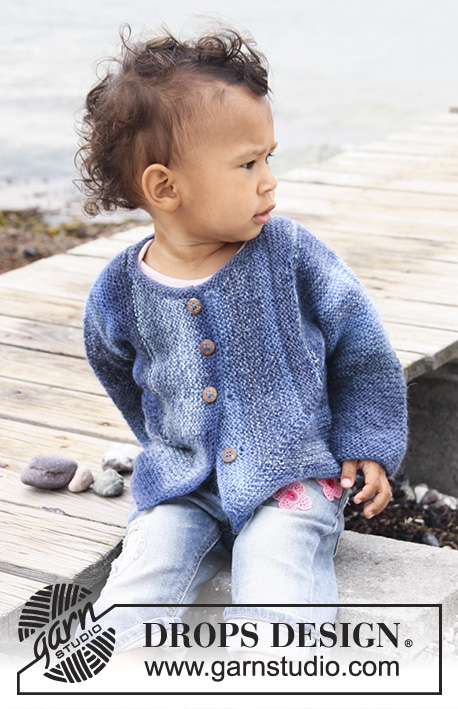
Knitted domino jacket in garter st for baby and children in DROPS Delight
DROPS Baby 20-15 |
||||
|
INCREASE TIP: Inc 1 st in each side of marker by making 1 YO. Work YO twisted on next row (i.e. knit in back loop of st instead of front loop) to avoid holes. ---------------------------------------------------------- JACKET: Work the piece sideways. Work 2 pieces and finish by sewing pieces tog in the back. Work the pieces from the sleeve towards the mid of jacket. RIGHT HALF: Worked back and forth on circular needle. Cast on 36-38-40 (40-42-44) sts on circular needle size 3 mm with Delight. K back and forth on all rows until completed (= garter st). REMEMBER THE KNITTING TENSION! AT THE SAME TIME when piece measures 6-6-5 (5-6-6) cm, inc 1 st in each side, repeat the inc on every 8th row a total of 6-7-9 (11-13-14) times = 48-52-58 (62-68-72) sts. Work until piece measures 17-19-20 (25-29-33) cm – adjust so that the last row is worked from WS. BODY: K 1 row (= RS), at end of row cast on 41-43-50 (53-58-60) sts (= towards the back) = 89-95-108 (115-126-132) sts. NOW MEASURE PIECE FROM HERE! K 1 row, turn, insert a marker in the 2nd st on needle from RS (= in right side). Continue – AT THE SAME TIME inc 1 st on each side of the st with marker every other row a total of 38-40-46 (48-50-52) times – SEE INCREASE TIP. AT THE SAME TIME when piece measures 8.5 - 9 - 10.5 (11 - 12 - 13) cm work only over the last 60-65-74 (79-86-91) sts in the left side seen from RS (= back piece), slip the remaining sts on a stitch holder. BACK PIECE: Work until piece measures 13-14-16 (17-18-19) cm (from where back piece sts was cast on), cast off. FRONT PIECE: Put sts from stitch holder back on needle but leave 9-10-10 (10-12-12) sts towards the back on the stitch holder for neckline. Continue inc on every other row – AT THE SAME TIME dec 1 st towards the neck (= towards sts on stitch holder) on every 4th row a total of 6-7-7 (7-7-7) times. AT THE SAME TIME when piece measures 14-15-17 (18-19-20 cm (from where inc on front piece started and towards mid front) cast off for 3-4-4 (5-5-5) button holes as follows (from neck, i.e. from WS): K 2, cast off 2 sts, * K 12-9-11 (9-10-10) sts, cast off 2 sts *, repeat from *-* a total of 2-3-3 (4-4-4) times, K rest of row. On next row cast on 2 new sts over the cast off sts. After all inc and dec there are 90-93-109 (115-121-126) sts on the needle. When finished with inc on right side, cast off 51-52-62 (66-70-74) sts from the neckline and down the front band of jacket (cast off from WS) = 39-41-47 (49-51-52) sts left on needle. K back and forth over these sts for approx. 1-1-2 (2-3-3) cm (fold piece at the shoulder and check that the front piece is the same length as back piece). Cast off. LEFT HALF: Work as right half but without button holes – this piece is assembled with wrong side out. ASSEMBLY: Put the 2 pieces towards each other and sew tog mid back – sew edge to edge to avoid a chunky seam. Fold the jacket and sew underarm and side seams in front loop of outermost sts. Sew on buttons. NECKLINE: Knit up 55 to 80 sts (including sts on stitch holder) around the neck on circular needle size 3 mm with Delight. K 3 rows back and forth, cast off. |
||||
Diagram explanations |
||||
|
||||

|
||||
|
Have you made this or any other of our designs? Tag your pictures in social media with #dropsdesign so we can see them! Do you need help with this pattern?You'll find tutorial videos, a Comments/Questions area and more by visiting the pattern on garnstudio.com. © 1982-2024 DROPS Design A/S. We reserve all rights. This document, including all its sub-sections, has copyrights. Read more about what you can do with our patterns at the bottom of each pattern on our site. |
||||


With over 40 years in knitting and crochet design, DROPS Design offers one of the most extensive collections of free patterns on the internet - translated to 17 languages. As of today we count 304 catalogues and 11422 patterns - 11422 of which are translated into English (UK/cm).
We work hard to bring you the best knitting and crochet have to offer, inspiration and advice as well as great quality yarns at incredible prices! Would you like to use our patterns for other than personal use? You can read what you are allowed to do in the Copyright text at the bottom of all our patterns. Happy crafting!
Comments / Questions (191)
Bonjour , il s'agit des augmentations , A combien du bort ?
14.04.2024 - 17:49DROPS Design answered:
Bonjour Mme Latri, les augmentations du devant se font de chaque côté de la maille avec le marqueur, autrement dit, le marqueur doit toujours rester dans cette maille et le nombre de mailles avant/après cette maille avec un marqueur va augmenter - cf diagonale dans le schéma. Bon tricot!
15.04.2024 - 08:21Questo modello si può fare per una misura da adulto?
08.01.2024 - 22:35DROPS Design answered:
Buongiorno Franca, questo modello è stato pensato per taglie da bambino, sul nostro sito può trovare tantissime ispirazioni gratuite per modelli da adulto. Buon lavoro!
09.01.2024 - 16:23Hej Jeg bil gerne vide om denne opskrift findes til voksne. Og hvis den gør så hvor . På f orhånd tak Venlig hilsen christa
27.11.2023 - 15:23Bonjour, une question concernant boutonnières combien de rangs y a t-il après les boutonnières? Moi j ai plus de 20 rangs après
08.11.2023 - 22:07DROPS Design answered:
Bonjour Raymonde, vous ne devez pas avoir autant de rangs après les boutonnières, les boutonnières sont faites à 14-15-17 (18-19-20) cm - mesurés le long du bas du devant et le devant mesure 16-17-19 (20-21-22) cm (cf schéma). Bon tricot!
09.11.2023 - 08:27Wenn ich nach dem Ärmel die Maschen zunehme, auf welcher Seite und. immer 2? Liebe Grüße Brigitte
13.05.2023 - 22:53DROPS Design answered:
Liebe Brigitte, nach dem Ärmel werden die neuen Maschen am Ende einer Hinreihe für das Rückenteil angeschlagen; stricken Sie dann die Rückreihe. Setzen Sie jetzt eine Markierung in die 2. Maschen der nächsten Hinreihe und jetzt werden Sie beidseitig von dieser Maschen für das Vorderteil zunehmen (die Masche mit der gestrichen Linien). Viel Spaß beim stricken!
15.05.2023 - 08:40Hallo und schönen Abend, Nehme ich beim Rumpfteil immer vor und nach der vorletzten Masche zu, oder immer dort wo ich als erstes den Markierer eingesetzt habe? Vielen Dank und liebe Grüße aus Wien. Brigitte
12.05.2023 - 22:52Hej! När ökningarna på varje sida maskmarkören gjorts på FRAM BAKSTYCKE och man går över till att enbart sticka maskorna på vänster sida, hur många maskor totalt ska det då vara på stickan i storlek 12/18 mån? Hälsningar, Ingrid
03.05.2023 - 06:47DROPS Design answered:
Hej Ingrid, du har 58 m, slår 50 masker op til ryggen, økar 2 m på vartannant varv (totalt 46 gg på framstycket) men når arb måler 10,5 cm (enligt stickfastheten har du 48v på 10 cm) har du ökat ca 25 ggr x 2 m så ca 52 m på framstycket :)
09.05.2023 - 10:14Is dit patroon ook beschikbaar voor volwassenen?
05.03.2023 - 16:58DROPS Design answered:
Dag Gerda,
Nee, helaas is dit patroon er alleen voor babymaten.
Misschien kun je wel iets vinden als je zoekt op damesvesten in DROPS Delight.
08.03.2023 - 12:56Bonjour Tous les tutos que vous publiez en rapport aux jetés sont sur du jersey donc rang suivant envers mais dans ce modèle au point mousse comment tricoter le jeté torse ? Nous tenons notre fil de la main droite ce qui augmente la difficulté pour les tutos ! J’aimerais vraiment tricoter ce modèle mais les jetés me résistent !
30.01.2023 - 12:41DROPS Design answered:
Bonjour Mme Estadieu, tricotez le jeté dans le brin arrière (donc pas le brin face à vous mais celui qui se trouve plutôt de l'autre côté de l'aiguille) et tricotez simplement à l'endroit, ce qui va donner l'effet "torse" est de le tricoter dans le brin arrière - quand vous regardez les vidéos, suivez le fil par rapport à l'aiguille, ce sera la même chose, quelle que soit la main avec laquelle vous tenez votre fil. Bon tricot!
30.01.2023 - 15:58Ich möchte die Jacke in Größe 3-4-Jahre stricken, aber MIT KAPUZE. Wie stricke ich die, wenn ich da auch gerne einen " Zacken " drin haben möchte? Danke Angela
15.01.2023 - 21:44DROPS Design answered:
Liebe Frau Vigelahn, leider können wir nicht jede Anleitung nach jeder Anfrage anpassen - vielleicht können Sie zuerst die Jacke stricken dann die Maschen auffassen um die Kapuze zu stricken. Gerne kann Ihnen Ihr DROPS Händler damit - auch per Telefon oder per E-Mail - helfen, eine Kapuze dazu zu stricken. Viel Spaß beim stricken!
16.01.2023 - 10:26