
Popular categories
Looking for a yarn?


|
||||||||||||||||
DROPS 95-21 |
||||||||||||||||
|
|
||||||||||||||||
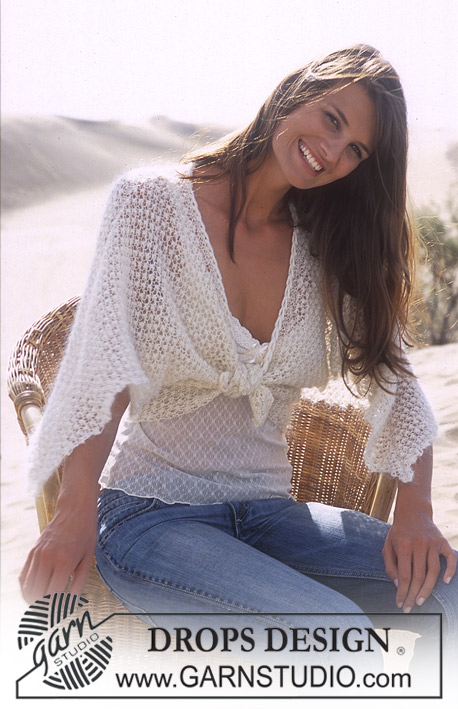
DROPS Cardigan knitted in lace pattern with Silke-Tweed.
DROPS 95-21 |
||||||||||||||||
|
Knitting Gauge: 23 sts x 30 rows on needles size 3.5 mm in stocking sts = 10 x 10 cm. 20 sts x 27 rows on needles size 4 mm in stocking sts= 10 x 10 cm. Rib: *K2, P3*, repeat from *-* Lace Pattern: See diagram M.1 to M.3. The diagrams are seen from the right side. Increasing tips (for the front edge): Inc inside the outer edge sts at the centre front edge as follows: Make a yo. On the next row twist the yo 1 time and K it. Bind off tips (for the neckline): Bind off inside the 3 edge sts. All bind off’s to be done from the right side. Bind off as follows after the 3 edge sts: Slip a st as if to knit, K1, psso. Bind off before the 3 edge sts: K2 tog. Front edge: The front edge is knitted in garter sts up to the neck – to make sure the front edge will look nice knit it a little tight. Front and Back Piece: The cardigan is knitted forward and backward on circular needles starting from the centre front. Cast on loosely 207-232-247-277-307-337 sts (inclusive of 5 edge sts each side = centre front) on needles size 3.5 in Silke-Tweed. P 1st row from the wrong side, and continue in Rib with 5 edge sts in garter sts each side (make sure you start and finish the rib with K2 and then the edge sts). When the piece measures 3 cm dec all P3 to P2 = 168-188-200-224-248-272 sts. Continue the rib K2/P2 until the piece measures 10-10-11-11-12-12 cm, make sure the next row starts from the right side. Change to needles size 4 and continue in stocking sts (knit the 5 edge sts in gartr sts) at the same time adjusting the number of sts on row to 167-191-203-227-251-275 – NB: Do not inc. or dec on the front edges. Please read the rest of the front and back piece section before continuing! Pattern: When the piece measures 13-14-15-16-17-18 cm knit the next row from the right side as follows: 5 edge sts, M.1A (=16 sts), M.1B over the next 132-156-168-192-216-240 sts, M.1C (= 9 sts) and 5 edge sts. Continue M.1 - 1 repeat. At the same time insert a marking thread 44-50-53-59-65-71 sts in from each side = 79-91-97-109-121-133 sts between the marking threads for the back piece. When finished with M.1 continue in M.2 in the same way: 5 edge sts, M.2A (= 16 sts), M.2B on the next 132-156-168-192-216-240 sts, M.2C (= 9 sts) and 5 edge sts. Continue M.2 until the piece measures 40-41-42-43-44-45 cm (adjust the length to a finished pattern repeat). Continue in M.3 – 1 repeat the same way (5 edge sts at each side). Continue in stocking sts until finished measurements (front edge and sts for the neck knitted in garter sts as explained in the pattern). Front edge shaping: At the same time when the piece measures 13-14-15-16-18-19 cm inc. for the front edge shaping – see increasing tips – as follows: 1 st on every 4-4-3.5-3.5-3-3 cm a total of 8-8-9-9-10-10 times. Armholes: At the same time when the piece measures 35-36-37-38-39-40 cm bind off for armholes each side as follows: 6-6-8-8-10-10 sts (3-3-4-4-5-5 sts each side of the marking threads). Continue to knit each piece separately. Back piece: = 73-85-89-101-111-123 sts. Bind off for armhole each side on every other row as follows: 3 sts 0-0-0-1-1-2 times, 2 sts 0-2-2-3-5-5 times and 1 sts 2-3-4-4-4-6 times = 69-71-73-75-77-79 sts – continue pattern as before but with a seam st each side (all seam sts are knitted in garter sts) -NB: When binding off for armholes K sts not fitting into a hole pattern line. Make sure that the number off sts in the pattern remain constant, i.e. as many yo's as sts knitted tog. After 1 repeat of M.3 continue in stocking sts. When the piece measures 51-53-55-57-59-61 cm knit 4 rows of garter sts over the centre 25-27-27-29-29-31 sts (all other sts are knitted as before). On next row bind off the centre 19-21-21-23-23-25 sts for neck. Continue to bind off 1 st on each neckline – see bind off tips = 24-24-25-25-26-26 sts left on each shoulder. Continue in stocking sts and 3 garter sts at each neck side until the piece measures 54-56-58-60-62-64 cm. Bind off. Left front: Continue the pattern as before and at the same time continue the inc. for the front edge shaping. At the same time bind off for armhole as done for the back piece. After all inc. and dec. are complete there are 47-48-50-51-53-54 sts left on row (- 1 seam sts, 33-34-35-36-37-38 pattern sts and 13-13-14-14-15-15 garter sts for the edge at the centre front). At the same time after the last inc. on front edge (the piece now measures approx. 41-42-43-44-45-46 cm), bind off the outermost 10-10-11-11-12-12 edge sts at the centre front edge for neck. Continue to bind off 1 st on neckline on every other row – see bind off tips – a total of 13-14-14-15-15-16 times = 24-24-25-25-26-26 sts left for shoulder. When the piece measures 54-56-58-60-62-64 cm bind off remaining sts. Right front: Knit as left front but reverse. Sleeve: Knit forward and backward on circular needles. Cast on loosely 77-77-77-92-92-92 sts (inclusive of 1 seam st each side) on needles size 3.5 mm with Silke-Tweed. P 1st row from the wrong side, and continue in Rib with 1 seam st each side. When the piece measures 4 cm dec every 3rd P3 to P2 = 72-72-72-86-86-86 sts. Repeat the dec at 8 and 12 cm and make sure that when all P-reports have been dec to P2, there are K2/P2 over all sts with a seam st each side = 62-62-62-74-74-74 sts. Continue the rib until the piece measures 13-13-14-14-15-15 cm, make sure the next row starts from the right side. Change to knitting needles size 4 and continue in stocking sts at the same time adjusting the number of sts on row to 51-55-57-59-61-63. Please read the rest of the sleeve section before continuing! Pattern: When the piece measures 16-16-17-17-18-18 cm knit the next row from the right side as follows: 1 seam st, 0-2-3-4-5-6 sts stocking sts, M.1A (=16 sts), M.1B over the next 24 sts, M.1C (= 9 sts), 0-2-3-4-5-6 sts stocking sts and 1 seam st. Continue M.1 - 1 repeat, and then knit M.2 the same way – remember to knit the inc sts each side in stocking sts – see explanation below. When the piece measures approx. 29-29-30-30-31-31 cm - adjust the length to a finished pattern repeat - continue M.3 - 1 repeat, the same way, and then continue in stocking sts until finished mesurements. Increasing: At the same time when the piece measures 17-17-18-18-19-19 cm inc 1 st each side a total of 10-11-11-14-15-16 times Size XS: Alternate between every 4th and 5th row. Size S: every 4th row. Size M: Alternate between every 3rd and 4th row. Size L: Alternate between every 2nd and 3rd row. Size XL: Every other row. Size XXL: On every row = 71-77-79-87-91-95 – knit new sts in stocking sts. Sleeve cap: When the piece measures 35-34-33-32-30-38 cm bind off for sleeve cap each side on every other row as follows: 4 sts 1 time, 3 sts 1 time, 2 sts 2-3-3-4-4-4 times and 1 st 1-3-4-4-7-8 times, continue to bind off 2 sts each side until piece measures 41-42-42-42-42-42 cm. Then bind off each side 3 sts 1 time. When the piece measures 42-43-43-43-43-43 cm bind off the remaining sts. Knit the other sleeve. Assembly: Sew shoulders seams. Sew the sleeve and the sides tog. inside of the seam sts. Sew in the sleeves. Button loops: Crochet 3 -4 loops along the right front edge with hook size 3 in Silke-Tweed. Place the top loop approx 0.5 cm from the top of the front edge. Place the other loops with a space of approx 6-8 cm in between. 1 loop = 1 dc in a st, 6 ch, skip 8 rows of garter sts and fasten with a sl st in the next st. Sew the button on the inside of the left front edge – see picture. |
||||||||||||||||
Diagram explanations |
||||||||||||||||
|
||||||||||||||||

|
||||||||||||||||
|
Have you made this or any other of our designs? Tag your pictures in social media with #dropsdesign so we can see them! Do you need help with this pattern?You'll find tutorial videos, a Comments/Questions area and more by visiting the pattern on garnstudio.com. © 1982-2024 DROPS Design A/S. We reserve all rights. This document, including all its sub-sections, has copyrights. Read more about what you can do with our patterns at the bottom of each pattern on our site. |
||||||||||||||||


With over 40 years in knitting and crochet design, DROPS Design offers one of the most extensive collections of free patterns on the internet - translated to 17 languages. As of today we count 304 catalogues and 11422 patterns - 11422 of which are translated into English (UK/cm).
We work hard to bring you the best knitting and crochet have to offer, inspiration and advice as well as great quality yarns at incredible prices! Would you like to use our patterns for other than personal use? You can read what you are allowed to do in the Copyright text at the bottom of all our patterns. Happy crafting!
Comments / Questions (26)
Ich bin beim linken Vorderteil. Abnahme für den Halsausschnitt.Da bin ich mir unsicher Gr.S: Vorteile+Rückenteil wird bei 36cm separat gestrickt. Bei 41cm soll ich schon für den Ausschnitt abnehmen? Die wenn ich 8x alle 4cm an derBlende zunehme, bin ich da noch garnicht fertig. Kann das sein, dass 41cm ohne Bündchen gemeint ist?
18.02.2023 - 18:13DROPS Design answered:
Liebe Frau Rombach, Halsausschnitt beginnt man wenn die Arbeit 42 cm (Größe S = 2. Größe) ab der Anschlagskante misst, dann nehmen Sie 1 Masche in jeder 2. Reihe 14 Mal ab, und stricken Sie bis die Arbeit 56 cm misst. Viel Spaß beim stricken!
20.02.2023 - 09:43Bonjour, je n'ai pas compris comment se tricote le motif M3??? Pouvez vous m'expliquer s'il vous plaît, merci.
14.08.2019 - 17:41DROPS Design answered:
Bonjour Mme Chtioui, M.3 va se tricoter ainsi: on commence par M.3A (après les 5 m point mousse), on répéte M.3B jusqu'à ce qu'il reste 14 mailles, on tricote ensuite M.3C et on termine par les 5 m au point mousse. Bon tricot!
15.08.2019 - 09:28Kathy wrote:
I wrote the chart into a line by line pattern, For instance Line 1 of M2 would read K4, *K2tog, YO, K1, YO, S1K1Psso, K7, repeat from *, K4. Looking at other people's completed sweaters, it looks like the YO is made before the decrease to create the chain looking diagonal row of decreases. Did I translate the chart correctly? Or is the YO worked before the decrease.
31.05.2017 - 01:28DROPS Design answered:
Dear Kathy, almost correct, M.2A= K4, K2 tog, YO, K1, YO, S1K1psso, K7 - M2B = K2 tog, YO, K1, YO, S1K1psso, K7 - M2C = K2 tog, YO, K1, YO, S1k1psso, K4. Happy knitting!
31.05.2017 - 08:37I don't understand the Front Edge Shaping instructions. Do the cms refer to length of garment and is the increase at the beginning and end of the row? I am very confused. Would appreciate it if someone could help me. Thank you
09.10.2016 - 15:40DROPS Design answered:
Dear Fanny, the cms refers to the entire length, so you'll start working the front shaping when you'll start the pattern. You've to increase following the instructions stated in the increasing tip. Happy knitting!
10.10.2016 - 07:17Hi ....i knitted M2 for 1 time . should i repeat it and then finish with M3 once ?? thank you
26.02.2016 - 22:18DROPS Design answered:
Dear Mrs Mervat, you first work M.1 1 time in height, then repeat M.2 in height until piece measures 40-45 cm (see size - adjust to a complete diagram), then work M.3 1 time in height and continue in stocking st until finished measurements. Happy knitting!
27.02.2016 - 16:29Merci de votre réponse super je vais pouvoir continuer le tricot.
17.03.2015 - 13:34Bonjour, Je ne comprends pas le motif m1b car il se tricote sur 11m et j'ai 192 m donc 192: 11 =17,45 et j'ai essayé mais soit il me manque 5m ou soit 5 de trop. Pourtant j'ai le même nombre de mailles que sur le modèle. Pouvez vous m'aider merci
17.03.2015 - 11:19DROPS Design answered:
Bonjour Mme Loucart, M1B se tricote sur 12 m (Rang 1 = 2 m ens à l'end, 1 jeté, 1 m end, 1 jeté, 1 surjet simple, 7 m end), on va le répéter 16 fois = 192 m. Bon tricot!
17.03.2015 - 13:28I am about to knit this pattern and have circled the size I am going to make. There seem to be 3 places where there are only 5 options though there are 6 sizes. 1)'front edge shaping' line 2 and 2) 'back piece' line 1 and line 6. Have you any corrections for this? Many thanks
01.04.2014 - 20:34DROPS Design answered:
Dear Mrs Matthews, pattern have been edited so that there are all indications for all sizes now. Thank you very much for your patience. Happy knitting!
05.05.2014 - 13:46Nr of stitches on sleeve for the second size don't match. When starting stockinette the patt. says 55 sts although the first lace part only adds up 53 sts.
20.02.2013 - 21:58DROPS Design answered:
Dear Blahblah, in 2nd size, you will work pattern as follows : 1 edge st, 2 sts stocking sts, M.1A (=16 sts), M.1B over the next 24 sts, M.1C (= 9 sts), 2 sts stocking sts and 1 edge st = 55 sts. Continue with M.2 as for M.1. Happy knitting!
21.02.2013 - 11:32The translations for the Diagrams for all Garnstudio patterns are included within the text of the Pattern itself. If you look you will find lines starting with an = sign. These are the translations, and they are given in the same vertical order as the chart symbols within the diagram.
18.05.2008 - 21:28