
Popular categories
Looking for a yarn?


|
||||||||||
DROPS 88-4 |
||||||||||
|
|
||||||||||
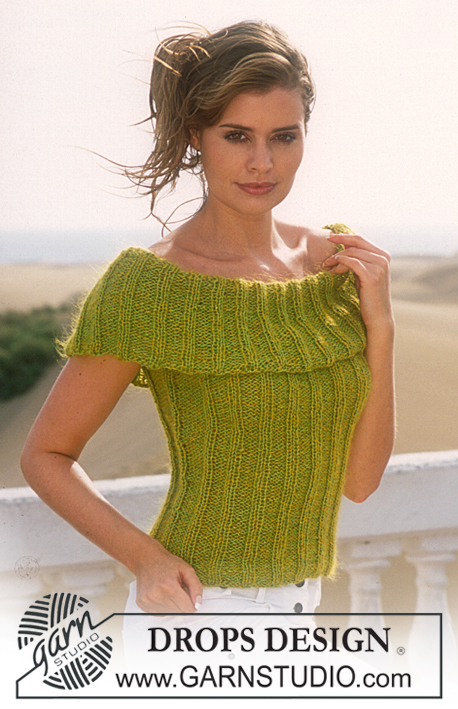
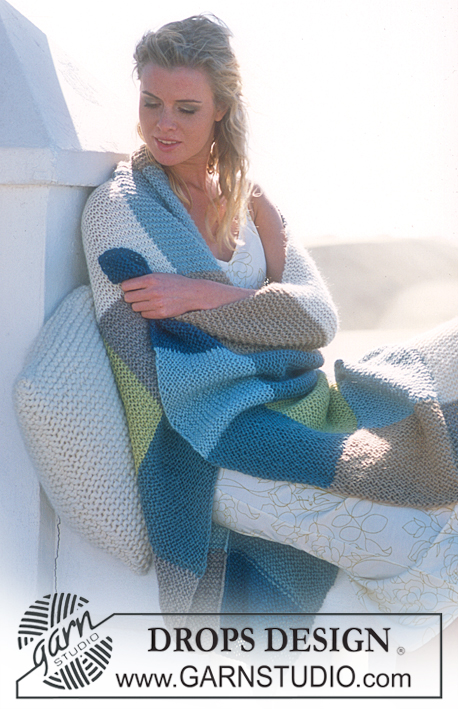
DROPS Cardigan in Alpaca with glitter
DROPS 88-4 |
||||||||||
|
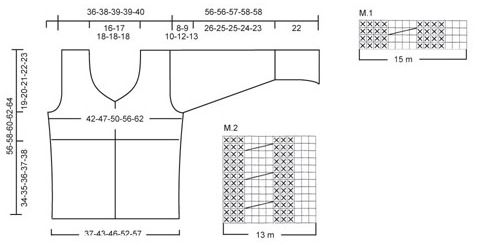
Knitting Tension: 3.5mm needle: 23 sts x 30 rows = 10 x 10 cm. 4.5mm needle: 20 sts x 26 rows = 10 x 10 cm Front band: knitted in garter stitch. Buttonholes: Make buttonholes on right front band from the right side as follows: K 1, K2 tog, yon. On next row knit yon. Make buttonholes as follows: XS/S: 10, 20, 30 and 40 cm S/M: 11, 21, 31 and 41 cm M/L: 10, 18, 26, 34 and 42 cm XL: 10, 19, 27, 35 and 43 cm XXL: 10, 18, 27, 36 and 45 cm Neckline: *knit until there’s 1 st left on needle, turn, put this st on thread*, repeat from *-* until finished measurements. Pattern: See chart M.1 and M.2. The pattern is seen from the right side and the entire pattern is knitted in stocking stitch. English translations for the wording in the diagram are given at the bottom of this pattern, and they are given in the vertical order in which they appear in the diagram. Body: The jumper is knitted back and forth on circular needles. Cast on 223-253-268-313-343 sts (incl 5 front band sts either side)on 3.5 needle and 1 thread Alpaca and 1 thread glitter. Purl one row and continue as follows: 5 front band sts in garter, M.1 over the next 210-240-255-300-330 sts, 3 sts in stocking stitch, 5 front band sts in garter. After 1 report of M.1 (4 rows), decrease the 4 purled sts to 3 = 195-221-234-273-299 sts. Continue as follows: 5 front band sts in garter, M.2 over the next 182-208-221-260-286 sts, 3 sts in stocking stitch, 5 front band sts in garter. Remember buttonholes! Read all of the next section before knitting it: Yoke: When piece measures approx 34-35-36-37-38 cm (adjust so that you’ve knitted one row after a cable) put the 5 front band sts either side on thread = 185-211-224-263-289 sts. Knit 1 row from the right side and 1 from wrong side (garter), change to needle 4.5mm and stocking sts and at the same time, decrease 17-23-24-39-41 sts evenly on row = 168-188-200-224-248 sts. Insert a marking thread 42-47-50-56-62 sts from each side = 84-94-100-112-124 sts between marking threads = back piece. Armhole: At the same time, when piece measures 37-38-39-40-41 cm, decrease 6-6-6-8-10 sts each side for armhole (i.e. 3-3-3-4-5 sts either side of the marking threads) = 78-88-94-104-114 sts on back piece and 39-44-47-52-57 sts on each front piece. Finish each piece separately. Back piece: = 78-88-94-104-114 sts. Decrease for armhole each side on every other row as follows: 2 sts 0-1-2-3-4 times and 1 st 3-4-4-7-9 times = 72-76-78-78-80 sts. When piece measures 54-56-58-60-62 cm, cast off middle 28-30-32-32-32 sts for neckline and finish each shoulder separately. Decrease 1 st on every other row twice = 20-21-21-21-22 sts left on shoulder. Cast off when piece measures 56-58-60-62-64 cm. Right Front: = 39-44-47-52-57 cm. Decrease for armhole as on back piece. At the same time, when piece measures 41-4243-44-46 cm, put the 5-6-7-7-7 sts towards mid front on thread for neckline. Decrease to shape the neckline on every other row as follows: 2 st 2 times, 1 st 4 times; thereafter on every 4th row: 1 st 3 times. After all decreases for armhole and neck, there are 20-21-21-21-22 sts left on shoulder. Cast off when piece measures 56-58-60-62-64 cm. Left Front: as right, but mirrored. Sleeves: Back and forth on circular needle. Cast on 77-77-77-92-92 sts loosely on needle 3.5mm and 1 thread Alpaca and 1 thread Glitter. Purl one row and continue in M.1 with 1 edge st each side. After 1 report of M.1 (4 rows), decrease the 4 purled sts to 3 = 67-67-67-80-80 sts. Continue in M.2 with one edge st each side. When sleeve measures approx 20 cm (adjust so that you’ve knitted one row after a cable), knit one row from the right side and one from the wrong side (garter), change to needle 4.5mm and stocking sts whilst decreasing 13-9-7-18-16 sts evenly on row = 54-58-60-62-64 sts. At the same time, when sleeve measures 22 cm, increase 1 st each side every 4-3-2.5-2-1.5 cm a total of 7-8-9-11-13 times = 68-74-78-84-90 sts. When sleeve measures 48-47-47-46-45 cm, decrease for armhole each side on every other row as follows: 4 sts 1 time, 3 sts 1 time, 2 sts 2 times and 1 st 2-4-4-7-8 times. Thereafter decrease 2 sts each side until sleeve measures 55-55-56-57-57 cm. On next row decrease 3 sts each side and cast off remaining sts when sleeve measures approx 56-56-57-58-58 cm. To make up: Join shoulders. Front band: Put the 5 front band sts from one piece on needle 3.5mm. Knit approx 7-7-7-7-8 cm (to fit front piece up to neck line), put sts on thread and repeat on other front piece- remember button holes on right front piece. Sew on front bands to front pieces. Neck line: From the right side, pick up approx 116-128 sts (incl sts on thread at front)round neck line using 1 thread Alpaca and 1 thread Glitter and needle 3.5mm. Knit reverse stocking stitch, putting last st on thread on every row (see Neckline). At the same time, when neckline measures 2 cm, increase 1 st in every 4th st = approx 137-152 sts. When neckline measures 4 cm, put sts on thread back on needle and knit 1 row before casting off all sts. To ensure that the neckline doesn't become too tight, make a “yarn over needle” after every 8 sts whilst casting off – the yarn over needle is cast off like a st. Set in sleeves and join sleeve seams. Sew on buttons. Rosette: Use a remnant of Alpaca and Glitter (pictured: Alpaca colour no 3720, Glitter no 07) and crochet with 1 thread of each quality and crochet hook size 3.5. Crochet 4 ch and form a ring with a sl st. 1st round: 6 dc in ring and finish with a sl st in first dc 2nd round: 1 dc in first dc, *3 ch, 1 dc in next dc*, repeat from *-* a total of 5 times and finish with a sl st in first dc from beg of round = 6 ch-loops 3rd round: 1 ch, *1 dc, 1 ch, 1 tr, 1 ch, 1 dc* in each ch-loop and finish with a sl st in first ch from beg of round 4th round: *1 dc round dc from 2nd round (i.e. crochet round dc from behind the leaf), 5 ch*, repeat from *-* a total of 6 times and finish with a sl st in first dc from beg of round 5th round: 1 ch, *1 dc, 1 ch, 5 tr, 1 ch, 1 dc* in each ch-loop and finish with a sl st in first ch from beg of round 6th round: *1 dc round dc from 2nd round (as in round 4), 7 ch*, repeat from *-* a total of 6 times and finish with a sl st in first ch from beg of round 7th round: *1 dc, 1 ch, 1 tr, 5 dtr, 1 tr, 1 ch, 1 dc* in each ch-loop and finish with a sl st in first ch from beg of round 8th round: *1 dc round dc from 2nd round (as in round 4), 8 ch*, repeat from *-* a total of 6 times and finish with a sl st in first dc from beg of round 9th round: 1 ch, *1 dc, 1 ch, 1 tr, 3 dtr, 1 ttr, 3 dtr, 1 tr, 1 ch, 1 dc* in each ch-loop and finish with a sl st in first ch from beg of round. Cut the thread and attach rosette to cardigan. |
||||||||||
Diagram explanations |
||||||||||
|
||||||||||
|
||||||||||
|
Have you made this or any other of our designs? Tag your pictures in social media with #dropsdesign so we can see them! Do you need help with this pattern?You'll find tutorial videos, a Comments/Questions area and more by visiting the pattern on garnstudio.com. © 1982-2024 DROPS Design A/S. We reserve all rights. This document, including all its sub-sections, has copyrights. Read more about what you can do with our patterns at the bottom of each pattern on our site. |
||||||||||


With over 40 years in knitting and crochet design, DROPS Design offers one of the most extensive collections of free patterns on the internet - translated to 17 languages. As of today we count 304 catalogues and 11422 patterns - 11422 of which are translated into English (UK/cm).
We work hard to bring you the best knitting and crochet have to offer, inspiration and advice as well as great quality yarns at incredible prices! Would you like to use our patterns for other than personal use? You can read what you are allowed to do in the Copyright text at the bottom of all our patterns. Happy crafting!
Comments / Questions (44)
Bonjour avez vous les explications avec aiguilles courte et non circulaire ? je ne comprends pas astuce encolure ? merci
01.04.2024 - 09:25DROPS Design answered:
Bonjour Mme Bch, ce gilet se tricote en allers et retours sur aiguille circulaire, vous pouvez donc simplement le tricoter sur aiguilles droites, sans rien changer aux explications. L'astuce pour l'encolure indique comment tricoter le col (correction faite). Bon tricot!
02.04.2024 - 14:59How do I work out the sizes in a particular pattern. I am knitting pattern number 88-4
12.10.2022 - 19:33DROPS Design answered:
Hi Mrs Gratton, You will find a size chart at the bottom of the pattern, giving you all the measurements for the different sizes. Happy crafting!
13.10.2022 - 06:58Hallo, eine Frage zum Stricktip zur Halskante: Bis zur letzten Masche stricken, Arbeit drehen und die Masche auf einen Faden lagen. Was bedeutet das? Ist dann jede Reihe um eine Masche reduziert und der obere Rand abgeschrägt? Könnten Sie das bitte genau erklären, was hier gemeint ist? Besten Dank
18.05.2022 - 22:00DROPS Design answered:
Liebe Elsa, wenn Sie die Halskante stricken sollen Sie die äusserste M. auf einen Hilfsfaden legen , dh wie beim verkürzten Reihen wird 1 Masche nicht gestrickt = am Ende der Reihe stricken Sie die letzte Masche auf der Nadel nicht sondern diese Masche legen Sie auf einem Faden still; wenden und am Ende der nächsten Reihe die letzte Masche nicht stricken sondern auf einem (anderen) Faden stilllegen, so weiter stricken bis die Halskante 4 cm misst, dann werden alle Maschen wieder gestrickt. Viel Spaß beim stricken!
19.05.2022 - 09:09Buongiorno, ho iniziato la prima manica: avviate 77 m, un giro a rovescio, fatto primo giro M1. Al secondo giro del diagrmma, dopo la maglia di vivagno, mi trovo che dovrei fare 3 maglie di diritto ma il giro precedente terminava con le ultime 4 maglie del motivo: in questo modo il motivo si sfalsa. Potreste aiutarmi, per cortesia? Grazie in anticipo.
09.03.2022 - 21:13DROPS Design answered:
Buonasera Claudia, le maniche sono lavorate in piano, con ferri di andata e ritorno. Buon lavoro!
10.03.2022 - 23:24Das Muster neben der Blume sieht auf dem Foto aus, als ob es kraus rechts gestrickt wird. Wieviel Reihen und dann glatt rechts? Besten Dank für die Rückmeldung.
04.03.2022 - 21:28DROPS Design answered:
Liebe Elsa, wir haben nachgeprüft und können bestätigen, daß die Jacke glatt rechts gestrickt wurde; die Anleitung stimmt so, auch wenn es vielleicht anders vom Foto aussieht. Viel Spaß beim stricken!
08.03.2022 - 23:10Wenn laut Maschenprobe für dieses Modell 23 Maschen (3,5 Nadel) 10 cm sind, dann wären bei einer einfachen Breite von 43 cm für Grösse S/M ca. 100 Maschen und für den ganzen Rumpf knapp 200 Maschen. In der angegebenen Maschenzahl zum Aufschlagen werden aber 253 Maschen genannt. Auch wenn ich die 10 Bordmaschen hinzufüge, komme ich auf eine große Differenz. Wo habe ich einen Rechenfehler? Besten Dank, Elsa
27.01.2022 - 22:23DROPS Design answered:
Liebe Elsa, das Muster zieht die Arbeit zusammen, deshalb braucht man mehr Maschen als wenn man glatt rechts (= Maschenprobe) strickt. Beachten Sie nur, daß Ihre Maschenprobe mit beiden Nadelngröße stimmt, und so weiterstricken, um die genauen Maßen wie in der Skizze zu bekommen. Viel Spaß beim stricken!
28.01.2022 - 09:08Buongiorno, sono arrivata al punto in cui i 5 e 5 punti del bordo sul davanti devono essere messi in attesa ma, per inesperienza, non riesco a capire : restano non lavorati?fino a quando? e come li recupero? Grazie in anticipo.
14.01.2022 - 21:46DROPS Design answered:
Buonasera Claudia, le 5 maglie non si lavorano fino alla cucitura delle spalle, sotto il paragrafo CONFEZIONE. Buon lavoro!
14.01.2022 - 23:45BONJOUR PEUT ON TRICOTER SANS LE GLITTER DANS LES CONDITIONS ? A quoi sert le glitter ? Merci
13.03.2021 - 16:38DROPS Design answered:
Bonjour Mme Bch, le fil DROPS Glitter apporte juste une petite note de brillant, vous pouvez tout à fait ne pas l'utiliser, il est tellement fin que ça n'aura aucune incidence ni sur votre échantillon ni sur les explications. Bon tricot!
15.03.2021 - 08:23Bonjour, je ne comprends pas pourquoi l'échantillon est en aiguilles 4 et 4,5 alors que le modèle se tricote ne 3,5 et 4,5...
26.11.2020 - 19:02DROPS Design answered:
Bonjour Mme Kremer, c'était juste une erreur désormais corrigée, merci pour votre retour. L'échantillon se tricote en 3,5. Bon tricot!
27.11.2020 - 07:23När byter jag från stickor 3,5 till 4,5?
04.10.2020 - 14:57DROPS Design answered:
Hej Eva. Det gör du när du börjar sticka slätstickning (det står i andra delen av "Fram- och bakst"). Mvh DROPS Design
06.10.2020 - 07:48