DROPS Alaska
DROPS Alaska
100% Wool
from 1.90 £ /50g
Get the yarn to make this pattern from 34.20£.

The yarn cost is calculated from the pattern’s smallest size and the yarn’s cheapest product type. Looking for an even better price? You might find it on the DROPS Deals!

DROPS Super Sale

To the Sea

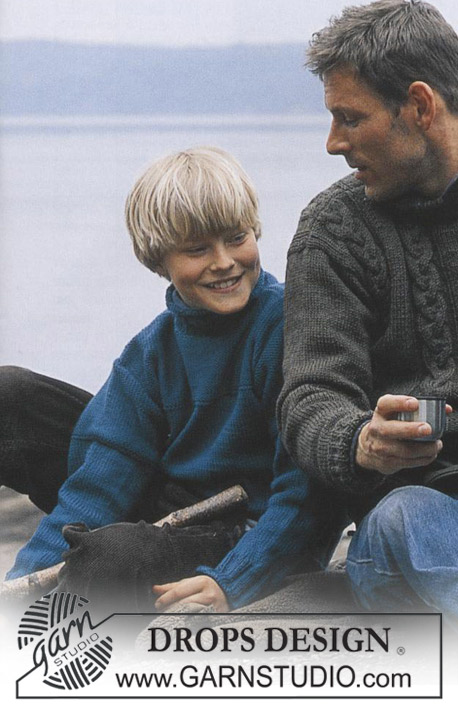
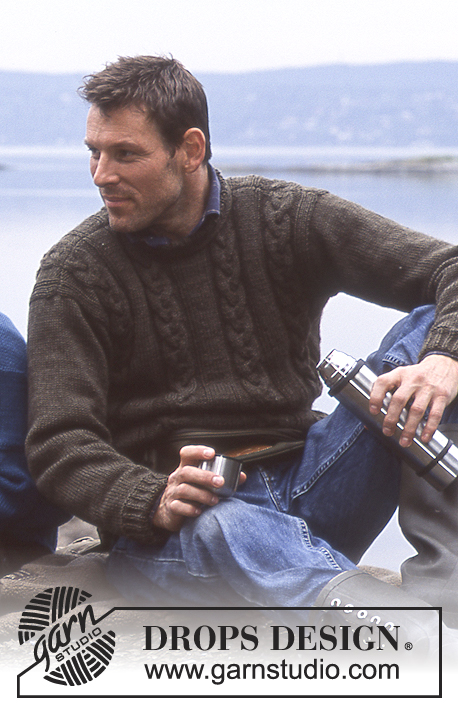
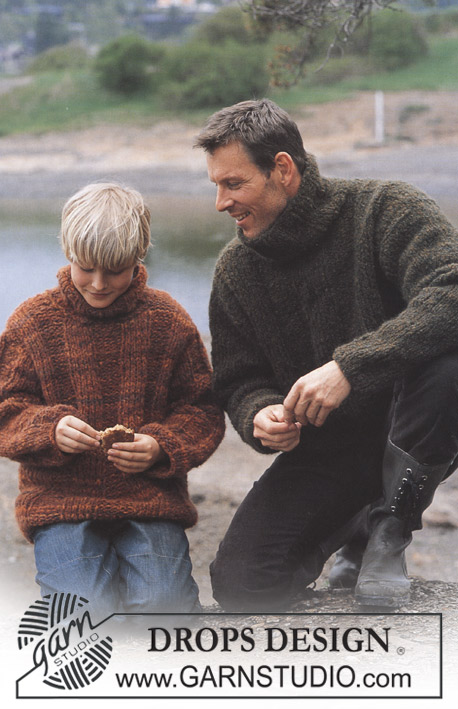
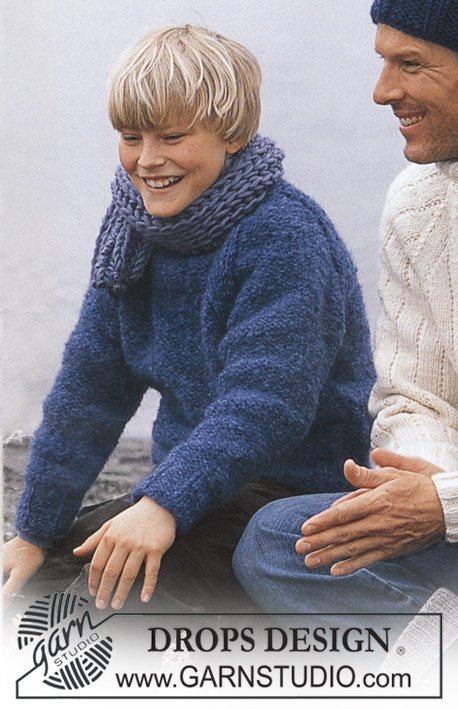
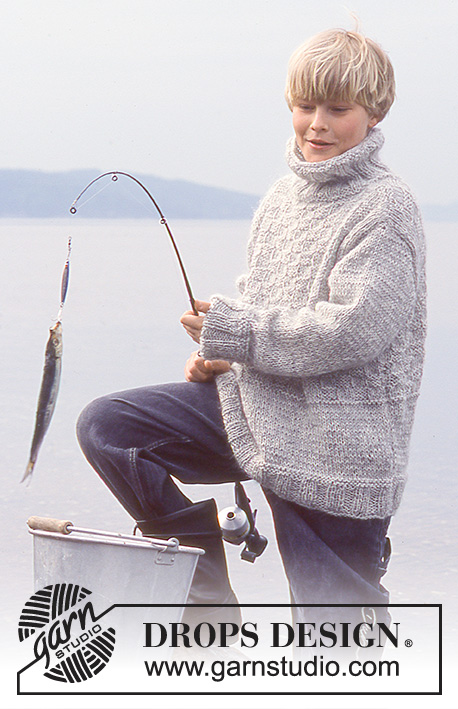
Knitted men's jumper with cables and high neck in DROPS Alaska, plus hat in DROPS Snow

DROPS 85-23
DROPS 85-23
PULLOVER:

Sizes: 12/14 years - S/M - L - XL - XXL

Materials: DROPS ALASKA from Garnstudio
750-900-1000-1100-1200 gr nr 02, natural

DROPS 4 mm and 5 mm circular and double-pointed needles, or sizes needed to obtain correct gauge

-------------------------------------------------------

Alternative Yarn – See how to change yarns here
Yarn Groups A to F – Use the same pattern and change the yarn here
Yarn usage using an alternative yarn – Use our yarn converter here

-------------------------------------------------------

DROPS Alaska
DROPS Alaska
100% Wool
from 1.90 £ /50g
Get the yarn to make this pattern from 34.20£.

The yarn cost is calculated from the pattern’s smallest size and the yarn’s cheapest product type. Looking for an even better price? You might find it on the DROPS Deals!

DROPS Super Sale

SAVE 30% on 6 cotton favourites!
Valid until 12.04.2024

Pattern instructions

NOTE: This pattern is written in British English. All measurements in charts are in cm. For conversion from cm to inches - click here. There are different terms for crocheting in British and American English. If this pattern includes crochet, click for "crochet terms" here. For this pattern in American English, please click here.
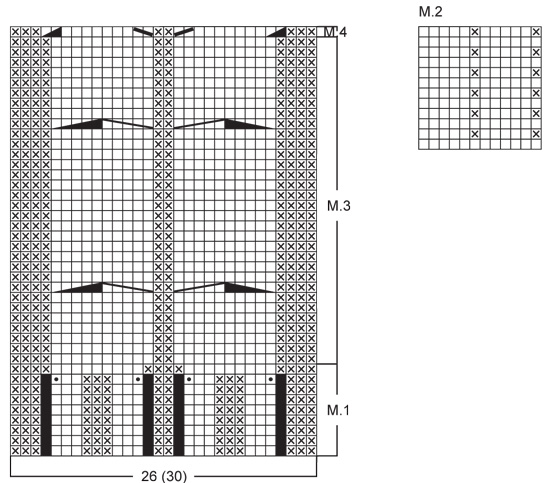
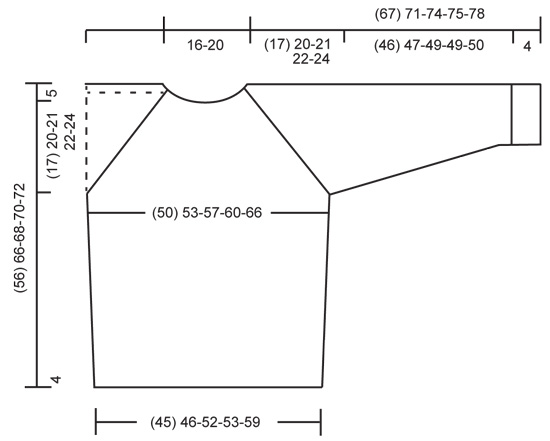
Gauge: 17 sts x 22 rows on larger needles in stockinette st = 10 x 10 cm.

Rib: *K 3, P 3*, repeat from *-*.

Pattern: See the chart below. The pattern is seen from the right side.


Decreasing tips (for raglan):
Dec as follows on right side:
Start 4 sts before the marker: Sl 1 as if to knit, K 1, psso, K 4 (the marker is in the middle of these 4 sts), K 2 tog.
Dec as follows on wrong side:
Start 4 sts before the marker, P 2 tog, P 4, P 2 tog, twisting sts (if this is too difficult, sl 2, return to left needle 1 by 1, twisting each, then P 2 tog).

BODY
Cast on 155-159-179-183-203 sts on smaller circular needles; join and knit rib as follows: K 3-5-3-5-3 (put a marker in the center st = side), *P 3, K 3*, repeat *-* over the following 24-24-30-30-36 sts, Pattern 1 (= 26 sts), *K 3, P 3*, repeat *-* over the following 24-24-30-30-36 sts, K 3-5-3-5-3 (put a marker in the center st = side), *P 3, K 3*, repeat *-* over the following 72-72-84-84-96 sts and finish with P 3.
On the last row of Pattern 1 dec 2 sts on back and at the same time inc 4 sts on the front as shown in chart = 157-161-181-185-205 sts.
When Pattern 1 is complete (the piece measures approx. 4 cm) change to larger circular needles and continue as follows: K 3-5-3-5-3, Pattern 2 over the following 24-24-30-30-36 sts, Pattern 3 (= 30 sts), Pattern 2 over the following 24-24-30-30-36 sts – reverse the pattern so that it will be the same on both sides of Pattern 3, K 3-5-3-5-3 and Pattern 2 over the remaining 73-73-85-85-97 sts.
When the piece measures 12 cm inc 1 st at each side of sts with markers at each side every 5-4-6-4-4 cm a total of 4-6-4-6-6 times – knit the increased sts in Pattern 2 as you go along = 173-185-197-209-229 sts. When the piece measures 34-41-42-43-43 cm bind off 7 sts at each side for armhole (= the sts with the markers + 3 sts each side = 82-88-94-100-110 sts on front and 77-83-89-95-105 sts on back. Lay piece aside and knit the sleeves.

Sleeve: Cast on 42-42-42-48-48 sts on double-pointed needles 4 mm; join and place a marker at the join. Knit rib. When the piece measures 4 cm change to double-pointed needles 5 mm and continue working following Pattern 2 (the pattern will not come out even).
When the piece measures 9-12-14-14-14 cm inc 1 st on each side of seed st at marker every 3.5-2.5-2-2.5-2 cm a total of 11-14-17-15-20 times (knit the incd sts into the pattern as you go along) = 64-70-76-78-88 sts.
When the piece measures 50-51-53-53-54 cm bind off 7 sts at marker (the st with the marker + 3 sts each side of marker) = 57-63-69-71-81 sts. Lay piece aside and knit second sleeve.

Yoke: Put the sleeves in on the same circular needles as Body where you bound off for armhole = 273-297-321-337-377 sts Put a marker in each transition between Body and sleeves = 4 markers. Knit 2-3-0-0-0 rows before decreasing.
Read the entire next section before knitting:
Raglan shaping: Dec 1 st at each side of each marker (= 8 decs) – see Decreasing tips above. Dec every other row 18-21-23-24-24 times and every row 0-0-1-1-6 times.
Pattern: When the piece measures 50-59-61-63-65 cm – adjust to end after a cable – knit Pattern 4 over the center 30 sts (decreasing the 4 sts incd on the last row of Pattern 1 at lower edge of Body) – knit the remaining sts as before.
On the next row put the center 30-30-30-34-34 sts on a st holder for the neck and knit back and forth on needles. Continue to dec 1 st at each neck edge every other row 1-2-2-2-2 times. After all raglan and neck shaping is complete, 93-91-91-95-95 sts remain and the piece measures approx. 56-66-68-70-72 cm to shoulder. Neckband: Pick up and knit approx. 32-38 sts in front neck (incl. sts on st holder) on double-pointed needles and put all sts on same needles = approx. 125-133 sts. Join and P 1 row, then K 1 row, decreasing evenly distributed to 83-89-89-95-95 sts. Knit rib (K 3, P 3) – but at center front there should be a P 2, following pattern on front. When the collar measures 18-20-20-22-22 cm bind off all sts in rib. Fold neckband out to right side.
If you want a crew neck, knit as follows: knit rib until the collar measures approx. 10-11-12-12-13 cm, bind off in pattern. Fold the neckband to wrong side and stitch in place.

Assembly: Sew opening under the sleeve.

HAT:
Sizes: one-size

Materials: SNOW
100 gr nr 15, marine blue.

DROPS 9 mm double-pointed needles, or size needed to obtain correct gauge.

Gauge: 10 sts x 14 rows in stockinette st = 10 x 10 cm.

Rib: *P 5, K 2*, repeat from *-*.

Hat: Cast on 56 sts; join and place a marker at the join. Knit 1 row stockinette st, then knit rib – see instructions above. When the piece measures 12 cm dec all P 5 to P 4 = 48 sts. When the piece measures 15 cm dec all P 4 to P 3 = 40 sts.
Dec in the same way 2 more times with 3 cm between each dec round so that there will be 1 P less for each dec round = 24 sts – the rib is now *K 2, P 1*. When the piece measures 22 cm knit the next row as follows: *K 2 tog, P 1*, repeat from *-* over all sts = 16 sts. Cut yarn and pull through the remaining sts, fasten neatly. Hat measures approx 23 cm high.

This pattern has been corrected.

Updated online: 04.12.2013
New chart M.1

Diagram

symbols = no st (skip this square)
symbols = K
symbols = P
symbols = Inc 1 st by working 2 sts in this st
symbols = P2 tog
symbols = K2 tog
symbols = Slip 1 st as if to K, K1, psso
symbols = slip 5 sts on cable needle behind piece, K5, K5 from cable needle
symbols = slip 5 sts on cable needle in front of piece, K5, K5 from cable needle
diagram
diagram

Each of our patterns has specific tutorial videos to help you.

Do you have a question? See a list of frequently asked questions (FAQ)

Knitting tension is what determines the final measurements of your work, and is usually measured per 10 x 10 cm. It is provided like so: number of stitches in width x number of rows in height - eg: 19 stitches x 26 rows = 10 x 10 cm.

The knitting tension is very individual; some people knit/crochet loosely while others work tightly. You adjust the knitting tension with the needle size, which is why the suggested needle size is only meant as a guide! You need to adjust this (up or down) to ensure that YOUR knitting tension matches the knitting tension provided in the pattern. If you work with a different knitting tension than provided you will have a different yarn consumption, and your work will have different measurements than what the pattern suggests.

The knitting tension also determines which yarns can replace each other. As long as you achieve the same knitting tension you can replace one yarn with another.

See DROPS lesson: How to measure your tension/gauge

See DROPS video: How to make a gauge tension swatch

The required amount of yarn is provided in grams, eg: 450 g. To calculate how many balls you’ll need you first need to know how many grams are in 1 ball (25g, 50g or 100g). This information is available if you click on the individual yarn quality on our pages. Divide the amount required with the amount of each ball. For example, if each ball is 50g (the most common amount), the calculation will be as follows: 450 / 50 = 9 balls.

The important thing when changing from one yarn to another is that the knitting/crochet tension remains the same. This is so that the measurements of the finished piece will be the same as on the sketch provided. It is easier to achieve the same knitting tension using yarns from the same yarn group. It is also possible to work with multiple strands of a thinner yarn to achieve the knitting tension of a thicker one. Please try our yarn converter. We recommend you to always work a test swatch.

Please NOTE: when changing yarn the garment might have a different look and feel to the garment in the photo, due to individual properties and qualities of each yarn.

See DROPS lesson: Can I use a different yarn than the one mentioned in the pattern?

All our yarns are categorised into yarn groups (from A to F) according to thickness and knitting tension – group A contains the thinnest yarns and group F the thickest. This makes it easier for you to find alternative yarns to our patterns, should you wish to switch yarn. All yarns within the same group have a similar knitting tension and can easily replace each other. However, different yarn qualities have different structures and properties which will give the finished work a unique look and feel.

Click here for an overview of the yarns in each yarn group

At the top of all our patterns you’ll find a link to our yarn calculator, which is a helpful tool should you wish to use a different yarn than suggested. By filling in the yarn quality you wish to replace, the amount (in your size) and number of strands, the calculator will present good alternative yarns with the same knitting tension. Additionally it will tell you how much you’ll require in the new qualities and whether you’ll need to work with multiple strands. Most skeins are 50g (some are 25g or 100g).

If the pattern is worked with multiple colours, every colour will have to be calculated separately. Similarly, if the pattern is worked with several strands of different yarns (for example 1 strand Alpaca and 1 strand Kid-Silk) you will have to find alternatives for each, individually.

Click here to see our yarn calculator

Since different yarns have different qualities and textures we have chosen to keep the original yarn in our patterns. However, you can easily find options among our available qualities by using our yarn calculator, or simply pick a yarn from the same yarn group.

It is possible that some retailers still have discontinued yarns in stock, or that someone has a few skeins at home that they would like to find patterns for.

The yarn calculator will provide both alternative yarn as well as required amount in the new quality.

If you think it's hard to decide what size to make, it can be a good idea to measure a garment you own already and like the size of. Then you can pick the size by comparing those measures with the ones available in the pattern's size chart.

You'll find the size chart at the bottom of the pattern.

See DROPS lesson: How to read size chart

The needle size provided in the pattern serves only as a guide, the important thing is to follow the knitting tension. And since knitting tension is very individual, you will have to adjust the needle size to ensure that YOUR tension is the same as in the pattern – maybe you’ll have to adjust 1, or even 2 needle sizes, up or down to achieve the correct tension. For this, we recommend that you work test swatches.

Should you work with a different knitting tension than the one provided, the measurements of the finished garment might deviate from the measurement sketch.

See DROPS lesson: How to measure your tension/gauge

See DROPS video: How to make a tension/gauge swatch

Working a garment top-down provides more flexibility and room for personal adjustment. For example it is easier to try the garment on while working, as well as making adjustments to length of yoke and shoulder caps.

The instructions are carefully explaining every step, in the correct order. Diagrams are adjusted to the knitting direction and are worked as usual.

The diagram depicts all rows/rounds, and every stitch seen from the right side. It is read from bottom to top, from right to left. 1 square = 1 stitch.

When working back and forth, every other row is worked from the right side and every other row is worked from the wrong side. When working from the wrong side, the diagram will have to be worked reversed: from left to right, knit stitches are purled, purl stitches are knit etc.

When working in the round every round is worked from the right side and the diagram are worked from right to left on all rounds.

See DROPS lesson: How to read knitting diagrams

The diagram depicts all rows/rounds, and every stitch seen from the right side. It is worked from bottom to top, from right to left.

When working back and forth every other row is worked from the right side: from right to left and every other row is worked from the wrong side: from left to right.

When working in the round, every row in the diagram are worked from the right side, from right to left.

When working a circular diagram you start in the middle and work your way outwards, counter clockwise, row by row.

The rows usually start with a given number of chain stitches (equivalent to the height of the following stitch), this will either be depicted in the diagram or explained in the pattern.

See DROPS lesson: How to read crochet diagrams

Instructions for working several diagrams after each other on the same row/round, will often be written like so: “work A.1, A.2, A.3 a total of 0-0-2-3-4 times". This means you work A.1 once, then A.2 is worked once, and A.3 is repeated (in width) the number of times provided for your size – in this case like so: S = 0 times, M = 0 times, L=2 times, XL= 3 times and XXL = 4 times.

The diagrams are worked as usual: begin with the first row in A.1, then work the first row in A.2 etc.

See DROPS lesson: How to read knitting diagrams

See DROPS lesson: How to read crochet diagrams

The total width of the garment (from wrist-to-wrist) will be larger in the larger sizes, despite the actual sleeves being shorter. The larger sizes have longer sleeve caps and wider shoulders, so there will be a good fit in all sizes.

The measurement sketch/schematic drawing provides information regarding the full length of the garment. If it’s a jumper or a jacket the length is measured from the highest point on the shoulder closest to the neckline, and straight down to the bottom of the garment. It is NOT measured from the tip of shoulder. Similarly, the length of yoke is measured from the highest point on the shoulder and down to where yoke is split into body and sleeves.

On a jacket measures are never taken along bands, unless specifically stated. Always measure inside band stitches when measuring the length.

See DROPS lesson: How to read a schematic drawing

Diagrams are often repeated on the round or in height. 1 repeat is the diagram the way it appears in the pattern. If it says to work 5 repeats of A.1 in the round, then you work A.1 a total of 5 times after/next to each other in the round. If it says to work 2 repeats of A.1 vertically/in height you work the entire diagram once, then begin again at the start and work the entire diagram one more time.

Chain stitches are slightly narrower than other stitches and to avoid working the cast-on edge too tight, we simply chain more stitches to begin with. The stitch count will be adjusted on the following row to fit the pattern and measurement sketch.

The rib edge is more elastic and will contract slightly compared to, for example, stocking stitch. By increasing before the rib edge, you avoid a visible difference in width between the rib edge and the rest of the body.

It’s very easy to cast off too tightly, and by making yarn overs while casting off (and simultaneously casting these off) you avoid a too tight cast off edge.

See DROPS video: How to bind off with yarn overs (yo)

To achieve an even increase (or decrease) you can increase on, for example: every 3rd and 4th row alternately, like so: work 2 rows and increase on the 3rd row, work 3 rows and increase on the 4th. Repeat this until the increase is complete.

See DROPS lesson: Increase or decrease 1 st on every 3rd and 4th row alternately

Should you prefer to work in the round instead of back and forth, you may of course adjust the pattern. You’ll need to add steeks mid-front (usually 5 stitches), and follow the instructions. When you would normally turn and work from the wrong side, simply work across the steek and continue in the round. At the end you’ll cut the piece open, pick up stitches to work bands, and cover the cut edges.

See DROPS video: How to knit steeks and cut open

Should you prefer to work back and forth instead of in the round, you may of course adjust the pattern so you work the pieces separately and then assemble them at the end. Divide the stitches for the body in 2, add 1 edge stitch in each side (for sewing) and work the front and back pieces separately.

See DROPS lesson: Can I adapt a pattern for circular needles into straight needles?

Pattern repeats can vary slightly in the different sizes, in order to get the correct proportions. If you’re not working the exact same size as the garment in the photo, yours might deviate slightly. This has been carefully developed and adjusted so that the complete impression of the garment is the same in all sizes.

Make sure to follow instructions and diagrams for your size!

If you have found a pattern you like which is available in women’s size it’s not very difficult to convert it to men’s size. The biggest difference will be the length of sleeves and body. Start working on the women size that you think would fit across the chest. The additional length will be worked right before you cast off for the armhole/sleeve cap. If the pattern is worked top-down you can add the length right after the armhole or before the first decrease on sleeve.

Regarding additional yarn amount, this will depend on how much length you add, but it is better with a skein too many than too few.

All yarns will have excess fibres (from production) that might come off as lint or shedding. Brushed yarns (ie hairier yarns) have more of these loose, excess fibres, causing more shedding.

Shedding also depends on what is worn under or over the garment, and whether this pulls at the yarn fibres. It’s therefore not possible to guarantee that there will be no shedding

Below are some tips on how to get the best result when working with hairier yarns:

1. When the garment is finished (before you wash it) shake it vigorously so the looser hairs come off. NOTE: do NOT use a lint roller, brush or any method that pulls at the yarn.

2. Place the garment in a plastic bag and put it in your freezer - the temperature will cause the fibres to become less attached to each other, and excess fibres will come off easier.

3. Leave in the freezer for a few hours before taking it out and shaking it again.

4. Wash the garment according to the instructions on the yarn label.

Pilling is a natural process that happens to even the most exclusive of fibers. It's a natural sign of wear and tear that is hard to avoid, and that is most visible in high friction areas of your garment like a sweater's arms and cuffs.

You can make your garment look as new by removing the pilling, using a fabric comb or a pill/lint remover.

Still can't find the answer you need? Then scroll down and leave your question so one of our experts can try to help you. This will be done normally within 5 to 10 working days.
In the meantime, you can read the questions and answers that others have left to this pattern or join the DROPS Workshop on Facebook to get help from fellow knitters/crocheters!

You might also like...

Post a comment to pattern DROPS 85-23

We would love to hear what you have to say about this pattern!

If you want to leave a question, please make sure you select the correct category in the form below, to speed up the answering process. Required fields are marked *.

Comments / Questions (145)

country flag El Knitto wrote:

The pattern reads “when the piece measures 12cm inc 1 st at each side of the sts with markers at each side…” “knit the increased sts in Pattern 2 as you go along”. Does this mean only knit the added stitches (not the stitch with the marker and the 1 stitch either side of the marker). Or do I knit all of the stitches including the one with the stitch marker in it and the 1 stitch either side in pattern 2 from now on?

18.03.2024 - 00:24

DROPS Design answered:

Dear El Knitto, you knit all stitches except the one with the stitch marker in pattern A.2. Happy knitting!

18.03.2024 - 01:18

country flag Jenny Älverbrandt wrote:

Hej! Det står i beskrivningen att jag skall inleda, efter 3 rm, med att sticka *3 am, 3 rm* i 24 m (=8 gånger) vilket =M1. Men på mönster M1 står det att det de första varven endast skall stickad 2 am i mitten. Vad skall jag rätta mig efter? Era skriftliga instruktioner el mönster M1?

23.01.2024 - 10:18

DROPS Design answered:

Hej Jenny. Nej de 24 maskorna (3am, 3 rm upprepat) är inte M.1. Utan du stickar först 24 m (upprepa 3am, 3 rm), efter det stickar du M.1 (=26 m) och sedan fortsätter du enligt beskrivningen. Mvh DROPS Design

24.01.2024 - 14:30

country flag Giuseppe wrote:

Ho realizzato questo maglione partendo da assoluto principiante, seguendo il vostro fantastico modello "To the Sea". E' raro trovare delle risorse così ben fatte e complete in ogni piccolo passaggio, con tutte le spiegazioni per chi come me è alle prime armi. Complimenti e grazie davvero per avermi fatto scoprire questo fantastico mondo, che anche gli uomini possono trovare rilassante e soddisfacente. Segnalo che tutte le indicazioni e le misure finali per la taglia L sono corrette. Saluti!

12.01.2024 - 09:41

country flag Zoé wrote:

Bonjour, Je tricote ce modèle en taille L. Je suis en train de réaliser les diminutions raglan, et j'ai déjà effectué 19 diminutions et mon pull mesure déjà 61cm. Devrais-je tricoter le m4 sur mes 30 mailles centrales et sauter les 4 dernières diminutions? ou attendre d'avoir effectué les 24 diminutions au risque que le pull soit un peu trop long? Merci d'avance :)

26.11.2023 - 16:05

DROPS Design answered:

Bonjour Zoé, si votre échantillon est juste en hauteur, les diminutions du raglan terminées doivent mesurer environ 21 cm (23 fois tous les 2 rangs + 1 fois tous les rangs = 47 rangs = environ 21 cm), l'encolure se fait avant la fin de ces diminutions, autrement dit, à 61 cm, mettez les mailles de l'encolure en attente et terminez en allers et retours en rabattant pour l'encolure de chaque côté et en même temps, continuez les diminutions du raglan comme avant. Bon tricot!

27.11.2023 - 09:43

country flag Donna Solomon wrote:

Could you verify the sizes in this pattern. I want to knit a size medium or large for a man. The picture shows a man's sweater but, the sizes are shown: 12/14 years-S/M-L-XXL

28.10.2023 - 18:24

DROPS Design answered:

Dear Donna, this pattern can also be used for children, which is why the size 12/14 years exists. In any case, you can check the measurements in the size charts at the lower part of the pattern to ensure you are working the size with your desired measurements. Happy knitting!

29.10.2023 - 19:56

country flag Zoé wrote:

Hi! is it normal that the body seems smaller than the measurements provided in the pattern? I knitted about 10 cm of the body bottom, and it measures about 40 cm (instead of 53 cm for an XL size). Is it because the needles length is smaller than the actual size of the sweater? I also knitted a swatch that matched the indications given at the beginning of the pattern... this is my first time knitting in the round with circular needles! thank you for your help!

25.09.2023 - 22:55

DROPS Design answered:

Hi Zoe, If your measurements are smaller than those given in the chart, it is most likely that your knitting tension is too tight. Try going up a needle size to correct this. Happy knitting!

26.09.2023 - 06:56

country flag Zoé wrote:

Hello! I want to make this pattern but I'm not sured about the needles requirements. What length would you recommend using for the circular needle ? and do you need double pointed needles in both 4 and 5mm? Thanks in advance

15.09.2023 - 12:24

DROPS Design answered:

Dear Zoé, the length of circular needle should always be somewhat shorter than the circumference of piece , you will then need here 8O cm in both sizes - and yes, double pointed needles in the same both sizes, except if you work with magic loop. Happy knitting!

15.09.2023 - 15:51

country flag Kylie Michelle wrote:

My stiches now and stixh holder and I have "knit back and forth " remaining stiches to decrease 4 .. now I cam see that I was not supposed to KNIT back and forth, rather knit IN PATTERN ba k and forth! Now, it says to join stitches on holder to main piece but the stiche's on holder are like 4 rows lower? Also, 30 sts on holder plus 91 on Main body =121... but it says I should have at least 125? Help!

28.04.2023 - 07:46

DROPS Design answered:

Dear Mrs Kylie, pick up 2 stitches on each side of neck (where you decreased 1 stitch on each side 2 times), so that there are: 91+30+2+2=125 sts. Happy knitting!

28.04.2023 - 10:52

country flag Kylie Michelle Thurgar wrote:

In the last row of Pattern 1 dec 2 sts on back and at the same time inc 4 sts on the front as shown in chart = 157-161-181-185-205 sts. In the diagram I can see the increase but I can not see any decrease. I am making size medium. I have 159 stitches so need to go to 161. I can see four increase diagram 1 but have no idea where to decrease the two in pattern one.

27.03.2023 - 22:42

DROPS Design answered:

Dear Mrs Thurgar, the decreases on back piece are not included in the diagram, this means you have to decrease these 2 stitches evenly on the stitches on back piece and on the same round increase 4 sts as shown in next to last row in M.1. You had 159 sts + 2 sts decreased on back piece + 4 sts increased on front piece = 161 sts. Happy knitting!

28.03.2023 - 10:17

country flag Kylie Michelle Thurgar wrote:

I don't understand the decrease two increase fouron row 8.... a) the increase is on the second last row b) I cant see the decrease

27.03.2023 - 11:56

DROPS Design answered:

Dear Mrs Thurger, you do mean the increases worked on 8th row in M.1? They are a kind of "set-up row" for the cables worked afterwards; you increase by working the stitch with a dot in front and back loop. You increase 4 sts in the diagram. The decreases in M.4 are worked by P 2 tog (5th symbol) or K2 tog (6th symbol) or slip 1, k1, psso (7th symbol). = you decrease 4 sts in the diagram. Happy knitting!

27.03.2023 - 13:30