
Popular categories
Looking for a yarn?


|
||||||||||||||||
DROPS 78-11 |
||||||||||||||||
|
|
||||||||||||||||
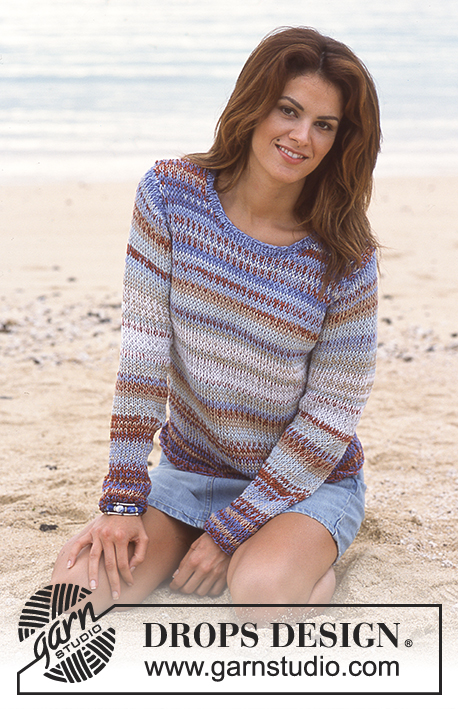
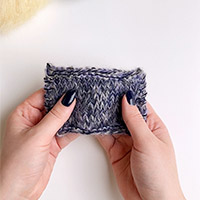
DROPS Cardigan in Muskat
DROPS 78-11 |
||||||||||||||||
|
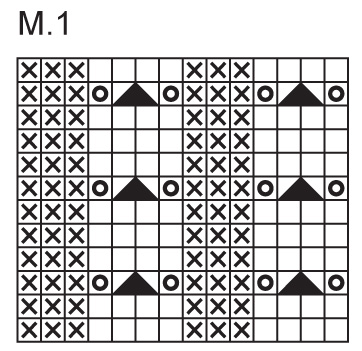
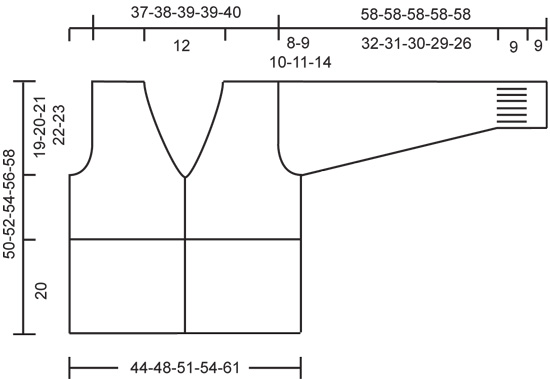
Gauge: 21 sts x 28 rows = 10 x 10 cm in stockinette st. Pattern: See chart. The pattern is seen from the right side. Garter st, when knitting flat: Knit all sts, all rows. Buttonhole: Make buttonholes along right button band. Make buttonholes as follows (right side row): 2 sts garter st, K 2 tog, yo, P 3. On the next row (wrong side) P the yo from previous row. Make buttonholes when the piece measures: Size S: 2, 7, 11, 16, 21, 25 and 30 cm. Size M: 2, 7, 12, 17, 22, 27 and 31 cm. Size L: 2, 7, 12, 17, 22, 27 and 32 cm. Size XL: 2, 7, 12, 18, 23, 28 and 33 cm. Size XXL: 2, 8, 13, 19, 24, 29 and 34 cm. Knitting tips (for neckband): All decs are made from right side. Dec 1 st for the neck every other row inside 7 buttonband sts as follows: After 7 buttonband sts: Sl 1 as if to knit, K 1, psso. Before 7 buttonband sts: K 2 tog. Body: Cast on 200-214-228-242-270 sts and establish pattern as follows on first row (right side row): K 2 (edge sts knit in garter st throughout), K 2, P 3 (5 sts in rib) – these 7 sts are the buttonband, Pattern 1 over 186-200-214-228-256 sts, P 3, K 2 (5 sts in rib), K 2 (edge sts knit in garter st throughout) – these 7 sts are the buttonband. Continue in pattern as established. Make buttonholes along right buttonband - see instructions above. When the piece measures 20 cm knit stockinette st to finished measurements, keeping the 7 sts at each side (buttonbands) the same as before. When the piece measures 31-32-33-34-35 cm knit the next row as follows (right side row): 50-54-57-61-68 sts (= right front), bind off 6 sts for armhole, 88-94-102-108-122 sts (= back), bind off 6 sts for armhole, 50-54-57-61-68 sts (= left front). Knit each piece separately. Left front: = 50-54-57-61-68 sts. Bind off at the same time for armhole and V-neck. Armhole: Bind off for armhole at the side every other row: 3 sts 0-1-1-2-2 times, 2 sts 1-1-2-2-4 times and 1 st 3-2-3-3-5 times. V-neck: At the same time dec 1 st for the neck every other row inside the 7 buttonband sts 19-20-19-20-20 times - see knitting tips. After all armhole and neck shaping is complete 26-27-28-28-29 sts remain on shoulder. Bind off when the piece measures 50-52-54-56-58 cm. Right front: = 50-54-57-61-68 sts. Knit the same as left front, reversing shaping and continuing to make buttonholes. Back: = 88-94-102-108-122 sts. Bind off for armhole at each side as on front = 78-80-82-82-84 sts remain. When the piece measures 47-49-51-53-55 cm knit rib as follows over the center 40 sts: P 3, * K 2, P 2 *, repeat from * - *, finish with K 2, P 3 (knit the remaining sts in stockinette st). When the piece measures 49-51-53-55-57 cm bind off the center 26 sts in rib. Keep the 7 sts at each neck edge in rib as follows (seen from right side): K 2 (edge sts knit in garter st), K 2 and P 3. Bind off all sts when the piece measures 50-52-54-56-58 cm. Sleeve: Cast on 56-56-56-63-63 sts on double-pointed needles; join and place a marker at the join. Knit 1 row with K 1, P 1 rib, then knit stockinette st. When the piece measures 9 cm knit Pattern 1. When the piece measures 18 cm knit stockinette st to finished measurements. After Pattern 1 inc 1 st each side of marker every 4-3-2.5-2.5-2 cm a total of 8-10-12-11-13 times = 72-76-80-85-89 sts. When the piece measures 50-49-48-47-44 cm bind off 3 sts each side of marker. Then bind off for sleeve cap at each side every other row: 3 sts 1 time, 2 sts 3-3-3-3-2 times, 1 st 1-4-4-5-12 times, then bind off 2 sts at each side until the piece measures 57 cm, then bind off 3 sts at each side 1 time. The piece measures approx. 58 cm, bind off. Assembly: Sew shoulder seams and sew in sleeves and buttons. |
||||||||||||||||
Diagram explanations |
||||||||||||||||
|
||||||||||||||||
|
||||||||||||||||
|
||||||||||||||||
|
Have you made this or any other of our designs? Tag your pictures in social media with #dropsdesign so we can see them! Do you need help with this pattern?You'll find tutorial videos, a Comments/Questions area and more by visiting the pattern on garnstudio.com. © 1982-2024 DROPS Design A/S. We reserve all rights. This document, including all its sub-sections, has copyrights. Read more about what you can do with our patterns at the bottom of each pattern on our site. |
||||||||||||||||


With over 40 years in knitting and crochet design, DROPS Design offers one of the most extensive collections of free patterns on the internet - translated to 17 languages. As of today we count 304 catalogues and 11422 patterns - 11422 of which are translated into English (UK/cm).
We work hard to bring you the best knitting and crochet have to offer, inspiration and advice as well as great quality yarns at incredible prices! Would you like to use our patterns for other than personal use? You can read what you are allowed to do in the Copyright text at the bottom of all our patterns. Happy crafting!
Comments / Questions (21)
I like the look of this pretty sweater!
04.04.2024 - 19:04Having trouble with the sleeves at the point where it says bind off 2 on each side until piece measures 57cm. Do you do this once, then continue or every row until piece measures 57cm?
23.06.2021 - 03:28DROPS Design answered:
Dear Mrs Wrack, you cast off 2 stitches at the beginning of each row (both from RS and from WS) until sleeve measures 57 cm - make sure you have cast off the same number of times 2 sts on each side to get a symetrical sleeve cap. Happy knitting!
23.06.2021 - 08:00Bij het breien van de mouwen kom ik toch echt een probleem tegen. Voor maat S zet ik 56 steken op, na het patroon breien moet ik weerzijde van de markeerdraad 18x1 st, meerderen = volgens mij 38 steken. Wanneer ik die optel bij mijn 56 begin steken kom ik op 92 st. en geen 72. De meerderingen moeten in mijn geval om de 4 cm maar dan kom ik niet uit op de 50 cm die ik dan moet hebben voor de armsgat mindering. Graag uw advies hierin. Vriendelijke groet Els
27.02.2021 - 12:18DROPS Design answered:
Dag Els,
Er lijkt inderdaad een fout in te staan en volgens mij moet het 8 keer voor maat S zijn, in plaats van 18 keer.
02.03.2021 - 10:06Bij het breien van de mouwen kom ik toch echt een probleem tegen. Voor maat S zet ik 56 steken op, na het patroon breien moet ik weerzijde van de markeerdraad 18x1 st, meerderen = volgens mij 38 steken. Wanneer ik die optel bij mijn 56 begin steken kom ik op 92 st. en geen 72. De meerderingen moeten in mijn geval om de 4 cm maar dan kom ik niet uit op de 50 cm die ik dan moet hebben voor de armsgat mindering. Graag uw advies hierin. Vriendelijke groet Els
22.02.2021 - 21:32Thank you for your response but can you explain about the '6 bind offs' on the right front and '6 bind offs' from the left front totaling 12 bind offs? That would only leave 66 stitches for the back and not 80. Right?
15.12.2020 - 21:05DROPS Design answered:
Dear Elaine, you bind off 6 stitches between front pieces and back piece for armhole, then you finish each piece together: front pieces = 54 sts and you bind off 3 sts 1 time + 2 sts 1 time + 1 st 2 time for armhole = 7 sts for armhole. On back piece, there are 94 sts and you bind off 7 sts on each side for armhole = 94-14= 80 sts remain. But when dividing you should have: 54 sts front piece, bind off 6, 94 sts back piece, bind off 6, 54 sts front piece. Happy knitting!
16.12.2020 - 06:55Back for Medium size: When splitting each side and back, the directions say 'knit 54, bind off 6, knit 94, bind off 6, knit 54. If there are 54 stitches on each side and 12 bind offs, that only leaves 80 stitches for the back. When working the back it says to shape armhole that would leave 66 sts not 80. Is that correct? Left side: 54 stitches Right side; 54 stitches Two Bind offs: 12 Back: 80 stitches Total: 200 stitches
11.12.2020 - 21:16DROPS Design answered:
Dear Mrs Peterson, when dividing piece on armholes, you will have (2nd size): 54 sts for each front piece and 94 sts for back piece. You then have to shape armhole casting off 3 sts 1 time, 2 sts 1 time and 1 st 2 times = 7 sts in total are cast off on each front piece, but 14 sts will be cast off for back piece (= you cast off on each side for the armholes) = 80 sts remain after all cast off for armholes are done). Happy knitting!
14.12.2020 - 07:24Ce modele se tricote t-il en un seul morceau pour le corps du gilet ? svp
25.01.2019 - 08:04DROPS Design answered:
Bonjour Véronique, le dos et les deux devants se tricotent en une seule pièce jusqu'aux emmanchures, puis on termine chaque pièce séparément (devant gauche, devant droit et dos). Bon tricot!
25.01.2019 - 09:28No entiendo el final de las instrucciones para la espalda:"Con 47-49-51-53-55 cm, tejer en resorte sobre los 40 pts centrales: 3r, * 2d, 2r *, repetir de *a*, terminar con 2d, 3r (tejer los restantes en pt jersey). " Haciéndolo así, supongo que quedará como cenefa a rayas.¿No se trataría más bien de hacer 3 vueltas (hileras) al revés, dos vueltas al derecho y 2 al revés para seguir el dibujo de la cenefa del cuerpo? El resto (los 7 p restantes) tampoco lo entiendo.
19.08.2018 - 11:45DROPS Design answered:
Hola Teresa, el patrón es correcto, los 40 puntos centrales que se trabajan en punto elástico forman la cenefa del escote en la parte de la espalda, que se trabaja en punto elástico. Después de cerrar los 26 puntos centrales de estos 40, continuamos con 7 puntos a cada lado, trabajándolos a punto elástico para la cenefa del escote.
26.08.2018 - 16:25Ik heb een vraag over de omslag.Hoe moet de omslag tussen een rechte en averechte steek? En tussen een averechte en rechte steek? Ik brei nu door zonder de draad onder de naald naar voor resp. achter te brengen, maar dan worden de gaatjes niet even groot.
01.04.2018 - 07:05DROPS Design answered:
Hoi Gertruud, Als je een omslag maakt tussen een rechte en averechte steek dan breng je eerst de draad naar voren en daarna maak je nog een omslag. Andersom doe je dat ook zo: Eerst de draad naar achteren brengen en dan (indezefde richting) nog een omslag maken.
02.04.2018 - 10:17In de laatste alinea van de brei instructies voor de mouwen wordt geschreven: "kant vervolgens 2 st af aan weerskanten tot een hoogte van 57 cm en vervolgens nog 1 x 3 st. Het werk heeft een hoogte van ca. 58 cm, kant de resterende st af." Is het de bedoeling dat ik eenmalig 2 steken afkant? En daarna nog eenmalig 3 steken. Ik heb namelijk al ongeveer een hoogte van 57 cm bereikt door een keer 2 steken af te kanten. Heel graag een antwoord. De rest van het patroon is heel duidelijk
24.02.2015 - 12:21DROPS Design answered:
Hoi Veronique. Je kant 2 st af aan beide zijkanten tot de mouw een hoogte heeft van 57 cm = dus je blijft 2 st afkanten tot die hoogte. Ben je na 1 keer 2 st afkanten op 57 cm, dan is dat goed. Daarna kant je een keer 3 st af aan beide kanten.
24.02.2015 - 15:53