DROPS Alpaca
DROPS Alpaca
100% Alpaca
from 3.40 £ /50g
Get the yarn to make this pattern from 20.40£.

The yarn cost is calculated from the pattern’s smallest size and the yarn’s cheapest product type. Looking for an even better price? You might find it on the DROPS Deals!

DROPS Super Sale

Viking Knots

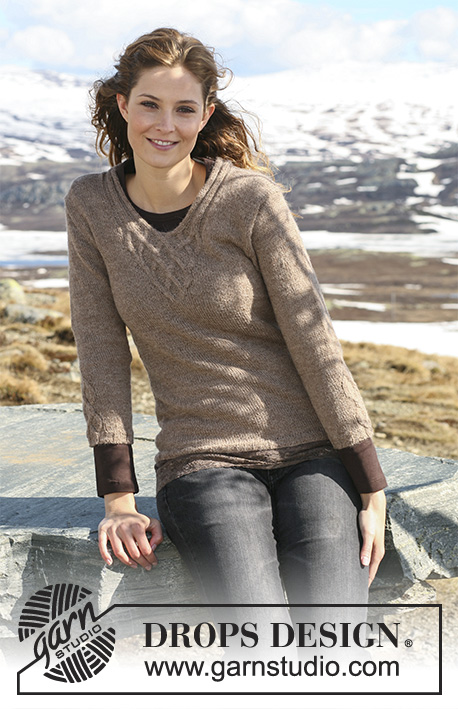
DROPS jumper with cables in ”Alpaca” with 3/4 sleeves or long sleeves. Size S - XXXL.

DROPS 114-8
DROPS design: Pattern no Z-442.

Size: S - M - L - XL - XXL - XXXL
Materials: DROPS ALPACA
Colour no 618, light beige:
3/4 sleeves:
250-300-350-350-400-450 g
Long sleeves:
300-350-400-400-450-500 g

DROPS POINTED NEEDLES size 3 mm –
or size needed to get 24 sts x 32 rows in stocking st = 10 x 10 cm.
DROPS POINTED NEEDLES size 2.5 mm – for rib.

-------------------------------------------------------

Alternative Yarn – See how to change yarns here
Yarn Groups A to F – Use the same pattern and change the yarn here
Yarn usage using an alternative yarn – Use our yarn converter here

-------------------------------------------------------

DROPS Alpaca
DROPS Alpaca
100% Alpaca
from 3.40 £ /50g
Get the yarn to make this pattern from 20.40£.

The yarn cost is calculated from the pattern’s smallest size and the yarn’s cheapest product type. Looking for an even better price? You might find it on the DROPS Deals!

DROPS Super Sale

SAVE 30% on 6 cotton favourites!
Valid until 12.04.2024

Pattern instructions

NOTE: This pattern is written in British English. All measurements in charts are in cm. For conversion from cm to inches - click here. There are different terms for crocheting in British and American English. If this pattern includes crochet, click for "crochet terms" here. For this pattern in American English, please click here.
PATTERN:
See diagram M.1 and M.2. Diagram shows the pattern from RS.
--------------------------------------------------------

BACK PIECE:
Worked back and forth on needle. Cast on 107-121-135-142-163-177 sts (includes 1 edge st each side) on needle size 2.5 mm with Alpaca. Work rib as follows (first row = RS): 1 edge st, * K3, P4 *, repeat from *-* and finish with 1 edge st. When rib measures 2 cm K 1 row from RS, AT THE SAME TIME dec 9-13-17-12-19-19 sts evenly = 98-108-118-130-144-158 sts. Change to needle size 3 mm. P 1 row from WS and continue in stocking st with 1 edge st each side. When piece measures 9 cm dec 1 st each side, repeat the dec on every 2 cm a total of 5 times = 88-98-108-120-134-148 sts. When piece measures 20-21-21-20-20-21 cm inc 1 st each side, repeat the inc on every 3-3-3.5-4-4.5-4.5 cm a total of 5 times = 98-108-118-130-144-158 sts. When piece measures 38-40-41-41-42-44 cm cast off 4 sts each side for armhole and cast off for armhole each side on every other row: 4 sts 0-0-0-1-1-2 times, 2 sts 2-3-5-6-8-9 times and 1 st 0-2-2-1-2-2 times = 82-84-86-88-92-94 sts. Continue in stocking st on all sts. When piece measures 54-57-59-60-62-65 cm cast off the middle 32-34-34-36-38-40 sts for neck and complete each shoulder separately. Cast off 1 st on neckline on every other row 2 times = 23-23-24-24-25-25 sts left on shoulder. Cast off loosely when piece measures 57-60-62-63-65-68 cm.

FRONT PIECE:
Cast on and work like back piece until piece measures 20-21-21-20-20-21 cm. On next row inc 1 st each side, repeat the inc on every 3-3-3.5-4-4.5-4.5 cm a total of 5 times = 98-108-118-130-144-158 sts. Continue in stocking st with 1 edge st each until piece measures 33-34-35-36-39-40 cm. Now continue as follows (from RS): 1 edge st, 33-38-43-49-56-63 stocking sts, M.1 (= 30 sts), 33-38-43-49-56-63 stocking sts and 1 edge st. AT THE SAME TIME when piece measures 38-40-41-41-42-44 cm cast off for armhole each side as described for back piece. Continue up to arrow-A in M.1. On next row from RS cast off for neck as follows: work the first 24 sts of M.1, cast off 2 sts (= mid front) and work the remaining 24 sts of M.1 (work remaining sts in stocking st as before). Insert a marker in piece, and now complete each side separately.

LEFT FRONT PIECE:
Continue back and forth on needle in stocking st and M.1 as before – remember to cast off for armhole at the side! AT THE SAME TIME on next row from mid front dec 1 st for neck. Continue to arrow-B in diagram for M.1. Now continue with 15 sts rib as shown in M.1, work remaining sts in stocking st as before. AT THE SAME TIME dec 1 st for neck inside the 15 sts in rib, and repeat the dec on every 4th row 3-4-4-5-6-7 times = 38-38-39-39-40-40 sts.
Continue until piece measures 11-12-12-13-13-14 cm from marker (adjust to length of armhole on back piece). Now cast off 23-23-24-24-25-25 sts from shoulder towards neckline = 15 sts left on needle. Continue back and forth on needle in rib as before on these 15 sts. Cast off loosely with K over K and P over P after approx 7-7-7-8-8-8 cm (measured from shoulder).

RIGHT FRONT PIECE:
Like left front piece but mirrored.

ASSEMBLY:
Sew shoulder seams.

3/4 SLEEVES:
Worked back and forth on needle.
LEFT SLEEVE:
Cast on 65-65-72-72-72-79 sts on needle size 2.5 mm with Alpaca. Work rib as follows (first row = RS): 1 edge st, * P4, K3 *, repeat from *-* on 21-21-28-28-28-28 sts, M.2 (= 18 sts), K3, *P4, K3 *, repeat from *-* on the next 21-21-21-21-21-28 sts and 1 edge st. Continue like this up to Arrow-C in M.2. There are now 73-73-80-80-80-87 sts on needle. Change to needle size 3 mm. Continue as follows (from RS): 1 edge st, 21-21-28-28-28-28 stocking sts, M.2 (= 26 sts), 24-24-24-24-24-31 stocking sts and 1 edge st. Work 1 vertical repeat of M.2 like this = 65-65-72-72-72-79 sts on needle. Insert a marker, and now measure piece from here.
Continue in stocking st with 1 edge st each side. AT THE SAME TIME when piece measures approx 2 cm from marker inc 1 st each side, repeat the inc on every 1.5-1-1-0.5- 0.5-0.5 cm a total of 8-11-11-14-17-17 times = 81-87-94-100-106-113 sts. When piece measures 17-16-16-15-14-12 cm from marker (less for the larger sizes because of longer sleeve cap and wider shoulder) cast off 4 sts each side. Cast off for sleeve cap at the beg of every row: 2 sts 4-5-5-5-4-4 times each side and 1 st 3-3-5-5-11-14 times each side, then 2 sts each side until piece measures 24-24-25-25-26-26 cm, now cast off 4 sts each side 1 time, and cast off remaining sts. Piece measures a total of approx 43-43-44-44-45-45 cm.

RIGHT SLEEVE:
Cast on 65-65-72-72-72-79 sts on needle size 2.5 mm with Alpaca. Work rib as follows (first row = from RS): 1 edge st, * K3, P4 *, repeat from *-* on 21-21-21-21-21-28 sts, K3, M.2 (= 18 sts), * K3, P4 *, repeat from *-* on the next 21-21-28-28-28-28 sts and 1 edge st. Continue like this up to Arrow-C in M.2. There are now 73-73-80-80-80-87 sts on needle. Change to needle size 3 mm and continue as follows (from RS): 1 edge st, 24-24-24-24-24-31 stocking sts, M.2 (= 26 sts), 21-21-28-28-28-28 stocking sts and 1 edge st. Work 1 vertical repeat of M.2 like this = 65-65-72-72-72-79 sts on needle. Insert a marker, and now measure piece from here. Continue as described for Left Sleeve.


LONG SLEEVES:
Worked back and forth on needle.

LEFT SLEEVE:
Cast on 58-58-65-65-65-72 sts on needle size 2.5 mm with Alpaca. Work rib as follows (first row = RS): 1 edge st, * P4, K3 *, repeat from *-* on 21-21-21-21-21-28 sts, M.2 (= 18 sts), K3, * P4, K3 *, repeat from *-* on the next 14-14-21-21-21-21 sts and 1 edge st. Continue like this up to Arrow-C in M.2. There are now 66-66-73-73-73-80 sts on needle. Change to needle size 3 mm and continue as follows (from RS): 1 edge st, 21-21-21-21-21-28 stocking sts, M.2 (= 26 sts), 17-17-24-24-24-24 stocking sts and 1 edge st. Work 1 vertical repeat of M.2 like this = 58-58-65-65-65-72 sts on needle. Insert a marker, and now measure piece from here. Continue in stocking st with 1 edge st each side. AT THE SAME TIME when piece measures approx 1-2-2-1-1-1 cm from marker inc 1 st each side, repeat the inc on every 2.5-1.5-1.5-1.5-1-1 cm a total of 12-15-15-18-21-21 times = 82-88-95-101-107-114 sts. When piece measures 31-31-30-30-28-27 cm from marker (less for the larger sizes because of longer sleeve cap and wider shoulder) cast off for 4 sts each side for sleeve cap and cast off for sleeve cap at the beg of every row: 2 sts 4-5-5-5-4-4 times each side and 1 st 3-3-5-5-11-14 times each side, then cast off 2 sts each side until piece measures 38-39-39-40-40-41 cm, now cast off 4 sts each side 1 time, and cast off remaining sts. Piece measures a total of approx 57-58-58-59-59-60 cm.

RIGHT SLEEVE:
Cast on 58-58-65-65-65-72 sts on needle size 2.5 mm with Alpaca. Work rib as follows (first row = RS): 1 edge st, * K3, P4 *, repeat from *-* on 14-14-21-21-21-21 sts, K3, M.2 (= 18 sts), * K3, P4 *, repeat from *-* on the next 21-21-21-21-21-28 sts and 1 edge st. Continue like this up to Arrow-C in M.2. There are now 66-66-73-73-73-80 sts on needle. Change to needle size 3 mm and continue as follows (from RS): 1 edge st, 17-17-24-24-24-24 stocking sts, M.2 (= 26 sts), 21-21-21-21-21-28 stocking sts and 1 edge st. Work 1 vertical repeat of M.2 like this = 58-58-65-65-65-72 sts on needle. Insert a marker, and now measure piece from here. Continue as described for Left Sleeve.

ASSEMBLY:
Sew shoulder seams. Set in sleeves. Sew sleeve and side seams inside 1 edge st. Sew rib on neck tog mid back and sew to back piece.

Diagram

symbols = K from RS, P from WS
symbols = P from RS, K from WS
symbols = 1 YO between 2 sts, on next row work YO into back of loop to avoid a hole.
symbols = slip 1 st on cable needle behind piece, K3, P1 from cable needle.
symbols = slip 3 sts on cable needle in front of piece, P1, K3 from cable needle.
symbols = slip 3 sts on cable needle in front of piece, K3, K3 from cable needle
symbols = slip 3 sts on cable needle behind piece, K3, K3 from cable needle
symbols = slip 3 sts on cable needle behind piece, work first st on needle tog with first st on cable needle a total of 3 times.
symbols = P2 tog
symbols = slip 3 sts on cable needle in front of piece, work first st on cable needle tog with first st on needle a total of 3 times.
symbols = K2 tog
diagram
diagram

Each of our patterns has specific tutorial videos to help you.

Do you have a question? See a list of frequently asked questions (FAQ)

Knitting tension is what determines the final measurements of your work, and is usually measured per 10 x 10 cm. It is provided like so: number of stitches in width x number of rows in height - eg: 19 stitches x 26 rows = 10 x 10 cm.

The knitting tension is very individual; some people knit/crochet loosely while others work tightly. You adjust the knitting tension with the needle size, which is why the suggested needle size is only meant as a guide! You need to adjust this (up or down) to ensure that YOUR knitting tension matches the knitting tension provided in the pattern. If you work with a different knitting tension than provided you will have a different yarn consumption, and your work will have different measurements than what the pattern suggests.

The knitting tension also determines which yarns can replace each other. As long as you achieve the same knitting tension you can replace one yarn with another.

See DROPS lesson: How to measure your tension/gauge

See DROPS video: How to make a gauge tension swatch

The required amount of yarn is provided in grams, eg: 450 g. To calculate how many balls you’ll need you first need to know how many grams are in 1 ball (25g, 50g or 100g). This information is available if you click on the individual yarn quality on our pages. Divide the amount required with the amount of each ball. For example, if each ball is 50g (the most common amount), the calculation will be as follows: 450 / 50 = 9 balls.

The important thing when changing from one yarn to another is that the knitting/crochet tension remains the same. This is so that the measurements of the finished piece will be the same as on the sketch provided. It is easier to achieve the same knitting tension using yarns from the same yarn group. It is also possible to work with multiple strands of a thinner yarn to achieve the knitting tension of a thicker one. Please try our yarn converter. We recommend you to always work a test swatch.

Please NOTE: when changing yarn the garment might have a different look and feel to the garment in the photo, due to individual properties and qualities of each yarn.

See DROPS lesson: Can I use a different yarn than the one mentioned in the pattern?

All our yarns are categorised into yarn groups (from A to F) according to thickness and knitting tension – group A contains the thinnest yarns and group F the thickest. This makes it easier for you to find alternative yarns to our patterns, should you wish to switch yarn. All yarns within the same group have a similar knitting tension and can easily replace each other. However, different yarn qualities have different structures and properties which will give the finished work a unique look and feel.

Click here for an overview of the yarns in each yarn group

At the top of all our patterns you’ll find a link to our yarn calculator, which is a helpful tool should you wish to use a different yarn than suggested. By filling in the yarn quality you wish to replace, the amount (in your size) and number of strands, the calculator will present good alternative yarns with the same knitting tension. Additionally it will tell you how much you’ll require in the new qualities and whether you’ll need to work with multiple strands. Most skeins are 50g (some are 25g or 100g).

If the pattern is worked with multiple colours, every colour will have to be calculated separately. Similarly, if the pattern is worked with several strands of different yarns (for example 1 strand Alpaca and 1 strand Kid-Silk) you will have to find alternatives for each, individually.

Click here to see our yarn calculator

Since different yarns have different qualities and textures we have chosen to keep the original yarn in our patterns. However, you can easily find options among our available qualities by using our yarn calculator, or simply pick a yarn from the same yarn group.

It is possible that some retailers still have discontinued yarns in stock, or that someone has a few skeins at home that they would like to find patterns for.

The yarn calculator will provide both alternative yarn as well as required amount in the new quality.

If you think it's hard to decide what size to make, it can be a good idea to measure a garment you own already and like the size of. Then you can pick the size by comparing those measures with the ones available in the pattern's size chart.

You'll find the size chart at the bottom of the pattern.

See DROPS lesson: How to read size chart

The needle size provided in the pattern serves only as a guide, the important thing is to follow the knitting tension. And since knitting tension is very individual, you will have to adjust the needle size to ensure that YOUR tension is the same as in the pattern – maybe you’ll have to adjust 1, or even 2 needle sizes, up or down to achieve the correct tension. For this, we recommend that you work test swatches.

Should you work with a different knitting tension than the one provided, the measurements of the finished garment might deviate from the measurement sketch.

See DROPS lesson: How to measure your tension/gauge

See DROPS video: How to make a tension/gauge swatch

Working a garment top-down provides more flexibility and room for personal adjustment. For example it is easier to try the garment on while working, as well as making adjustments to length of yoke and shoulder caps.

The instructions are carefully explaining every step, in the correct order. Diagrams are adjusted to the knitting direction and are worked as usual.

The diagram depicts all rows/rounds, and every stitch seen from the right side. It is read from bottom to top, from right to left. 1 square = 1 stitch.

When working back and forth, every other row is worked from the right side and every other row is worked from the wrong side. When working from the wrong side, the diagram will have to be worked reversed: from left to right, knit stitches are purled, purl stitches are knit etc.

When working in the round every round is worked from the right side and the diagram are worked from right to left on all rounds.

See DROPS lesson: How to read knitting diagrams

The diagram depicts all rows/rounds, and every stitch seen from the right side. It is worked from bottom to top, from right to left.

When working back and forth every other row is worked from the right side: from right to left and every other row is worked from the wrong side: from left to right.

When working in the round, every row in the diagram are worked from the right side, from right to left.

When working a circular diagram you start in the middle and work your way outwards, counter clockwise, row by row.

The rows usually start with a given number of chain stitches (equivalent to the height of the following stitch), this will either be depicted in the diagram or explained in the pattern.

See DROPS lesson: How to read crochet diagrams

Instructions for working several diagrams after each other on the same row/round, will often be written like so: “work A.1, A.2, A.3 a total of 0-0-2-3-4 times". This means you work A.1 once, then A.2 is worked once, and A.3 is repeated (in width) the number of times provided for your size – in this case like so: S = 0 times, M = 0 times, L=2 times, XL= 3 times and XXL = 4 times.

The diagrams are worked as usual: begin with the first row in A.1, then work the first row in A.2 etc.

See DROPS lesson: How to read knitting diagrams

See DROPS lesson: How to read crochet diagrams

The total width of the garment (from wrist-to-wrist) will be larger in the larger sizes, despite the actual sleeves being shorter. The larger sizes have longer sleeve caps and wider shoulders, so there will be a good fit in all sizes.

The measurement sketch/schematic drawing provides information regarding the full length of the garment. If it’s a jumper or a jacket the length is measured from the highest point on the shoulder closest to the neckline, and straight down to the bottom of the garment. It is NOT measured from the tip of shoulder. Similarly, the length of yoke is measured from the highest point on the shoulder and down to where yoke is split into body and sleeves.

On a jacket measures are never taken along bands, unless specifically stated. Always measure inside band stitches when measuring the length.

See DROPS lesson: How to read a schematic drawing

Diagrams are often repeated on the round or in height. 1 repeat is the diagram the way it appears in the pattern. If it says to work 5 repeats of A.1 in the round, then you work A.1 a total of 5 times after/next to each other in the round. If it says to work 2 repeats of A.1 vertically/in height you work the entire diagram once, then begin again at the start and work the entire diagram one more time.

Chain stitches are slightly narrower than other stitches and to avoid working the cast-on edge too tight, we simply chain more stitches to begin with. The stitch count will be adjusted on the following row to fit the pattern and measurement sketch.

The rib edge is more elastic and will contract slightly compared to, for example, stocking stitch. By increasing before the rib edge, you avoid a visible difference in width between the rib edge and the rest of the body.

It’s very easy to cast off too tightly, and by making yarn overs while casting off (and simultaneously casting these off) you avoid a too tight cast off edge.

See DROPS video: How to bind off with yarn overs (yo)

To achieve an even increase (or decrease) you can increase on, for example: every 3rd and 4th row alternately, like so: work 2 rows and increase on the 3rd row, work 3 rows and increase on the 4th. Repeat this until the increase is complete.

See DROPS lesson: Increase or decrease 1 st on every 3rd and 4th row alternately

Should you prefer to work in the round instead of back and forth, you may of course adjust the pattern. You’ll need to add steeks mid-front (usually 5 stitches), and follow the instructions. When you would normally turn and work from the wrong side, simply work across the steek and continue in the round. At the end you’ll cut the piece open, pick up stitches to work bands, and cover the cut edges.

See DROPS video: How to knit steeks and cut open

Should you prefer to work back and forth instead of in the round, you may of course adjust the pattern so you work the pieces separately and then assemble them at the end. Divide the stitches for the body in 2, add 1 edge stitch in each side (for sewing) and work the front and back pieces separately.

See DROPS lesson: Can I adapt a pattern for circular needles into straight needles?

Pattern repeats can vary slightly in the different sizes, in order to get the correct proportions. If you’re not working the exact same size as the garment in the photo, yours might deviate slightly. This has been carefully developed and adjusted so that the complete impression of the garment is the same in all sizes.

Make sure to follow instructions and diagrams for your size!

If you have found a pattern you like which is available in women’s size it’s not very difficult to convert it to men’s size. The biggest difference will be the length of sleeves and body. Start working on the women size that you think would fit across the chest. The additional length will be worked right before you cast off for the armhole/sleeve cap. If the pattern is worked top-down you can add the length right after the armhole or before the first decrease on sleeve.

Regarding additional yarn amount, this will depend on how much length you add, but it is better with a skein too many than too few.

All yarns will have excess fibres (from production) that might come off as lint or shedding. Brushed yarns (ie hairier yarns) have more of these loose, excess fibres, causing more shedding.

Shedding also depends on what is worn under or over the garment, and whether this pulls at the yarn fibres. It’s therefore not possible to guarantee that there will be no shedding

Below are some tips on how to get the best result when working with hairier yarns:

1. When the garment is finished (before you wash it) shake it vigorously so the looser hairs come off. NOTE: do NOT use a lint roller, brush or any method that pulls at the yarn.

2. Place the garment in a plastic bag and put it in your freezer - the temperature will cause the fibres to become less attached to each other, and excess fibres will come off easier.

3. Leave in the freezer for a few hours before taking it out and shaking it again.

4. Wash the garment according to the instructions on the yarn label.

Pilling is a natural process that happens to even the most exclusive of fibers. It's a natural sign of wear and tear that is hard to avoid, and that is most visible in high friction areas of your garment like a sweater's arms and cuffs.

You can make your garment look as new by removing the pilling, using a fabric comb or a pill/lint remover.

Still can't find the answer you need? Then scroll down and leave your question so one of our experts can try to help you. This will be done normally within 5 to 10 working days.
In the meantime, you can read the questions and answers that others have left to this pattern or join the DROPS Workshop on Facebook to get help from fellow knitters/crocheters!

Viking Knot

Ana Maria, Portugal

Viking Knots

Sari, Finland

Post a comment to pattern DROPS 114-8

We would love to hear what you have to say about this pattern!

If you want to leave a question, please make sure you select the correct category in the form below, to speed up the answering process. Required fields are marked *.

Comments / Questions (133)

country flag Janis wrote:

I love the cabled knots but am struggling to understand the instructions. I am working the front piece and have reached arrow-B in diagram M1. I am making size 4 and had 88st before dividing for the neck - as per the instructions for the back piece. After the last cable row I now have 34st on the left sided piece (15 pattern st and 19 stocking st). I am confused as the pattern says to decrease for the neck until 39st remain?? Can you help please?

27.09.2023 - 15:54

country flag Valerie wrote:

Thank you for your help. It makes sense now.

04.04.2023 - 04:35

country flag Valerie wrote:

Hi I emailed a question and realize I’d like an email as to when you’ve answered please

01.04.2023 - 23:02

DROPS Design answered:

Dear Valerie, please see answer below.

02.04.2023 - 22:11

country flag Valerie wrote:

Hi I’m knitting the front but am confused about page 3 left front piece saying remember to cast off for armhole. I thought I’d finished the armhole castoffs on page 2. I’m enjoying the pattern a lot so far. Thank you.

01.04.2023 - 22:32

DROPS Design answered:

Dear Valerie, on the front piece you start casting off for the armholes as indicated in the back piece. However, you may reach the point where you cast off for the neck before finishing the armholes. So you need to continue casting off for the armholes when working each piece separately. Happy knitting!

02.04.2023 - 22:11

country flag Guedon Odette wrote:

A quelle hauteur de ce modèle doit on commencer les dessins devant.merci

26.01.2023 - 16:50

DROPS Design answered:

Bonjour Mme Guedon, vous commencez à tricoter le diagramme M.1 quand le devant mesure 33-34-35-36-39-40 cm de hauteur totale. Bon tricot!

27.01.2023 - 09:01

country flag Jaana T wrote:

Hihapyöriön viimeinen kavennus (1 x 4s) tuottaa ikävän "kulman" hihan reunaan. Tulisiko linjasta parempi, jos kavennuksen tekisi 2 x 2 s vai onko ohjeessa virhe?

14.10.2022 - 12:43

country flag Catherine Gautherot wrote:

Pouvez vous me donner les explications pour triciter le col de ce pull. Elles ne figurent pas dans le texte. Merci

27.02.2022 - 14:27

DROPS Design answered:

Bonjour, le col se tricote sur le devant droit et gauche. Les explications à ce sujet sont incluses dans leurs sections respectives. Bon tricot!

27.02.2022 - 16:28

country flag Undine wrote:

Danke, aber das geht leider an meiner Frage vorbei. Es gibt kein einziges Modell in der Nadelstärke, das geeignet wäre. Schade... Bleib meine Anregung, das Modell zeitnah zu überarbeiten.

26.01.2022 - 09:12

country flag Undine wrote:

Ich würde diesen Ausschnitt so gerne für ein Topdown Modell verwenden. Gibt es ein schlichtes mit V-Ausschnitt wozu der Viking Knoten passen würde? Ansonsten meine Anregung, dieses Modell demnächst zu überarbeiten und zu modernisieren. Das wäre toll ;-)

25.01.2022 - 18:13

DROPS Design answered:

Liebe Undine, hier finden Sie unsere Modellen für Pullover von oben nach unten mit V-Halsausschnitt, sicher kann Ihnen ein davon inspirieren. Viel Spaß beim stricken!

26.01.2022 - 08:49

country flag Sawnuy wrote:

Sehr geehrte Damen, Habe ich richtig verstanden? Nach 9 cm auf beiden Seiten je 1 M. abk. Ist es nicht abnehmen? Vielen Dank

25.11.2021 - 20:40

DROPS Design answered:

Liebe Swanuy, ja genau, hier soll man lieber abnehmen. Viel Spaß beim stricken!

26.11.2021 - 07:31