
Popular categories
Looking for a yarn?


|
||||||||||||||||
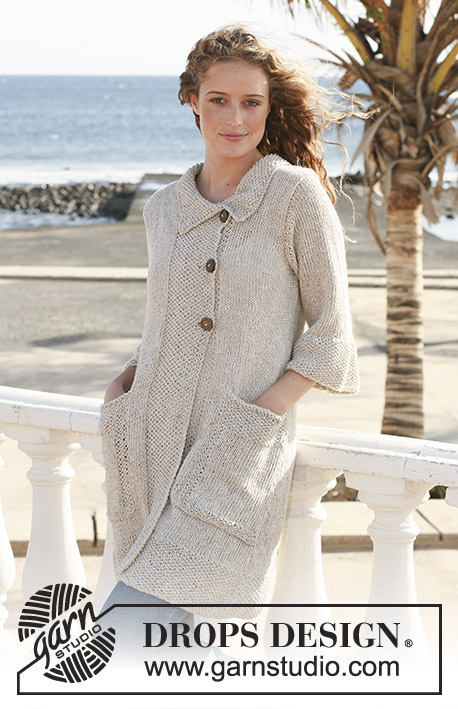
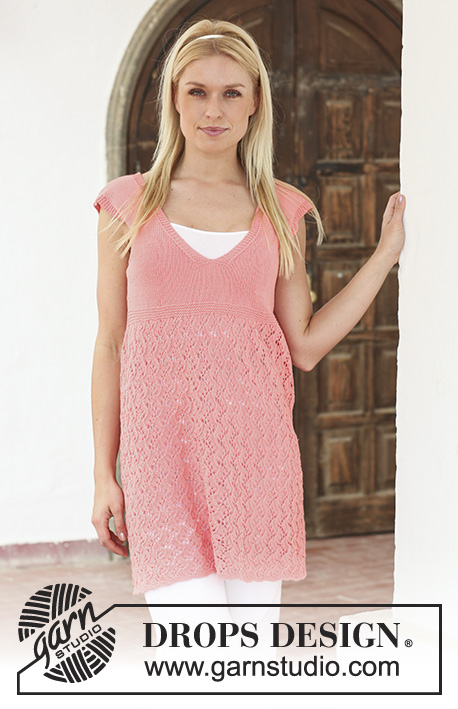
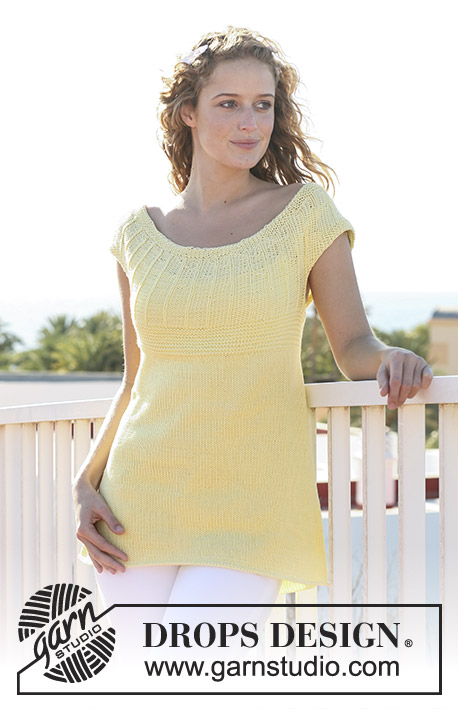
Spanish Flower |
||||||||||||||||
|
|
||||||||||||||||
DROPS bolero in ”Paris” with short, wide sleeves in lace pattern. Size S – XXXL.
DROPS 113-23 |
||||||||||||||||
|
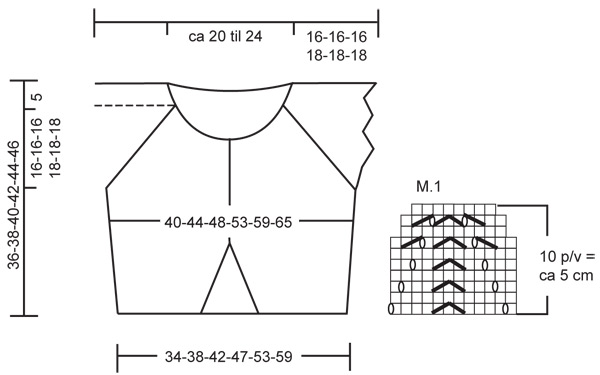
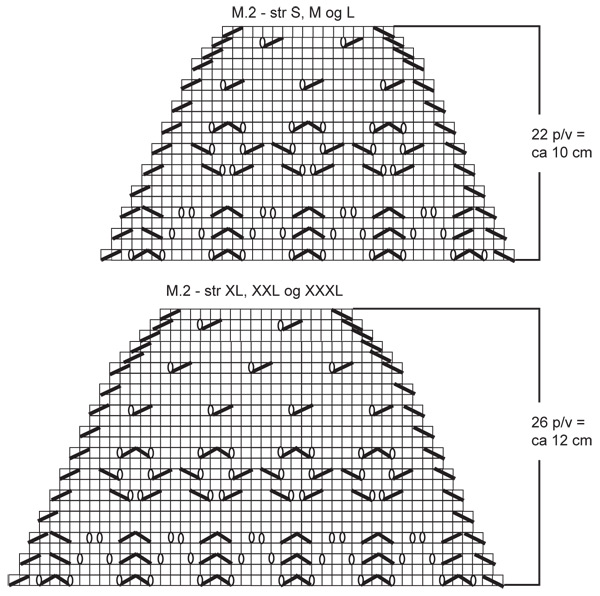
GARTER ST (back and forth on needle): K all rows. INCREASING TIP: Inc 1 st towards mid front from RS inside 5 garter sts by making 1 YO. Work YO into back of loop on return row to avoid a hole. PATTERN: See diagram M.1 and M.2 – the diagrams show the pattern from the RS. BUTTONHOLES: Make buttonholes on right front band. 1 buttonhole = K tog 2nd and 3rd st from mid front and make 1 YO. Make buttonholes when piece measures: SIZE S: 14, 20 and 26 cm. SIZE M: 15, 21 and 27 cm. SIZE L: 15, 22 and 29 cm. SIZE XL: 16, 23 and 30 cm. SIZE XXL: 16, 24 and 32 cm. SIZE XXXL: 17, 25 and 33 cm. RAGLAN DECREASES: Dec 1 st on each side of 4 garter sts. From RS: Before 4 garter sts: K2 tog. After 4 garter sts: slip 1 st as if to K, K1, psso. From WS: Before 4 garter sts: P2 tog into back of loops After 4 garter sts: P2 tog --------------------------------------------------------------------- BODY PIECE: Worked back and forth on circular needle from mid front. Cast on 102-114-130-146-166-186 sts (includes 5 front band sts each side towards mid front) on circular needle size 5 mm with Paris. Insert a marker 22-25-29-33-38-43 sts in from each side (= 58-64-72-80-90-100 sts on back piece). Work 4 rows garter st – SEE ABOVE - (first row = RS). Continue in stocking st with 5 front band sts in garter st each side. AT THE SAME TIME on first row in stocking st inc 1 st inside the 5 front band sts each side – SEE INCREASING TIP – and repeat the inc on every other row a total of 12 times. AT THE SAME TIME when piece measures 4 cm inc 1 st on each side of both markers at the sides and repeat the inc on every 2-2.5-3-3-3.5-3.5 cm a total of 5 times. AT THE SAME TIME when piece measures 14-15-15-16-16-17 cm make BUTTONHOLE on right front piece – see above. REMEMBER THE KNITTING TENSION! When inc mid front and at the sides are complete there are 146-158-174-190-210-230 sts on row. When piece measures approx 15-17-19-19-21-23 cm – adjust so that next row is from WS – work 2 rows garter st on 18 sts each side (= 9 sts on each side of marker) with remaining sts as before. After these 2 rows cast off 10 sts each side (= 5 sts of each side of marker) for armhole – cast off with K sts from WS. On next row (from RS) loosely cast on 69-69-69-81-81-81 new sts for sleeves over each armhole = 264-276-292-332-352-372 sts – continue in garter st on the 4 sts on each side of sleeve. WORK NEXT ROW AS FOLLOWS: (= WS): 5 garter sts, P 25-28-32-36-41-46 sts, K 77-77-77-89-89-89 sts, P 50-56-64-72-82-92 sts, K 77-77-77-89-89-89 sts, P 25-28-32-36-41-46 sts, 5 garter sts. Now work 2 rows stocking st on the 69-69-69-81-81-81 sleeve sts each side with remaining sts as before. NOW READ ALL OF THE FOLLOWING SECTION BEFORE CONTINUING! Continue as follows: 5 front band sts in garter st, 25-28-32-36-41-46 stocking sts, 4 garter sts, 4 stocking sts, M.1 on 60-60-60-72-72-72 sts, 5 stocking sts, 4 garter sts, 50-56-64-72-82-92 stocking sts, 4 garter sts, 4 stocking sts, M.1 on 60-60-60-72-72-72 sts, 5 stocking sts, 4 garter sts, 25-28-32-36-41-46 stocking sts and 5 front band sts in garter st. RAGLAN DECREASES: at the same time on row 3 of M.1 dec for RAGLAN – see above – on every other row a total of 14-14-14-15-15-15 times and then on every row 3-3-3-5-5-5 times. AT THE SAME TIME after M.1 (41-41-41-49-49-49 sts left on each sleeve) work M.2 (see diagram for your size) on sleeves – AT THE SAME TIME continue dec for raglan (marked in M.2). NECKLINE: at the same time when piece measures 27-28-30-31-33-34 cm (from cast on row) slip 7-8-9-11-11-12 sts each side towards mid front on stitch holders for neck. Dec 1 st each side towards mid front at the beg of every row until raglan dec are complete. After M.2 there are approx 68-78-92-98-116-134 sts on row. NECK: Pick up 12 to 17 sts (incl sts on stitch holders) on each neckline on front pieces = approx 92 to 168 sts. K 1 row from WS, AT THE SAME TIME dec evenly to 90-94-96-104-108-112 sts (do not dec on front bands and raglan). K 2 rows and cast off loosely. CROCHET BORDER: Crochet a border along cast on row on sleeves with crochet size 4 mm as follows: 1 dc in first st, *3 ch, skip approx 1 cm, 1 dc in next st *, repeat from *-*. Sew on buttons. |
||||||||||||||||
Diagram explanations |
||||||||||||||||
|
||||||||||||||||
|
||||||||||||||||
|
||||||||||||||||
|
Have you made this or any other of our designs? Tag your pictures in social media with #dropsdesign so we can see them! Do you need help with this pattern?You'll find tutorial videos, a Comments/Questions area and more by visiting the pattern on garnstudio.com. © 1982-2024 DROPS Design A/S. We reserve all rights. This document, including all its sub-sections, has copyrights. Read more about what you can do with our patterns at the bottom of each pattern on our site. |
||||||||||||||||


With over 40 years in knitting and crochet design, DROPS Design offers one of the most extensive collections of free patterns on the internet - translated to 17 languages. As of today we count 304 catalogues and 11422 patterns - 11422 of which are translated into English (UK/cm).
We work hard to bring you the best knitting and crochet have to offer, inspiration and advice as well as great quality yarns at incredible prices! Would you like to use our patterns for other than personal use? You can read what you are allowed to do in the Copyright text at the bottom of all our patterns. Happy crafting!
Comments / Questions (91)
Merci beaucoup pour votre réponse rapide. Meilleures salutations, Véronique
04.04.2022 - 12:33Bonjour! Je ne comprends pas comment mettre les mailles en attente pour l'encolure? Sur le devant? Et comment diminuer ensuite? Merci de m aider pour que je puisse continuer ce modèle. Véronique
02.04.2022 - 21:29DROPS Design answered:
Bonjour Véronique, tricotez les 7-8-9-11-11-12 premières mailles en début de rang sur l'endroit et glissez-les en attente, tricotez jusqu'à la fin du rang comme avant, tournez, tricotez les 7-8-9-11-11-12 premières mailles en début de rang sur l'envers et glissez-les en attente, terminer le rang comme avant, tournez et tricotez comme avant en rabattant 1 m au début de chaque rang de chaque côté jusqu'à ce que toutes les diminutions des raglans soient finies (attention à bien diminuer le même nombre de mailles sur l'endroit et sur l'envers pour les 2 devants). Bon tricot!
04.04.2022 - 09:30Bonjour. Merci pour ce modèle. Question 1: doit on continuer raglan tous les rangs avant et après 4mailles mousse, simultanément au diagramme M2? Je n arrive jamais au nombre de mailles indiqué. Merci de votre aide. Véronique
02.04.2022 - 21:26DROPS Design answered:
Bonjour Véronique, en même temps que vous tricotez M.2 vous devez diminuer sur les devants et le dos (avant/après les 4 mailles point mousse), les diminutions des manches figurent dans M.2. Bon tricot!
04.04.2022 - 09:28Ik ben met M1 begonnen en moet nu op rij 3 beginnen met minderen voor de raglan. Ik snap alleen niet goed hoe ik verder moet na de samengebreide steken op de mouw: moet ik daarna nog 2 steken breien of 4? De eerste 2 naalden was t steeds 4 r en daarna M1 patroon en daarna 5r: moet ik na de twee samengebreide steken van die 4 steken r 2 st afhalen en dus nog maar 2 r breien..? Of gewoon 4r aanhouden..(dus 2st samenbreien en dan 4r en dan M1 of 2st samenbreien, nog 2r en dan M1)
24.06.2020 - 17:48DROPS Design answered:
Dag Ilja,
Het is de bedoeling dat je de 4 ribbelsteken in tact laat en mindert op de manden en de muwen, dus vlak voor en na de 4 ribbelsteken. Je breit dus 2 steken samen (de laatste 2 steken van het telpatroon op de mouw of het pand), dan brei je de 4 ribbelstenken en dan 1 steek afhalen, 1 breien, 1 overhalen.
04.07.2020 - 17:07Kan ikke få maske antallet til at stemme ? Strikker i str. Xl. Har slået 146m op, ta'r ud ved kanterne 2x12m. Og 2x10m. i siderne ialt: 190m, lukker så 2x20m. af til ærmegab: 150 m. Så slås 2x 81 m. Op til ærmer : ialt 312 m. Og i opskriften står der 332 masker ?
13.08.2014 - 20:02DROPS Design answered:
Hej Marianne. Du skal lukke 10 m af i hver side til aermegab (totalt 20). Dvs, du har 190 m, lukker af til aermegab (= 20) og slaar 2 x 81 m op over begge aermegab til aermer: 190-20-162 = 332 m.
14.08.2014 - 16:32Karen wrote:
Dear Drops, You say that 'the raglan dec are marked in M2 at the beg + end of sleeve, so that you work M2 for sleeves between the sts in garter st and dec sts as in diagram'. This is what I am doing, i.e. I am decreasing before and after the 4 garter stitches at each side of each sleeve. However, I still have 40 stitches between the raglan on each sleeve, it's just the number of stitches being knit in pattern that is decreasing but the overall number of stitches is the same. Is that right?
26.05.2014 - 15:28DROPS Design answered:
Dear Karen, after M.1, 41 sts remain for sleeve, follow diagram M.2 over these sts (= 41 sts on 1st row). You dec from 1st row in M.2 1 st at the beg + 1 st at the end of M.2 so that 39 sts remain in M.2 at the end of row 1. Continue decrease as shown in diagram (more dec than yo will make the sleeve). Happy knitting!
26.05.2014 - 15:49Karen wrote:
Dear drops, I am working the M2 part, and I notice that the number of stitches on the sleeves is not decreasing. The number of stitches knit in M2 is decreasing but I end up with stitches after M2 which I am just knitting in Garter. The pattern looks ok, but I am wondering if I am doing something wrong. The decreases that are marked each side of M2- where should they be made? I am doing these either side of the 4 garter stitches for the raglan. Thanks for your help once again :)
25.05.2014 - 10:32DROPS Design answered:
Dear Karen, the raglan dec are marked in M2 at the beg + end of sleeve, so that you work M2 for sleeves between the sts in garter st and dec sts as in diagram. Happy knitting!
26.05.2014 - 09:36Karen wrote:
I still don't understand what you mean when you say when M1 has been worked one time in height - M1 seems to contain 10 rows, so if I decrease every second row after row 3, this would only be 4 decreases (rows 3, 5, 7 and 9) before I have done M1. I'm so sorry for being a nuisance!
22.05.2014 - 11:39DROPS Design answered:
Dear Karen, You work M1 on the sts for sleeves, and at the same dec for raglan starting dec on 3rd row in M1 then every other row (every row from RS) as stated. After the 10 rows of M1 have been worked 1 time in height, continue following M2 and at the same time, continue dec for raglan as before. Happy knitting!
22.05.2014 - 13:23Karen wrote:
And one more question about M1 decreases: In the pattern, it states to do 'RAGLAN DECREASES: at the same time on row 3 of M.1 dec for RAGLAN on every other row a total of 14-14-14-15-15-15 times and then on every row 3-3-3-5-5-5 times' As I understand, M1 is made over 10 rows. If I decrease on row 3 and should do this 14 times, that would be 140 rows of knitting, making very long sleeves! I think I am reading this wrong? Thanks in advance, Karen
21.05.2014 - 21:29DROPS Design answered:
Dear Karen, you start dec for raglan on row 3 in M.1 then repeat these dec every 2 rows (every row from RS) 13 more times, then 3 times every row, and then after M1 has been worked 1 time in height, you work M.2 (choose diagram for your size) still working raglan dec. Happy knitting!
22.05.2014 - 08:40Karen' wrote:
Dear Drops, thanks again for your help. I have some questions about the sleeves. 1) I have cast on sleeves and worked the next 2 rows. for the next row it says to 'Continue as follows: 5 front band sts in garter st, 25-28-32-36-41-46 stocking sts, 4 garter sts, 4 stocking sts, M.1 on 60-60-60-72-72-72 sts, etc'. What are these stocking stitches? since the last row was done in purl on the sides and back, I presume those stitches should be garter on this row?
21.05.2014 - 21:26DROPS Design answered:
Dear Karen, the sts worked in stocking st on this row will be K from RS and then P from WS - you have 4 sts K every round for each raglan (4 sts in garter st) and on sleeve 4 sts before M1 and 5 sts after M1 worked in stocking st (K from RS, P from WS). Happy knitting!
22.05.2014 - 08:35