DROPS Alpaca
DROPS Alpaca
100% Alpaca
from 3.40 £ /50g
DROPS Cotton Viscose
54% Cotton, 46% Viscose
Discontinued
find alternatives
DROPS Super Sale

Rolling Dunes

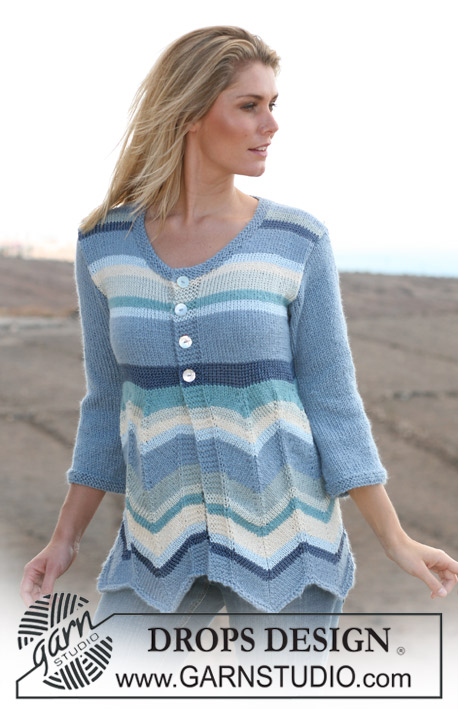
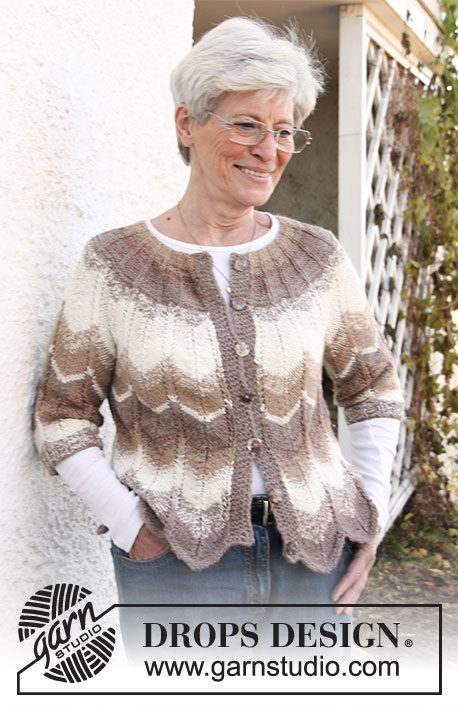
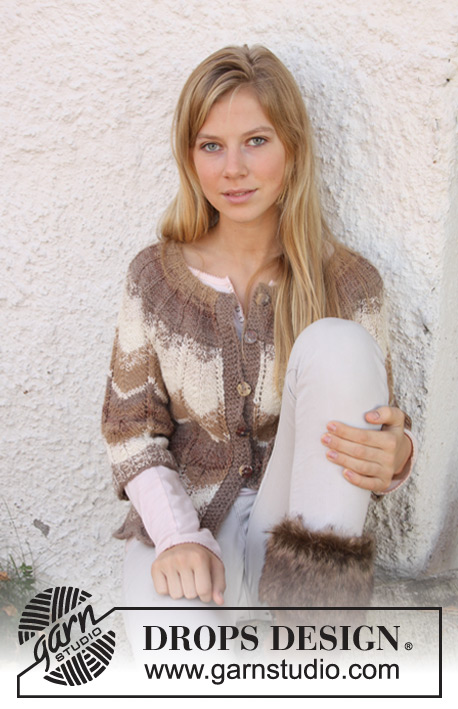
DROPS jacket with zigzag pattern and round yoke in “Alpaca” and “Cotton Viscose”. Size XS – XXXL

DROPS 105-26
Size: XS – S/M – L/XL – XXL/XXXL

Materials: DROPS Alpaca, from Garnstudio
100-100-150-150 g colour no 100, off-white
100-100-100-150 g colour no 302, camel
150-200-200-200 g colour no 618, light beige
and use: DROPS Cotton Viscose, from Garnstudio
150-150-150-200 g colour no 02, off-white
100-150-150-150 g colour no 26, chestnut

DROPS circular needle size 5 mm (80 and 40 cm) - or size needed to obtain 22 sts x 24 rows in zigzag pattern with double thread = 10 x 10 cm.
DROPS circular needle size 4.5 mm (80 and 40 cm) – for Rib

DROPS Mother-of-pearl button w/hole, no 522, 7-8-8-9 pcs.

-------------------------------------------------------

Alternative Yarn – See how to change yarns here
Yarn Groups A to F – Use the same pattern and change the yarn here
Yarn usage using an alternative yarn – Use our yarn converter here

-------------------------------------------------------

DROPS Alpaca
DROPS Alpaca
100% Alpaca
from 3.40 £ /50g
DROPS Cotton Viscose
54% Cotton, 46% Viscose
Discontinued
find alternatives

DROPS Super Sale

SAVE 30% on 6 cotton favourites!
Valid until 12.04.2024

Pattern instructions

NOTE: This pattern is written in British English. All measurements in charts are in cm. For conversion from cm to inches - click here. There are different terms for crocheting in British and American English. If this pattern includes crochet, click for "crochet terms" here. For this pattern in American English, please click here.
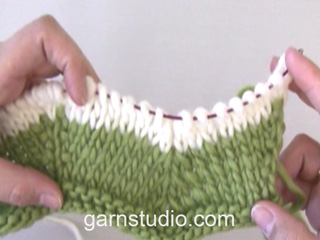
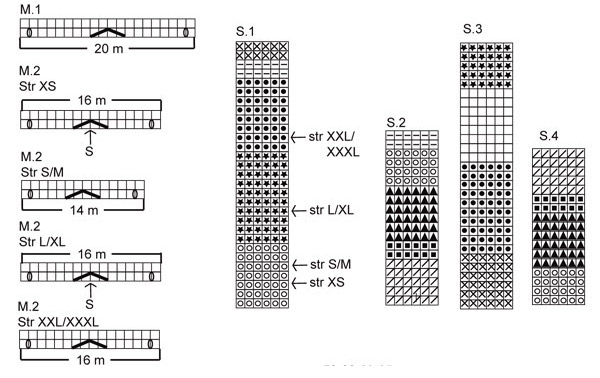
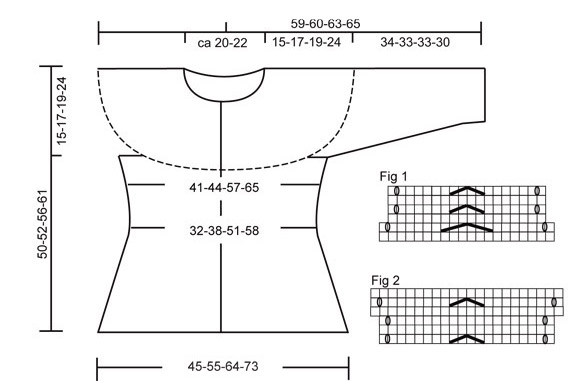
Stripes, body piece: See S.1-S.4.
Noet! S-arrows only apply to sleeves, for body piece beg at bottom of diagram for all sizes.
Work 1 vertical repeat of S.1, and continue in double thread camel Alpaca until piece measures 16-17-19-21 cm.
Work 1 vertical repeat of S.2, and continue in double thread camel Alpaca until piece measures 27-29-32-35 cm.
Work 1 vertical repeat of S.3, and continue in double thread light beige Alpaca until piece measures 8 cm from Marking Thread (MT.
Work 1 vertical repeat of S.4, and complete piece in double thread camel Alpaca.

Stripes, sleeves: See S.1-S.4.
Beg by arrow for appropriate size. NB! Less of S.1 in the larger sizes because of wider yoke.
Work 1 vertical repeat of S.1, and continue in double thread camel Alpaca until no of rows equals no of rows in S.1 on body piece.
Work 1 vertical repeat of S.2, and continue in double thread camel Alpaca until no of rows equals no of rows in S.2 on body piece.
Work S.3.

Pattern: See diagram M.1 and M.2. The diagram shows the pattern from the RS. NB! For size XS and L/XL beg by arrow in diagram for M.2.

Front band: = 5 sts each side towards mid front, worked in garter st in double thread light beige Alpaca. Use separate balls for front bands and twist threads when changing colours to avoid hole in transition.

Decreasing tip-1: See fig.1 for an example. All dec are made on rows worked in pattern. Dec 2 sts in each pattern repeat as follows: K1, 1 yo, continue until 3 sts before the centre of pattern repeat, slip 1 st as if to K, K2 tog, psso, after the pattern repeat centre K3 tog. Complete pattern repeat and finish with 1 yo and K1. On next row continue as before but with 1 less st on either side of the centre of pattern repeat.
Decreasing tip-2: When dec in P sections, dec by P tog the first 2 and the last 2 sts alternately – to make the dec less noticeable.

Increasing tip: See fig. 2 for an example.
All inc are made on rows worked in pattern. Inc 2 sts in each pattern repeat as follows: K1, 1 yo, work remaining sts in pattern repeat in stocking st and finish pattern repeat with 1 yo, K1. On next row continue as before but with 1 additional st on either side of the centre of pattern repeat.

Buttonholes: Make buttonholes on right front band. 1 buttonhole = cast off third st from mid front, cast on 1 new st on return row.
Make buttonholes when piece measures:
Size XS: 1, 9, 17, 25, 33, 41 and 49 cm.
Size S/M: 2, 9, 16, 23, 30, 37, 44 and 51 cm.
Size L/XL: 2, 10, 17, 25, 32, 40, 47 and 55 cm.
Size XXL/XXL: 2, 10, 17, 24, 31, 38, 45, 52 and 60 cm.

__________________________________________________________________

Back and front piece: Knitted back and forth on circular needle from mid front.
Read the entire pattern before beginning! Cast on 210-250-290-330 sts (incl 5 front band sts each side) on 2 circular needle size 5 mm (to make the hem elastic) with double thread light beige Alpaca. Remove 1 needle. Work 2 rows garter st, at the same time work Stripes – see above. Insert a Marking Thread (MT) 55-65-75-85 sts in from each side (to mark the sides) = 100-120-140-160 sts on back piece. Continue in zigzag pattern M.1 (10-12-14-16 repeats) with 5 garter sts each side – see Front bands. Remember buttonholes on right front band – see above. When piece measures 2 cm from bottom point dec 2 sts in each pattern repeat – see Decreasing tip-1 – on every 5 cm a total of 3-3-2-2 times = 150-178-234-266 sts (1 repeat = 14-14-16-16 sts). Remember the knitting tension!
When piece measures19 cm inc 2 sts in each pattern repeat – see Increasing tip = 170-202-262-298 sts (1 repeat = 16-16-18-18 sts).
For size XS: repeat the inc when piece measures 29 cm = 190 sts (1 repeat = 18 sts).
When piece measures 32-32-34-34 cm continue with 9-8-9-9 stocking sts on each side of both MT (work remaining sts as before) and when piece measures 35-35-37-37 cm cast off the 9-8-9-9 sts each side of both MT for armhole = 154-170-226-262 sts (= 8-10-12-14 repeats in total). Put piece aside and knit the sleeves.

Sleeves: Knitted in the round on circular needle 40 cm. Cast on 48-56-64-80 sts on needle size 4.5 mm with double thread light beige Alpaca. K 1 round, at the same time start working Stripes – see above. Continue in Rib as follows: *K1/P3*, repeat from *-*. When Rib measures 4 cm K 1 round and change to needle size 5 mm. K 1 round and now continue in M.2 – see diagram for appropriate size (= 3-4-4-5 pattern repeats). NB! Make sure to place first st in M.2 over K1 in Rib. When piece measures 10 cm inc 2 sts in each pattern repeat = 54-64-72-90 sts (1 repeat = 18-16-18-18 sts). When piece measures 31-30-30-27 cm continue with 9-8-9-9 sts each side in stocking st (work remaining sts as before) and when piece measures approx 34-33-33-30 cm (adjust no of rows in S.3 to no of rows in S.3 on body piece) cast off the 9-8-9-9 sts each side for armhole = 36-48-54-72 sts left on row (= 2-3-3-4 repeats). Put piece aside and knit the other sleeve.

Yoke: Put sleeves in on the same circular needle as body piece where cast off for armholes = 226-266-334-406 sts (= 12-16-18-22 repeats). Insert a MT in piece and now measure piece from here. Continue in stripes (S.3) and zigzag pattern with front bands in garter st as before. When piece measures 1 cm from MT dec 2 sts in each pattern repeat = 202-234-298-362 sts. Repeat the dec when piece measures 3 cm = 178-202-262-318 sts.
Size L/XL: repeat the dec when piece measures 5 cm = 226 sts.
Size XXL/XXXL: repeat the dec when piece measures 5 cm (= 274 sts) and 7 cm = 230 sts.
When piece measures 8 -8-10-12 cm K 1 row, at the same time inc 1 st = 179-203-227-231 sts. Now continue in Rib as follows:
Size XS: 5 front band sts, *K1/P6*, repeat from *-* and finish with K1 and 5 front band sts.
Size S/M + L/XL: 5 front band sts, *K1/P7*, repeat from *-* and finish with K1 and 5 front band sts.
Size XXL/XXXL: 5 front band sts, *K1/P9*, repeat from *-* and finish with K1 and 5 front band sts.
When piece measures approx 9 -9-11-14 cm from MT dec 1 st in each P section – see Decreasing tip-2 – on every 2 cm a total of 3-4-4-5 times = 107-107-119-121 sts. When piece measures approx 14-16-18-23 cm from MT K 1 row, work 1 row Rib as before and cast off loosely in Rib.

Assembly: Sew openings under arms. Sew on buttons.
Note! Steam iron the jacket before use.

This pattern has been corrected.

Updated online: 11.04.2008
Sleeve: Cast on 48-56-64-80 sts...

Yoke: Last sentence before Assembly:
When piece measures approx 14-16-18-23 cm from MT K 1 row, work 1 row Rib as before and cast off loosely in Rib.

Diagram

symbols = K from RS, P from WS
symbols = 1 yo between 2 sts
symbols = slip 1 st as if to K, K1, psso
symbols = K2 tog
symbols = slip 1 st as if to K, K2 tog, psso
symbols = K3 tog
symbols = start here
symbols = Cotton Viscose
symbols = Alpaca
symbols = VC off-white + Alp light beige
symbols = CV off-white + Alp camel
symbols = 2 x Alp off-white
symbols = 2 x CV off-white
symbols = 2 x Alp light beige
symbols = CV chestnut + Alp camel
symbols = 2 x CV chestnut
symbols = CV chestnut + Alp light beige
symbols = CV off-white + Alp off white
diagram
diagram

Each of our patterns has specific tutorial videos to help you.

Do you have a question? See a list of frequently asked questions (FAQ)

Knitting tension is what determines the final measurements of your work, and is usually measured per 10 x 10 cm. It is provided like so: number of stitches in width x number of rows in height - eg: 19 stitches x 26 rows = 10 x 10 cm.

The knitting tension is very individual; some people knit/crochet loosely while others work tightly. You adjust the knitting tension with the needle size, which is why the suggested needle size is only meant as a guide! You need to adjust this (up or down) to ensure that YOUR knitting tension matches the knitting tension provided in the pattern. If you work with a different knitting tension than provided you will have a different yarn consumption, and your work will have different measurements than what the pattern suggests.

The knitting tension also determines which yarns can replace each other. As long as you achieve the same knitting tension you can replace one yarn with another.

See DROPS lesson: How to measure your tension/gauge

See DROPS video: How to make a gauge tension swatch

The required amount of yarn is provided in grams, eg: 450 g. To calculate how many balls you’ll need you first need to know how many grams are in 1 ball (25g, 50g or 100g). This information is available if you click on the individual yarn quality on our pages. Divide the amount required with the amount of each ball. For example, if each ball is 50g (the most common amount), the calculation will be as follows: 450 / 50 = 9 balls.

The important thing when changing from one yarn to another is that the knitting/crochet tension remains the same. This is so that the measurements of the finished piece will be the same as on the sketch provided. It is easier to achieve the same knitting tension using yarns from the same yarn group. It is also possible to work with multiple strands of a thinner yarn to achieve the knitting tension of a thicker one. Please try our yarn converter. We recommend you to always work a test swatch.

Please NOTE: when changing yarn the garment might have a different look and feel to the garment in the photo, due to individual properties and qualities of each yarn.

See DROPS lesson: Can I use a different yarn than the one mentioned in the pattern?

All our yarns are categorised into yarn groups (from A to F) according to thickness and knitting tension – group A contains the thinnest yarns and group F the thickest. This makes it easier for you to find alternative yarns to our patterns, should you wish to switch yarn. All yarns within the same group have a similar knitting tension and can easily replace each other. However, different yarn qualities have different structures and properties which will give the finished work a unique look and feel.

Click here for an overview of the yarns in each yarn group

At the top of all our patterns you’ll find a link to our yarn calculator, which is a helpful tool should you wish to use a different yarn than suggested. By filling in the yarn quality you wish to replace, the amount (in your size) and number of strands, the calculator will present good alternative yarns with the same knitting tension. Additionally it will tell you how much you’ll require in the new qualities and whether you’ll need to work with multiple strands. Most skeins are 50g (some are 25g or 100g).

If the pattern is worked with multiple colours, every colour will have to be calculated separately. Similarly, if the pattern is worked with several strands of different yarns (for example 1 strand Alpaca and 1 strand Kid-Silk) you will have to find alternatives for each, individually.

Click here to see our yarn calculator

Since different yarns have different qualities and textures we have chosen to keep the original yarn in our patterns. However, you can easily find options among our available qualities by using our yarn calculator, or simply pick a yarn from the same yarn group.

It is possible that some retailers still have discontinued yarns in stock, or that someone has a few skeins at home that they would like to find patterns for.

The yarn calculator will provide both alternative yarn as well as required amount in the new quality.

If you think it's hard to decide what size to make, it can be a good idea to measure a garment you own already and like the size of. Then you can pick the size by comparing those measures with the ones available in the pattern's size chart.

You'll find the size chart at the bottom of the pattern.

See DROPS lesson: How to read size chart

The needle size provided in the pattern serves only as a guide, the important thing is to follow the knitting tension. And since knitting tension is very individual, you will have to adjust the needle size to ensure that YOUR tension is the same as in the pattern – maybe you’ll have to adjust 1, or even 2 needle sizes, up or down to achieve the correct tension. For this, we recommend that you work test swatches.

Should you work with a different knitting tension than the one provided, the measurements of the finished garment might deviate from the measurement sketch.

See DROPS lesson: How to measure your tension/gauge

See DROPS video: How to make a tension/gauge swatch

Working a garment top-down provides more flexibility and room for personal adjustment. For example it is easier to try the garment on while working, as well as making adjustments to length of yoke and shoulder caps.

The instructions are carefully explaining every step, in the correct order. Diagrams are adjusted to the knitting direction and are worked as usual.

The diagram depicts all rows/rounds, and every stitch seen from the right side. It is read from bottom to top, from right to left. 1 square = 1 stitch.

When working back and forth, every other row is worked from the right side and every other row is worked from the wrong side. When working from the wrong side, the diagram will have to be worked reversed: from left to right, knit stitches are purled, purl stitches are knit etc.

When working in the round every round is worked from the right side and the diagram are worked from right to left on all rounds.

See DROPS lesson: How to read knitting diagrams

The diagram depicts all rows/rounds, and every stitch seen from the right side. It is worked from bottom to top, from right to left.

When working back and forth every other row is worked from the right side: from right to left and every other row is worked from the wrong side: from left to right.

When working in the round, every row in the diagram are worked from the right side, from right to left.

When working a circular diagram you start in the middle and work your way outwards, counter clockwise, row by row.

The rows usually start with a given number of chain stitches (equivalent to the height of the following stitch), this will either be depicted in the diagram or explained in the pattern.

See DROPS lesson: How to read crochet diagrams

Instructions for working several diagrams after each other on the same row/round, will often be written like so: “work A.1, A.2, A.3 a total of 0-0-2-3-4 times". This means you work A.1 once, then A.2 is worked once, and A.3 is repeated (in width) the number of times provided for your size – in this case like so: S = 0 times, M = 0 times, L=2 times, XL= 3 times and XXL = 4 times.

The diagrams are worked as usual: begin with the first row in A.1, then work the first row in A.2 etc.

See DROPS lesson: How to read knitting diagrams

See DROPS lesson: How to read crochet diagrams

The total width of the garment (from wrist-to-wrist) will be larger in the larger sizes, despite the actual sleeves being shorter. The larger sizes have longer sleeve caps and wider shoulders, so there will be a good fit in all sizes.

The measurement sketch/schematic drawing provides information regarding the full length of the garment. If it’s a jumper or a jacket the length is measured from the highest point on the shoulder closest to the neckline, and straight down to the bottom of the garment. It is NOT measured from the tip of shoulder. Similarly, the length of yoke is measured from the highest point on the shoulder and down to where yoke is split into body and sleeves.

On a jacket measures are never taken along bands, unless specifically stated. Always measure inside band stitches when measuring the length.

See DROPS lesson: How to read a schematic drawing

Diagrams are often repeated on the round or in height. 1 repeat is the diagram the way it appears in the pattern. If it says to work 5 repeats of A.1 in the round, then you work A.1 a total of 5 times after/next to each other in the round. If it says to work 2 repeats of A.1 vertically/in height you work the entire diagram once, then begin again at the start and work the entire diagram one more time.

Chain stitches are slightly narrower than other stitches and to avoid working the cast-on edge too tight, we simply chain more stitches to begin with. The stitch count will be adjusted on the following row to fit the pattern and measurement sketch.

The rib edge is more elastic and will contract slightly compared to, for example, stocking stitch. By increasing before the rib edge, you avoid a visible difference in width between the rib edge and the rest of the body.

It’s very easy to cast off too tightly, and by making yarn overs while casting off (and simultaneously casting these off) you avoid a too tight cast off edge.

See DROPS video: How to bind off with yarn overs (yo)

To achieve an even increase (or decrease) you can increase on, for example: every 3rd and 4th row alternately, like so: work 2 rows and increase on the 3rd row, work 3 rows and increase on the 4th. Repeat this until the increase is complete.

See DROPS lesson: Increase or decrease 1 st on every 3rd and 4th row alternately

Should you prefer to work in the round instead of back and forth, you may of course adjust the pattern. You’ll need to add steeks mid-front (usually 5 stitches), and follow the instructions. When you would normally turn and work from the wrong side, simply work across the steek and continue in the round. At the end you’ll cut the piece open, pick up stitches to work bands, and cover the cut edges.

See DROPS video: How to knit steeks and cut open

Should you prefer to work back and forth instead of in the round, you may of course adjust the pattern so you work the pieces separately and then assemble them at the end. Divide the stitches for the body in 2, add 1 edge stitch in each side (for sewing) and work the front and back pieces separately.

See DROPS lesson: Can I adapt a pattern for circular needles into straight needles?

Pattern repeats can vary slightly in the different sizes, in order to get the correct proportions. If you’re not working the exact same size as the garment in the photo, yours might deviate slightly. This has been carefully developed and adjusted so that the complete impression of the garment is the same in all sizes.

Make sure to follow instructions and diagrams for your size!

If you have found a pattern you like which is available in women’s size it’s not very difficult to convert it to men’s size. The biggest difference will be the length of sleeves and body. Start working on the women size that you think would fit across the chest. The additional length will be worked right before you cast off for the armhole/sleeve cap. If the pattern is worked top-down you can add the length right after the armhole or before the first decrease on sleeve.

Regarding additional yarn amount, this will depend on how much length you add, but it is better with a skein too many than too few.

All yarns will have excess fibres (from production) that might come off as lint or shedding. Brushed yarns (ie hairier yarns) have more of these loose, excess fibres, causing more shedding.

Shedding also depends on what is worn under or over the garment, and whether this pulls at the yarn fibres. It’s therefore not possible to guarantee that there will be no shedding

Below are some tips on how to get the best result when working with hairier yarns:

1. When the garment is finished (before you wash it) shake it vigorously so the looser hairs come off. NOTE: do NOT use a lint roller, brush or any method that pulls at the yarn.

2. Place the garment in a plastic bag and put it in your freezer - the temperature will cause the fibres to become less attached to each other, and excess fibres will come off easier.

3. Leave in the freezer for a few hours before taking it out and shaking it again.

4. Wash the garment according to the instructions on the yarn label.

Pilling is a natural process that happens to even the most exclusive of fibers. It's a natural sign of wear and tear that is hard to avoid, and that is most visible in high friction areas of your garment like a sweater's arms and cuffs.

You can make your garment look as new by removing the pilling, using a fabric comb or a pill/lint remover.

Still can't find the answer you need? Then scroll down and leave your question so one of our experts can try to help you. This will be done normally within 5 to 10 working days.
In the meantime, you can read the questions and answers that others have left to this pattern or join the DROPS Workshop on Facebook to get help from fellow knitters/crocheters!

You might also like...

Post a comment to pattern DROPS 105-26

We would love to hear what you have to say about this pattern!

If you want to leave a question, please make sure you select the correct category in the form below, to speed up the answering process. Required fields are marked *.

Comments / Questions (31)

country flag Karen Johanne Nielsen wrote:

Hvor mange nøgler alpaca-garn skal man købe, hvis den skal være ensfarvet?

02.03.2021 - 15:40

DROPS Design answered:

Hej Karen, det har vi desværre ikke med i oversigten, men du kan nok klare dig med et par nøgler mindre :)

03.03.2021 - 14:34

country flag Gitte wrote:

Meget fin trøje, som jeg gerne vil strikke. Jeg kan bare ikke se, om det hele strikkes i dobbelt garn, eller om der bare slås masker op med dobbelt garn og at resten af trøjen strikkes i enkelt garn? Jeg glæder mig til at komme igang med den i det meget lækre alpacagarn

21.02.2021 - 08:33

DROPS Design answered:

Hej Gitte, der strikkes med to tråde, du ser hvilke farver i diagrammet nederst i opskriften. God fornøjelse!

23.02.2021 - 14:00

Isolde wrote:

This looks stunning. Would love to have the pattern!

19.10.2012 - 13:50

country flag Drops Design wrote:

Forklaring til M.1 1r,1oms,7r,tag 1 m løst af p 1 r løft den løse m over, 2r sammen, 7r,1oms,1r, således strikker du M.1 om og om igen på omgangen. God fornøjelse!

16.02.2009 - 09:18

country flag Else Johansen wrote:

Nu har jeg læst opskriften igennem og har fundet ud af hvordan striberne skal være, men jeg kan ikke finde ud af mønstret. Kan jeg få det forklaret detaljeret? På forhånd tak. Venlig hilsen Else Johansen

15.02.2009 - 19:52

country flag Hanh wrote:

I like the design but not the colors, too much contrast creating strong horizontals that are not flattering even for slim people

21.02.2008 - 18:15

country flag Bea wrote:

Zou graag het patroon kreigen a.u.b

08.02.2008 - 17:50

country flag Helvig wrote:

Utrolig spændende, den må jeg prøve at strikke

22.01.2008 - 08:04

country flag Karen wrote:

Lovely design - good use of color changes. Would look good on many different shapes.

17.01.2008 - 12:15

country flag Rachel wrote:

Elegant and eye-catching.

14.01.2008 - 17:02