
Popular categories
Looking for a yarn?


Comments / Questions (7)
![]() Linda Van Staaden wrote:
Linda Van Staaden wrote:
Please answer my latest question
18.07.2024 - 09:54
![]() Linda Van Staaden wrote:
Linda Van Staaden wrote:
Thank you for the reply, but I was referring to the piece and not the markers. Must you decrease in every row. Right and wrong side, or only right (front) side.
18.07.2024 - 08:40DROPS Design answered:
Dear Linda, the pattern does tell you that: "Now dec 1 st on the left side of each marker every other row a total of 11-12 times": every OTHER row, in other words every second row. Happy Knitting!
18.07.2024 - 10:58
![]() Linda Van Staaden wrote:
Linda Van Staaden wrote:
After reaching 16cm, markers are placed on the right side. Must the next row on wrong side be only knit and decreasing on left side of marker be only on right side?
17.07.2024 - 21:07DROPS Design answered:
Dear Linda, you put the stitchmarkers between the stitches, so they should be visible on both sides (from the wrongs ide as well). Happy Knitting!
18.07.2024 - 04:24
![]() Trine wrote:
Trine wrote:
Hej. Jeg vil gerne strikke hatten. Jeg kan se, at drops ALPACA er tilgængelig, men at drops VIVALDI er udgået. Jeg kan se, at jeg kan erstatte VIVALDI med garn fra gruppe C og stadig bruge ALPACA fra gruppe A, så 2 tråde i alt. Har jeg forstået det rigtigt, at garngruppe A + C = D, så jeg på denne måde kan anvende 1 tråd fra garngruppe D i stedet for at anvende 2 tråde fra gruppe A og gruppe C. Vh
25.01.2024 - 21:32DROPS Design answered:
Hei Trine. Ja, det stemmer. Nå har vi kun garnet DROPS Melody i garngruppe D. Ta en titt nederst på fargekartet til Melody og under Toving. Der ser du et før og etter bilde av en prøvelapp av Melody. mvh DROPS Design
05.02.2024 - 09:03
![]() BELLUSSI wrote:
BELLUSSI wrote:
COMMENT FAIRE LES AUGMENTATIONS APRES LES 5 CM AU POINT MOUSSE FAUT IL LES FAIRE SUR LE MEME RANG?
09.04.2022 - 20:56DROPS Design answered:
Bonjour Mme Bellussi, tout à fait, vous diminuez 35 mailles sur le même rang en tricotant 35 fois 2 mailles ensemble à l'endroit à intervalles réguliers - Cette leçon pourra vous aider à savoir comment placer vos diminutions. Bon tricot!
19.04.2022 - 07:38
![]() BELLUSSI wrote:
BELLUSSI wrote:
JE NE SAIS PAS COMMENT FAIRE LES AUGMENTATIONS ,FAIT ILFAIRE LES 35 AUGMENTATIONS SUR LE MEME RANG APRES AVOR TRICOTER LES 5cm AU POINT MOUSSE?
09.04.2022 - 20:52
![]() Brugere wrote:
Brugere wrote:
Bonjour, je viens de terminer ce chapeau mais problème il est mou, comment faire tenir le rebord ? Merci cordialement
07.11.2021 - 20:11DROPS Design answered:
Bonjour Mme Brugere, avez-vous bien la bonne tension? 21 m = 10 cm avec 1 fil Alpaca + 1 fil Vivaldi (ou son alternative)? Vous pouvez sinon crocheter une petite bordure autour d'un fil de fer tout autour du bas du chapeau - cf vidéo. Bon tricot!
08.11.2021 - 07:53
|
|
DROPS 76-30 |
|
|
|
|
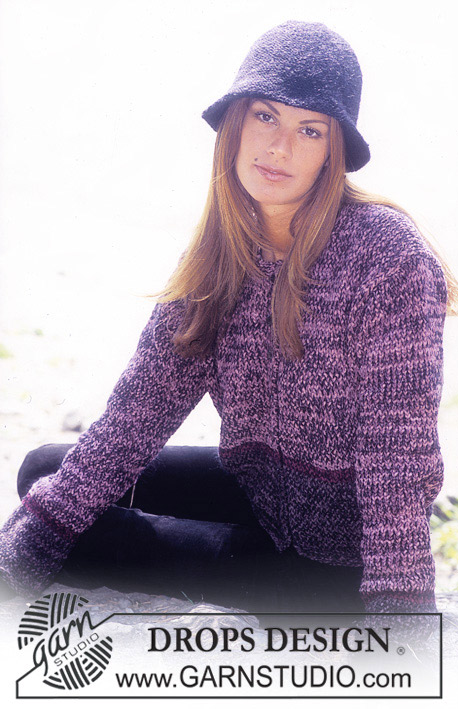
DROPS HAT
DROPS 76-30 |
|
|
Hat: Loosely cast on 143-152 sts with 1 strand each Alpaca and Vivaldi and knit garter st. When the piece measures 5 cm dec 35 sts evenly distributed = 108-117 sts. Continue with garter st. When the piece measures 16 cm put 9 markers in work as follows (from right side): K 1 st, put in 1 marker, * K 12-13 sts, put in 1 marker *, repeat from * - * a total of 8 times, after last marker there are 11-12 sts. Now dec 1 st on the left side of each marker every other row a total of 11-12 times = 9 sts remain on needles. Pull a strand of yarn through the remaining sts and fasten. Sew hat at center back. Hat measures approx. 21-22 cm in height. |
|
Have you finished this pattern?Tag your pictures with #dropspattern or submit them to the #dropsfan gallery. Do you need help with this pattern?You'll find 9 tutorial videos, a Comments/Questions area and more by visiting the pattern on garnstudio.com. © 1982-2026 DROPS Design A/S. We reserve all rights. This document, including all its sub-sections, has copyrights. Read more about what you can do with our patterns at the bottom of each pattern on our site. |


With over 40 years in knitting and crochet design, DROPS Design offers one of the most extensive collections of free patterns on the internet - translated to 17 languages. As of today we count 325 catalogues and 12298 patterns translated into English (UK/cm).
We work hard to bring you the best knitting and crochet have to offer, inspiration and advice as well as great quality yarns at incredible prices! Would you like to use our patterns for other than personal use? You can read what you are allowed to do in the Copyright text at the bottom of all our patterns. Happy crafting!
Post a comment to pattern DROPS 76-30
We would love to hear what you have to say about this pattern!
If you want to leave a question, please make sure you select the correct category in the form below, to speed up the answering process. Required fields are marked *.