
Popular categories
Looking for a yarn?


Comments / Questions (25)
![]() Wanda Cleaveland wrote:
Wanda Cleaveland wrote:
I watched the video “How to dec in sc(US) dc (UK) on each side” but what does the part after that mean? Right after “see decreasing tip-2 (which refers to the slip stitch decrease) ……“and dec each side on every row as follows: 2dc 1-1-1(2-2) times and 1 dc 2 times= 22-25-29(29-32)”…. I can not figure this out. Thank you so much for your help.
15.07.2022 - 02:08DROPS Design answered:
Dear Wanda, in the row with decreases, you work the first 2 stitches as 2 slip stitches instead of 2 sc/dc. Work until 2 stitches remain in the row. Turn the piece (the last 2 stitches are not worked). Work back as normal (no decreases). On the next row (right side) work decreases again, but depending on the size, you decrease substituting 1 or 2 sc/dc with slip stitches. Happy crocheting!
15.07.2022 - 13:07
![]() Pia wrote:
Pia wrote:
Ska det sen inte vara vart annat varv med 4 halvst hopa över 1 lm 4 halvst. Därefter ett varv med halvst över föreg halvst.. Eller hur kan det annars bli små håll Vad är det jag missar..
13.02.2022 - 23:47DROPS Design answered:
Hej Pia, nej det er kun på første række, prøv at lave en lille hækleprøve, så kan du se hvordan det kommer til at se ud. Se også de videoer som ligger nederst i opskriften :)
17.02.2022 - 15:02
![]() Susan Everline wrote:
Susan Everline wrote:
I’m having trouble understanding the decrease instructions for the cupcake dress armholes and neck? Can you help?
28.06.2021 - 23:59DROPS Design answered:
Dear Everline, decreases for armholes are worked as explained under DECREASING TIP-2 (applies to armhole and neck): - this technique is also shown in this video with sc (US-crochet) but will be the same with dc: at the beg of a row replace 1 dc with 1 sl st, at the end of the row, turn when the number of sts to dec remain and work next row. Happy crocheting!
29.06.2021 - 09:02
![]() Susan Everline wrote:
Susan Everline wrote:
I’m having trouble understanding the decrease instructions for cup cake pattern. Can you clarify for me?
28.06.2021 - 17:42DROPS Design answered:
Dear Susan, can you please clarify? Do you have problems with th edress or the hat? What exactly is not clear? Thank you:
28.06.2021 - 23:51
![]() Sofia wrote:
Sofia wrote:
Hej! Jag tror inte storlekarna stämmer med antal lm. Jag är precis i början på varv 1 och virkar den tredje storleken. Virkade 81 lm och antalet hst blir 64, inte 65 (inkl 2 lm i början). Har provat flera gånger och det blir inte rätt. Det blir 1 lm 5 hst för mig om 65 ska stämma på slutet. Mvh sofia.
09.12.2020 - 19:53
![]() Sabine wrote:
Sabine wrote:
Liebes Drops-Team, zur Mütze habe ich eine Frage: "Mit H-Stb weiterfahren bis die Arbeit 8-10 (11) cm misst." Bezieht sich diese Angabe ab Ohrklappenspitze oder ab eigentlichen Mützenbeginn? Gleiches gilt für die abschließende Gesamtlänge "Die Arbeit misst ca. 17-19 (21) cm." Dank vorab! :-)
16.06.2019 - 22:52DROPS Design answered:
Liebe Sabine, diese 8-10(11) cm werden ab Mützenbeginn (messen Sie hinten an den Rücken) gemessen, dh nicht vom Ohrenklappenspitze. Viel Spaß beim häkeln!
17.06.2019 - 08:46
![]() Maria Andersen wrote:
Maria Andersen wrote:
På bildet ser det ut som at det fremdeles er halvstaver over hullraden, men i oppskriften står det fastmasker. Hva er riktig?
17.01.2019 - 19:29DROPS Design answered:
Hei Maria. Det hekles fastmasker etter hullraden. Om du zoomer inn på bildet kan du også se det der. God fornøyelse
21.01.2019 - 11:18
![]() Inga wrote:
Inga wrote:
Hallo, ich habe eine kurze Frage zur Anleitung. Ich bin gerade beim Vorderteil. Ich habe die Lochkante gehäkelt und das Kleid misst jetzt 32 cm und 47 Maschen. Abgenommen wurde auch schon. Als nächstes kommt: 2 fM 1-1-1 (2-2) Mal und 1 fM 2 Mal = 22-25-29 (29-32) fM. Wie ist das gemeint? Nehme ich 1 Masche ab und dann wieder zwei normal häkeln? Es wäre sehr nett, wenn ihr mir da helfen könntet. Vielen Dank, Inga
12.09.2018 - 12:19DROPS Design answered:
Liebe Inga, zuerst nehmen Sie 5 Maschen (in der 3. Größe) auf beiden Seiten ab - siehe ABNAHME-TIPP-2 dann nehmen Sie auf beiden Seiten (= am Anfang + Am Ende nächste Hinreihe) 2 Maschen 1 x und dann nehmen Sie 1 M 2 Mal = am Anfang und am Ende jeder beiden nächsten Hinreihe = es sind jetst 29 M übrig. Viel Spaß beim häkeln!
12.09.2018 - 12:55
![]() Marie wrote:
Marie wrote:
Hei! Jeg forstår ikke hvordan dette "Videre felles det i hver side på hver rad slik: 2 fm 1-1-1 (2-2) ganger og 1 fm 2 ganger = 22-25-29 (29-32) fm." skal gjøres? Har noen tips?
05.05.2018 - 11:24DROPS Design answered:
Hei Marie. Det skal felles 2 fm i hver ende av pinnen, og avhengig av hvilken størrelse du strikker skal dette gjøres 1 eller 2 ganger. Dvs: om du strikker en av de 3 minste størrelsene feller du 2 masker på begynnelsen av pinnen og 2 masker på slutten av pinnen = 4 masker felt. Om du strikker en av de 2 største størrelsene gjentar du denne fellingen en gang til = totalt 8 masker felt. Videre skal du felle 1 maske på begynnelsen og 1 maske på splutten av de neste 2 pinnene = 4 masker felt over 2 omganger. God fornøyelse.
09.05.2018 - 12:45
![]() Giuseppina wrote:
Giuseppina wrote:
Danke. Dann ist die Passage "Zusammennähen" nicht korrekt.
12.09.2016 - 15:07DROPS Design answered:
Liebe Giuseppina, das Zusammennähen wurde korrigiert, vielen Dank!
13.09.2016 - 08:46
|
|
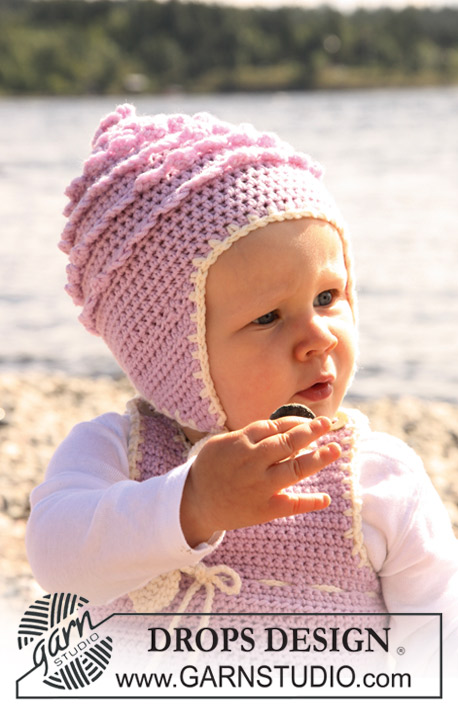
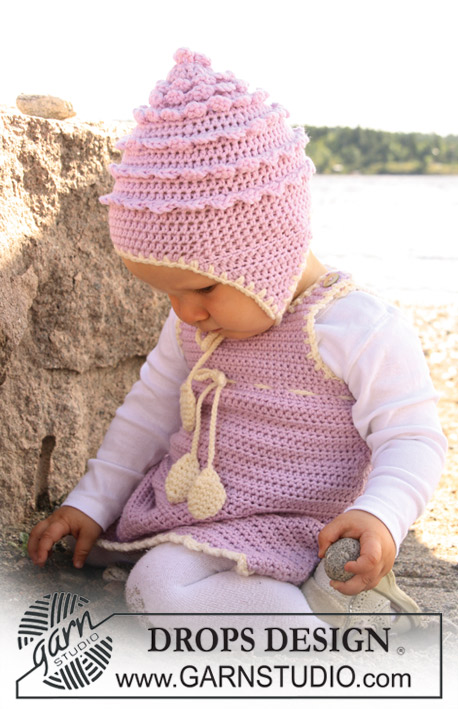
Sweet Little Cupcake#sweetlittlecupcakedress |
|
 |
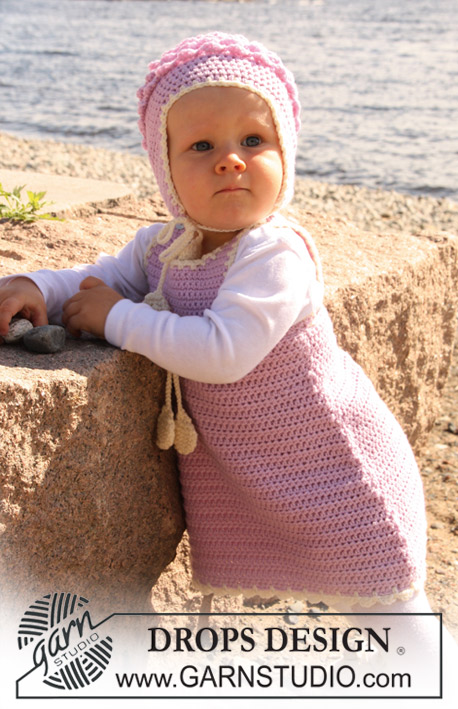 |
Set of crochet dress and hat for baby and children in DROPS Merino Extra Fine
DROPS Baby 20-20 |
|
|
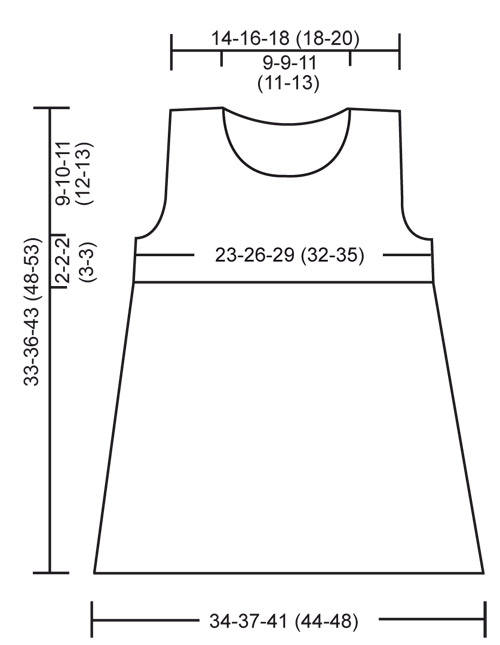
DRESS: CROCHET INFO: Replace first htr on row with 2 ch and first dc on row with 1 ch. Finish each row with htr with 1 htr in 2nd ch from beg of previous row and finish each row with dc with 1 dc in first ch from beg of previous row. DECREASING TIP-1: Dec 1 htr by crochet 2 htr tog, i.e. crochet 1 htr but wait with the last YO and pull-through (= 3 sts on hook), crochet 1 htr in next st and pull the last YO through all 5 sts on hook. DECREASING TIP-2 (applies to armhole and neck): Dec as follows at beg of row: replace 1 dc with 1 sl st. Dec as follows at the end of row: Turn piece when number of dc to be dec remain and work return row. CROCHET DC TOG (applies to pompom): Crochet 2 dc tog to 1 dc as follows: Insert hook in first st, pull thread through, insert hook in next st, pull thread though, make 1 YO and pull thread through all 3 sts on hook. ---------------------------------------------------------- ---------------------------------------------------------- DRESS Worked back and forth in 2 pieces. FRONT PIECE: Crochet 68-74-81 (89-95) ch (includes 2 ch to turn with) with crochet hook size 4.5 mm and light pink. ROW 1: See CROCHET INFO – crochet 1 htr in 3rd ch from hook, 1 htr in each of the next 3 ch, * skip 1 ch, 1 htr in each of the next 4 ch *, repeat from *-* until 2-3-5 (3-4) ch remain, skip 1 ch and finish with 1 htr in each of the last 1-2-4 (2-3) ch = 54-59-65 (71-76) htr. Continue with 1 htr in each htr – REMEMBER THE CROCHET TENSION! When piece measures 3 cm dec 1 htr each side – See DECREASING TIP-1 - and repeat the dec each side on every 2-2.5-3 (3-3.5) cm a total of 9-9-9 (10-10) times = 36-41-47 (51-56) htr on row. When piece measures 22-24-30 (33-37) cm (dec are now complete) crochet 2 rows with dc (crochet 1 dc in each st). CROCHET NEXT ROW AS FOLLOWS: Crochet 2-1-1 (2-1) dc, * 2 ch, skip 2 dc, 1 dc in next st *, repeat from *-* and finish with 1 dc in last dc (= eyelet row for ribbon). Continue with 1 dc in each st (on the row after eyelet row work 1 dc in each dc and 2 dc in each ch-loop) = 36-41-47 (51-56) dc on row. When piece measures 24-26-32 (36-40) cm dec 3-4-5 (5-6) dc each side for armhole – See DECREASING TIP-2 – and dec each side on every row as follows: 2 dc 1-1-1 (2-2) times and 1 dc 2 times = 22-25-29 (29-32) dc. When piece measures 29-31-38 (42-47) cm insert a marker mid piece (in SIZE 6/9 MONTHS, 12/18 MONTHS and 2 YEARS insert maker in the middle dc on row). Now dec for neck as follows: Crochet from shoulder towards neck until 4-4-5 (5-7) dc remain before marker (for SIZE 6/9 MONTHS, 12/18 MONTHS and 2 YEARS this is BEFORE dc with marker). Turn piece. Dec for neck on every row from mid front: 2 dc 1 time and 1 dc 1 time = 4-5-6 (6-6) dc left on shoulder. When 3 rows remain before finished measurements make buttonholes on shoulder as follows: crochet 1-1-2 (2-2) dc, 2 ch, skip 2 dc, 1 dc in each of the last 1-2-2 (2-2) sts. Work 2 rows dc (crochet 1 dc in each dc and 2 dc in each ch-loop from previous row) = 4-5-6 (6-6) dc. Cut and fasten thread, piece measures approx 33-36-43 (48-53) cm. Repeat on the other side of neck. BACK PIECE: Beg as described for front piece and dec for armhole as described for front piece = 22-25-29 (29-32) dc. When piece measures approx 31-34-41 (46-51) cm insert a marker mid piece (in SIZE 6/9 MONTHS, 12/18 MONTHS and 2 YEARS insert the marker in the middle dc on row). Now dec for neck as follows: Crochet from shoulder towards neck until 5-5-6 (6-8) dc remain before marker (for SIZE 6/9 MONTHS, 12/18 MONTHS and 2 YEARS this is BEFORE dc with marker). Turn piece. Dec 1 dc at the beg of the next 2 rows from mid front = 4-5-6 (6-6) dc left on shoulder. When piece measures 33-36-43 (48-53) cm insert a marker = mid shoulder. Crochet 3 rows dc for button band, cut and fasten thread. Repeat on the other side of neck. ASSEMBLY: Sew side seams edge to edge with neat sts. Sew on buttons to back piece in line with marker on shoulder. CROCHET BORDER: Crochet a border round armholes, along shoulder and round neckline in one with crochet hook size 4 mm and off-white as follows – beg at the side: 1 dc in first st, * 2 ch, skip approx 2 dc/2 rows, 1 dc in next st *, repeat from *-* and finish with 2 ch and 1 sl st in first dc. Crochet a border along bottom edge of dress with crochet hook size 4.5 mm and off-white as follows – beg at the side: 1 dc in first st, * 3 ch, 1 tr in first ch, skip approx 1.5 cm, 1 dc in next st *, repeat from *-* and finish with 1 sl st in first dc. TIE RIBBON WITH FLAT POMPOMS: Crochet 1 pompom as follows: Crochet 4 ch with crochet hook size 4.5 mm and off-white and form a ring with 1 sl st in first ch. NOTE: replace first dc at beg of round with 1 ch and finish each round with 1 sl st in ch from beg of round. ROUND 1: Crochet 4 dc in ring. ROUND 2: Crochet 2 dc in each dc = 8 dc. ROUND 3: * 1 dc in first dc, 2 dc in next dc *, repeat from *-* = 12 dc. ROUND 4-5: Crochet 1 dc in each dc = 12 dc. ROUND 6: * 1 dc in first dc, then crochet the next 2 dc tog – SEE ABOVE *, repeat from *-* = 8 dc. ROW 7: Place piece flat and crochet 1 dc in each dc through both layers = 4 dc. ROW 8: Crochet 2 dc tog 2 times = 2 dc. Crochet another pompom. Crochet 1 sl st in the middle of pompom where the 2 layers are crochet tog and now crochet a string of ch measuring approx 75-80-85 (95-100) cm. Thread string through eyelet row on dress (beg and finish mid front) and attach string to the other pompom with a sl st in the middle. Cut and fasten thread. --------------------------------------------------------- HAT: CROCHET INFO-1: Replace first htr on row with 2 ch. Finish each row with 1 htr in 2nd ch from beg of previous row. CROCHET INFO-2: Replace first htr at beg of round with 2 ch. Finish each round with 1 sl st in 2nd ch from beg of round. INCREASING TIP: Inc 1 htr by working 2 htr in the last but one htr. CROCHET 2 HTR TOG: Dec 1 htr by crochet 2 htr tog, i.e. crochet 1 htr but wait with the last YO and pull through (= 3 sts on hook), crochet 1 htr in next st and when doing the last pull-through pull thread through all 5 sts on hook. CROCHET 2 DC TOG: Crochet 2 dc tog to 1 dc as follows: Insert hook in the first st, pull thread though, insert hook in next st, pull thread through, make 1 YO and pull thread through all 3 sts on hook. --------------------------------------------------------- --------------------------------------------------------- EAR FLAP: Crochet 5 ch with crochet hook size 4.5 mm with light pink. Crochet 1 htr in 3rd ch from hook, 1 htr in the next 2 ch = 4 htr, turn piece. See CROCHET INFO-1. Crochet 1htr in each htr, AT THE SAME TIME inc 1 htr each side – See INCREASING TIP! Repeat the inc each side on every row a total of 6-7 (8) times = 16-18 (20) htr. Continue with 1 htr in each htr until ear flap measures 6-7 (8) cm. Put piece aside and crochet 1 more ear flap. HAT: See CROCHET INFO-2! Crochet 7-8 (9) ch, crochet 1 htr in each htr on one ear flap, crochet 18-20 (22) ch (= mid front), crochet 1 htr in each htr on the other ear flap, crochet 7-8 (9) ch and finish with 1 sl st in first ch = 64-72 (80) htr. Continue with 1 htr in each htr in the round. When piece measures 8-10 (11) cm from mid back crochet next round with dec as follows: * 1 htr in each of the first 6 htr, then crochet the next 2 htr tog – SEE ABOVE *, repeat from *-* (= 8-9-10 htr dec on round). Crochet 1 round without dec and then next round like this: * 1 htr in each of the first 5 htr, then crochet the next 2 htr tog, repeat from *-* around. Repeat the dec (with 1 less htr between 2 htr tog for each dec round) on every other round 3 more times = 24-27 (30) htr on round. Crochet 2-2 (3) rounds without dec. Crochet next round as follows: * 1 htr in first htr, then crochet the next 2 htr tog *, repeat from *-* = 16-18 (20) htr on round. On next round crochet 2 htr tog all the way round = 8-9 (10) htr left on round. Cut the thread, pull it through remaining sts, tighten and fasten. Hat measures approx 17-19 (21) cm from the top. CROCHET BORDER: Crochet a border with crochet hook size 4.5 mm with off-white round the opening as follows: * 1 dc in first st, 1 ch, skip 1 st/row *, repeat from *-* and finish with 1 sl st in first dc. STRING WITH POMPOM: Beg with pompom: Crochet 4 ch with crochet hook size 4.5 mm with off-white and form a ring with 1 sl st in first ch. NOTE: replace first dc on round with 1 ch and finish each round with 1 sl st in ch from beg of round. ROUND 1: Crochet 4 dc in ring. ROUND 2: Crochet 2 dc in each dc = 8 dc. ROUND 3: * 1 dc in first dc, 2 dc in next dc *, repeat from *-* = 12 dc. ROUND 4-5: Crochet 1 dc in each dc = 12 dc. ROUND 6: * 1 dc in first dc, the crochet the next 2 dc tog – SEE ABOVE *, repeat from *-* = 8 dc. ROW 7: Place piece flat and crochet 1 dc in each dc through both layers = 4 dc. ROW 8: Crochet 2 dc tog 2 times = 2 dc. Crochet 22-26 (30) cm with ch for string and fasten with 1 sl st at the point of one ear flap. Repeat on den other side. LACE BORDERS: Crochet approx 7 rounds with lace borders round the hat. Beg in the second round from the top and crochet 1 round as follows: 1 dc in first st, * 3 ch, 1 tr in first ch, skip approx 1.5 cm, 1 dc in next st *, repeat from *-* all the way round and finish with 1 sl st in first dc. Cut and fasten thread. Now crochet a further 6 rounds in the same way with approx 2-2.5 cm between each round. |
|
 |
|
Have you finished this pattern?Tag your pictures with #dropspattern #sweetlittlecupcakedress or submit them to the #dropsfan gallery. Do you need help with this pattern?You'll find 9 tutorial videos, a Comments/Questions area and more by visiting the pattern on garnstudio.com. © 1982-2026 DROPS Design A/S. We reserve all rights. This document, including all its sub-sections, has copyrights. Read more about what you can do with our patterns at the bottom of each pattern on our site. |
|


With over 40 years in knitting and crochet design, DROPS Design offers one of the most extensive collections of free patterns on the internet - translated to 17 languages. As of today we count 324 catalogues and 12290 patterns translated into English (UK/cm).
We work hard to bring you the best knitting and crochet have to offer, inspiration and advice as well as great quality yarns at incredible prices! Would you like to use our patterns for other than personal use? You can read what you are allowed to do in the Copyright text at the bottom of all our patterns. Happy crafting!
Post a comment to pattern DROPS Baby 20-20
We would love to hear what you have to say about this pattern!
If you want to leave a question, please make sure you select the correct category in the form below, to speed up the answering process. Required fields are marked *.