DROPS Alpaca
DROPS Alpaca
100% Alpaca
from 3.40 £ /50g
Get the yarn to make this pattern from 23.80£.

The yarn cost is calculated from the pattern’s smallest size and the yarn’s cheapest product type. Looking for an even better price? You might find it on the DROPS Deals!

DROPS Super Sale

Sweet Olivia Cardigan

Knitted DROPS jacket in garter st with raglan, worked top down in "Alpaca". Size: S - XXXL.

DROPS 164-42
DROPS design: Pattern no z-713
Yarn group A
----------------------------------------------------------
Size: S - M - L - XL - XXL - XXXL
Materials:
DROPS ALPACA from Garnstudio
350-400-450-500-550-600 g colour no 7233, olive

DROPS DOUBLE POINTED NEEDLES and CIRCULAR NEEDLE (80 cm) SIZE 3 mm - or size needed to get 24 sts x 48 rows in garter st = 10 x 10 cm. And 24 sts x 32 rows in stocking st = 10 x 10 cm.
DROPS DOUBLE POINTED NEEDLES and CIRCULAR NEEDLE (80 cm) SIZE 2.5 mm - for edges.
DROPS MOTHER-OF-PEARL BUTTON: Arched (white), NO 521: 7 pieces in all sizes

-------------------------------------------------------

Alternative Yarn – See how to change yarns here
Yarn Groups A to F – Use the same pattern and change the yarn here
Yarn usage using an alternative yarn – Use our yarn converter here

-------------------------------------------------------

DROPS Alpaca
DROPS Alpaca
100% Alpaca
from 3.40 £ /50g
Get the yarn to make this pattern from 23.80£.

The yarn cost is calculated from the pattern’s smallest size and the yarn’s cheapest product type. Looking for an even better price? You might find it on the DROPS Deals!

DROPS Super Sale

SAVE 30% on 6 cotton favourites!
Valid until 12.04.2024

Pattern instructions

NOTE: This pattern is written in British English. All measurements in charts are in cm. For conversion from cm to inches - click here. There are different terms for crocheting in British and American English. If this pattern includes crochet, click for "crochet terms" here. For this pattern in American English, please click here.
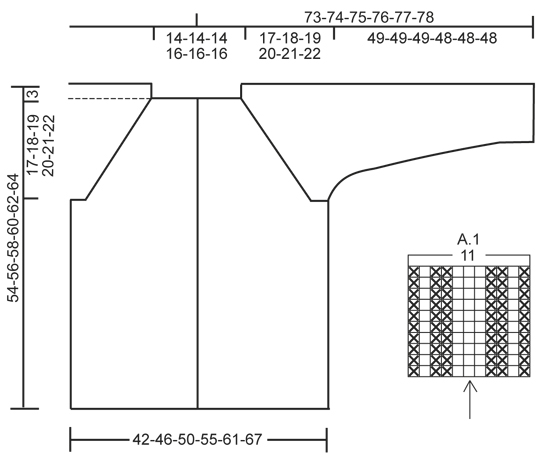
GARTER ST (back and forth):
K all rows. 1 ridge = 2 rows K.

PATTERN:
See diagram A.1. The diagram shows all rows in pattern seen from RS.

BUTTONHOLES:
Dec for buttonholes on right band. 1 buttonhole = work until 3 sts remain on needle (seen from RS), make 1 YO, K 2 tog and K the last 1 st.
Dec for buttonholes when piece measures:
SIZE S: 2, 9, 16, 24, 32, 40 and 48 cm
SIZE M: 2, 10, 18, 26, 34, 42 and 50 cm
SIZE L: 2, 10, 18, 26, 34, 42 and 50 cm
SIZE XL: 2, 10, 18, 26, 34, 43 and 52 cm
SIZE XXL: 2, 10, 18, 27, 36, 45 and 54 cm
SIZE XXXL: 2, 11, 20, 29, 38, 47 and 56 cm

RAGLAN:
Inc 1 st on each side of the 11 raglan sts. Inc by K 2 in st both before and after the 11 raglan sts (= 2 sts inc at every A.1). All inc are done from RS.

MEASURING TIP:
Because of garter st the garment will be longer when worn. All length measurements must therefore be done while holding up the garment.
----------------------------------------------------------

JACKET:
Work back and forth on circular needle from mid front, work top down.

YOKE:
Cast on 106-106-106-114-114-114 sts (incl 5 band sts each side towards mid front) on circular needle size 2.5 mm with Alpaca. Work 3 ridges in GARTER ST - see explanation above. Switch to circular needle size 3 mm and K 1 row from RS while inc 24 sts evenly - NOTE: P the outermost 5 sts in each side towards mid front and do not inc over these sts (= band sts) = 130-130-130-138-138-138 sts on row.
Insert 4 markers in the piece as follows (from WS): P 5 (= band sts), K 19-19-19-21-21-21 (= right front piece), insert 1 marker in next st, K 20 (= sleeve), insert 1 marker in next st, K 38-38-38-42-42-42 (= back piece), insert 1 marker in next st, K 20 (= sleeve), insert 1 marker in next st, K 19-19-19-21-21-21 (= left front piece) and finish with P 5 (= band sts).
READ ALL OF THE FOLLOWING SECTION BEFORE CONTINUING:
Then work ridges (1st row = RS) but in every transition between body and sleeves work A.1 (= 11 sts - NOTE: St with marker should fit with st with arrow in diagram), P the 5 band sts in each side towards mid front on every row until finished measurements.
REMEMBER THE KNITTING TENSION and remember to dec for BUTTONHOLES on right band - see explanation above.
AT THE SAME TIME on first row from RS beg inc for RAGLAN – see explanation above. NOTE: Inc differently on body and sleeves:
BODY: Inc every other row (i.e. every row from RS) a total of 13-21-26-34-42-53 times and then every 4th row (i.e. every other row from RS) a total of 14-11-10-7-4-0 times.
SLEEVE: Inc every other row a total of 17-19-18-20-18-21 times, and on every 4th row a total of 12-12-14-14-16-16 time.

After all inc for raglan there are 354-382-402-438-458-498 sts on row and piece measures approx. 20-21-22-23-24-25 cm from shoulder.
Work next row as follows from WS: Work 52-57-61-68-73-80 sts (= right front piece), slip the next 78-82-84-88-88-94 sts on 1 stitch holder (= sleeve), cast on 6-6-8-8-10-10 new sts (= under sleeve), work 94-104-112-126-136-150 sts (= back piece), slip the next 78-82-84-88-88-94 sts on 1 stitch holder (= sleeve), cast on 6-6-8-8-10-10 sts (= under sleeve), work the remaining 52-57-61-68-73-80 sts (= left front piece).

BODY:
= 210-230-250-278-302-330 sts. Continue to work in garter st back and forth and P bands - remember buttonholes on right band.
When piece measures 33-34-35-36-37-38 cm, measured from where sleeve was divided under sleeve (or desired length) – READ MEASURING TIP, P 1 row from WS while inc 2 sts evenly = 212-232-252-280-304-332 sts on needle. Switch to circular needle size 2.5 mm and work 3 rows rib (= K 2/P 2) with 5 band sts in garter st and 2 K in each side towards mid front (seen from RS). Then LOOSELY cast off sts with K over K and P over P. Entire jacket measures approx. 54-56-58-60-62-64 cm from shoulder.

SLEEVE:
Worked in the round on double pointed needles. Slip the 78-82-84-88-88-94 sts from stitch holder in one side of piece back on double pointed needles size 3 mm and cast in addition on 6-6-8-8-10-10 new sts mid under sleeve = 84-88-92-96-98-104 sts. Insert 1 marker – NOW MEASURE PIECE FROM HERE. Work in stocking st in the round. AT THE SAME TIME after 3 rounds dec 2 sts mid under sleeve. Repeat dec every 4th round 4-4-4-5-5-5 times in total and then every 4½-3½-3-3-3-2 cm 9-11-12-13-13-16 times in total = 58-58-60-60-62-62 sts.
When sleeve measures 48-48-48-47-47-47 cm (or at desired length), K 1 round while dec 2-2-4-0-2-2 sts evenly = 56-56-56-60-60-60 sts on needle. Work 3 rounds rib (= K 2/P 2). Then LOOSELY cast off sts with K over K and P over P. Work the other sleeve the same way.

ASSEMBLY:
Sew the openings under the sleeves. Sew the buttons on to the left band.

Diagram

symbols = K from RS, P from WS
symbols = P from RS, K from WS
diagram

Each of our patterns has specific tutorial videos to help you.

Do you have a question? See a list of frequently asked questions (FAQ)

Knitting tension is what determines the final measurements of your work, and is usually measured per 10 x 10 cm. It is provided like so: number of stitches in width x number of rows in height - eg: 19 stitches x 26 rows = 10 x 10 cm.

The knitting tension is very individual; some people knit/crochet loosely while others work tightly. You adjust the knitting tension with the needle size, which is why the suggested needle size is only meant as a guide! You need to adjust this (up or down) to ensure that YOUR knitting tension matches the knitting tension provided in the pattern. If you work with a different knitting tension than provided you will have a different yarn consumption, and your work will have different measurements than what the pattern suggests.

The knitting tension also determines which yarns can replace each other. As long as you achieve the same knitting tension you can replace one yarn with another.

See DROPS lesson: How to measure your tension/gauge

See DROPS video: How to make a gauge tension swatch

The required amount of yarn is provided in grams, eg: 450 g. To calculate how many balls you’ll need you first need to know how many grams are in 1 ball (25g, 50g or 100g). This information is available if you click on the individual yarn quality on our pages. Divide the amount required with the amount of each ball. For example, if each ball is 50g (the most common amount), the calculation will be as follows: 450 / 50 = 9 balls.

The important thing when changing from one yarn to another is that the knitting/crochet tension remains the same. This is so that the measurements of the finished piece will be the same as on the sketch provided. It is easier to achieve the same knitting tension using yarns from the same yarn group. It is also possible to work with multiple strands of a thinner yarn to achieve the knitting tension of a thicker one. Please try our yarn converter. We recommend you to always work a test swatch.

Please NOTE: when changing yarn the garment might have a different look and feel to the garment in the photo, due to individual properties and qualities of each yarn.

See DROPS lesson: Can I use a different yarn than the one mentioned in the pattern?

All our yarns are categorised into yarn groups (from A to F) according to thickness and knitting tension – group A contains the thinnest yarns and group F the thickest. This makes it easier for you to find alternative yarns to our patterns, should you wish to switch yarn. All yarns within the same group have a similar knitting tension and can easily replace each other. However, different yarn qualities have different structures and properties which will give the finished work a unique look and feel.

Click here for an overview of the yarns in each yarn group

At the top of all our patterns you’ll find a link to our yarn calculator, which is a helpful tool should you wish to use a different yarn than suggested. By filling in the yarn quality you wish to replace, the amount (in your size) and number of strands, the calculator will present good alternative yarns with the same knitting tension. Additionally it will tell you how much you’ll require in the new qualities and whether you’ll need to work with multiple strands. Most skeins are 50g (some are 25g or 100g).

If the pattern is worked with multiple colours, every colour will have to be calculated separately. Similarly, if the pattern is worked with several strands of different yarns (for example 1 strand Alpaca and 1 strand Kid-Silk) you will have to find alternatives for each, individually.

Click here to see our yarn calculator

Since different yarns have different qualities and textures we have chosen to keep the original yarn in our patterns. However, you can easily find options among our available qualities by using our yarn calculator, or simply pick a yarn from the same yarn group.

It is possible that some retailers still have discontinued yarns in stock, or that someone has a few skeins at home that they would like to find patterns for.

The yarn calculator will provide both alternative yarn as well as required amount in the new quality.

If you think it's hard to decide what size to make, it can be a good idea to measure a garment you own already and like the size of. Then you can pick the size by comparing those measures with the ones available in the pattern's size chart.

You'll find the size chart at the bottom of the pattern.

See DROPS lesson: How to read size chart

The needle size provided in the pattern serves only as a guide, the important thing is to follow the knitting tension. And since knitting tension is very individual, you will have to adjust the needle size to ensure that YOUR tension is the same as in the pattern – maybe you’ll have to adjust 1, or even 2 needle sizes, up or down to achieve the correct tension. For this, we recommend that you work test swatches.

Should you work with a different knitting tension than the one provided, the measurements of the finished garment might deviate from the measurement sketch.

See DROPS lesson: How to measure your tension/gauge

See DROPS video: How to make a tension/gauge swatch

Working a garment top-down provides more flexibility and room for personal adjustment. For example it is easier to try the garment on while working, as well as making adjustments to length of yoke and shoulder caps.

The instructions are carefully explaining every step, in the correct order. Diagrams are adjusted to the knitting direction and are worked as usual.

The diagram depicts all rows/rounds, and every stitch seen from the right side. It is read from bottom to top, from right to left. 1 square = 1 stitch.

When working back and forth, every other row is worked from the right side and every other row is worked from the wrong side. When working from the wrong side, the diagram will have to be worked reversed: from left to right, knit stitches are purled, purl stitches are knit etc.

When working in the round every round is worked from the right side and the diagram are worked from right to left on all rounds.

See DROPS lesson: How to read knitting diagrams

The diagram depicts all rows/rounds, and every stitch seen from the right side. It is worked from bottom to top, from right to left.

When working back and forth every other row is worked from the right side: from right to left and every other row is worked from the wrong side: from left to right.

When working in the round, every row in the diagram are worked from the right side, from right to left.

When working a circular diagram you start in the middle and work your way outwards, counter clockwise, row by row.

The rows usually start with a given number of chain stitches (equivalent to the height of the following stitch), this will either be depicted in the diagram or explained in the pattern.

See DROPS lesson: How to read crochet diagrams

Instructions for working several diagrams after each other on the same row/round, will often be written like so: “work A.1, A.2, A.3 a total of 0-0-2-3-4 times". This means you work A.1 once, then A.2 is worked once, and A.3 is repeated (in width) the number of times provided for your size – in this case like so: S = 0 times, M = 0 times, L=2 times, XL= 3 times and XXL = 4 times.

The diagrams are worked as usual: begin with the first row in A.1, then work the first row in A.2 etc.

See DROPS lesson: How to read knitting diagrams

See DROPS lesson: How to read crochet diagrams

The total width of the garment (from wrist-to-wrist) will be larger in the larger sizes, despite the actual sleeves being shorter. The larger sizes have longer sleeve caps and wider shoulders, so there will be a good fit in all sizes.

The measurement sketch/schematic drawing provides information regarding the full length of the garment. If it’s a jumper or a jacket the length is measured from the highest point on the shoulder closest to the neckline, and straight down to the bottom of the garment. It is NOT measured from the tip of shoulder. Similarly, the length of yoke is measured from the highest point on the shoulder and down to where yoke is split into body and sleeves.

On a jacket measures are never taken along bands, unless specifically stated. Always measure inside band stitches when measuring the length.

See DROPS lesson: How to read a schematic drawing

Diagrams are often repeated on the round or in height. 1 repeat is the diagram the way it appears in the pattern. If it says to work 5 repeats of A.1 in the round, then you work A.1 a total of 5 times after/next to each other in the round. If it says to work 2 repeats of A.1 vertically/in height you work the entire diagram once, then begin again at the start and work the entire diagram one more time.

Chain stitches are slightly narrower than other stitches and to avoid working the cast-on edge too tight, we simply chain more stitches to begin with. The stitch count will be adjusted on the following row to fit the pattern and measurement sketch.

The rib edge is more elastic and will contract slightly compared to, for example, stocking stitch. By increasing before the rib edge, you avoid a visible difference in width between the rib edge and the rest of the body.

It’s very easy to cast off too tightly, and by making yarn overs while casting off (and simultaneously casting these off) you avoid a too tight cast off edge.

See DROPS video: How to bind off with yarn overs (yo)

To achieve an even increase (or decrease) you can increase on, for example: every 3rd and 4th row alternately, like so: work 2 rows and increase on the 3rd row, work 3 rows and increase on the 4th. Repeat this until the increase is complete.

See DROPS lesson: Increase or decrease 1 st on every 3rd and 4th row alternately

Should you prefer to work in the round instead of back and forth, you may of course adjust the pattern. You’ll need to add steeks mid-front (usually 5 stitches), and follow the instructions. When you would normally turn and work from the wrong side, simply work across the steek and continue in the round. At the end you’ll cut the piece open, pick up stitches to work bands, and cover the cut edges.

See DROPS video: How to knit steeks and cut open

Should you prefer to work back and forth instead of in the round, you may of course adjust the pattern so you work the pieces separately and then assemble them at the end. Divide the stitches for the body in 2, add 1 edge stitch in each side (for sewing) and work the front and back pieces separately.

See DROPS lesson: Can I adapt a pattern for circular needles into straight needles?

Pattern repeats can vary slightly in the different sizes, in order to get the correct proportions. If you’re not working the exact same size as the garment in the photo, yours might deviate slightly. This has been carefully developed and adjusted so that the complete impression of the garment is the same in all sizes.

Make sure to follow instructions and diagrams for your size!

If you have found a pattern you like which is available in women’s size it’s not very difficult to convert it to men’s size. The biggest difference will be the length of sleeves and body. Start working on the women size that you think would fit across the chest. The additional length will be worked right before you cast off for the armhole/sleeve cap. If the pattern is worked top-down you can add the length right after the armhole or before the first decrease on sleeve.

Regarding additional yarn amount, this will depend on how much length you add, but it is better with a skein too many than too few.

All yarns will have excess fibres (from production) that might come off as lint or shedding. Brushed yarns (ie hairier yarns) have more of these loose, excess fibres, causing more shedding.

Shedding also depends on what is worn under or over the garment, and whether this pulls at the yarn fibres. It’s therefore not possible to guarantee that there will be no shedding

Below are some tips on how to get the best result when working with hairier yarns:

1. When the garment is finished (before you wash it) shake it vigorously so the looser hairs come off. NOTE: do NOT use a lint roller, brush or any method that pulls at the yarn.

2. Place the garment in a plastic bag and put it in your freezer - the temperature will cause the fibres to become less attached to each other, and excess fibres will come off easier.

3. Leave in the freezer for a few hours before taking it out and shaking it again.

4. Wash the garment according to the instructions on the yarn label.

Pilling is a natural process that happens to even the most exclusive of fibers. It's a natural sign of wear and tear that is hard to avoid, and that is most visible in high friction areas of your garment like a sweater's arms and cuffs.

You can make your garment look as new by removing the pilling, using a fabric comb or a pill/lint remover.

Still can't find the answer you need? Then scroll down and leave your question so one of our experts can try to help you. This will be done normally within 5 to 10 working days.
In the meantime, you can read the questions and answers that others have left to this pattern or join the DROPS Workshop on Facebook to get help from fellow knitters/crocheters!

You might also like...

Post a comment to pattern DROPS 164-42

We would love to hear what you have to say about this pattern!

If you want to leave a question, please make sure you select the correct category in the form below, to speed up the answering process. Required fields are marked *.

Comments / Questions (135)

country flag Astrid Michaelsen wrote:

Litt usikker på reglanfellingen der det står øk ved å strikke 2 rett i m ? Kan dere utdype dette nærmere vær så snill?

15.03.2024 - 12:17

country flag Christel Hanson wrote:

Hej! Första frågan, kommer säkert fler… Vill inte göra fel från början… Ska de 5 kantmaskorna i varje sida stickas aviga från 1:a varvet eller är det först när jag har ökat de 24 m som jag börjar sticka de de 5 yttersta aviga, alltså ska knappkanten vara slätstickning?

01.02.2024 - 16:33

DROPS Design answered:

Hei Christel. Legg opp og deretter strikker du 6 pinner RÄTST (= rett på alle pinnene). Deretter øker du 24 masker og fra nå av skal stolpe maskene strikkes kun vrang (aviga), både fra retten og fra vrangen til ferdig mål. mvh DROPS design

12.02.2024 - 10:00

country flag Ellen Røsjø wrote:

Hvor mange nøster går med til denne jakka? Kan ikke se det står noe sted...

29.01.2024 - 14:08

DROPS Design answered:

Hei Ellen, Drops Alpaca er i 50 g nøster. Antall er avhengig av størrelsen du strikker men, som eksempel, hvis du strikker størrelse S trenger du 350 g som er 7 nøster. God fornøyelse!

30.01.2024 - 06:46

country flag Anette Pettersson wrote:

Hej! Är det någon som stickat denna kofta med Drops Flora som kan vara ett alternativ garn? Kan man även lägga till kid silk garn och använda detta mönster?

23.01.2024 - 09:38

DROPS Design answered:

Hej Anette. Det går bra att använda Flora till detta mönster och du kan även lägga till en tråd kidsilk så länge du får stickfastheten att stämma. Mvh DROPS Design

24.01.2024 - 14:23

country flag Holly Bernstein wrote:

I have four extra stitches after doing the first set of markers\r\nBand 5\r\nK 19\r\nMarker\r\nK 20\r\nMarker\r\nK 38\r\nMarker\r\nK 20\r\nMarker\r\nK 19\r\nBand 5\r\nTotals 126 stitches

19.01.2024 - 19:06

country flag Annamaria wrote:

Salve credo che sulla spiegazione ci sia un errore perché le maglie non combaciano. La spiegazione dice di avviare 106 m e poi aggiungere 24 aumenti quindi 130 m in tutto, nel momento di mettere i marker da 5m per bordo dx+ 19m per il davanti dx+ 20 ma per la manica+ 38m per il dietro+20m per l'altra manica+ 19m per il davanti sx e 5m per l'altro bordo che in tutto fanno 126m per cui restano fuori 4m mi spiegate come mai??? Grazie....

26.11.2023 - 18:34

DROPS Design answered:

Buonasera Annamaria, ha inserito i segnapunti NELLE maglie come indicato e non TRA le maglie? le 4 maglie che mancano sono le maglie con i segnapunti. Buon lavoro!

26.11.2023 - 23:13

country flag Greetje Van Hulst wrote:

Dag Greetje, Heb je de markeerders in de steken geplaatst en niet tussen 2 steken? Mogelijk verklaart dit het verschil van 4 steken...? Antwoord: 18.09.2023 kl. 20:20 Ik heb ze er tussen geplaatst: (5 steken,markeerder,21 steken,markeerder, 20 steken, markeerder, 42 steken, markeerder, 20 steken, markeerder, 21 steken, markeerder, 5 steken Dat zijn er nog steeds 134

18.09.2023 - 20:39

DROPS Design answered:

Dag Greetje,

Heb je de markeerders in de steken geplaatst en niet tussen 2 steken? Mogelijk verklaart dit het verschil van 4 steken...?

05.10.2023 - 06:24

country flag Greetje Van Hulst wrote:

In het patroon begin je de pas na het meerderen met 138 steken. Als je de markeerders plaatst volgens de aanwijzingen kom je op 134 steken (5+21+20+42+20+21+5= 134). Waar laat ik de overgebleven 4 steken ?

17.09.2023 - 21:29

DROPS Design answered:

Dag Greetje,

Heb je de markeerders in de steken geplaatst en niet tussen 2 steken? Mogelijk verklaart dit het verschil van 4 steken...?

18.09.2023 - 20:20

country flag Beatrix Windolph-Leicht wrote:

Laut Anleitung erfolgt Zunahme an Rumpf und Ärmel im unterschiedlichen Rhythmus. Aber die Zunahme in jeder 4. Reihe ist bei Größe M ab Rumpf (21. Zunahme ) und Ärmel (19. Zunahme +4 Reihen, also dann gleiche Reihe wie Rumpf) identisch. Ist das korrekt?

18.08.2023 - 17:54

DROPS Design answered:

Liebe Frau Windolph-Leicht, in M wird es beim Rumpf in jeder 2. Reihe 21 Mal dann in jeder 4. Reihe 11 Mal zugenommen; und gleichzeitig bei den Ärmeln in jeder 2. Reihe 19 Mal dann in jeder 4. Reihe 12 Mal zugenommen, dh es wird entweder 8 Maschen (Rumpf und Ärmel) oder nur 4 Maschen (wenn man in jeder 2. Reihe noch beim Rumpf zunimmt aber in jeder 4. Reihe bei den Ärmeln zunehmen soll) zunehmen. Viel Spaß beim stricken!

21.08.2023 - 08:37

country flag Susanne wrote:

Ich habe diese Jacke inzwischen 8 x gestrickt- in verschiedenen Größe und Farben- und somit meine lieben Freundinnen , Tochter und Mutter beglückt, da meine eigene Jacke stets bewundert wurde. Ein herrliches Stück und immer dabei! Besonders liebe ich das Federgewicht , womit diese ein täglicher Begleiter ist. Danke für die Strickanleitung und die wundervolle Wolle!

30.05.2023 - 08:47