
Popular categories
Looking for a yarn?


Comments / Questions (44)
![]() Chris wrote:
Chris wrote:
Hello, I see at the very bottom of lothlorien/166-43 a border that looks like a garter stitch band. I don't see it in the written instructions. Do I start with this border or is it added at the finishing of the poncho? Thank you, Chris
08.08.2022 - 04:46DROPS Design answered:
Dear Chris, the 2 ridges visible at the bottom of the jacket are the 4 first rows worked at the bottom of A.1 (= knit 1 row from RS with decreases, knit 1 row from WS, knit 1 row from RS with decreases, knit 1 row from WS). Happy knitting!
08.08.2022 - 07:54
![]() Patricia wrote:
Patricia wrote:
Re bonjour, j'ai compris pas la peine de me répondre à ma question . Le fait de l'écrire je viens de comprendre. Il ne faut pas tricoter trop tard le soir on n'a pas les idées claires. Merci, bonne journée.
09.03.2020 - 09:06
![]() Patricia wrote:
Patricia wrote:
Bonjour, je viens de finir A1, si j'ai bien compris je dois tricoter A2 A3 A4 puis de nouveau A2 A3 A4 et ainsi de suite sur tout le rang. Je si fais cela au bout d'un moment je suis décalée et les diminutions et les jetés se retrouvent au milieu des 12 mailles de A1. ça ne cadre plus . Je ne sais pas si j'arrive à me faire comprendre, je suis perdue. Merci de votre aide.
09.03.2020 - 08:47DROPS Design answered:
Bonjour Patricia, vous allez répéter A.3 seulement, autrement dit, vous tricotez vos 4 m de bordure devant au point mousse, puis les 6 m de A.2, puis vous répétez les 12 mailles de A.3 jusqu'à ce qu'il reste 11 mailles, et vous terminez par les 7 m de A.4 et 4 m au point mousse. Sur l'envers, tricotez A.4, répétez A.3 et terminez par A.2 en lisant les diagrammes de gauche à droite. Bon tricot!
09.03.2020 - 12:46
![]() Henna Oron wrote:
Henna Oron wrote:
Ik vind het vermoeiend om lange tijd naar het beeldscherm te kijken, zijn uw patronen ook als PDF te printen?
21.01.2020 - 22:32DROPS Design answered:
Dag Henna,
Jazeker! Onder de materialenlijst staat een knop 'Patroon'. Klik hierop en klik dan op afdrukken, om een print te maken van het patroon.
26.01.2020 - 14:51
![]() RossWildflower wrote:
RossWildflower wrote:
The first row instructions say: Cast on 429-489-529-549 sts on circular needle size 5 mm / US 8 with 1 strand BabyAlpaca Silk and 1 strand Kid-Silk (= 2 strands). Work pattern as follows from RS: 4 band sts in GARTER ST - see explanation above, work last st in A.1, A.1 (= 20 sts) 21-24-26-27 times in width, 4 band sts in garter st. Does this mean I should work the first stitch in ALL RS rows and last stitch in ALL WS rows as the last st in A.1? For how many rows?
27.06.2019 - 19:30DROPS Design answered:
Dear Mrs RossWildflower, from RS you will always work the last stitch in A.1 after the front band sts and before repeating A.1 (read diagrams from the right towards the left). From WS work the front band sts, then repeat A.1 (read diagrams from the left towards the right) then work the last st in A.1 and finish with the front band sts. That way pattern will be symetrical on each side. Read more about diagrams here. Happy knitting!
28.06.2019 - 06:27
![]() Pauline wrote:
Pauline wrote:
Hallo, ich würde allzu gerne dieses Modelll stricken, vertrage aber keine Mohair-Garne auf meiner Haut. Kann ich Kid-Silk einfach weglassen? Falls ja, reicht Baby Alpaca Silk 2-fädig für dieses Modell aus oder benötige ich das Garn dann 3-fädig? Welche Nadelstärke ist für Alpaca Silk 2-fädig oder 3-fädig am Besten?
20.06.2019 - 20:52DROPS Design answered:
Liebe Pauline, Sie können 1 Faden Kid-Silk durch 1 Faden BabyAlpaca Silk ersetzen, so stricken Sie mit 2 Fäden BabyAlpaca Silk - beide gehören der Garngruppe A - benutzen Sie unseren Garnumrechner um die neue Menge zu kalkulieren (die Garnmenge in BabyAlpaca Silk für Ihre Größe kommt noch dazu). Viel Spaß beim stricken!
21.06.2019 - 06:56
![]() Susanne wrote:
Susanne wrote:
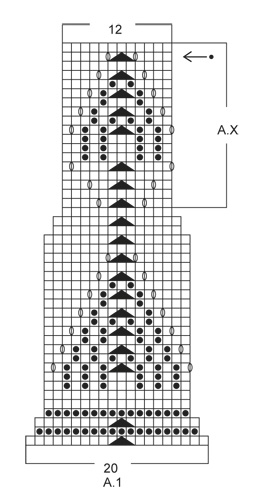
Hallo, ich verstehe nicht, was mit „A.X“ gemeint ist? „Wenn A.1 1 x in der Höhe gestr wurde, sind 261-297-321-333 M auf der Nadel. A.X noch 1 x in der Höhe arb. Die KNOPFLÖCHER nicht vergessen - siehe oben. Dann die 2 letzten R von A.X noch 11-10-9-9 x in der Höhe arb. Die Arb hat eine Gesamtlänge von ca. 38-37-36-36 cm ab dem Anschlagrand.“ Nochmal A1???? Danke und Gruß!
18.05.2019 - 14:36DROPS Design answered:
Liebe Susanne, wenn A.1 1x in der Höhe gestrickt wird, stricken Sie die mit A.X markierten Reihen = die letzten 18 Reihen in A.1 - dann wiederholen Sie nur die 2 letzten Reihen (siehe Pfeil und schwarzer Punkt). Viel Spaß beim stricken!
20.05.2019 - 10:11
![]() Valérie P. wrote:
Valérie P. wrote:
Bonjour, Je viens de recommencer l'ouvrage car je ne sais pas si il faut commencer le A1 par la dernière maille du motif sur toute la hauteur du A1? ou simplement sur les 3 premiers rangs ? merci de votre réponse
26.08.2018 - 09:58DROPS Design answered:
Bonjour Valérie, quand vous tricotez A.1, vous tricotez ainsi: 4 m point mousse, la dernière m de A.1, puis vous répétez A.1 en largeur et terminez par 4 m point mousse, et ce, jusqu'à ce que A.1 soit terminé en hauteur: le motif est ainsi symétrique de chaque côté. Bon tricot!
05.09.2018 - 14:37
![]() Valérie P. wrote:
Valérie P. wrote:
Bonjour, Je voudrais savoir si vous avez une vidéo qui montre comment monter les 429 mailles avec 2 jeux d'aiguilles circulaires pour ce modèle. Merci
10.08.2018 - 10:45DROPS Design answered:
Bonjour Valérie P., nous n'avons pas de vidéo de ce type, montez simplement la moitié des mailles sur une aiguille circulaire, et montez l'autre moité des mailles sur l'autre aiguille à suivre simplement. Bon tricot!
10.08.2018 - 10:56Marilyn wrote:
I am on row 10, having made the yarnovers in row 9. I don't know how I can purl the yarnovers without creating a new stitch. Row 11 does not show additional stitches. Please help!
09.02.2018 - 03:15DROPS Design answered:
Hi Marilyn, All the yarn overs are accompanied by either K2 together or slip 1 stitch, knit 1 and pass the slipped stitch over. So the number of stitches stays the same and the pattern gives the lace effect. On the next row purl the yarn overs to leave a hole. Happy knitting!
09.02.2018 - 07:06
|
||||||||||||||||||||||||||||
Lothlorien#lothloriencardigan |
||||||||||||||||||||||||||||
 |
 |
|||||||||||||||||||||||||||
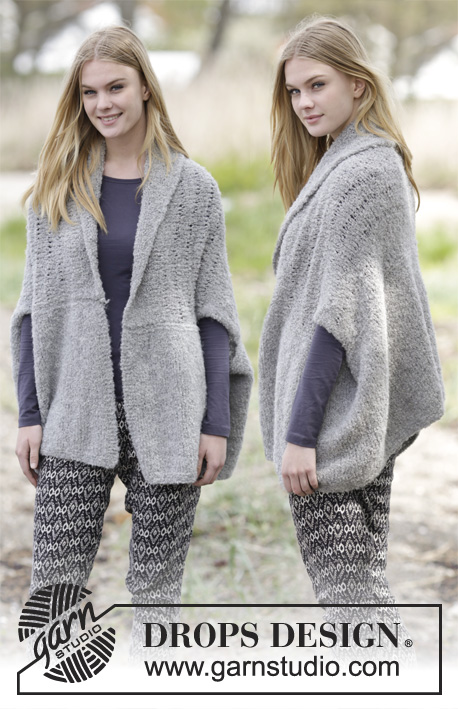
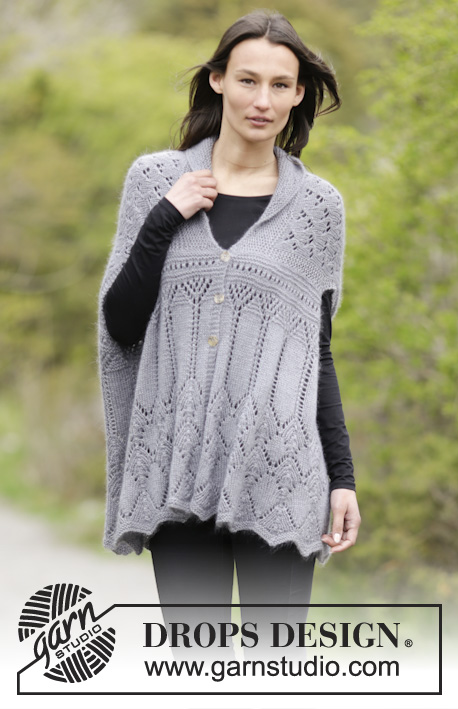
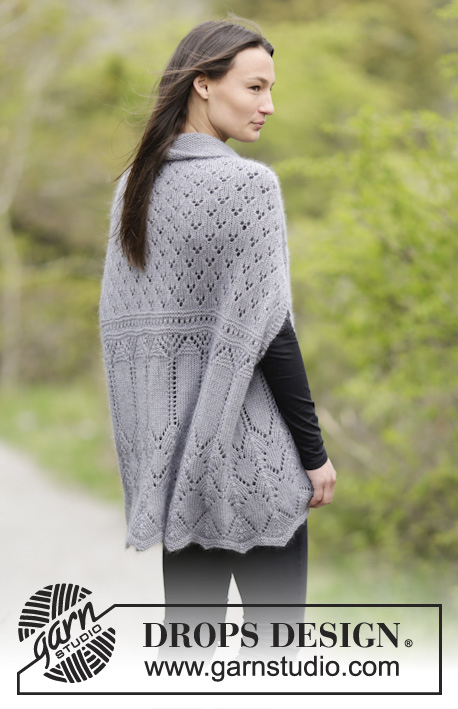
Knitted DROPS jacket in garter st with lace pattern and shawl collar in "BabyAlpaca Silk" and "Kid-Silk". Size S-XXXL.
DROPS 166-43 |
||||||||||||||||||||||||||||
|
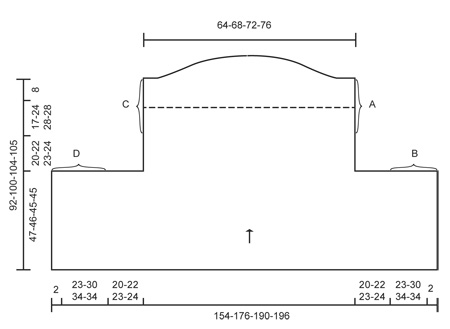
GARTER ST (back and forth): K all rows. 1 ridge = 2 rows K. PATTERN: See diagrams A.1 to A.8. The diagrams show all rows in pattern seen from RS. INCREASE TIP: Inc 1 st by making 1 YO, on next row K YO twisted (i.e. work in the back loop of st instead front) to avoid holes. BUTTONHOLES: Dec for buttonholes on right band (i.e. the first 4 sts seen from RS). 1 buttonhole = K tog second and third st from edge and make 1 YO. Dec for buttonholes when piece measures: SIZE S/M: 29, 37 and 45 cm SIZE L/XL: 28, 36 and 44 cm SIZE XXL: 27, 35 and 43 cm SIZE XXXL: 27, 35 and 43 cm ---------------------------------------------------------- JACKET: Worked back and forth on circular needle. work on 2 circular needle size 80 cm to make room for all sts at beg of piece. Beg at the bottom of back piece and front piece, then cast off sts in each side, continue on back piece, then work shawl collar before sewing piece tog. Cast on 429-489-529-549 sts on circular needle size 5 mm with 1 strand BabyAlpaca Silk and 1 strand Kid-Silk (= 2 strands). Work pattern as follows from RS: 4 band sts in GARTER ST - see explanation above, work last st in A.1, A.1 (= 20 sts) 21-24-26-27 times in width, 4 band sts in garter st. REMEMBER THE KNITTING TENSION Work the 4 band sts in garter st until finished measurements. When entire A.1 has been worked 1 time vertically, there are 261-297-321-333 sts on needle. Repeat A.X 1 more time vertically. Remember BUTTONHOLES - see explanation above. Then repeat the 2 last rows in A.X 11-10-9-9 more times vertically. Piece measures approx. 38-37-36-36 cm from cast-on edge. Now work as follows: 4 band sts in garter st, A.2 (= 6 sts), A.3 (= 12 sts) 20-23-25-26 times in width, A.4 (= 7 sts), 4 band sts in garter st. When A.2-A.4 have been worked 1 time vertically, continue with A.5 inside band sts in each side. NOTE: On 7th row work last st before band sts K, and on 10th row inc 2-1-2-1 sts = 263-298-323-334 sts. When entire A.5 has been worked 1 time vertically, work 2 rows in stocking st, AT THE SAME TIME at beg of these 2 rows cast off 77-91-100-102 sts = 109-116-123-130 sts. Now continue as follows: 4 sts in garter st, A.6 (= 6 sts), A.7 (= 7 sts) until 8 sts remain, A.8 (= 4 sts), 4 sts in garter st. When piece measures 84-92-96-97 cm - adjust to finish after 6th or 12th row in A.6-A.8 - switch to circular needle size 4.5 mm and continue in garter st until finished measurements. Work the first 45-48-50-53 sts, insert 1 marker in next st, work 4-4-5-5 sts, insert a marker in next st, work 7-8-9-10 sts, insert a marker in next st, work 4-4-5-5 sts, insert a marker in next st, work the next 45-48-50-53 sts (= 4 markers). On next row from RS, inc 1 st before the 4 sts with markers – READ INCREASE TIP (= 4 sts inc). Repeat inc alternately on right and left side of each marker every 4th row 4 more times (= 20 sts inc) = 129-136-143-150 sts. On next ridge do not work the outermost 10-14-16-18 sts in each side, then on the next 8 ridges work over 4 sts less on every row. Work 2 ridges over all sts, AT THE SAME TIME on first row inc 12-16-20-24 sts evenly = 141-152-163-174 sts. Loosely cast off. ASSEMBLY: Sew seam A and B tog (see chart). Sew in outer loops of edge sts to avoid a chunky seam. Armhole = 20-22-23-24 cm Repeat in the other side. I.e. sew seam C and D tog the same way. Fasten off. |
||||||||||||||||||||||||||||
Diagram explanations |
||||||||||||||||||||||||||||
|
||||||||||||||||||||||||||||
 |
||||||||||||||||||||||||||||
 |
||||||||||||||||||||||||||||
 |
||||||||||||||||||||||||||||
Have you finished this pattern?Tag your pictures with #dropspattern #lothloriencardigan or submit them to the #dropsfan gallery. Do you need help with this pattern?You'll find 19 tutorial videos, a Comments/Questions area and more by visiting the pattern on garnstudio.com. © 1982-2026 DROPS Design A/S. We reserve all rights. This document, including all its sub-sections, has copyrights. Read more about what you can do with our patterns at the bottom of each pattern on our site. |
||||||||||||||||||||||||||||


With over 40 years in knitting and crochet design, DROPS Design offers one of the most extensive collections of free patterns on the internet - translated to 17 languages. As of today we count 325 catalogues and 12298 patterns translated into English (UK/cm).
We work hard to bring you the best knitting and crochet have to offer, inspiration and advice as well as great quality yarns at incredible prices! Would you like to use our patterns for other than personal use? You can read what you are allowed to do in the Copyright text at the bottom of all our patterns. Happy crafting!
Post a comment to pattern DROPS 166-43
We would love to hear what you have to say about this pattern!
If you want to leave a question, please make sure you select the correct category in the form below, to speed up the answering process. Required fields are marked *.