
Popular categories
Looking for a yarn?


Comments / Questions (34)
![]() Arela Santiago wrote:
Arela Santiago wrote:
Por favor dígame ¿donde puedo comprar estos hilos drops snow aquí en Perú?y que significa obtener 8 p.b/p.a de ancho? gracias
04.07.2021 - 16:01DROPS Design answered:
Hola Arela. No tenemos tiendas en Perú. Puedes comprar las lanas en los siguientes tiendas con envíos internacionales: https://www.garnstudio.com/findastore.php?s=w&cid=23
04.07.2021 - 16:07
![]() Rose-Marie Björkan wrote:
Rose-Marie Björkan wrote:
Hej! Tänkte bara höra innan jag börjar, går det att följa beskrivningen utan diagram? Jag klarar inte av diagram. Mvh Rosie
30.06.2020 - 12:55DROPS Design answered:
Hej Rose-Marie, Ja du kan virka enligt beskrivning eller diagram :)
02.07.2020 - 10:57
![]() Gudrun Skjæveland wrote:
Gudrun Skjæveland wrote:
Hei! A3, omgang 7: * 2 st hekles sm til 1 st i første fm, 2 lm, hopp over 1 fm, 2 st hekles sm til 1 st i neste fm, 2 lm, 2 st hekles sm til 1 st i neste fm, 2 lm *, - skal det ikkje hoppast over fastmaske mellom kvar samanhekla stav (altså under luftmaskene)? Ser slik ur på diagrammet? Kan de endra dette i teksten om det er feil? Måtte ta opp igjen dette fleire gonger då det ikkje passa.
18.01.2019 - 16:23DROPS Design answered:
Hei Gudrun. Diagrammet er rikitg: du skal hoppe over 1 fastmaske mellom hver stavgruppe på 7 omgang. Vi har nå rettet dette i teksten også. Takk for beskjed og god fornøyelse
25.01.2019 - 14:42Lena wrote:
Har noen prøvd å tove dette teppet?
04.11.2018 - 20:21
![]() Stine Sofie Finholt wrote:
Stine Sofie Finholt wrote:
Omg. 7 på A.3 og A.4 er lik i oppskriften, og stemmer ikke med A.4 i diagrammet. Her skal det vel være fastmasker og luftmasker?
18.08.2018 - 11:43DROPS Design answered:
Hei Stine Sofie, Omgang 7 på A.3 og A.4 er ganske like med ikke helt det samme. Du skal hoppe over 1 fm og 1 lm i A.4 som man ikke gjør i A.3. God fornøyelse!
21.08.2018 - 08:01
![]() Bettina wrote:
Bettina wrote:
Liebes Drops Team, Ich möchte mich der Frage von Frau Wagner anschließen. Laut der häkelschrift/dem Diagramm zu A3 Runde 7 wird nach den 2 LM IMMER 1 Fm bzw. die LM der Vorrunde übersprungen. Nach der geschriebenen Anleitung ist das nicht so. Ich meine auch, dass eher die häkelschrift stimmt. Oder? Danke und viele Grüße
30.05.2017 - 22:55DROPS Design answered:
Liebe Bettina, es stimmt ja, danke für den Hinweis, Texte wird geprüft und korrigiert. Viel Spaß beim häkeln!
31.05.2017 - 08:44
![]() Monika Wagner wrote:
Monika Wagner wrote:
A3 Reihe 7 Hier sollte nach jeder Büschelmasche eine Masche übersprungen werden, wie es die Häkelschrift zeigt, oder?
25.12.2016 - 21:29DROPS Design answered:
Liebe Frau Wagner, Reihe 7 in A.3 wird so gehäkelt: * in der nächsten fM 2 Stb zu einem Stb zushäkeln, 2 Lm, 1 fM überspringen, in der nächsten fM 2 Stb zu einem Stb zushäkeln, 2 Lm, in der nächsten fM 2 Stb zu einem Stb zushäkeln, 2 Lm *, von *-* bis Rd-Ende wdh = 72 Stb-Gruppen und 72 Lm-Bögen.Viel Spaß beim häkeln!
02.01.2017 - 09:27
![]() Marthe Lene Hestnes wrote:
Marthe Lene Hestnes wrote:
Jeg skjønner ikke hvordan i omgang 6, A4 at det kan økes fra 108 luftmaskebuer til 126 luftmaskebuer? Når man går fra * til ** 4 ganger? Og deretter fra ** til **. Vil ikke det da økes flere enn 18 luftmaskebuer?
22.04.2016 - 12:39
![]() Caroline Kölln wrote:
Caroline Kölln wrote:
Ein schöner Teppich, abwechslungsreich zu häkeln. Ich habe ihn einfarbig weiss gemacht. Genau so schön wie der bunte. Vielen Dank für die tollen Anleitungen.
17.03.2016 - 11:32
![]() Filippa wrote:
Filippa wrote:
Perfekt till min dotters rum. Hur ljuvlig som helst. Aldrig gjort något av detta garn ej heller virkat något annat än mormorsrutor. Men nu ska här virkas! Tack för inspirationen.
25.01.2016 - 11:09
|
||||||||||||||||||||||||||||
Color Wheel#colorwheelrug |
||||||||||||||||||||||||||||
|
|
||||||||||||||||||||||||||||
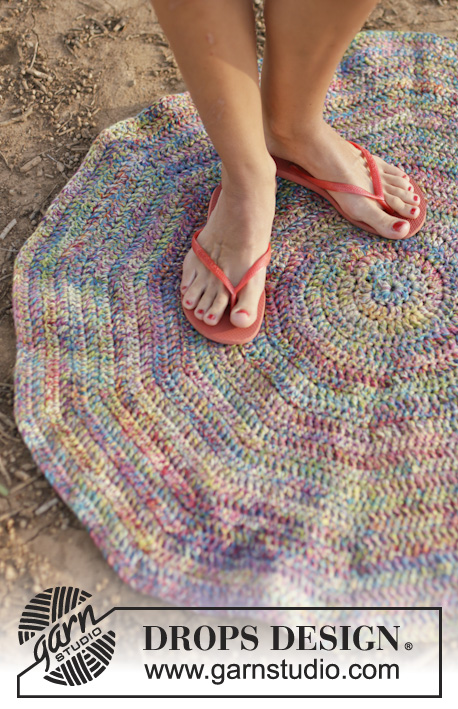
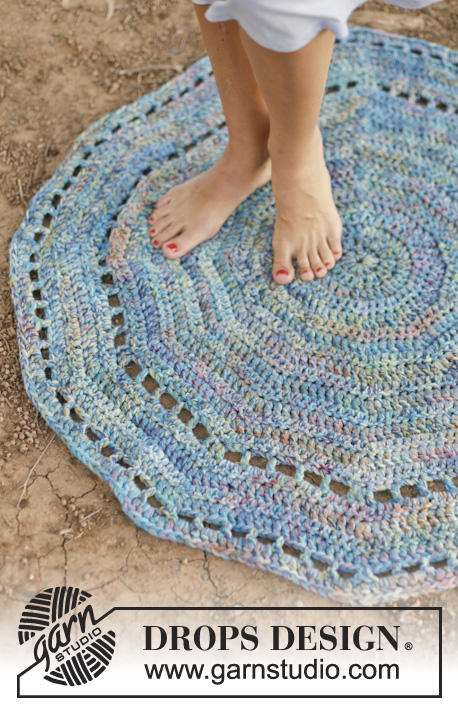
Crochet DROPS carpet with stripe pattern in 2 strands "Snow".
DROPS 162-43 |
||||||||||||||||||||||||||||
|
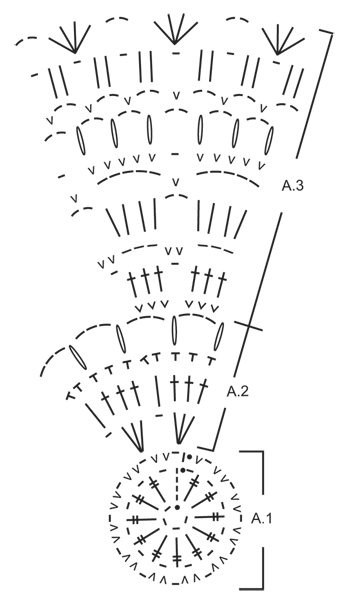
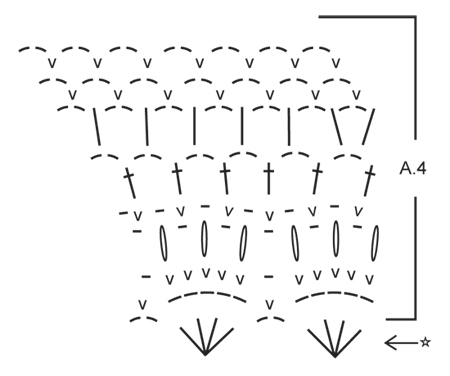
PATTERN: See diagrams A.1 to A.4. STRIPE COLOURS: Work with 2 strands of each colour. A.1: ROUND 1: Petrol ROUND 2: Sapphire A.2: ROUND 1-2: Off white ROUND 3: Medium purple ROUND 4: Lime A.3: ROUND 1-2: Off white ROUND 3: Hot pink ROUND 4: Medium purple ROUND 5-6: Off white ROUND 7: Sapphire ROUND 8: Petrol ROUND 9: Lime A.4: ROUND 1-2: Off white ROUND 3: Hot pink ROUND 4: Medium purple ROUND 5-6: Off white ROUND 7-8: Sapphire CROCHET INFO: Replace first dc at beg of every dc round with 1 ch. Finish every round with 1 sl st in ch from beg of round. Replace first tr at beg of every tr round with 3 ch. Finish round with 1 sl st in 3rd ch at beg of round. COLOUR CHANGE: Crochet last sl st on the last round with the colours of next round to get a nice colour change. CROCHET TOG: Work 2 tr into 1 tr: Work 1 tr but wait with last pull through (= 2 strands on hook), then work next tr but on last pull through, pull yarn through all sts on hook. ---------------------------------------------------------- CARPET: Crochet 4 ch on hook size 8 mm with 2 strands petrol and form a ring with 1 sl st in first ch. READ STRIPE COLOURS. Work either according to diagram or pattern, i.e. work as follows: Work according to diagram: Read CROCHET INFO and COLOUR CHANGE! Work A.1 the entire round (= 1 repetition in total), A.2 (= 6 repetitions in total), A.3 (= 12 repetitions in total), finish with A.4 (= 18 repetitions). Work A.1 as follows: ROUND 1: READ COLOUR CHANGE. Work 5 ch (= 1 dtr and 1 ch), * 1 dtr in ch-ring, 1 ch *, repeat from *-* 10 more times, finish with 1 sl st in 4th ch from beg of round = 12 dtr and 12 ch. ROUND 2: 2 ch (= 1 dc and 1 ch), 2 dc in next ch, 1 ch, 2 dc in next ch *, repeat from *-* 9 more times, work 1 ch, 1 dc in next ch, finish with 1 sl st in 1st ch from beg of round = 24 dc and 12 ch. REMEMBER THE CROCHET TENSION! Work A.2 as follows: ROUND 1: READ CROCHET INFO! Work * 3 tr in first ch, 1 ch *, repeat from *-* the entire round = 12 tr-groups and 12 ch. ROUND 2: * 1 tr in each of the next 3 tr, 1 tr in next ch *, repeat from *-* the entire round = 48 tr. ROUND 3: * 1 dc in each of the first 3 tr, 2 dc in next tr *, repeat from *-* the entire round = 60 dc. ROUND 4: * work 2 tr into 1 tr in first dc – READ CROCHET TOG, 3 ch, skip 1 dc, work 2 tr into 1 tr in next dc, skip 2 dc, work 2 tr into 1 tr in next dc, 3 ch *, repeat from *-* the entire round = 24 tr-groups and 24 ch-spaces. Work A.3 as follows: ROUND 1: Work 3 dc in every ch-space the entire round = 72 dc. ROUND 2: * 1 tr in each of the first 3 dc, 1 ch *, repeat from *-* the entire round = 72 tr and 24 ch-spaces. ROUND 3: * 3 ch, 2 dc in first ch-space *, repeat from *-* the entire round = 24 ch-spaces and 48 dc. ROUND 4: * 4 tr in first ch-space, 2 ch *, repeat from *-* the entire round = 24 tr-groups and 24 ch-spaces. ROUND 5: * 5 ch, 1 dc in first ch-space *, repeat from *-* the entire round = 24 ch-spaces and 24 dc. ROUND 6: * 5 dc in first ch-space, 1 ch *, repeat from *-* the entire round = 120 dc and 24 ch. ROUND 7: * work 2 tr into 1 tr in first dc, 2 ch, skip 1 dc, work 2 tr into 1 tr in next dc, 2 ch, skip 1 dc, work 2 tr into 1 tr in next dc, 2 ch skip 1 ch *, repeat from *-* the entire round = 72 tr-groups and 72 ch-spaces. ROUND 8: * 2 ch, 1 dc in first ch-space *, repeat from *-* the entire round = 72 dc and 72 ch-spaces. ROUND 9: * 2 tr in first ch-space, 1 ch *, repeat from *-* the entire round = 72 tr-groups and 24 ch-spaces. ROUND 10: * 4 tr in first ch, 2 ch, skip 2 tr + 1 ch + 2 tr *, repeat from *-* the entire round = 36 tr-groups and 36 ch-spaces. Work A.4 as follows: ROUND 1: Work * 5 ch, 1 dc in first ch-space *, repeat from *-* the entire round = 36 ch-spaces and 36 dc. ROUND 2: * 5 dc in first ch-space, 1 ch *, repeat from *-* the entire round = 180 dc and 36 ch. ROUND 3: * work 2 tr into 1 tr in first dc, 1 ch, skip 1 dc, work 2 tr into 1 tr in next dc, 1 ch, work 2 tr into 1 tr in next dc, 1 ch *, repeat from *-* the entire round = 108 tr and 108 ch-spaces. ROUND 4: * 1 dc in first ch, 1 ch *, repeat from *-* the entire round = 108 dc and 108 ch. ROUND 5: * 1 tr in first dc, 2 ch *, repeat from *-* the entire round = 108 tr and 108 ch-spaces. ROUND 6: ** 1 tr + 2 ch + 1 tr in first ch-space, 2 ch, * 1 tr in next ch-space, 2 ch *, repeat from *-* 4 more times **, repeat from **-** the entire round = 126 tr and 126 ch-spaces. ROUND 7: * 1 dc in first ch-space, 2 ch *, repeat from *-* the entire round = 126 dc and 126 ch-spaces. ROUND 8: * 1 dc in first ch-space, 2 ch *, repeat from *-* the entire round = 126 dc and 126 ch-spaces. Fasten off. Carpet measures approx. 97 cm in diameter. |
||||||||||||||||||||||||||||
Diagram explanations |
||||||||||||||||||||||||||||
|
||||||||||||||||||||||||||||
 |
||||||||||||||||||||||||||||
 |
||||||||||||||||||||||||||||
Have you finished this pattern?Tag your pictures with #dropspattern #colorwheelrug or submit them to the #dropsfan gallery. Do you need help with this pattern?You'll find 12 tutorial videos, a Comments/Questions area and more by visiting the pattern on garnstudio.com. © 1982-2026 DROPS Design A/S. We reserve all rights. This document, including all its sub-sections, has copyrights. Read more about what you can do with our patterns at the bottom of each pattern on our site. |
||||||||||||||||||||||||||||


With over 40 years in knitting and crochet design, DROPS Design offers one of the most extensive collections of free patterns on the internet - translated to 17 languages. As of today we count 324 catalogues and 12278 patterns translated into English (UK/cm).
We work hard to bring you the best knitting and crochet have to offer, inspiration and advice as well as great quality yarns at incredible prices! Would you like to use our patterns for other than personal use? You can read what you are allowed to do in the Copyright text at the bottom of all our patterns. Happy crafting!
Post a comment to pattern DROPS 162-43
We would love to hear what you have to say about this pattern!
If you want to leave a question, please make sure you select the correct category in the form below, to speed up the answering process. Required fields are marked *.