DROPS Alpaca
DROPS Alpaca
100% Alpaca
from 3.40 £ /50g
DROPS Kid-Silk
DROPS Kid-Silk
75% Mohair, 25% Silk
from 4.60 £ /25g
Get the yarn to make this pattern from 51.40£.

The yarn cost is calculated from the pattern’s smallest size and the yarn’s cheapest product type. Looking for an even better price? You might find it on the DROPS Deals!

DROPS SS24

Twist

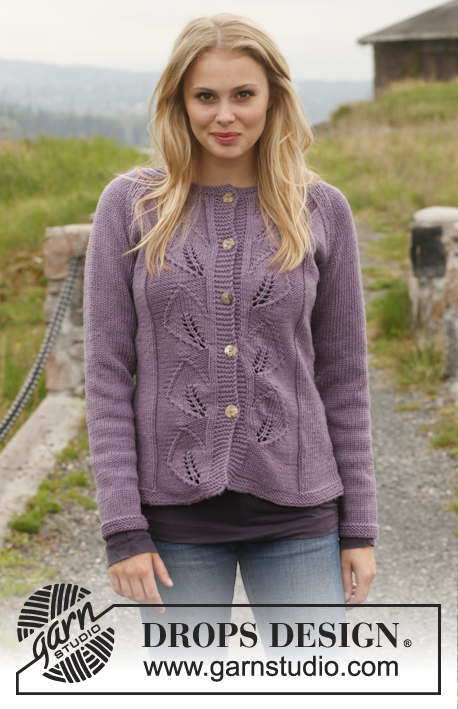
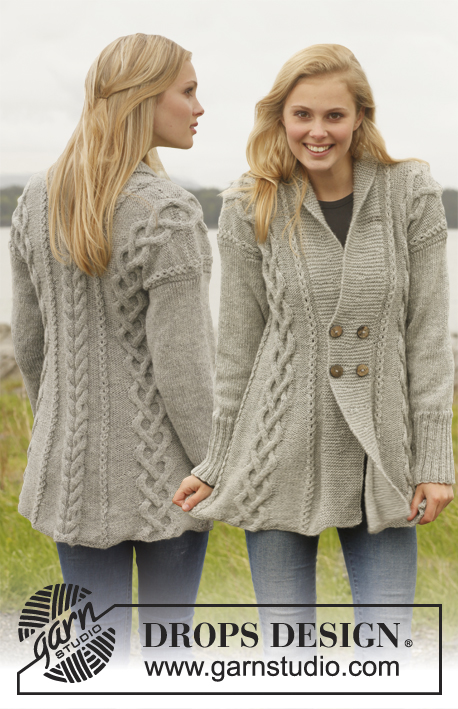
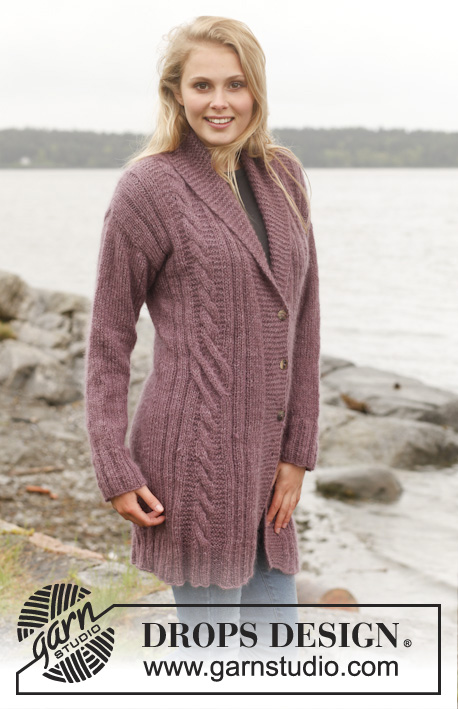
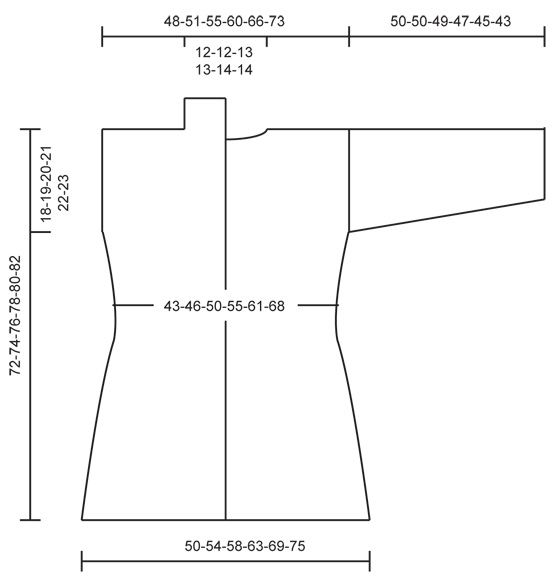
Knitted DROPS jacket with cables and shawl collar in "Alpaca" and "Kid-Silk". Size: S - XXXL.

DROPS 151-4
DROPS design: Pattern no z-646
Yarn group A + A
-----------------------------------------------------------
Size: S - M - L - XL - XXL - XXXL
Materials:
DROPS ALPACA from Garnstudio
350-350-400-450-450-500 g colour no 3800, old pink
And use:
DROPS KID-SILK from Garnstudio
150-150-175-175-200-225 g colour no 05, heather

DROPS DOUBLE POINTED NEEDLES and CIRCULAR NEEDLE (60 or 80 cm) SIZE 6 mm – or size needed to get 16 sts x 20 rows in stocking st with 1 strand of each yarn = 10 x 10 cm.
DROPS DOUBLE POINTED NEEDLES and CIRCULAR NEEDLE (60 cm) SIZE 5 mm - for rib.
DROPS MOTHER-OF-PEARL BUTTON w/HOLES, NO 522: 3 pieces

-------------------------------------------------------

Alternative Yarn – See how to change yarns here
Yarn Groups A to F – Use the same pattern and change the yarn here
Yarn usage using an alternative yarn – Use our yarn converter here

-------------------------------------------------------

DROPS Alpaca
DROPS Alpaca
100% Alpaca
from 3.40 £ /50g
DROPS Kid-Silk
DROPS Kid-Silk
75% Mohair, 25% Silk
from 4.60 £ /25g
Get the yarn to make this pattern from 51.40£.

The yarn cost is calculated from the pattern’s smallest size and the yarn’s cheapest product type. Looking for an even better price? You might find it on the DROPS Deals!

Pattern instructions

NOTE: This pattern is written in British English. All measurements in charts are in cm. For conversion from cm to inches - click here. There are different terms for crocheting in British and American English. If this pattern includes crochet, click for "crochet terms" here. For this pattern in American English, please click here.
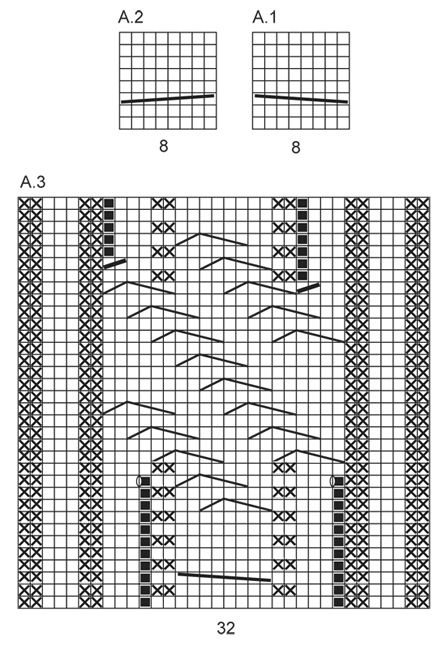
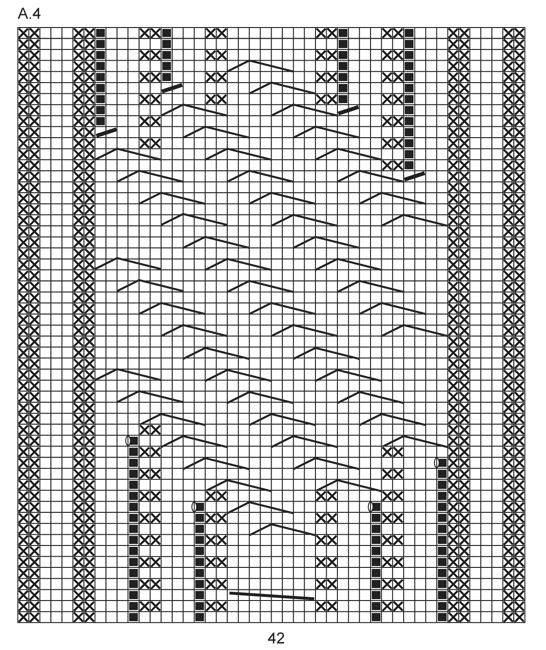
GARTER ST (back and forth on needle):
K all rows. 1 ridge = 2 rows K.

PATTERN:
See diagrams A.1 to A.5. The diagrams show all rows in pattern seen from RS.

BUTTONHOLE:
Dec for buttonholes on right band. 1 buttonhole = K tog third and fourth st from mid front and make 1 YO.
Dec for buttonholes when piece measures:
SIZE S: 33, 41 and 49 cm
SIZE M: 35, 43 and 51 cm
SIZE L: 37, 45 and 53 cm
SIZE XL: 39, 47 and 55 cm
SIZE XXL: 41, 49 and 57 cm
SIZE XXXL: 43, 51 and 59 cm
----------------------------------------------------------

BACK PIECE:
Worked back and forth on circular needle.
Cast on 88-88-98-108-118-128 sts (incl 1 edge st in each side) on circular needle size 5 mm with 1 strand of each yarn. P 1 row from WS, then work as follows - from RS:
1 edge st (worked in garter st), P 1, * K 3, P 2 *, repeat from *-* 4-4-5-6-7-8 times in total, K 3, P 6, K 3, P 6, K 3, P 2, K 3, P 6, K 3, P 6, * K 3, P 2 *, repeat from *-* 4-4-5-6-7-8 times in total, finish with K 3, P 1 and 1 edge st (worked in garter st). Work rib like this for 8 cm. Switch to circular needle size 6 mm. Then work as follows seen from RS: 1 edge st, K 14-14-19-24-29-34 AT THE SAME TIME dec 3-0-2-3-3-3 sts evenly over these sts, P 2, K 3, P 2, K 3, 6 sts in garter st, K 3, 6 sts in garter st, A.1 (= 8 sts), 6 sts in garter st, K 3, 6 sts in garter st, K 3, P 2, K 3, P 2, K 14-14-19-24-29-34 AT THE SAME TIME dec 3-0-2-3-3-3 sts evenly over these sts, 1 edge st in garter st = 82-88-94-102-112-122 sts. REMEMBER THE KNITTING TENSION! Continue this pattern (11-14-17-21-26-31 in stocking st in each side), AT THE SAME TIME when piece measures 9 cm, dec 1 st in each of the 4 sections in garter st. Repeat dec every 3½ cm 3 more times (4 dec in total, 16 sts dec), dec alternately at beg and end of sections in garter st by K 2 tog = 66-72-78-86-96-106 sts. When piece measures approx. 20 cm - adjust so that one whole repetition has been worked of A.1 vertically and last dec is done - continue as follows – from RS: 1 edge st in garter st, K 11-14-17-21-26-31, A.4 (= 42 sts), K 11-14-17-21-26-31 and 1 edge st in garter st. Continue until A.4 has been work 1 time vertically. Now work as follows from RS: 1 edge st, K 11-14-17-21-26-31, P 2, K 3, P 2, K 3, 2 sts in garter st, K 3, 2 sts in garter st, A.1 (= 8 sts), 2 sts in garter st, K 3, 2 sts in garter st, K 3, P 2, K 3, P 2, K 11-14-17-21-26-31, 1 edge st in garter st. When piece measures 50 cm, inc 1 st in every section in garter st, repeat inc every 10-10-11-11-12-12 cm 2 more times (3 inc in total = 12 sts inc), inc alternately at beg and end of section in garter st. AT THE SAME TIME when piece measures 54-55-56-57-58-59 cm, dec 1 edge st in each side. Continue the pattern like this. After all inc are done there are 76-82-88-96-106-116 sts on needle. When piece measures 70-72-74-76-78-80 cm, cast off the middle 16-16-18-18-20-20 sts for neck and finish each shoulder separately. On next row from the neck, dec 1 st = 29-32-34-38-42-47 sts remain for shoulder. Cast off when piece measures 72-74-76-78-80-82 cm.

RIGHT FRONT PIECE:
Cast on 70-70-70-80-80-90 sts (incl 1 edge st in the side and 12 band sts towards mid front) on circular needle size 5 mm with 1 strand of each yarn. P 1 row from WS, then work as follows - from RS:
12 band sts (worked in garter st), * K 3, P 2 *, repeat from *-* 3-3-3-4-4-5 times in total, K 3, P 6, K 3, P 2, K 3, P 6, * K 3, P 2 *, repeat from *-* 3-3-3-4-4-5 times in total, finish with K 3, P 1 and 1 edge st (worked in garter st). Work rib for 8 cm, switch to circular needle size 6 mm, then work as follows from RS. 12 band sts (worked in garter st), K 8-8-8-13-13-18 AT THE SAME TIME dec 3-2-0-3-1-4 sts evenly over these sts, P 2, K 3, P 2, K 3, 6 sts in garter st, A.1 (= 8 sts), 6 sts in garter st, K 3, P 2, K 3, P 2, K 9-9-9-14-14-19 AT THE SAME TIME dec 4-3-1-4-2-5 sts evenly over these sts, 1 edge st in garter st = 63-65-69-73-77-81 sts. REMEMBER THE KNITTING TENSION! Continue this pattern (5-6-8-10-12-14 sts in stocking st in each side). AT THE SAME TIME when piece measures 9 cm, dec 1 st in each of the 2 sections in garter st. Repeat dec every 5½ cm 3 more times (4 dec in total, 8 sts dec), dec alternately at beg and end of sections in garter st = 55-57-61-65-69-73 sts. When piece measures approx. 26 cm - adjust so that one whole repetition has been worked of A.1 vertically - continue as follows – from RS:
12 band sts in garter st, K 5-6-8-10-12-14, A.3 (= 32 sts), K 5-6-8-10-12-14 and 1 edge st in garter st. Continue until A.3 has been work 1 time vertically. Now work as follows from RS: 12 sts in garter st (band), K 5-6-8-10-12-14, P 2, K 3, P 2, K 3, 2 sts in garter st, A.1 (= 8 sts), 2 sts in garter st, K 3, P 2, K 3, P 2, K 5-6-8-10-12-14, 1 edge st in garter st. Remember to dec for BUTTONHOLES - see explanation above. When piece measures 45 cm, inc 1 st in every section in garter st, repeat inc every 10-10-11-11-12-12 cm 2 more times (3 inc in total = 6 sts inc), inc alternately at beg and end of section in garter st. AT THE SAME TIME when piece measures 49-51-53-55-57-59 cm, work 1 st of front piece into band, i.e. no of sts in garter st on band inc and no of sts in pattern on front piece dec (total no of sts is the same), repeat every cm 19-18-20-20-20-19 times in total (= 31-30-32-32-32-31 sts in garter st on band). AT THE SAME TIME when piece measures 54-55-56-57-58-59 cm, dec 1 edge st in the side. Continue the pattern like this. After all inc are done there are 60-62-66-70-74-78 sts on needle.

When piece measures 72-74-76-78-80-82 cm, cast off the first 29-32-34-38-42-47 sts from WS for shoulder = 31-30-32-32-32-31 sts remain on needle. Work the rest of row. Then work short rows over the 31-30-32-32-32-31 sts as follows - from RS: * Work 2 rows over the first 15 sts, work 2 rows over all sts *, repeat from *-* until neck edge measures 8-8-9-9-10-10 cm at the shortest. Cast off.

LEFT FRONT PIECE:
Cast on and work the same way as on right front piece but reversed - work A.2 instead of A.1 and A.5 instead of A.3. Beg as follows: P 1 row from WS, then work as follows - from RS: 1 edge st (worked in garter st) P 1, K 3, * P 2, K 3 *, repeat from *-* 3-3-3-4-4-5 times in total, P 6, K 3, P 2, K 3, P 6, K 3, * P 2, K 3 *, repeat from *-* 3-3-3-4-4-5 times in total, 12 band sts (worked in garter st). Do not dec for buttonholes.

SLEEVE:
Worked in the round on double pointed needles. Cast on 45-45-50-50-55-55 sts on double pointed needles size 5 mm with 1 strand of each yarn. Work rib = K 3/P 2. When piece measures 7 cm, switch to double pointed needles size 6 mm. Continue in stocking st AT THE SAME TIME on 1st round dec 7-7-10-8-11-9 sts evenly = 38-38-40-42-44-46 sts. Insert 1 marker at the beg of round. Work in stocking st, AT THE SAME TIME inc 1 st on each side of marker, repeat inc every 4-3½-3½-3-2½-2½ cm 9-10-11-12-12-13 more times (10-11-12-13-13-14 inc in total) = 58-60-64-68-70-74 sts. When piece measures 50-50-49-47-45-43 cm (shorter measurements in the larger sizes because of wider shoulders), cast off all sts. Knit another sleeve.

ASSEMBLY:
Sew the shoulder seams. Sew the side seams inside 1 edge st. Sew in sleeves. Sew the collar tog mid back and sew it to the neckline. Sew the buttons on to left front piece.

This pattern has been corrected.

Updated online: 26.08.2014
6 times the words „in total“ added:
BACK PIECE: ...1 edge st (worked in garter st), P 1, * K 3, P 2 *, repeat from *-* 4-4-5-6-7-8 times in total, K 3, P 6, K 3, P 6, K 3, P 2, K 3, P 6, K 3, P 6, * K 3, P 2 *, repeat from *-* 4-4-5-6-7-8 times in total, finish with K 3, P 1 and 1 edge st (worked in garter st). …

RIGHT FRONT PIECE:... 12 band sts (worked in garter st), * K 3, P 2 *, repeat from *-* 3-3-3-4-4-5 times in total,, K 3, P 6, K 3, P 2, K 3, P 6, * K 3, P 2 *, repeat from *-* 3-3-3-4-4-5 times in total...
LEFT FRONT PIECE:...1 edge st (worked in garter st) P 1, K 3, * P 2, K 3 *, repeat from *-* 3-3-3-4-4-5 times in total,, P 6, K 3, P 2, K 3, P 6, K 3, * P 2, K 3 *, repeat from *-* 3-3-3-4-4-5 times in total...

Diagram

symbols = K from RS, P from WS
symbols = P from RS, K from WS
symbols = slip 4 sts on cable needle behind piece, K 4, K 4 from cable needle
symbols = slip 4 sts on cable needle in front of piece, K 4, K 4 from cable needle
symbols = slip 2 sts on cable needle behind piece, K 4, K 2 from cable needle
symbols = slip 4 sts on cable needle in front of piece, K 2, K 4 from cable needle
symbols = 1 YO between 2 sts
symbols = this st has been cast off – skip this square
symbols = K 2 tog
diagram
diagram
diagram
diagram

Each of our patterns has specific tutorial videos to help you.

Do you have a question? See a list of frequently asked questions (FAQ)

Knitting tension is what determines the final measurements of your work, and is usually measured per 10 x 10 cm. It is provided like so: number of stitches in width x number of rows in height - eg: 19 stitches x 26 rows = 10 x 10 cm.

The knitting tension is very individual; some people knit/crochet loosely while others work tightly. You adjust the knitting tension with the needle size, which is why the suggested needle size is only meant as a guide! You need to adjust this (up or down) to ensure that YOUR knitting tension matches the knitting tension provided in the pattern. If you work with a different knitting tension than provided you will have a different yarn consumption, and your work will have different measurements than what the pattern suggests.

The knitting tension also determines which yarns can replace each other. As long as you achieve the same knitting tension you can replace one yarn with another.

See DROPS lesson: How to measure your tension/gauge

See DROPS video: How to make a gauge tension swatch

The required amount of yarn is provided in grams, eg: 450 g. To calculate how many balls you’ll need you first need to know how many grams are in 1 ball (25g, 50g or 100g). This information is available if you click on the individual yarn quality on our pages. Divide the amount required with the amount of each ball. For example, if each ball is 50g (the most common amount), the calculation will be as follows: 450 / 50 = 9 balls.

The important thing when changing from one yarn to another is that the knitting/crochet tension remains the same. This is so that the measurements of the finished piece will be the same as on the sketch provided. It is easier to achieve the same knitting tension using yarns from the same yarn group. It is also possible to work with multiple strands of a thinner yarn to achieve the knitting tension of a thicker one. Please try our yarn converter. We recommend you to always work a test swatch.

Please NOTE: when changing yarn the garment might have a different look and feel to the garment in the photo, due to individual properties and qualities of each yarn.

See DROPS lesson: Can I use a different yarn than the one mentioned in the pattern?

All our yarns are categorised into yarn groups (from A to F) according to thickness and knitting tension – group A contains the thinnest yarns and group F the thickest. This makes it easier for you to find alternative yarns to our patterns, should you wish to switch yarn. All yarns within the same group have a similar knitting tension and can easily replace each other. However, different yarn qualities have different structures and properties which will give the finished work a unique look and feel.

Click here for an overview of the yarns in each yarn group

At the top of all our patterns you’ll find a link to our yarn calculator, which is a helpful tool should you wish to use a different yarn than suggested. By filling in the yarn quality you wish to replace, the amount (in your size) and number of strands, the calculator will present good alternative yarns with the same knitting tension. Additionally it will tell you how much you’ll require in the new qualities and whether you’ll need to work with multiple strands. Most skeins are 50g (some are 25g or 100g).

If the pattern is worked with multiple colours, every colour will have to be calculated separately. Similarly, if the pattern is worked with several strands of different yarns (for example 1 strand Alpaca and 1 strand Kid-Silk) you will have to find alternatives for each, individually.

Click here to see our yarn calculator

Since different yarns have different qualities and textures we have chosen to keep the original yarn in our patterns. However, you can easily find options among our available qualities by using our yarn calculator, or simply pick a yarn from the same yarn group.

It is possible that some retailers still have discontinued yarns in stock, or that someone has a few skeins at home that they would like to find patterns for.

The yarn calculator will provide both alternative yarn as well as required amount in the new quality.

If you think it's hard to decide what size to make, it can be a good idea to measure a garment you own already and like the size of. Then you can pick the size by comparing those measures with the ones available in the pattern's size chart.

You'll find the size chart at the bottom of the pattern.

See DROPS lesson: How to read size chart

The needle size provided in the pattern serves only as a guide, the important thing is to follow the knitting tension. And since knitting tension is very individual, you will have to adjust the needle size to ensure that YOUR tension is the same as in the pattern – maybe you’ll have to adjust 1, or even 2 needle sizes, up or down to achieve the correct tension. For this, we recommend that you work test swatches.

Should you work with a different knitting tension than the one provided, the measurements of the finished garment might deviate from the measurement sketch.

See DROPS lesson: How to measure your tension/gauge

See DROPS video: How to make a tension/gauge swatch

Working a garment top-down provides more flexibility and room for personal adjustment. For example it is easier to try the garment on while working, as well as making adjustments to length of yoke and shoulder caps.

The instructions are carefully explaining every step, in the correct order. Diagrams are adjusted to the knitting direction and are worked as usual.

The diagram depicts all rows/rounds, and every stitch seen from the right side. It is read from bottom to top, from right to left. 1 square = 1 stitch.

When working back and forth, every other row is worked from the right side and every other row is worked from the wrong side. When working from the wrong side, the diagram will have to be worked reversed: from left to right, knit stitches are purled, purl stitches are knit etc.

When working in the round every round is worked from the right side and the diagram are worked from right to left on all rounds.

See DROPS lesson: How to read knitting diagrams

The diagram depicts all rows/rounds, and every stitch seen from the right side. It is worked from bottom to top, from right to left.

When working back and forth every other row is worked from the right side: from right to left and every other row is worked from the wrong side: from left to right.

When working in the round, every row in the diagram are worked from the right side, from right to left.

When working a circular diagram you start in the middle and work your way outwards, counter clockwise, row by row.

The rows usually start with a given number of chain stitches (equivalent to the height of the following stitch), this will either be depicted in the diagram or explained in the pattern.

See DROPS lesson: How to read crochet diagrams

Instructions for working several diagrams after each other on the same row/round, will often be written like so: “work A.1, A.2, A.3 a total of 0-0-2-3-4 times". This means you work A.1 once, then A.2 is worked once, and A.3 is repeated (in width) the number of times provided for your size – in this case like so: S = 0 times, M = 0 times, L=2 times, XL= 3 times and XXL = 4 times.

The diagrams are worked as usual: begin with the first row in A.1, then work the first row in A.2 etc.

See DROPS lesson: How to read knitting diagrams

See DROPS lesson: How to read crochet diagrams

The total width of the garment (from wrist-to-wrist) will be larger in the larger sizes, despite the actual sleeves being shorter. The larger sizes have longer sleeve caps and wider shoulders, so there will be a good fit in all sizes.

The measurement sketch/schematic drawing provides information regarding the full length of the garment. If it’s a jumper or a jacket the length is measured from the highest point on the shoulder closest to the neckline, and straight down to the bottom of the garment. It is NOT measured from the tip of shoulder. Similarly, the length of yoke is measured from the highest point on the shoulder and down to where yoke is split into body and sleeves.

On a jacket measures are never taken along bands, unless specifically stated. Always measure inside band stitches when measuring the length.

See DROPS lesson: How to read a schematic drawing

Diagrams are often repeated on the round or in height. 1 repeat is the diagram the way it appears in the pattern. If it says to work 5 repeats of A.1 in the round, then you work A.1 a total of 5 times after/next to each other in the round. If it says to work 2 repeats of A.1 vertically/in height you work the entire diagram once, then begin again at the start and work the entire diagram one more time.

Chain stitches are slightly narrower than other stitches and to avoid working the cast-on edge too tight, we simply chain more stitches to begin with. The stitch count will be adjusted on the following row to fit the pattern and measurement sketch.

The rib edge is more elastic and will contract slightly compared to, for example, stocking stitch. By increasing before the rib edge, you avoid a visible difference in width between the rib edge and the rest of the body.

It’s very easy to cast off too tightly, and by making yarn overs while casting off (and simultaneously casting these off) you avoid a too tight cast off edge.

See DROPS video: How to bind off with yarn overs (yo)

To achieve an even increase (or decrease) you can increase on, for example: every 3rd and 4th row alternately, like so: work 2 rows and increase on the 3rd row, work 3 rows and increase on the 4th. Repeat this until the increase is complete.

See DROPS lesson: Increase or decrease 1 st on every 3rd and 4th row alternately

Should you prefer to work in the round instead of back and forth, you may of course adjust the pattern. You’ll need to add steeks mid-front (usually 5 stitches), and follow the instructions. When you would normally turn and work from the wrong side, simply work across the steek and continue in the round. At the end you’ll cut the piece open, pick up stitches to work bands, and cover the cut edges.

See DROPS video: How to knit steeks and cut open

Should you prefer to work back and forth instead of in the round, you may of course adjust the pattern so you work the pieces separately and then assemble them at the end. Divide the stitches for the body in 2, add 1 edge stitch in each side (for sewing) and work the front and back pieces separately.

See DROPS lesson: Can I adapt a pattern for circular needles into straight needles?

Pattern repeats can vary slightly in the different sizes, in order to get the correct proportions. If you’re not working the exact same size as the garment in the photo, yours might deviate slightly. This has been carefully developed and adjusted so that the complete impression of the garment is the same in all sizes.

Make sure to follow instructions and diagrams for your size!

If you have found a pattern you like which is available in women’s size it’s not very difficult to convert it to men’s size. The biggest difference will be the length of sleeves and body. Start working on the women size that you think would fit across the chest. The additional length will be worked right before you cast off for the armhole/sleeve cap. If the pattern is worked top-down you can add the length right after the armhole or before the first decrease on sleeve.

Regarding additional yarn amount, this will depend on how much length you add, but it is better with a skein too many than too few.

All yarns will have excess fibres (from production) that might come off as lint or shedding. Brushed yarns (ie hairier yarns) have more of these loose, excess fibres, causing more shedding.

Shedding also depends on what is worn under or over the garment, and whether this pulls at the yarn fibres. It’s therefore not possible to guarantee that there will be no shedding

Below are some tips on how to get the best result when working with hairier yarns:

1. When the garment is finished (before you wash it) shake it vigorously so the looser hairs come off. NOTE: do NOT use a lint roller, brush or any method that pulls at the yarn.

2. Place the garment in a plastic bag and put it in your freezer - the temperature will cause the fibres to become less attached to each other, and excess fibres will come off easier.

3. Leave in the freezer for a few hours before taking it out and shaking it again.

4. Wash the garment according to the instructions on the yarn label.

Pilling is a natural process that happens to even the most exclusive of fibers. It's a natural sign of wear and tear that is hard to avoid, and that is most visible in high friction areas of your garment like a sweater's arms and cuffs.

You can make your garment look as new by removing the pilling, using a fabric comb or a pill/lint remover.

Still can't find the answer you need? Then scroll down and leave your question so one of our experts can try to help you. This will be done normally within 5 to 10 working days.
In the meantime, you can read the questions and answers that others have left to this pattern or join the DROPS Workshop on Facebook to get help from fellow knitters/crocheters!

You might also like...

Post a comment to pattern DROPS 151-4

We would love to hear what you have to say about this pattern!

If you want to leave a question, please make sure you select the correct category in the form below, to speed up the answering process. Required fields are marked *.

Comments / Questions (71)

country flag Edith wrote:

Les explications ne correspondent pas au modele la bordure devant est faite en cotes et pas au point mousse

08.02.2023 - 21:23

DROPS Design answered:

Bonjour Edith, dans ce modèle, on tricote bien les 12 mailles de bordure des devants au point mousse, et on va augmenter ce nombre de mailles point mousse pour former le col, et pour former le retombé du col châle, on tricote des rangs raccourcis sur les mailles du col (à la fin des devants). Bon tricot!

09.02.2023 - 10:25

country flag Xxx wrote:

Les explications ne correspondent pas au modéle

08.02.2023 - 21:17

country flag Sophia wrote:

In right front piece I don't understand this part: when piece measures 53 cm work 1st of front piece into band no of sts in garter ston band inc and no of sts in pattern on front piece dec (total no of sts is the same) repeat every cm . And then say when piece measures 56cm after all inc there are 66 sts on needle. I don't understand because I have 63 st on neendle and with all inc it will be more sts . In the pattern don't say anything about where I dec sts. Thank you.happy new year

02.01.2021 - 20:28

DROPS Design answered:

Dear Sophia, in size L you have 61 sts on needle and increase a total of 6 sts (= 2 stitches 3 times in total in the garter stitch sections) = 67 sts, then you decrease 1 st on the side when piece meaesures 56 cm= 66 sts remain. At the same time, when piece measures 53 cm, increase the number of sts worked in garter stitch, work 1more sticth in garter stitch this means 1 stitch less in pattern(number of sts keeps constant). Hope it helps, happy knitting!

04.01.2021 - 15:56

country flag Renée Lamonde wrote:

Bonjour, Je suis à faire le devant droit. Je ne comprend pas où faire les diminutions. Je n'arrive pas à faire coïncider les côtes et le motif comme le modèle. Merci!

15.02.2019 - 18:44

DROPS Design answered:

Bonjour Mme Lamonde, pouvez-vous indiquer la taille que vous faites pour vérifier? Merci!

18.02.2019 - 08:32

country flag PLAUT wrote:

Bonjour, J'aimerais connaitre le nombre de pelotes à commander pour la taille L s'il vous plait ? Je ne trouve pas l'information. Merci

07.01.2019 - 05:14

DROPS Design answered:

Bonjour Mme Plaut, vous trouverez la quantité totale requise pour chaque taille dans l'en-tête du modèle, soit en taille L: 400 g DROPS Alpaca/50 g la pelote = 8 pelotes DROPS Alpaca + 175 g DROPS Kid-Silk / 25 g la pelote = 7 pelotes DROPS Kid-Silk. Bon tricot!

07.01.2019 - 12:08

country flag Natasja De Jong wrote:

Ik heb dit vest gebreid en ben er best lang bezig mee geweest. Het resultaat was schitterend. Echter na zo\'n 10x dragen beginnen onder de armen de draden nu al heel erg dun te worden. Dat vind ik wel heel erg zonde van al dat dure garen en het werk. Ik heb exact het garen uit het patroon gebruikt. Test u uw patronen niet op stevigheid? Dit heeft me behoorlijk wat geld gekost zo voor een vest wat ik nu slechts 10x gedragen heb! Kunt u mij tips geven?

20.12.2018 - 00:43

DROPS Design answered:

Dag Natasja,

Alpaca is helaas iets kwetsbaarder dan gewone wol. Probeer het in ieder geval net te vaak te wassen (Je kunt het ook buiten hangen, om te luchten) en voorzichtig te wassen. Bij klachten over de wol, kun je het beste naar de winkel gaan waar je de wol hebt gekocht.

01.01.2019 - 20:49

country flag Gina Jarvis wrote:

There is no size in inches or otherwise for me to decipher what size to make???

24.08.2017 - 18:32

DROPS Design answered:

Dear Mrs Jarvis, all measurements in chart are in cm - convert into inches here. Happy knitting!

28.08.2017 - 13:04

country flag DÁNIEL REUSS wrote:

Nagyon tetszik nekem a kardigán. Hogyan tudnám megvenni , ha meg szeretném venni ?

18.07.2017 - 21:05

DROPS Design answered:

Kedves Dániel, ezt a kardigánt készen nem tudja megvenni. Viszont az ingyenesen elérhető minta, leírás alapján a kardigán elkészíthető. Üdvözlettel.

23.07.2017 - 21:55

country flag Kirsten Asmussen wrote:

Hej! Kan jeg strikke cardiganen med garn fra garngruppe C?

23.09.2016 - 14:37

DROPS Design answered:

Hej Kirsten. Ja, du kan sagtens erstatte 2 traade fra gruppe A med 1 traad fra gruppe C. Husk at strikke en pröve saa du ved din strikkefasthed er i orden.

27.09.2016 - 16:13

country flag Lardiere wrote:

Je m étonné de la largeur des devants 80 mailles par rapport au dos 108 mailles n y ayrait il pas une erreur. Merci de votre rapide réponse por faire les devants

27.04.2015 - 18:15

DROPS Design answered:

Bonjour Mme Lardiere, tout est bien correct, en taille XL, on monte bien 108 m pour le dos (= 94 m après les côtes, au 1er rang point fantaisie), et 80 m pour le devant (73 m après les côtes, au 1er rang point fantaisie, y compris les 12 m de bordure devant). Bon tricot!

28.04.2015 - 09:36