
Popular categories
Looking for a yarn?


Comments / Questions (15)
![]() Galina SPINU wrote:
Galina SPINU wrote:
J'ai tricoter le petit manteau chaque partie à part : Les pans devant Les pans dos Les hauts devant Le haut dos, Ça demande plus de travail d'assemblage Mais la tenue à la fin... IMPECCABLE Voulez vous bien m'aider pour savoir quelle quantité il me faudrait pour une taille d\'adulte 46-48 ???Merci beaucoup
29.12.2021 - 15:46
![]() Galina SPINU wrote:
Galina SPINU wrote:
Je l'ai fait et c'est une joie que j'ai eu en retour Maintenant j'aimerais le faire pour moi mais je me demande quelle quantité je vais avoir besoin ... Pouvez vous m'aider ? Pour une taille 46/48 ?
29.12.2021 - 15:34DROPS Design answered:
Bonjour Mme Spinu, nous ne sommes malheureusement pas en mesure de pouvoir adapter chacun de nos modèles à chaque demande - retrouvez ici tous nos modèles de longues vestes, n'hésitez pas à ajouter des filtres en fonction de vos souhaits & envies. Merci pour votre compréhension. Bon tricot!
03.01.2022 - 09:42
![]() Galla wrote:
Galla wrote:
Bonnes fêtes à tous ! Un nom ? Bien sûr ! Chaperon Rouge ! 😊
29.12.2021 - 15:31
![]() Galla wrote:
Galla wrote:
Bonnes fêtes à tous ! Un nom ? Bien sûr ! Chaperon Rouge ! 😊
29.12.2021 - 15:30
![]() Karina wrote:
Karina wrote:
Hallo, würde gerne den roten Kinder Mantel nachstricken Drops Children 9-18. Anstelle von Pelizza (dass es nicht mehr gibt)... welche Alternative...als passendes Garn kann ich wählen, sodass auch der Mantel dann so fällt, wie am Foto ?? Danke
13.01.2020 - 11:00DROPS Design answered:
Liebe Karina, für dieses Modell schlagen wir DROPS Brushed Alpaca Silk vor, um Pelliza zu ersetzen. Gerne bekommen Sie weitere Idee/Hilfe von Ihrem DROPS Laden - auch telefonisch oder per E-Mail. Viel Spaß beim stricken!
13.01.2020 - 11:31
![]() Magda wrote:
Magda wrote:
Dobry wieczór. Czy do zrobienia kołnierza mogę urzyć włóczki brushed alpaka czy musi jednak być Pelliza? Jeśli to musi być Pelliza to czy macie ją w sprzedaży?
20.05.2019 - 23:18DROPS Design answered:
Witaj Magdo, oczywiście chodzi o włóczkę DROPS Brushed Alpaca Silk, już poprawiam we wzorze. Pozdrawiamy i miłej pracy nad robótką!
21.05.2019 - 21:10
![]() Dirk wrote:
Dirk wrote:
Kann es sein, das in der Beschreibung ein Fehler unterlaufen ist? Nach 25cm soll man für die Armlöcher abketten. Weiter unten kommt dann nochmal, diesmal nach 36cm für Armlöcher abketten.
01.04.2019 - 20:25DROPS Design answered:
Lieber Dirk, stimmt, deutsche Anleitung wird korrigiert, nach 19-22-25 (27-30-33) cm soll man das erste Knopfloch arbeiten - nich die Armlöcher. Viel Spaß beim stricken!
02.04.2019 - 09:58
![]() SYLVAINE wrote:
SYLVAINE wrote:
Bonjour, j’ai acheté « pelotes pour faire le manteau en 2 ans comme indiqué dans les quantités et j’ai termine la premiere pelote au bout d’une dizaine de cm du bas . Il me seùmble que les quantites sont sous estimees. C’est assez ennuyeux car cela genere une nouvelle commande et des frais de port sans compter le risque de ne pas avaoir le m^me bain . combien de pelotes pour le 2 ans ???
27.02.2019 - 08:47DROPS Design answered:
Bonjour Sylvaine, en 2 ans, il faut 125 grammes en Brushed Alpaca Silk, soit 5 pelotes de 25 grammes, sur la base d'un échantillon de 24 m x 48 rangs = 10 x 10 cm. Bon tricot!
27.02.2019 - 09:15
![]() Mamina wrote:
Mamina wrote:
Bonjour ,puis je avoir les explications de ce modèle avec les aiguilles droites ? comment faire pour que les questions et les réponses soient en francais ? ça m'aiderait pour le tricot Merci
03.12.2018 - 08:17DROPS Design answered:
Bonjour Mamina, ce modèle se tricote en allers et retours sur aiguille circulaire pour avoir suffisamment de place pour y loger toutes les mailles - plus d'infos sur les aiguilles circulaires ici. Vous pouvez utiliser un traducteur en ligne pour lire les questions/réponses/commentaires. Vous pouvez également poser votre question ici. Bon tricot!
03.12.2018 - 10:43
![]() Claire-Chantal COUTU wrote:
Claire-Chantal COUTU wrote:
Les explications de ce modèles sont fausses dès qu'il s'agit de tricoter le haut des devants, après les diminutions des manches. j'ai dû traduire le modèle en anglais pour terminer mon tricot.
26.01.2017 - 13:33DROPS Design answered:
Bonjour Mme Coutu, les explications du devant gauche ont été corrigées, merci. Bon tricot!
26.01.2017 - 15:58
|
|
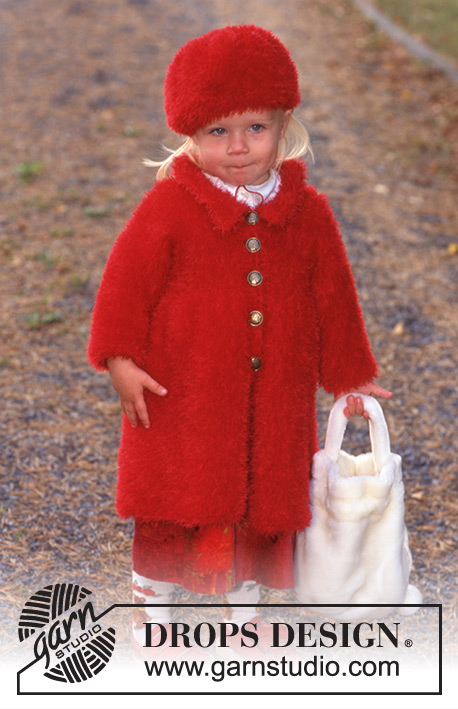
Little Lady in Red#littleladyinredcoat |
|
 |
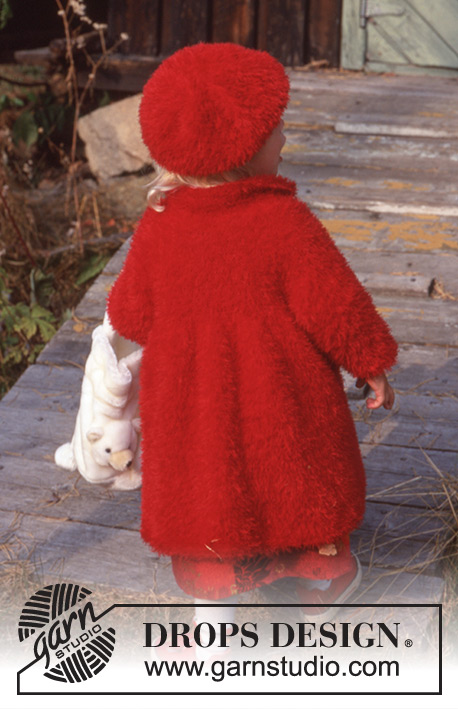 |
Cape and hat in "Brushed Alpaca Silk"
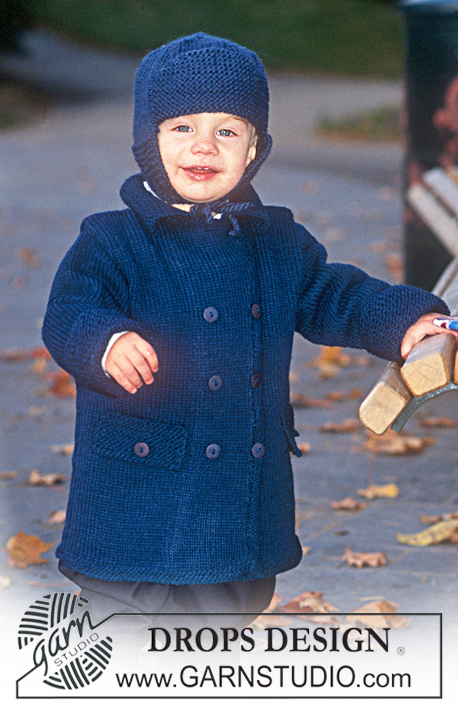
DROPS Children 9-18 |
|
|
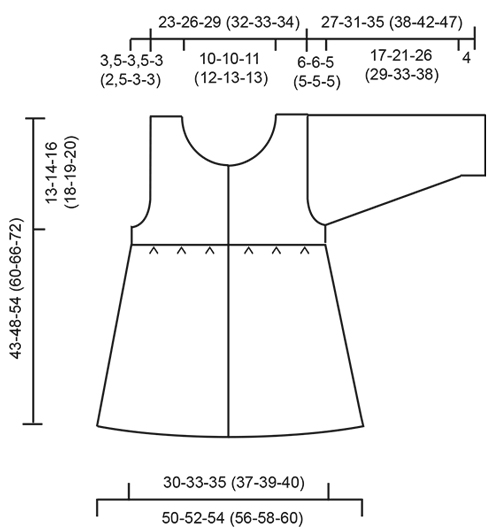
Garter st (back and forth): knit all rows. Garter st (circular needle): 1st row: P. 2nd row: K. Buttonhole: 1 buttonhole = cast off the middle of the 5 front band sts on right front band and make a yo over the cast off st on return row. Cast off for buttonhole when piece measures: 19-22-25 (27-30-33) cm, 25-28-32 (34-38-41) cm, 30-34-38 (41-45-49) cm, 34-39-43 (47-52-57) cm and 38-43-48 (54-59-65) cm. Back and front pieces: Knitted back and forth on circular needle from mid front. Cast on 250-262-268 (280-286-298) sts (incl 5 front band sts each side towards mid front) on needle size 3 mm with Brushed Alpaca Silk. Knit garter st. Remember the knitting tension! At the same time, when piece measures 19-22-25 (27-30-33) cm cast off for button hole – see explanation above. When piece measures 29-32-36 (40-44-48) cm dec 96-100-86 (90-92-96) sts evenly on row as follows – from RS: The 2 smaller sizes: garter st 5 front band sts, * K1, K2 tog, K2 tog*, repeat from *-*, and finish with 5 front band sts in garter st = 154-162 st. The 4 larger sizes: 5 front band sts in garter st, * K1, K2 tog *, repeat from *-* and finish with 5 front band sts in garter st = 182 (190-198-202) sts. Continue until piece measures 30-34-38 (42-47-52) cm, now cast off for armhole as follows: Knit 38-40-45 (47-49-50) sts = front piece, cast off 6 sts for armhole, knit 66-70-80 (84-88-90) sts = back, cast off 6 sts for armhole, knit 38-40-45 (47-49-50) sts = front piece. Finish each piece separately. Left front piece: = 38-40-45 (47-49-50) sts. Cast off for armhole every 2nd row: 2 sts 2-1-2 (1-1-1) times, 1 st 1-2-1 (2-2-2) times = 33-36-40 (43-45-46) sts. When piece measures 39-44-49 (55-60-66) cm cast off 10-10-11 (12-13-13) sts towards mid front for neck and dec to shape the neckline on every other row: 2 sts 2 times, 1 st 3 times = 16-19-22 (24-25-26) sts left on shoulder. Cast off when piece measures 43-48-54 (60-66-72) cm. Right front piece: Knit as left piece – remember buttonholes up along front band. Back: = 66-70-80 (84-88-90) sts. Cast off for armhole as described for front piece = 56-62-70 (76-80-82) sts. Continue until piece measures 42-47-53 (59-65-71) cm, now cast off the middle 20-20-22 (24-26-26) sts for neck and cast of 2 sts on next row at neckline = 16-19-22 (24-25-26) sts left on each shoulder. Cast off when piece measures 43-48-54 (60-66-72) cm. Sleeve: Cast on 40-42-46 (48-50-52) sts (incl 1 edge st each side) on needle size 3 mm in Alpaca Silk. Knit garter st. At the same time, when piece measures 4 cm inc 1st each side: 10-11-14 (18-19-20) times on every 1,5.-2.-2. (1,5.-1,5.-2.) cm = 60-64-74 (84-88-92) st. When piece measures 21-25-30 (33-37-42) cm cast off for sleeve cap each side on every other row: 4 sts 0-1-1 (2-2-3) times, 3 sts 1-1-2 (2-2-1) times, 2 sts 7-6-2 (0-0-0) times, 3 sts 1-1-2 (2-1-1) times, 4 sts 0-0-1 (2-3-3) times. Cast of remaining sts when piece measures approx 27-31-35 (38-42-47) cm. Asssembly: Sew shoulder seams. Gather approx 60-80 sts round neck on needle size 3 mm with Brushed Alpaca Silk. Knit garter st, after 4 rows garter sts inc 1 st each side mid front on every other row until collar measures 6-6-6 (7-7-7) cm, cast off. Sew sleeve seams within 1 edge st. Set in sleeves and sew on buttons. ------------------------------------------------------------------------------ HAT Size, years: 1- 2- 3/4- (5/6- 7/8- 9/10) Circumference of hat: 48-48-50 (50-50-52) cm. Knitting tension: 24 sts x 32 rows on needle size 3 mm and stocking st = 10 x 10 cm. Cast on 8 sts with Brushed Alpaca Silk on double pointed needle size 3 mm and distribute sts on 4 needles (knit with 5th needle). – Remember the knitting tension. Inc as follows: 1st round: K into back of sts. 2nd round: Inc 1 st in each st = 16 st. 3rd and all odd rounds: K 4th round: inc 1 st in every other st = 24 sts. 6th round: inc 1 st in every 3rd sts = 32 sts. 8th round: inc 1 st in every 4th sts = 40 sts. 10th round: inc 1 st in every 5th sts = 48 sts. 12th round: inc 1 st in every 6th sts = 56 sts. 14th round: inc 1 st in every 7th sts = 64 sts. 16th round: inc 1 st in every 8th sts = 72 sts. 18th round: inc 1 st in every 9th sts = 80 sts. 20th round: inc 1 st in every 10th sts = 88 sts. Continue inc in this fashion (in every 11th, 12 th, 13 th sts etc) until there are 144-144-152 (152-152-160) sts on needle, piece now measure approx 11-11-11,5 (11,5-11,5-12) cm from the middle. Insert marking thread and measure from this point onwards. Continue in stocking st without inc for 5-5,5-5,5 (5,5-6-6) cm and then dec 28-28-32 (32-32-36) sts evenly on round = 116-116-120 (120-120-124) sts. Knit 3 cm garter st, cast off. Use the hat inside out. |
|
 |
|
Have you finished this pattern?Tag your pictures with #dropspattern #littleladyinredcoat or submit them to the #dropsfan gallery. Do you need help with this pattern?You'll find 24 tutorial videos, a Comments/Questions area and more by visiting the pattern on garnstudio.com. © 1982-2026 DROPS Design A/S. We reserve all rights. This document, including all its sub-sections, has copyrights. Read more about what you can do with our patterns at the bottom of each pattern on our site. |
|


With over 40 years in knitting and crochet design, DROPS Design offers one of the most extensive collections of free patterns on the internet - translated to 17 languages. As of today we count 325 catalogues and 12298 patterns translated into English (UK/cm).
We work hard to bring you the best knitting and crochet have to offer, inspiration and advice as well as great quality yarns at incredible prices! Would you like to use our patterns for other than personal use? You can read what you are allowed to do in the Copyright text at the bottom of all our patterns. Happy crafting!
Post a comment to pattern DROPS Children 9-18
We would love to hear what you have to say about this pattern!
If you want to leave a question, please make sure you select the correct category in the form below, to speed up the answering process. Required fields are marked *.