DROPS Cotton Viscose
54% Cotton, 46% Viscose
Discontinued
find alternatives
DROPS Glitter
DROPS Glitter
60% Cupro, 40% Metal
from 1.75 £ /10g
DROPS Super Sale

Golden Roses

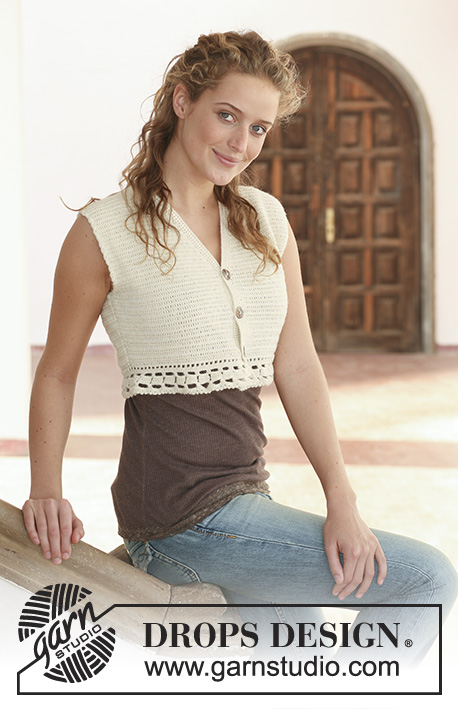
Crochet DROPS bolero in ”Cotton Viscose” with flower border round the opening. Size S - XXXL.

DROPS 111-25
Size: S - M - L - XL - XXL - XXXL

Materials: DROPS COTTON VISCOSE from Garnstudio
250-250-300-300-350-400 g colour no 17, beige
And use: DROPS GLITTER from Garnstudio
1 spool for all sizes colour no 01, gold – for flowers.

DROPS CROCHET HOOK size 3 mm – or size needed to get the width of 4.5 large ch-loops x the height of 5 large ch-loops = 10 x 10 cm when piece is placed flat. 1 flower = diameter approx 4.5 cm.

-------------------------------------------------------

Alternative Yarn – See how to change yarns here
Yarn Groups A to F – Use the same pattern and change the yarn here
Yarn usage using an alternative yarn – Use our yarn converter here

-------------------------------------------------------

DROPS Cotton Viscose
54% Cotton, 46% Viscose
Discontinued
find alternatives
DROPS Glitter
DROPS Glitter
60% Cupro, 40% Metal
from 1.75 £ /10g

DROPS Super Sale

SAVE 30% on 6 cotton favourites!
Valid until 12.04.2024

Pattern instructions

NOTE: This pattern is written in British English. All measurements in charts are in cm. For conversion from cm to inches - click here. There are different terms for crocheting in British and American English. If this pattern includes crochet, click for "crochet terms" here. For this pattern in American English, please click here.
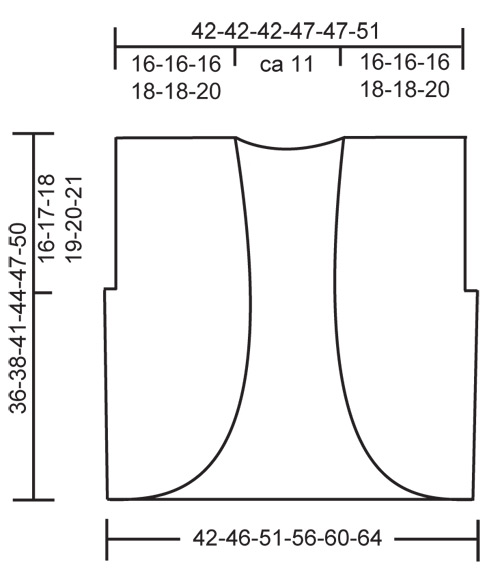
BOLERO: Work 105-115-125-135-145-155 ch with crochet hook size 3 mm and Cotton Viscose.
ROW 1: 1 dc in 15th ch from hook, and continue as follows: *7 ch, skip 4 ch, 1 dc in next ch *, repeat from *-* = 19-21-23-25-27-29 ch-loops on row, turn piece.
ROW 2: 14 ch, 1 dc in the middle of the 7 ch in first ch-loop from previous row, 3 ch, 1 dc in the same ch, * 7 ch, 1 dc in the middle ch in next ch-loop, 3 ch, 1 dc in the same ch *, repeat from *-*, and finish with: 7 ch, 1 dc in 3rd ch in the last ch-loop, 3 ch, 1 dc in the same ch, 7 ch and 1 dc in 8th ch in the last ch-loop, turn piece.
ROW 3: 14 ch, 1 dc in the middle ch in first large loop from previous row, 3 ch, 1 dc in the same ch, * 7 ch, 1 dc in the middle ch in next large ch-loop (skip the small ch-loop), 3 ch, 1 dc in the same ch *, repeat from *-*, and finish with: 7 ch, 1 dc in 3rd ch in last large ch-loop, 3 ch, 1 dc in the same ch, 7 ch and 1 dc in 8th ch in last large ch-loop, turn piece.

Repeat row 3, i.e. inc 1 loop on every row, until there are 35-39-43-47-51-55 large ch-loops on row, finish the last row as follows: 1 dc + 3 ch + 1 dc in 4th ch in last ch-loop, turn piece. The inc are now complete.
Continue as follows: Beg each row with 7 ch instead of 14, then 1 dc + 3 ch + 1 dc in the middle st in the first large ch-loop from previous row, continue across the row as before and finish with 1 dc + 3 ch + 1 dc in 4th ch in last ch-loop, turn piece.
AT THE SAME TIME when piece measures 20-21-23-25-27-29 cm divide for armholes – see below!

RIGHT FRONT PIECE: Crochet on the first 7-7-7-8-8-9 large ch-loops, turn piece after 1 dc + 3 ch + 1 dc in the last of these 7-7-7-8-8-9 ch-loops, turn with 7 ch and work return row. Continue on remaining ch-loops as before until piece measures 16-17-18-19-20-21 cm from where piece was divided, cut the thread but leave approx 200 cm to crochet tog the shoulders afterwards.

LEFT FRONT PIECE: Crochet on the first 7-7-7-8-8-9 large ch-loops the other side and continue as described for right front piece.

BACK PIECE: Crochet on the middle 19-19-19-21-21-23 large ch-loops, each armhole = 1-3-5-5-7-7 large loops. Continue until piece measures 16-17-18-19-20-21 cm from where piece was divided – make sure to have the same number of ch-loops on back piece as on front piece.

ASSEMBLY: Crochet shoulders tog as follows: Work sl sts to the middle of the first large ch-loop on front piece, 4 ch, 1 dc in the middle of the first large ch-loop on back piece, 4 ch, 1 dc in the next large loop on front piece, 4 ch, 1 dc in the next large loop on back piece, etc.
Crochet a row of dc with Cotton Viscose round the opening of the bolero as follows: approx 4 dc in each of the large ch-loops and 1 dc in each of the small ch-loops, and work 6 dc in the increases on front pieces – make sure the row is elastic. Crochet in the same way round armholes.

FLOWER:
Work 4 ch with crochet hook size 3 mm and 1 thread Cotton Viscose + 2 threads Glitter and form a ring with 1 sl st in first ch.
ROUND 1: 6 dc in ring, finish with 1 sl st in first dc.
ROUND 2: 4 ch, * 1 dc in next dc, 3 ch *, repeat from *-* a total of 5 times, finish with 1 sl st in 2nd ch from beg of round (= 6 ch-loops).
ROUND 3: Crochet as follows in each ch-loop: 1 dc, 3 tr, 1 dc, finish with 1 sl st in first dc (= 6 leaves).
ROUND 4: Fold leaves towards you and crochet in the back of these as follows: 1 dc round first dc from round 2, 5 ch, * 1 dc round next dc from round 2, 5 ch *, repeat from *-*, and finish with 1 sl st in first dc from beg of round (= 6 ch-loops).
ROUND 5: Crochet as follows in each ch-loop: 1 dc, 5 tr, 1 dc, finish with 1 sl st in first dc (= 6 leaves), cut the thread and leave approx 20 cm – used to sew tog flowers afterwards.
Make approx 29-31-35-37-39-41 flowers, and sew them tog, leaf to leaf, to a long row. Now sew the row to bolero, beg mid back. Place the centre of flower on the row of dc and sew the centre of flower to the dc row, repeat for the other flowers down along one front piece, and along bottom edge to mid back. Beg mid back at neckline again and continue to mid back at bottom edge. If you need more/less flowers, adjust this before sewing tog the flowers mid back at bottom edge.

This pattern has been corrected.

Updated online: 19.05.2009
Repeat row 3, i.e. inc 1 loop on every row, until there are 35-39-43-47-51-55 large ch-loops on row.
Updated online: 15.10.2009
ROW 1: 1 dc in 15th ch from hook, and continue as follows: *7 ch, skip 4 ch, 1 dc in next ch *, repeat from *-* = 19-21-23-25-27-29 ch-loops on row, turn piece.

Diagram

diagram measurements
Do you have a question? See a list of frequently asked questions (FAQ)

Knitting tension is what determines the final measurements of your work, and is usually measured per 10 x 10 cm. It is provided like so: number of stitches in width x number of rows in height - eg: 19 stitches x 26 rows = 10 x 10 cm.

The knitting tension is very individual; some people knit/crochet loosely while others work tightly. You adjust the knitting tension with the needle size, which is why the suggested needle size is only meant as a guide! You need to adjust this (up or down) to ensure that YOUR knitting tension matches the knitting tension provided in the pattern. If you work with a different knitting tension than provided you will have a different yarn consumption, and your work will have different measurements than what the pattern suggests.

The knitting tension also determines which yarns can replace each other. As long as you achieve the same knitting tension you can replace one yarn with another.

See DROPS lesson: How to measure your tension/gauge

See DROPS video: How to make a gauge tension swatch

The required amount of yarn is provided in grams, eg: 450 g. To calculate how many balls you’ll need you first need to know how many grams are in 1 ball (25g, 50g or 100g). This information is available if you click on the individual yarn quality on our pages. Divide the amount required with the amount of each ball. For example, if each ball is 50g (the most common amount), the calculation will be as follows: 450 / 50 = 9 balls.

The important thing when changing from one yarn to another is that the knitting/crochet tension remains the same. This is so that the measurements of the finished piece will be the same as on the sketch provided. It is easier to achieve the same knitting tension using yarns from the same yarn group. It is also possible to work with multiple strands of a thinner yarn to achieve the knitting tension of a thicker one. Please try our yarn converter. We recommend you to always work a test swatch.

Please NOTE: when changing yarn the garment might have a different look and feel to the garment in the photo, due to individual properties and qualities of each yarn.

See DROPS lesson: Can I use a different yarn than the one mentioned in the pattern?

All our yarns are categorised into yarn groups (from A to F) according to thickness and knitting tension – group A contains the thinnest yarns and group F the thickest. This makes it easier for you to find alternative yarns to our patterns, should you wish to switch yarn. All yarns within the same group have a similar knitting tension and can easily replace each other. However, different yarn qualities have different structures and properties which will give the finished work a unique look and feel.

Click here for an overview of the yarns in each yarn group

At the top of all our patterns you’ll find a link to our yarn calculator, which is a helpful tool should you wish to use a different yarn than suggested. By filling in the yarn quality you wish to replace, the amount (in your size) and number of strands, the calculator will present good alternative yarns with the same knitting tension. Additionally it will tell you how much you’ll require in the new qualities and whether you’ll need to work with multiple strands. Most skeins are 50g (some are 25g or 100g).

If the pattern is worked with multiple colours, every colour will have to be calculated separately. Similarly, if the pattern is worked with several strands of different yarns (for example 1 strand Alpaca and 1 strand Kid-Silk) you will have to find alternatives for each, individually.

Click here to see our yarn calculator

Since different yarns have different qualities and textures we have chosen to keep the original yarn in our patterns. However, you can easily find options among our available qualities by using our yarn calculator, or simply pick a yarn from the same yarn group.

It is possible that some retailers still have discontinued yarns in stock, or that someone has a few skeins at home that they would like to find patterns for.

The yarn calculator will provide both alternative yarn as well as required amount in the new quality.

If you think it's hard to decide what size to make, it can be a good idea to measure a garment you own already and like the size of. Then you can pick the size by comparing those measures with the ones available in the pattern's size chart.

You'll find the size chart at the bottom of the pattern.

See DROPS lesson: How to read size chart

The needle size provided in the pattern serves only as a guide, the important thing is to follow the knitting tension. And since knitting tension is very individual, you will have to adjust the needle size to ensure that YOUR tension is the same as in the pattern – maybe you’ll have to adjust 1, or even 2 needle sizes, up or down to achieve the correct tension. For this, we recommend that you work test swatches.

Should you work with a different knitting tension than the one provided, the measurements of the finished garment might deviate from the measurement sketch.

See DROPS lesson: How to measure your tension/gauge

See DROPS video: How to make a tension/gauge swatch

Working a garment top-down provides more flexibility and room for personal adjustment. For example it is easier to try the garment on while working, as well as making adjustments to length of yoke and shoulder caps.

The instructions are carefully explaining every step, in the correct order. Diagrams are adjusted to the knitting direction and are worked as usual.

The diagram depicts all rows/rounds, and every stitch seen from the right side. It is read from bottom to top, from right to left. 1 square = 1 stitch.

When working back and forth, every other row is worked from the right side and every other row is worked from the wrong side. When working from the wrong side, the diagram will have to be worked reversed: from left to right, knit stitches are purled, purl stitches are knit etc.

When working in the round every round is worked from the right side and the diagram are worked from right to left on all rounds.

See DROPS lesson: How to read knitting diagrams

The diagram depicts all rows/rounds, and every stitch seen from the right side. It is worked from bottom to top, from right to left.

When working back and forth every other row is worked from the right side: from right to left and every other row is worked from the wrong side: from left to right.

When working in the round, every row in the diagram are worked from the right side, from right to left.

When working a circular diagram you start in the middle and work your way outwards, counter clockwise, row by row.

The rows usually start with a given number of chain stitches (equivalent to the height of the following stitch), this will either be depicted in the diagram or explained in the pattern.

See DROPS lesson: How to read crochet diagrams

Instructions for working several diagrams after each other on the same row/round, will often be written like so: “work A.1, A.2, A.3 a total of 0-0-2-3-4 times". This means you work A.1 once, then A.2 is worked once, and A.3 is repeated (in width) the number of times provided for your size – in this case like so: S = 0 times, M = 0 times, L=2 times, XL= 3 times and XXL = 4 times.

The diagrams are worked as usual: begin with the first row in A.1, then work the first row in A.2 etc.

See DROPS lesson: How to read knitting diagrams

See DROPS lesson: How to read crochet diagrams

The total width of the garment (from wrist-to-wrist) will be larger in the larger sizes, despite the actual sleeves being shorter. The larger sizes have longer sleeve caps and wider shoulders, so there will be a good fit in all sizes.

The measurement sketch/schematic drawing provides information regarding the full length of the garment. If it’s a jumper or a jacket the length is measured from the highest point on the shoulder closest to the neckline, and straight down to the bottom of the garment. It is NOT measured from the tip of shoulder. Similarly, the length of yoke is measured from the highest point on the shoulder and down to where yoke is split into body and sleeves.

On a jacket measures are never taken along bands, unless specifically stated. Always measure inside band stitches when measuring the length.

See DROPS lesson: How to read a schematic drawing

Diagrams are often repeated on the round or in height. 1 repeat is the diagram the way it appears in the pattern. If it says to work 5 repeats of A.1 in the round, then you work A.1 a total of 5 times after/next to each other in the round. If it says to work 2 repeats of A.1 vertically/in height you work the entire diagram once, then begin again at the start and work the entire diagram one more time.

Chain stitches are slightly narrower than other stitches and to avoid working the cast-on edge too tight, we simply chain more stitches to begin with. The stitch count will be adjusted on the following row to fit the pattern and measurement sketch.

The rib edge is more elastic and will contract slightly compared to, for example, stocking stitch. By increasing before the rib edge, you avoid a visible difference in width between the rib edge and the rest of the body.

It’s very easy to cast off too tightly, and by making yarn overs while casting off (and simultaneously casting these off) you avoid a too tight cast off edge.

See DROPS video: How to bind off with yarn overs (yo)

To achieve an even increase (or decrease) you can increase on, for example: every 3rd and 4th row alternately, like so: work 2 rows and increase on the 3rd row, work 3 rows and increase on the 4th. Repeat this until the increase is complete.

See DROPS lesson: Increase or decrease 1 st on every 3rd and 4th row alternately

Should you prefer to work in the round instead of back and forth, you may of course adjust the pattern. You’ll need to add steeks mid-front (usually 5 stitches), and follow the instructions. When you would normally turn and work from the wrong side, simply work across the steek and continue in the round. At the end you’ll cut the piece open, pick up stitches to work bands, and cover the cut edges.

See DROPS video: How to knit steeks and cut open

Should you prefer to work back and forth instead of in the round, you may of course adjust the pattern so you work the pieces separately and then assemble them at the end. Divide the stitches for the body in 2, add 1 edge stitch in each side (for sewing) and work the front and back pieces separately.

See DROPS lesson: Can I adapt a pattern for circular needles into straight needles?

Pattern repeats can vary slightly in the different sizes, in order to get the correct proportions. If you’re not working the exact same size as the garment in the photo, yours might deviate slightly. This has been carefully developed and adjusted so that the complete impression of the garment is the same in all sizes.

Make sure to follow instructions and diagrams for your size!

If you have found a pattern you like which is available in women’s size it’s not very difficult to convert it to men’s size. The biggest difference will be the length of sleeves and body. Start working on the women size that you think would fit across the chest. The additional length will be worked right before you cast off for the armhole/sleeve cap. If the pattern is worked top-down you can add the length right after the armhole or before the first decrease on sleeve.

Regarding additional yarn amount, this will depend on how much length you add, but it is better with a skein too many than too few.

All yarns will have excess fibres (from production) that might come off as lint or shedding. Brushed yarns (ie hairier yarns) have more of these loose, excess fibres, causing more shedding.

Shedding also depends on what is worn under or over the garment, and whether this pulls at the yarn fibres. It’s therefore not possible to guarantee that there will be no shedding

Below are some tips on how to get the best result when working with hairier yarns:

1. When the garment is finished (before you wash it) shake it vigorously so the looser hairs come off. NOTE: do NOT use a lint roller, brush or any method that pulls at the yarn.

2. Place the garment in a plastic bag and put it in your freezer - the temperature will cause the fibres to become less attached to each other, and excess fibres will come off easier.

3. Leave in the freezer for a few hours before taking it out and shaking it again.

4. Wash the garment according to the instructions on the yarn label.

Pilling is a natural process that happens to even the most exclusive of fibers. It's a natural sign of wear and tear that is hard to avoid, and that is most visible in high friction areas of your garment like a sweater's arms and cuffs.

You can make your garment look as new by removing the pilling, using a fabric comb or a pill/lint remover.

Still can't find the answer you need? Then scroll down and leave your question so one of our experts can try to help you. This will be done normally within 5 to 10 working days.
In the meantime, you can read the questions and answers that others have left to this pattern or join the DROPS Workshop on Facebook to get help from fellow knitters/crocheters!

You might also like...

Post a comment to pattern DROPS 111-25

We would love to hear what you have to say about this pattern!

If you want to leave a question, please make sure you select the correct category in the form below, to speed up the answering process. Required fields are marked *.

Comments / Questions (154)

country flag Marie wrote:

Jag tycker liksom många andra här att det blir förvirrande när axlarna ska virkas ihop. Det tog ett tag för mig att förstå vad som var uppe och nere på koftan. Dessutom blir ju ärmhålen betydligt större än de fem luftmaskbågar som jag hela arbetet trott skulle utgöra ärmhålen, eftersom axlarna virkas ihop en bra bit ovanför dessa, om jag nu fattat rätt…

14.06.2022 - 00:36

country flag Cynthia wrote:

I would like support on how to put the flowers together

09.10.2021 - 11:08

DROPS Design answered:

Dear Cynthia, for the flower read through the description and pay attention to which rows should be crocheted from underneath the previous row. Afterwards,, you should stitch them together, in the outer loop of th efinal row. Happy Stitching!

09.10.2021 - 18:49

country flag Nicole Guay wrote:

In the American English version of the pattern, the instructions after round 5 of the flower say to "Place the centre of flower on the row of dc...". I'm confused about this because I can't find where in the pattern it told me to do a row of dc. Is it supposed to be instead that it's attached to the row of sc that was done during the assembly section?

26.09.2021 - 19:13

DROPS Design answered:

Dear Nicole, you should place the flovers at the edge of the bolero, on the row of sc-s (sc is dc in British English, it is easy to mix them up). Happy Stitching!

27.09.2021 - 03:31

country flag Vandana wrote:

How many rows to make wd front piece .. 21 cm equal to 7 large loop?nd we r making lengthwise n.. means rows shows length?

18.03.2020 - 20:57

country flag Vandana wrote:

Hi I made till 39 large loop but after I m not getting front peace.. plz help

18.03.2020 - 04:23

DROPS Design answered:

Dear Vandana, when piece measures 21 cm (in 2nd size) you will now divide piece finishing each piece separately, ie work right front piece over the firts 7 large ch-loops at the beg of the row. You will work later the left front piece over the first 7 large -ch-space on the other side of the row. And then work the back piece over the middle 19 ch-loops (there will be 3 large ch-loops between each front piece and back piece for armhole). Happy crocheting!

18.03.2020 - 08:52

country flag Susan wrote:

I was having trouble figuring out how to assemble the shoulders but after I set the pattern down for a day and looked at it again with fresh eyes, it was easy; very pretty too. Thank you Drops for such a great pattern.

12.06.2019 - 05:13

country flag Susan wrote:

I’ve come to the assembly and have a question about crocheting the shoulders together; not sure where to begin the slip stitches and how many per large loop. Do you start and the shoulder and work inward toward the neckline?

10.06.2019 - 07:02

DROPS Design answered:

Dear Susan, start with a sl st in the middle of 1st ch-space on front piece, then 4 ch, 1 sc in the 1st ch-space on back piece, 4 ch, 1 sc in 2nd ch-space on front piece, and so on until you have crocheted all ch-spaces on front piece (starting from armhole towards neck). Happy crocheting!

11.06.2019 - 11:42

country flag Inge wrote:

Welke van deze garens past best om samen te haken samen met de klos goud glitter : 1/ Flora beige mix 07 of 2/Safran beige unicolor 21 of 3/Nord lichtbeige mix 07 of 4/ Baby alpaca silk naturel unicolour 100 Of 5/ baby merino beige mix 17 of lichtbeige mix 23? De bolero moet gelijkaardig van kleur en dikte zijn. En graag de hoeveelheid die ik nodig heb.

01.03.2019 - 13:43

DROPS Design answered:

Dag Inge,

Als je Cotton Viscose vervangt met Safran, kun je ongeveer dezelfe hoeveelheid aanhouden. Qua materiaaleigenschappen komt Safran ook het meest in de buurt. Waarschijnlijk is beige 21 een geschikte kleur, maar om er zeker van te zijn, kun je dit het beste even in de winkel bekijken. We doen ons best om de kleuren zo goed mogelijk weer te geven, maar dit kan per beeldscherm verschillend zijn en afwijken van de werkelijke kleur. Dit geldt ook voor de kleur van het kledingstuk op de foto.

05.03.2019 - 21:07

country flag Ingrid wrote:

Wat is het beste alternatief voor de cotton viscose nr 17 beige ? want dit bestaat niet meer

28.02.2019 - 11:26

country flag Teresa wrote:

This is a very confusing pattern, can you please put a complete diagram or video on website? It does not make finishing this pattern easy. Please clarify the split, not repeating what is in the pattern but rather explain it please.

30.04.2018 - 22:49

DROPS Design answered:

Dear Teresa, we are unfortunately not able to adjust every pattern to each individual request. For any individual assistance with this pattern please contact your DROPS store - even per mail or telephone. Happy crocheting!

02.05.2018 - 09:39