
Popular categories
Looking for a yarn?


Comments / Questions (237)
![]() Lotta wrote:
Lotta wrote:
Äh glöm min fråga, repar upp & använder ett för mig mer begripligt mönster.
27.11.2025 - 17:23
![]() Lotta wrote:
Lotta wrote:
Hej igen! Storlek XL/XXL totalt antal maskor 124 st och märktråden sitter på maska 73. Just nu är stickningen bananformad, maska 73 sitter närmare innercirkeln och fattar att det är från den jag ska mäta. Men hur ska jag mäta, mot vad? Ska fortsätta med att minska med 8 maskor för första gången. Vi hörs!
25.11.2025 - 16:04DROPS Design answered:
Hei Lotta. Da har vi "glemt" ditt spørsmål og ønsker deg lykke til på ditt neste prosjekt :) mvh DROPS Design
01.12.2025 - 11:27
![]() Lotta wrote:
Lotta wrote:
Begriper inte hur jag ska mäta från märktråden för ärmhål!? Skickar gärna en bild men det går ju inte i detta formulär. Kontakta gärna mig via e-post. Tack på förhand!
24.11.2025 - 18:29DROPS Design answered:
Hej Lotta, skriv hvilken størrelse du strikker. Skriv hvor mange masker og cm du har og skriv den sætning du ikke forstår, så skal vi prøve at hjælpe dig her :)
25.11.2025 - 13:58
![]() Lisa wrote:
Lisa wrote:
Hi, Just trying to clarify; on the second row, do I leave 2 stitches on needle and turn, work 14 stitches then turn and work 16 stitches? Then repeat row 1 and do I leave 4 stitches unworked or just 2 again?
11.11.2025 - 19:16
![]() Lisa wrote:
Lisa wrote:
Pattern instructions far too difficult. I love the jacket and I love a challenge but this? What happened to row 1 all the way through to last row with specific instructions such as ask or dec or s1k1. Etc? I give up😞
27.07.2025 - 20:09
![]() Lisa wrote:
Lisa wrote:
So, am I leaving the the uncorked stitches on the needle or just not knitting them?
27.07.2025 - 19:38DROPS Design answered:
Dear Lisa, work the first 2 rows over all 112 stitches. In the 3rd row work only over the first 16 sts of the row. Now, start working the next row over all stitches but turn when you have worked 110 stitches. Work the next row back over all stitches, but turn when you have worked 108; so you work 2 less stitches on each side. Repeat rows 3 and 4 exactly as before. Continue working 2 less stitches on each side on the "long" rows 9 more times, then 4 less stitches 9 times and 8 less stitches 5 times. The stitches are simply left unworked until we "start at the beginning" the short rows technique. Happy knitting!
27.07.2025 - 20:36
![]() Lisa wrote:
Lisa wrote:
Where do I start the pattern? At the top of page or where it says circle? Also, what does it mean under the short row section to start again from beginning over all stitches? How many sections is this piece? I’m reading cast on 112 sts. Twice and under short row section start over from beginning? So, cast on another 112sts?
27.07.2025 - 19:06DROPS Design answered:
Dear Lisa, yes, the written instructions start at "Circle"; all of the instructions above are tips for when you are crochetting. In the short rows you work by turning the piece (but not decreasing) in order to get the correct circle shape. After reaching the remaining 18-16-20-20 outermost sts of circle, you will now work over all stitches again (not the pattern from the beginning); they were not decreased, just left behind. You work a single circle: you cast on 112 stitches, over which you will work the chart and short rows. Then you work the armholes, and continue working the other half-circle on the other side. Then you work the sleeves. Happy knitting!
27.07.2025 - 19:25
![]() Lisa wrote:
Lisa wrote:
Is there a row by row instruction for this pattern (ie, row 1, row 2 etc)? I find this really confusing
27.07.2025 - 15:44DROPS Design answered:
Dear Lisa, this is the only version of the pattern available, with both charts and written instructions. If you have any doubts as you read and work the pattern you can write us a comment here and we will try to answer all of your questions as clearly as possible. Happy knitting!
27.07.2025 - 18:59
![]() Patricia Alexandra Caruso Reis wrote:
Patricia Alexandra Caruso Reis wrote:
Caros, os diagramas M1 já não estão nítidos. Existe alguma nova versão desses diagramas que possam ser melhor vistos? Está tudo opaco, talvez pelo tempo. Grata
07.06.2024 - 03:36DROPS Design answered:
Bom dia, Vamos comunicar à equipa de web design. Obrigado!
07.06.2024 - 09:17
![]() Iris wrote:
Iris wrote:
Hello! I wanted to confirm something about the pattern. You have written that the first armhole should be started when the piece measures 37cm from the 63rd stitch of the first row to the 63rd stitch on the needle following the curve (on the smallest size). Is this right? It seems like 37cm is very long. What's the circumference of the piece following the 63rd stitch around? I'm knitting this for my sister as a graduation present so I want to make sure I have it right! Thank you!
20.07.2023 - 16:53DROPS Design answered:
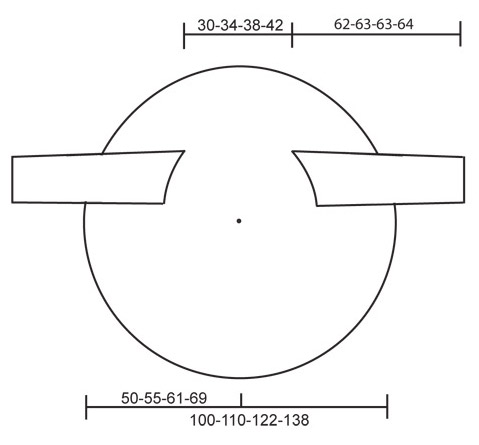
Dear Iris, the radius of the circumference is indicated in the pattern measurements: 50 cm. The diameter would approx. be 100cm. The width between the armholes (width of the back) would be 30 cm. 37 cm would be between the cast-on edge at the bottom of the piece up to the beginning of the armhole (so it would be 37 cm in the curve perimeter of the circle). So the total perimeter would be: 70 cm on half a circle and 70 cm on the other half. Happy knitting!
23.07.2023 - 19:06
|
||||||||||||||||
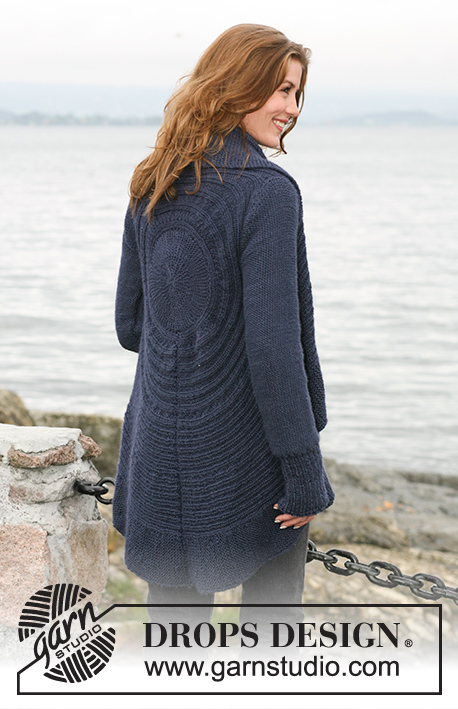
Blue Moon |
||||||||||||||||
 |
 |
|||||||||||||||
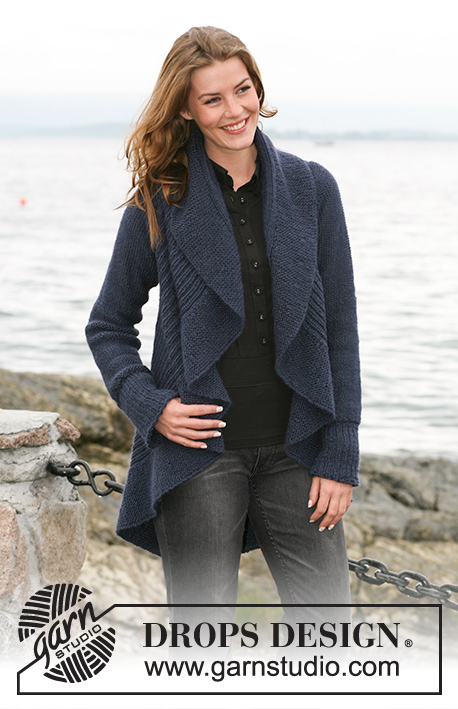
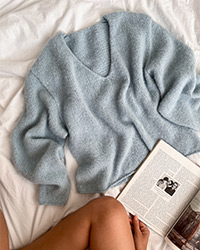
Knitted circular jacket in DROPS Silke Alpaca or DROPS Air, with texture pattern Size: S – XXXL
DROPS 102-6 |
||||||||||||||||
|
Knitting tension: 17 sts x 22 rows stocking sts = 10 x 10 cm Pattern: See diagram M.1. Diagrams are seen from RS. NOTE: Each size has own diagram. Short rows: Work short rows to ensure circular shape of piece, as follows: 1st / 2nd row: Knit 102-112-124-140 sts, turn piece and knit back. 3rd / 4th row: Knit back and forth over 18-16-20-20 first sts on row (these sts = outermost on circle) – read knitting tip 1 below. Repeat 1st to 4th rows, but reduce stitch number by 2 sts on every 1st/2nd row before turning piece – repeat this 10-10-12-12 times in total, then reduce sts number knitted by 4 sts before piece is turned – repeat this 6-9-8-12 times in total and from this point reduce sts number by 8 sts before piece is turned – repeat 5-5-6-6 times in total. Remaining are 18-16-20-20 outermost sts of circle. Start again from beginning over all sts. – read Knitting tip 2 below. Knitting tip 1: When turning piece slip the first st as if to knit and tighten yarn before continuing knitting. This is done to avoid holes when turning. This does not applies to innermost 20-20-24-24 sts of circle – when piece is turned knit all sts as normal. Knitting tip 2: On row where all sts are knit, P 20-20-24-24 innermost sts in circle (seen from RS). Then continue as before with chart M.1. Measuring tip: All measurements on circle are done with piece lying flat. Do not measure across! Measurements follow curve to 63rd - 69th -73rd - 81st sts. Circle: Knit piece back and forth on needle to make room for all sts. Cast on 102-112-124-140 sts on circular needle size 4.5 mm with Silke Alpaca or Air. Insert 1 marking thread or stitch marker after 63-69-73-81 sts, make all measurements from this point. Knit chart M.1 (see diagram for your size) from right to left (i.e. from outside towards inside on circle) 1st row = RS. At the same time as chart M.1 knit Short rows – see explanation above – to make circular shape. When piece measures 37-40-49-57 cm from marking thread or stitch marker – read measuring tip – knit armholes. Armhole: Slip outermost 63-69-73-81 sts onto an extra needle size 4.5 mm (circular needle to make room for all sts). Continuing, cast off next 2 sts (= armhole). Insert 1 marking thread or stitch marker between 2 cast off sts. Leave remaining sts on needle. Continuing, knit 2 parts (sts before and after armhole) separately, but knit them at the same time on separate needles with separate balls of yarn. This is done so the short rows are correct on both sides of armhole. Continue with pattern and short rows as earlier. When armhole measures 18-21-23-25 cm cast on 2 new sts over armhole(i.e. between the 2 parts). Continuing, slip all sts onto one needle again = 102-112-124-140 sts. Insert 1 marking thread or stitch marker after 63-69-73-81 sts. Continuing, measure piece from this point. Now knit chart M.1 and short rows on all sts. Continue like this until piece measures approx 15-17-19-21 cm, this should be a ½ circle. Continue until piece measures approx 30-34-38-42 cm from marking thread – read measuring tip. Now make armholes in same way. When all sts are back on one needle again insert 1 marking thread or stitch marker after 63-69-73-81 sts. Continue measuring from here. Continue with M.1 and short rows until piece measures approx 37-40-49-57 cm from marking thread or stitch markers (adjust to 1 whole pattern repeat with short rows). Cast off loosely. Sleeve: Knit piece back and forth on circular needles. Cast on 56-59-65-68 sts (incl 1 front edge sts on each side) on needles size 4.5 mm with Silke Alpaca or Air. P1 row from WS. Continue with Rib K2/P1 and 1 edge sts on each side. When Rib measures 13-13-14-14 cm K 1 row from WS at the same time dec 10-11-13-14 sts evenly = 46-48-52-54 sts. Continue in stocking sts with WS out until complete measurement. When piece measures 16 cm inc 1 sts on each side on every 9 -4.5 -3.5 -3 cm 5-9-11-13 times in total = 56-66-74-80 sts. When piece measures 56 cm cast off top shape sleeve top on each side on every other row: 4 sts 1-2-2-2 times. Continuing, cast off 2 sts on each side until piece measures approx 61-62-62-63 cm. Then cast off 4 sts 1 time on each side. Piece measures approx 62-63-63-64 cm. Cast off remaining sts. Assembly: Sew circle tog in outermost edge of cast on sts and cast off edge. Sew in sleeves so seams under sleeve meet at middle of marking thread or stitch marker placed at bottom of armhole and middle of sleeve top meet marking thread or stitch marker placed on top of armhole. Sew sleeve seams. |
||||||||||||||||
Diagram explanations |
||||||||||||||||
|
||||||||||||||||
 |
||||||||||||||||
 |
||||||||||||||||
Have you finished this pattern?Tag your pictures with #dropspattern or submit them to the #dropsfan gallery. Do you need help with this pattern?You'll find 15 tutorial videos, a Comments/Questions area and more by visiting the pattern on garnstudio.com. © 1982-2026 DROPS Design A/S. We reserve all rights. This document, including all its sub-sections, has copyrights. Read more about what you can do with our patterns at the bottom of each pattern on our site. |
||||||||||||||||

With over 40 years in knitting and crochet design, DROPS Design offers one of the most extensive collections of free patterns on the internet - translated to 17 languages. As of today we count 320 catalogues and 12110 patterns translated into English (UK/cm).
We work hard to bring you the best knitting and crochet have to offer, inspiration and advice as well as great quality yarns at incredible prices! Would you like to use our patterns for other than personal use? You can read what you are allowed to do in the Copyright text at the bottom of all our patterns. Happy crafting!
Post a comment to pattern DROPS 102-6
We would love to hear what you have to say about this pattern!
If you want to leave a question, please make sure you select the correct category in the form below, to speed up the answering process. Required fields are marked *.