
Popular categories
Looking for a yarn?


Comments / Questions (16)
![]() Françoise wrote:
Françoise wrote:
Bonsoir, J'aimerai réaliser cet ouvrage. Est-ce que l'utilisation d'aiguilles circulaires est obligatoires ou puis-je utiliser des aiguilles droites ? Merci de votre retour
04.01.2025 - 20:04DROPS Design answered:
Bonjour Françoise, ce modèle se tricote en différentes pièces assemblées entre elles à la fin, on utilise des aiguilles circulaires pour avoir suffisamment de place pour y loger toutes les mailles, vous pouvez donc utiliser des aiguilles droites, vos mailles seront juste plus serrées. Retrouvez plus d'infos sur les aiguilles circulaires ici. Bon tricot!
06.01.2025 - 09:21
![]() Inger Englund wrote:
Inger Englund wrote:
Detta svaret hade jag inte tänkt mig känner mig lurad av ett mönster som inte fungerar. Hur kan ni ha ett mönster som är till xxxs när det ska vara till en large. Har köpt garn till detta känner mig väldigt besviken. 😢 😞
29.04.2024 - 16:07
![]() Inger Englund wrote:
Inger Englund wrote:
Hej! Jag ska sticka mönster W-014 medium-large ska lägga upp 72 maskor med det blir en tröja i extra smal. Den ser ju stor ut på bilden. Vad gör jag nu🥴🤔 MVH/ Inger Englund
27.04.2024 - 17:52DROPS Design answered:
Hei Inger. Dette er en retro oppskrift (fra -80 tallet). Her var designet gjerne med en smal / trang vrangbord og en mye større hoveddel. I denne oppskriften legger man opp 72 masker i str. M/L (kun forstykket) på pinne 2,5 og når vrangborden er ferdig strikket bytter man til pinne 4 og strikker patent (patent blir veldig tøyelig). Sjekk strikkefastheten og blir den fulgt skal du ha de målene du ser på målskissen. mvh DROPS Design
29.04.2024 - 10:34
![]() Inger Englund wrote:
Inger Englund wrote:
Jag tänkte sticka drops W—014 försöker beställa garn natuvit uni color 17 det verkar som att jag inte kan beställ detta.\\r\\nMVH/ Inger
07.04.2024 - 20:58DROPS Design answered:
Hej Inger, når du klikker på beställ - Paris uni colour - kommer du in på LindeHobby. Här är det bara att välja färg i DROPS Paris som du lægger i varukorgen :)
09.04.2024 - 11:12
![]() Maaike Bandstra wrote:
Maaike Bandstra wrote:
Hallo Ik had 14 bolletjes van 50mgram .700 gram zoals vermeld. Maar dat is te weinig ,dus nu bij bestellen extra verzendkosten. Wees alles en doe maar 800 gram
03.04.2024 - 09:55
![]() Franka Van Oorschot wrote:
Franka Van Oorschot wrote:
In vervolg op mijn vraag (zie boven), dikkere naalden gebruiken is geen optie, want dan wordt het werk te grof! Alvast bedankt !
16.11.2022 - 09:37
![]() Franka Van Oorschot wrote:
Franka Van Oorschot wrote:
Bij het garen wat ik gebruik (drops Paris cotton) voor het patroon Drops 6-4, kom ik bij de proef lapjes in de breedte steeds 2,5 cm (is 5 a 6 steken) tekort. Hoe los ik dat op? Kan dat door naar verhouding meer steken op te zetten, of klopt het patroon dan niet meer? Ik wil overigens de halve patentsteek gebruiken i.p.v. de Engelse….
15.11.2022 - 11:21DROPS Design answered:
Dag Franka,
Je kan ook een grotere naald gebruiken. Het belangrijkst is dat de stekenverhouding in de breedte klopt. In de hoogte kun je namelijk de centimeters aanhouden.
16.11.2022 - 16:38
![]() Rosanna wrote:
Rosanna wrote:
Per quando riguardo la manica del maglione modello Paris Drops 6-4 non sono riuscita a fare 13 volte gli aumenti per parte ai lati della manica bensì 11 volte perché sono arrivata prima che le maglie erano 68 altrimenti continuando a 13 volte sarebbero aumentate adesso non mi è chiaro come intrecciare alla fine se devono rimanere solo 6 maglie centrali sto avendo un sacco di difficoltà su questo modello sperando di concluderlo al più presto
18.10.2022 - 00:49DROPS Design answered:
Buonasera Rosanna, partendo da 42 maglie e aumentando 1 maglia per lato 13 volte per un totale di 26 maglie aumentate si arriva a 68 maglie. Alla fine della manica deve proseguire sulle 6 maglie indicate. Buon lavoro!
18.10.2022 - 08:02
![]() Rosanna wrote:
Rosanna wrote:
Per quando riguarda la manica non mi è chiaro dopo aver eseguitoil bordo a coste 1/ 1 per 7 cm fare 14 aumenti al primo ferro a coste inglesi ( come fare gli aumenti ? )se esiste un video grazie!
10.10.2022 - 23:16DROPS Design answered:
Buonasera Rosanna, non ci sono indicazioni particolari per questi aumenti. Buon lavoro!
13.10.2022 - 22:42
![]() Rosanna wrote:
Rosanna wrote:
Nella parte CONFEZIONE come svolgere il punto "Alli stesso tempo intrecciare le maglie al centro davanti su ogni ferro: lavorare fino alle 3 maglie centrali - lavorare a diritto le maglie centrali. Trasferire le maglie centrali su un ferro ausiliario e lavorare la prima e la terza maglia insieme a diritto. Accavallare le maglie centrali sulle 2 maglie lavorate insieme. Intrecciare dopo 13 giri - circa 5 cm".
28.09.2022 - 11:21DROPS Design answered:
Buonasera Rosanna, abbiamo leggermente modificato il testo per renderlo più comprensibile: in quel punto deve proseguire intrecciando la maglia centrale come indicato. Buon lavoro!
01.10.2022 - 22:22
|
|
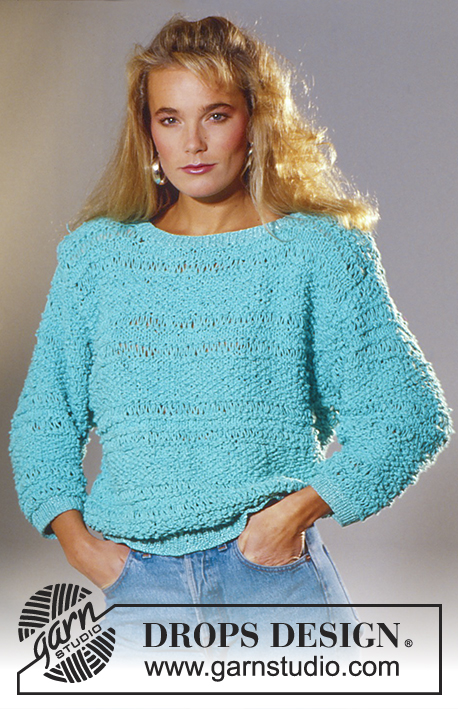
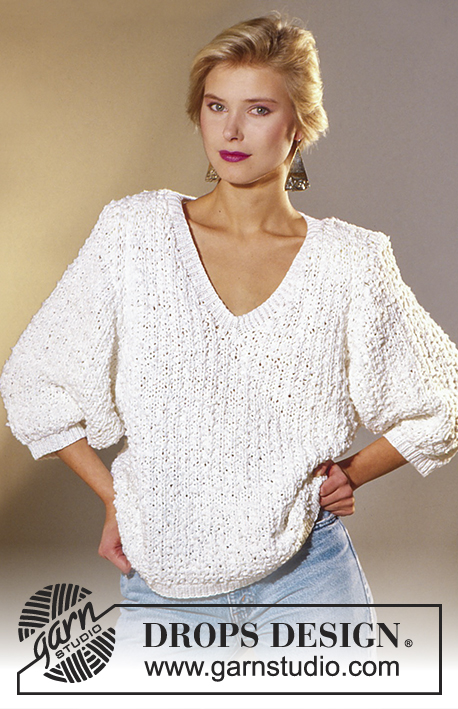
Paris Peach Sweater#parispeachsweater |
|
|
|
|
Knitted sweater in English rib with v-neck knitted in DROPS Paris or DROPS Air
DROPS 6-4 |
|
|
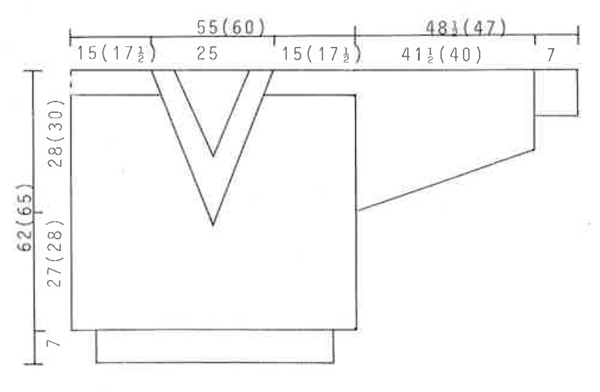
Knitting tension: 12 sts x 36 rows on needle size 4 mm English rib = 10 x 10 cm 16 sts x 20 rows on needle size 2.5 mm and purl border 1/1 = 10 x 10 cm Rib: * K1 into back of sts, P1*, *-* English rib: 1. row: 1 edge st * K1, yo, slip 1 sts as if to knit*, *-*, 1 edge st. 2. row: 1 edge st * K yo and slipped sts tog, yo, slip 1 st as if to purl *-*, 1 edge st. 3. row: 1 edge st * K yo and slipped sts tog, yo, slip 1 st as if to knit * *-*, 1 edge st. Continuing, repeat 2nd and 3rd rows. Front piece: Cast on 66(72) sts on needle size 2.5 mm. Knit 7 cm rib 1/1. Change to needle size 4 mm and English rib. Knit until piece measures 28(31) cm. Cast off 2 middle sts for v-neck and then 1 sts 12 times on every 8 rows on each side to shape neckline = 20(23) sts shoulder. Cast off when piece measures 57 (60) cm Back piece: Knit like front piece without cast off for v-neck. Knit until piece measures 60(60) cm and cast off middle 22 sts for neck, then 2 sts 1 time and 1 st 2 times on every other row on each side of neckline = 18(21) sts shoulder, cast off when piece measures 62(65) cm. Sleeves: Cast on 28 sts on needle size 2.5 mm and knit 7 cm rib 1/1. Change to needle size 4 mm and English rib. Inc 1 sts evenly on entire row = 42 sts on 1st row. Then inc 1 st on inside of 1st edge st on each side 13(15) times every 11(9) rows = 68(72) sts. When sleeve measures 48.5(47) cm cast off 28(30) sts towards front piece, knit 6 sts, cast off 34(36) sts towards back piece. Continue over 6 sts for row, measurement 15(17,5) cm, cast off from edge on WS 1 sts 6 times on each row. Assembly: Leave front and back piece flat shoulder to shoulder. Lie sleeve flat and sew on 5 cm wide border onto front and back pieces, ensure the seam is even! Sew side and sleeve seams. Pick up approx 160 sts on needle size 2.5 mm evenly around neckline - 60 sts on each side of v-neck and 40sts around back of neck. Knit 13 rows (approx 5 cm) rib -K1 into back of sts, P1. At the same time cast off mid front as follows on each row: Knit until middle 3 sts – K middle sts. Slip middle sts onto cable needle and K 1st and 3rd tog. Pass middle sts over 2 sts knit tog. Cast off after 13 rounds – approx 5 cm. |
|
 |
|
Have you finished this pattern?Tag your pictures with #dropspattern #parispeachsweater or submit them to the #dropsfan gallery. Do you need help with this pattern?You'll find 13 tutorial videos, a Comments/Questions area and more by visiting the pattern on garnstudio.com. © 1982-2026 DROPS Design A/S. We reserve all rights. This document, including all its sub-sections, has copyrights. Read more about what you can do with our patterns at the bottom of each pattern on our site. |


With over 40 years in knitting and crochet design, DROPS Design offers one of the most extensive collections of free patterns on the internet - translated to 17 languages. As of today we count 324 catalogues and 12285 patterns translated into English (UK/cm).
We work hard to bring you the best knitting and crochet have to offer, inspiration and advice as well as great quality yarns at incredible prices! Would you like to use our patterns for other than personal use? You can read what you are allowed to do in the Copyright text at the bottom of all our patterns. Happy crafting!
Post a comment to pattern DROPS 6-4
We would love to hear what you have to say about this pattern!
If you want to leave a question, please make sure you select the correct category in the form below, to speed up the answering process. Required fields are marked *.