
Popular categories
Looking for a yarn?


Comments / Questions (19)
![]() Josiane wrote:
Josiane wrote:
Merci beaucoup pour cette super réponse! Par contre, si je fais ce que vous suggérez, il me manquera 2 mailles au total. J'ai 256 mailles. Si j'en enlève 2 pour chaque emmanchure de chaque côté, il m'en restera 252. Toutefois, ils disent que je devrais avoir 254 mailles (127/côté)! De plus, si je regarde le patron, il n'y a pas vraiment d'emmanchures. Donc, je me demande si je dois simplement enlever une maille par côté pour avoir un nombre impair pour faire le col...?
03.08.2023 - 11:59DROPS Design answered:
Bonjour Josiane, oups je suis allée trop loin dans les tailles, effectivement, en taille S/M vous ne diminuez qu'une seule maille: la 1ère maille du devant + la 1ère mailles du dos = il reste 254 mailles soit 127 mailles pour le devant et autant pour le dos. Effectivement, les emmanchures ne sont pas vraiment marquées . Bon tricot!
03.08.2023 - 14:25
![]() Josiane wrote:
Josiane wrote:
Je repose ma question différemment, puisque vous me dites exactement ce qui est écrit!!! Est-ce que je diminue à la maille no1 et 256, ou à la maille 1 et 129? Parce que "de chaque côté" n'est pas une expression que je suis habituée de lire lorsque je tricote de cette façon, et je suis un peu confuse. Merci!
02.08.2023 - 13:11DROPS Design answered:
Bonjour Josiane, vous devez rabattre pour les emmanchures, autrement dit de chaque côté du pull: 1 maille au début du tour, puis tricotez comme avant jusqu'à ce qu'il reste 1 maille du devant, rabattez la dernière maille du devant + la 1ère maille du dos, continuez comme avant jusqu'à la dernière maile du dos que vous allez rabattre - vous avez maintenant rabattu 2 mailles pour les emmanchures (= de chaque côté du pull). Coupez le fil et continuez à tricoter le devant et le dos séparément (attention à bien commencer par un rang sur l'endroit ou sur l'envers en fonction du diagramme pour que les torsades continuent toujours sur l'endroit). Bon tricot!
02.08.2023 - 16:29
![]() Josiane C wrote:
Josiane C wrote:
Bonjour, Je fais le pull, et ils disent: "rabat 1-2-1 m de chaque côté pour les emmanchures ". Ne devrais-je pas en faire un aussi au milieu, pour avoir 2 emmanchures, puisque l'on tricote le dos et le devant ensemble? Merci beaucoup!
26.07.2023 - 00:15DROPS Design answered:
Bonjour Josiane, a 38-44-50 cm de hauteur totale, rabat 1-2-1 m DE CHAQUE COTE pour les emmanchures (2 emmanchures) et terminer le dos et le devant séparément. Depuis ce moment vous allez tricoter le dos et le devant separement en allers et retours. Bon tricot!
26.07.2023 - 08:13
![]() Siri Olsson wrote:
Siri Olsson wrote:
Pannebåndet strikkesfrem og tilbake (rett og veangside) mens mønsterbord M.1 kun viser rettsiden.
15.01.2022 - 16:30
![]() Christine wrote:
Christine wrote:
Je vous remercie, je cherche des gants facile à réaliser. une suggestion ? merci
05.01.2022 - 18:58DROPS Design answered:
Bonjour Christine, consultez nos différents modèles de gants, vous en trouverez de différents types, l'un d'eux vous inspirera peut-être. Bon tricot!
06.01.2022 - 08:06
![]() Christine wrote:
Christine wrote:
Je voudrai faire des gants mais je ne comprends vraiment rien à vos explications. merci de me guider ou me dire quel modèle sera plus facile. Je tricote depuis longtemps mais là ce n'est pas clair. merci
05.01.2022 - 13:31DROPS Design answered:
Bonjour Christine, les gants se tricotent en rond, on va augmenter pour le gousset du pouce puis glisser les mailles du pouce en attente et monter des mailles au-dessus de ces mailles en attente. On continue la main sur quelques rangs/cm et on tricote ensuite chaque doigt séparément en commençant par l'auriculaire. dites-nous précisément ce que nous ne comprenez pas, ce sera ainsi plus simple de vous aider. Bon tricot!
05.01.2022 - 16:58
![]() Kim wrote:
Kim wrote:
Hi I am looking do knit 27-6 pattern in Karisma. The yarn it says is double knit but looking at the picture the wool looks thicker. Please can you confirm?
06.01.2020 - 18:43DROPS Design answered:
Dear Kim, this pattern is worked in DROPS Karisma - and can be worked with any other yarn group B - read more about alternatives here. Happy knitting!
07.01.2020 - 08:14
![]() Jose Bekx wrote:
Jose Bekx wrote:
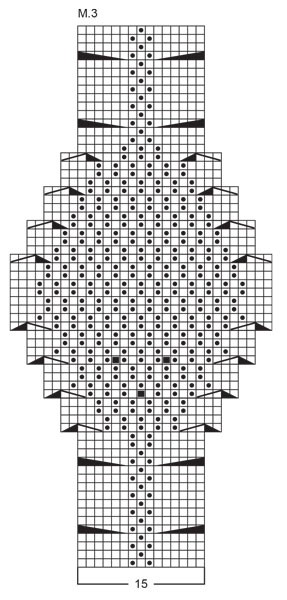
Hallo, volgens mij stat er bij de uitleg van de tekens bij patroon m 3 een verkeerde uitleg . het betreft een teken voor 5 steken , maar er staat een uitleg bij van 4 steken. Er staat zet 2 steek op een kabelnaald en brei twee steek rechts. een van beide moet 3 steken zijn , maar ik weet niet welke .
09.11.2019 - 20:57DROPS Design answered:
Dag Jose,
Dankjewel voor het doorgeven, het is nu aangepast. Veel breiplezier!
15.11.2019 - 15:05
![]() Nadia wrote:
Nadia wrote:
Pour l'étole pardon
15.01.2017 - 15:30
![]() Nadia wrote:
Nadia wrote:
Bonjour Après avoir effectuer le diagramme je ne comprends pas " continuer ainsi jusqu'à 2,3-2,6m"
15.01.2017 - 15:29DROPS Design answered:
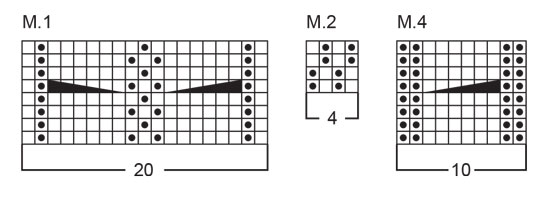
Bonjour Nadia, tricotez les diagrammes ainsi: 3 m au point de riz, M1, 20 m de M2, M3, 20 m de M2, M1, 3m au point de riz - jusqu'à ce que l'ouvrag emesure 2,3 / 2,4 mètres de hauteur totale. Bon tricot!
16.01.2017 - 10:17
|
||||||||||||||||||||||
DROPS 27-6 |
||||||||||||||||||||||
|
|
||||||||||||||||||||||
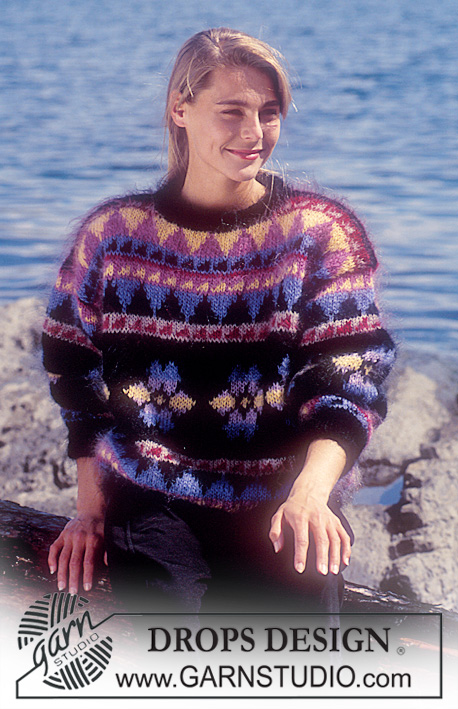
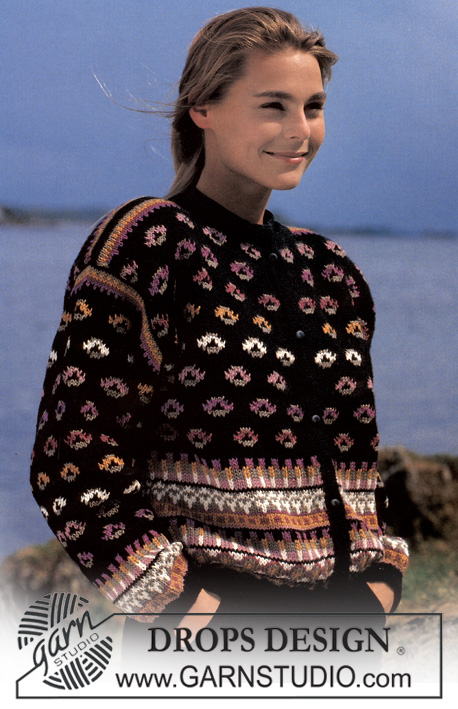
DROPS long sweater, shawl, gloves and head band in Karisma Superwash with moss stitch and cables
DROPS 27-6 |
||||||||||||||||||||||
|
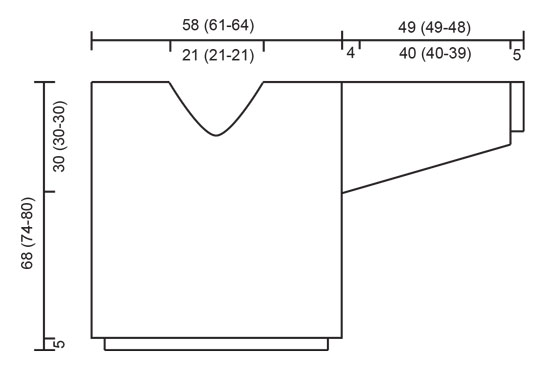
Knitting tension: 22 sts x 28 rows on needle size 4 mm and M.2. = 10 x 10 cm Bobble: Inc to 5 sts in 1 sts, knit 3 rows stocking sts on these, then pass 2nd sts over 1st sts, 3rd sts over 1st sts., 4th sts over 1st sts and 5th sts over 1st sts. Rib: * K1, P1 * Body: Cast on 210 (213-219) sts on circular needle size 2.5 mm and knit 5 rib rounds. Change to circular needle size 4 mm at the same time inc 46 (57-61) sts evenly on 1st row = 256 (270-280) sts. Knit 1st row as follows: * 1 (5-7) sts of M.2, M.4, 19 sts of M.2, M.4, 19 sts of M.2, M.4, 19 sts of M.2, M.4, 19 sts of M.2, M.4, 1 (4-7) sts of M.2 * - Repeat from *-* over back piece. Remember knitting tension. When piece measures 38 (44-50) cm cast off 1 (2-1) sts on each side for armhole and for and complete front and back pieces separately. Front piece: = 127 (133-139) sts. When piece measures 55 (61-67) cm cast off 1 sts mid front and then cast off 1 sts x 23 towards neck to shape neckline alternating on every and every other row . Cast off when piece measures 68 (74-80) cm Back piece: = 127 (133-139) sts. When piece measures 66 (72-78) cm slip middle 43 (43-43) sts onto a thread or stitch holder and then cast off 2 sts towards neck on next row. Cast off when piece measures 68 (74-80) cm. Sleeve: Cast on 48 (48-51) sts on circular needle size 2.5 mm and knit 5 cm rib. Change to circular needle size 4 mm at the same time inc 20 (20-17) sts evenly on 1st row = 68 (68-68) sts. Knit next row as follows (from mid under arm): M.4, 19 sts of M.2, M.4, 19 sts of M.2, M.4. At the same time inc mid under arm 2 sts x 32 (32-32) on every 3rd row = 132 (132-132) sts – knit the inc sts into M.2. When piece measures 45 (45-44) cm cast off 6 sts mid under arm and continuing cast off 6 sts x 5 times on each side on every other row, then cast off - piece measures approx 49 (49-48) cm. Assembly: Sew shoulder seams. Pick up 130 sts around neck on double pointed needles size 2.5 with natural and knit 14 cm rib at the same time cast off 6 sts distributed evenly from the picked up sts from thread or stitch holder on back piece = 124 m – ensure sts mid front is a stocking sts. At the same time as 1st row rib knit one bobble on every 6th sts (in one knit) – ensure one bobble is positioned mid front. Continuing cast off on every 3rd row as follows: slip middle sts onto cable needle to front of piece, knit sts before and sts after and psso mid sts over the 2 sts knit tog – cast off when to completed measurement = 14 cm, cast off. Sew sleeves onto body in outermost sts so seams are not too bulky. ________________________________________ DROPS Shawl, gloves and head band. Materials: DROPS Karisma Superwash from Garnstudio 550 g colour no 019, natural - shawl 100 g colour no 019, natural - gloves 50 g colour no 019, natural – head band _______________________________________ DROPS Shawl: DROPS Needles size 4 mm Knitting tension: 22 sts x 28 rows on needle size 4 mm and M.2. = 10 x 10 cm Bobble: Inc to 5 sts in 1 sts, knit 3 rows stocking sts on these, on 5th row pass 2nd sts over 1st sts, 3rd sts over 1st sts., 4th sts over 1st sts and 5th sts over 1st sts. Moss stitch: 1st row: K1, P1. 2nd row: knit K over P and P over K. Repeat 1st and 2nd rows continuously. Rib: * K1, P1 * Body: Cast on 99 sts on needle size 4 mm with natural and knit 3 rows moss stitch. Next row as follows: 3 sts moss stitch , M.1, 20 sts of M.2, M.3, 20 sts of M.2, M.1, 3 sts moss stitch. Continue in pattern until piece measures 2.3 to 2.4 meters – adjust finish with M.3 as started (- When M.3 get wider knit less sts from M.2 on each side) – complete with 3 rows moss stitch over all sts and cast off. ________________________________________ DROPS Gloves: DROPS double pointed needle size 3 mm. Bobble: Inc to 5 sts in 1 sts, knit 3 rows stocking sts on these, then pass 2nd sts over 1st sts, 3rd sts over 1st sts., 4th sts over 1st sts and 5th sts over 1st sts. Moss stitch: 1.9: K1, P1. 2nd row: knit K over P and P over K. Repeat 1st and 2nd rows continuously. Rib: * K1, P1 * Gloves: Cast on 60 (60) on double pointed needles size 3 mm and knit 2 rounds moss stitch then knit following needle as follows: * 4 sts moss stitch, 1 bobble * then 5 cm moss stitch, then 2 cm rib at the same time cast off 18 (16) sts evenly on 1st row = 42 (44) sts. On last row inc 2 (4) sts evenly on row = 44 (48) sts. Then knit following row as follows: 22 (24) sts moss stitch (=upper hand), 1 sts stocking sts for thumb (insert at marking thread or stitch marker), 21 (23) sts stocking sts (=inside hand)- Measure piece from here! When piece measures 1 cm inc on each side of 1 sts with marking thread or stitch marker for thumb as follows: 1 sts x 5 (6) on every 3rd row = 54 (60) sts – stocking sts the inc sts. Slip middle 11 sts over thumb onto a thread or stitche holder on next row cast on 1 new st over these = 44 (50) sts. Continue until piece measures 10 (11) cm – Now knit fingers as follows: Little finger: Pick up 4 (6) sts moss stitch and 4 (5) sts stocking sts and cast on 1 sts between fingers (stocking sts this sts) = 9 (12) sts. Knit 5 (6) cm then knit sts tog two by two, and then pull double thread through sts. Knit 3 rounds over remaining sts before knitting remaining fingers. Ring finger: Pick up 6 (6) sts moss stitch and 6 (7) sts stocking sts and cast on 1 sts between fingers (stocking sts this sts) = 14 (15) sts. Knit 6 (7) cm then knit sts tog two by two, and then pull double thread through sts. Middle finger: Like Ring finger but knit 7 (8) cm. Index finger: Pick up 6 (6) sts moss stitch and 6 (7) sts stocking sts and cast on in sts towards long finger (knit sts stocking sts) = 13 (14) sts. Knit like Ring finger. Thumb: Pick up 14 (16) sts round thumb (pick up 11 sts from holder and 3 (5) sts in the edge above), and knit 6 (6,5) cm stocking sts, cast off like Ring finger. Sew a small mattress sts between fingers. ________________________________________ DROPS Head band: DROPS needles size 4 mm Head band: Cast on 23 sts on needle size 4 mm and knit 1st row as follows: 2 sts moss stitch, M.1, 2 sts moss stitches. Continue until piece measures approx 54 cm (lightly stretched), cast off. Sew tog with mattress sts. |
||||||||||||||||||||||
Diagram explanations |
||||||||||||||||||||||
|
||||||||||||||||||||||
 |
||||||||||||||||||||||
 |
||||||||||||||||||||||
 |
||||||||||||||||||||||
Have you finished this pattern?Tag your pictures with #dropspattern or submit them to the #dropsfan gallery. Do you need help with this pattern?You'll find 28 tutorial videos, a Comments/Questions area and more by visiting the pattern on garnstudio.com. © 1982-2026 DROPS Design A/S. We reserve all rights. This document, including all its sub-sections, has copyrights. Read more about what you can do with our patterns at the bottom of each pattern on our site. |
||||||||||||||||||||||


With over 40 years in knitting and crochet design, DROPS Design offers one of the most extensive collections of free patterns on the internet - translated to 17 languages. As of today we count 324 catalogues and 12291 patterns translated into English (UK/cm).
We work hard to bring you the best knitting and crochet have to offer, inspiration and advice as well as great quality yarns at incredible prices! Would you like to use our patterns for other than personal use? You can read what you are allowed to do in the Copyright text at the bottom of all our patterns. Happy crafting!
Post a comment to pattern DROPS 27-6
We would love to hear what you have to say about this pattern!
If you want to leave a question, please make sure you select the correct category in the form below, to speed up the answering process. Required fields are marked *.