DROPS Nepal
DROPS Nepal
65% vlna, 35% alpaka
od 68.00 Kč /50g
Přízi na tento model můžete mít už za 952.00Kč.

Cenu za klubka počítáme podle spotřeby při výrobě modelu v nejmenší velikosti a nejlevnější variantě příze. Rádi byste ještě lepší cenu? Třeba ji najdete mezi DROPS Deals!

Jackie

Pletený DROPS svetřík nebo tunika s copánky, ¾ rukávy a velkorysým límcem z příze „Nepal“. Velikost XS – XXXL.

DROPS 131-1
DROPS design: Návod č. NE-050
Skupina přízí: C
-------------------------------------------------------

Velikost: XS/S - M - L/XL - XXL - XXXL

Materiál: DROPS NEPAL firmy Garnstudio
Svetr (jako na fotografii):
700-800-900-1050-1200 g, barva č. 0501m, šedá mix
Tunika (asi o 14 cm delší než svetr):
800-900-1050-1200-1400 g, barva č. 0501m, šedá mix

DROPS KRUHOVÁ JEHLICE č. 7 (40 a 80 cm) - nebo velikosti potřebné k upletení zkušebního vzorku o rozměrech 14 ok x 17 řad lícovým žerzejem = 10 x 10 cm
DROPS KRUHOVÁ JEHLICE č. 5,5 (60 cm) – na límec.
DROPS rohovinový knoflík č. 536: 4 ks.

-------------------------------------------------------

Náhradní příze – Podívejte se, jak změnit přízi
Skupina přízí A až F – Neměňte návod, změňte přízi
Spotřeba příze při použití náhradní příze – Využijte náš převodník

-------------------------------------------------------

DROPS Nepal
DROPS Nepal
65% vlna, 35% alpaka
od 68.00 Kč /50g
Přízi na tento model můžete mít už za 952.00Kč.

Cenu za klubka počítáme podle spotřeby při výrobě modelu v nejmenší velikosti a nejlevnější variantě příze. Rádi byste ještě lepší cenu? Třeba ji najdete mezi DROPS Deals!

DROPS Super Sale

SAVE 30% on 6 cotton favourites!
Platí do 12.04.2024

Návod

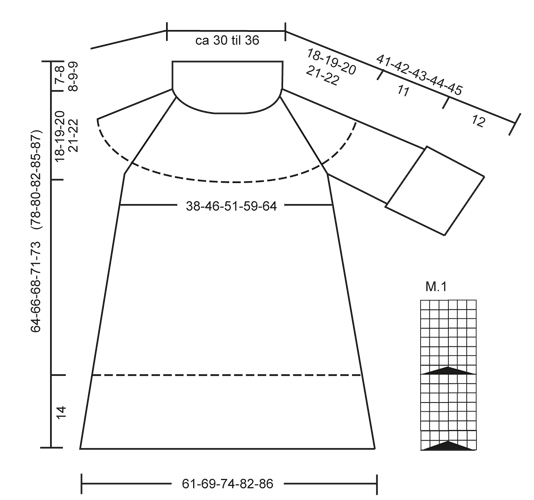
VZOR: viz schéma M. 1 – schéma zobrazuje jedno opakování, na schéma je nahlíženo z lícové strany.
----------------------------------------------------------------------

TĚLO (svetr i tunika):
Pleteme na kruhové jehlici v řadách dokola. POZN.: Údaje před závorkou platí pro svetr, údaje v závorkách platí pro tuniku. V případě, že závorka není, platí údaj jak pro svetr, tak pro tuniku.

Na kruhovou jehlici č. 7 nahodíme přízí Nepal 188-212-224-248-260 ok. 1 řadu pleteme obrace, 1 řadu hladce a 1 řadu obrace. Dvě značky umístíme do bočních švů, tj. mezi značkami je 94-106-112-124-130 ok.
Pokračujeme následovně: * 8-8-11-11-10 ok hladce, 5-6-6-7-8 ok obrace, 5-6-6-7-7 hladce, 5-6-6-7-8 ok obrace, 6 ok hladce, 5-6-6-7-8 ok obrace, 5-6-6-7-7ok hladce, 5-6-6-7-8 ok obrace, 6 ok hladce, 5-6-6-7-8 ok obrace, 6-6-6-7-7 ok hladce, 5-6-6-7-8 ok obrace, 6 ok hladce, 5-6-6-7-8 obrace, 5-6-6-7-7 hladce, 5-6-6-7-8 obrace, 8-8-11-11-10 hladce * ( = přední díl), upletly jsme všechna oka mezi značkami, mezi *-* zopakujeme ještě jednou (= zadní díl).
Ve výšce 5 cm, pleteme nad 6 oky hladce vzorem M. 1 (= 3 krát na předním a 3 krát na zadním díle). SOUČASNĚ ve výšce 13 (16) cm, ujmeme v každém obrace pleteném žebru 1 oko tak, že spleteme 2 oka obrace (= ujmuto 16 ok v řadě). Ve výšce 18 (24 cm), ujmeme jedno oko v každém hladce pleteném žebru tak, že spleteme dvě oka hladce – jedno žebro na každém díle ale vynecháme ( = 4 žebra na předním a 4 žebra na zadním díle) = 8 ok ujmeme v řadě.
Ve výšce 23 (32) cm, ujmeme ve všech obrace pletených žebrech jedno oko tak, že spleteme první dvě oka žaebra obrace (= 16 ok ujmuto).
Ve výšce 28 (40) cm, ujmeme ve všech hladce pletených žebrech jedno oko tak, že spleteme poslední dvě oka zebra hladce – jedno žebro z každé strany vynecháme (= 8 ok ujmuto).
Ve výšce 33 (48) cm, ujmeme ve všech obrace pletených žebrech jedno oko tak, že spleteme poslední dvě oka zebra obrace (= 16 ok ujmuto).
Na jehlici je 124-148-160-184-196 ok.
Pokračujeme do výšky 39-39-40-41-42 (53-53-54-55-56) cm, v následující kruhové řadě uzavřeme pro průramky 6-6-6-8-8 ok (tj. 3-3-3-4-4 oka z každé strany obou značek) = 112-136-148-168-180 ok.
Díl odložíme stranou a pleteme rukávy.

RUKÁV:
Pleteme na krátké kruhové jehlici v řadách dokola.
Na krátkou kruhovou jehlici č. 7 nahodíme přízí Nepal 54-56-58-60-62 ok. 1 řadu pleteme obrace, označíme začátek kruhové řady (= spodní střed rukávu). Pokračujeme následovně: 1-2-3-4-5 ok hladce, * 4 obrace, 3 hladce, 6 obrace, 3 hladce*, mezi *-* opakujeme celkem 3 krát, řadu končíme 4 oky obrace a 1-2-3-4-5 ok hladce Takto pokračujeme, po 1,5 cm vypracujeme 2 knoflíkové dírky: 10-11-12-13-14 ok pleteme vzorem, 2 spleteme obrace, 1x nahodit, 30 ok vzorem, 2 spleteme obrace, 1x nahodit, zbývající oka pleteme vzorem. Dále pleteme do výšky 20 cm. Následně pleteme obráceně, abychom na závěr mohli manžetu otočit: 1-2-3-4-5 obrace, * 4 hladce, 3 obrace, 6 hladce, 3 obrace*, mezi *-* opakujeme celkem 3 krát, řadu končíme 4 oky hladce, 1-2-3-4-5 obrace. Po 6 kruhových řadách pleteme nad 3 žebry pletenými 6 oky hladce vzorem M. 1 (tj. 3 copánky na rukávu). Ve výšce 35 cm – platí pro všechny velikosti, uzavřeme středových 6-6-6-8-8 ok (tj. 3-3-3-4-4 oka kolem značky) – řady přidáme tak, aby vzor navazoval na vzor na těle = 48-50-52-52-54 ok. Oka odložíme a upleteme druhý rukáv.

SEDLO:
Oka rukávů a těla přesuneme na jednu jehlici = 208-236-252-272-288 ok.
DÍL DÁLE MĚŘÍME OD TOHOTO MÍSTA!
Značky umístíme mezi jednotlivé díly (= 4 značky).
PŘED POKRAČOVÁNÍM SI PROSÍM PŘEČTĚTE CELÝ POSTUP!
Nad všemi oky upleteme jednu kruhovou řadu, ve druhé řadě začneme ujímat.
UJÍMÁNÍ NA RUKÁVECH:
Z každé strany rukávů ujmeme 2 krajní oka tak, že spleteme 2 oka buď hladce, nebo obrace, podle vzoru. Ujímání opakujeme v každé druhé kruhové řadě až k límci.
UJÍMÁNÍ NA TĚLE:
PRVNÍ ujímání: po 3 cm: v žebrech na předním a na zadním díle pletených 4. oky hladce, ujmeme jedno oko tak, že spleteme první dvě oka zebra hladce ( = ujmuto 8 ok v řadě).
Upleteme 5 cm jak se jeví, hladce hladce pletená oka, obrace obrace pletená oka, vzor M. 1 nad vzorem M. 1.
DRUHÉ ujímání: v žebrech na předním i zadním díle pletených 8. oky obrace, ujmeme jedno oko tak, že spleteme první dvě oka žebra obrace ( = ujmuto 16 ok v řadě).
Pleteme 5 cm.
TŘETÍ ujímání: v žebrech na předním i zadním díle pletených 4. oky hladce, ujmeme jedno oko tak, že spleteme poslední dvě oka zebra hladce ( = ujmuto 8 ok v řadě).
V TOMTO MÍSTĚ KONČÍ UJÍMÁNÍ PRO VELIKOST XS/S.
Ostatní velikosti pleteme 5 cm.
ČTVRTÉ ujímání (aplikujeme u 4 největších velikostí): v žebrech na předním i zadním díle pletených 8. oky obrace, ujmeme jedno oko tak, že spleteme poslední dvě oka žebra obrace ( = ujmuto 16 ok v řadě).
V TOMTO MÍSTĚ KONČÍ UJÍMÁNÍ PRO OSTATNÍ VELIKOSTI.
Vzorem pokračujeme až do výšky sedla 18-19-20-21-22 cm, zde končí také ujímání na rukávech.
Na jehlici nyní máme mezi 116 – 168 oky. Změníme velikost jehlic na 5,5 a pleteme 1 kruhovou řadu hladce, SOUČASNĚ ujmeme rovnoměrně na 96-104-112-120-120 ok. Upleteme jednu kruhovou řadu obrace. Následuje kruhová řada hladce a SOUČASNĚ rovnoměrně ujmeme 40 ok = 136-144-152-160-160 ok. Pleteme patentem = 1 hladce/ 1 obrace do výšky 7-8-8-9-9 cm. Dále pleteme patentem 2 hladce/ 2 obrace do výšky 7-8-8-8-8 cm. Následujících 8 cm pleteme patentem: 3 hladce, * 4 obrace, 4 hladce*, mezi *-* opakujeme, řadu končíme 4 obrace, 1 hladce. Změníme velikost jehlic na č. 7 a oka uzavřeme, jak se jeví.

DOKONČENÍ:
Sešijeme malé průramky. Manžety rukávů přeložíme asi 12 cm do líce, přišijeme knoflíky a zapneme.


Schéma

symbols = hladce
symbols = 3 oka sejmout na pomocnou jehlic ZA práci, 3 hladce, 3 oka z pomocné jehlice hladce
diagram
Chcete se na něco zeptat? Projděte si seznam nejčastějších otázek (FAQ).

Knitting tension is what determines the final measurements of your work, and is usually measured per 10 x 10 cm. It is provided like so: number of stitches in width x number of rows in height - eg: 19 stitches x 26 rows = 10 x 10 cm.

The knitting tension is very individual; some people knit/crochet loosely while others work tightly. You adjust the knitting tension with the needle size, which is why the suggested needle size is only meant as a guide! You need to adjust this (up or down) to ensure that YOUR knitting tension matches the knitting tension provided in the pattern. If you work with a different knitting tension than provided you will have a different yarn consumption, and your work will have different measurements than what the pattern suggests.

The knitting tension also determines which yarns can replace each other. As long as you achieve the same knitting tension you can replace one yarn with another.

See DROPS lesson: How to measure your tension/gauge

See DROPS video: How to make a gauge tension swatch

The required amount of yarn is provided in grams, eg: 450 g. To calculate how many balls you’ll need you first need to know how many grams are in 1 ball (25g, 50g or 100g). This information is available if you click on the individual yarn quality on our pages. Divide the amount required with the amount of each ball. For example, if each ball is 50g (the most common amount), the calculation will be as follows: 450 / 50 = 9 balls.

The important thing when changing from one yarn to another is that the knitting/crochet tension remains the same. This is so that the measurements of the finished piece will be the same as on the sketch provided. It is easier to achieve the same knitting tension using yarns from the same yarn group. It is also possible to work with multiple strands of a thinner yarn to achieve the knitting tension of a thicker one. Please try our yarn converter. We recommend you to always work a test swatch.

Please NOTE: when changing yarn the garment might have a different look and feel to the garment in the photo, due to individual properties and qualities of each yarn.

See DROPS lesson: Can I use a different yarn than the one mentioned in the pattern?

All our yarns are categorised into yarn groups (from A to F) according to thickness and knitting tension – group A contains the thinnest yarns and group F the thickest. This makes it easier for you to find alternative yarns to our patterns, should you wish to switch yarn. All yarns within the same group have a similar knitting tension and can easily replace each other. However, different yarn qualities have different structures and properties which will give the finished work a unique look and feel.

Click here for an overview of the yarns in each yarn group

At the top of all our patterns you’ll find a link to our yarn calculator, which is a helpful tool should you wish to use a different yarn than suggested. By filling in the yarn quality you wish to replace, the amount (in your size) and number of strands, the calculator will present good alternative yarns with the same knitting tension. Additionally it will tell you how much you’ll require in the new qualities and whether you’ll need to work with multiple strands. Most skeins are 50g (some are 25g or 100g).

If the pattern is worked with multiple colours, every colour will have to be calculated separately. Similarly, if the pattern is worked with several strands of different yarns (for example 1 strand Alpaca and 1 strand Kid-Silk) you will have to find alternatives for each, individually.

Click here to see our yarn calculator

Since different yarns have different qualities and textures we have chosen to keep the original yarn in our patterns. However, you can easily find options among our available qualities by using our yarn calculator, or simply pick a yarn from the same yarn group.

It is possible that some retailers still have discontinued yarns in stock, or that someone has a few skeins at home that they would like to find patterns for.

The yarn calculator will provide both alternative yarn as well as required amount in the new quality.

If you think it's hard to decide what size to make, it can be a good idea to measure a garment you own already and like the size of. Then you can pick the size by comparing those measures with the ones available in the pattern's size chart.

You'll find the size chart at the bottom of the pattern.

See DROPS lesson: How to read size chart

The needle size provided in the pattern serves only as a guide, the important thing is to follow the knitting tension. And since knitting tension is very individual, you will have to adjust the needle size to ensure that YOUR tension is the same as in the pattern – maybe you’ll have to adjust 1, or even 2 needle sizes, up or down to achieve the correct tension. For this, we recommend that you work test swatches.

Should you work with a different knitting tension than the one provided, the measurements of the finished garment might deviate from the measurement sketch.

See DROPS lesson: How to measure your tension/gauge

See DROPS video: How to make a tension/gauge swatch

Working a garment top-down provides more flexibility and room for personal adjustment. For example it is easier to try the garment on while working, as well as making adjustments to length of yoke and shoulder caps.

The instructions are carefully explaining every step, in the correct order. Diagrams are adjusted to the knitting direction and are worked as usual.

The diagram depicts all rows/rounds, and every stitch seen from the right side. It is read from bottom to top, from right to left. 1 square = 1 stitch.

When working back and forth, every other row is worked from the right side and every other row is worked from the wrong side. When working from the wrong side, the diagram will have to be worked reversed: from left to right, knit stitches are purled, purl stitches are knit etc.

When working in the round every round is worked from the right side and the diagram are worked from right to left on all rounds.

See DROPS lesson: How to read knitting diagrams

The diagram depicts all rows/rounds, and every stitch seen from the right side. It is worked from bottom to top, from right to left.

When working back and forth every other row is worked from the right side: from right to left and every other row is worked from the wrong side: from left to right.

When working in the round, every row in the diagram are worked from the right side, from right to left.

When working a circular diagram you start in the middle and work your way outwards, counter clockwise, row by row.

The rows usually start with a given number of chain stitches (equivalent to the height of the following stitch), this will either be depicted in the diagram or explained in the pattern.

See DROPS lesson: How to read crochet diagrams

Instructions for working several diagrams after each other on the same row/round, will often be written like so: “work A.1, A.2, A.3 a total of 0-0-2-3-4 times". This means you work A.1 once, then A.2 is worked once, and A.3 is repeated (in width) the number of times provided for your size – in this case like so: S = 0 times, M = 0 times, L=2 times, XL= 3 times and XXL = 4 times.

The diagrams are worked as usual: begin with the first row in A.1, then work the first row in A.2 etc.

See DROPS lesson: How to read knitting diagrams

See DROPS lesson: How to read crochet diagrams

The total width of the garment (from wrist-to-wrist) will be larger in the larger sizes, despite the actual sleeves being shorter. The larger sizes have longer sleeve caps and wider shoulders, so there will be a good fit in all sizes.

The measurement sketch/schematic drawing provides information regarding the full length of the garment. If it’s a jumper or a jacket the length is measured from the highest point on the shoulder closest to the neckline, and straight down to the bottom of the garment. It is NOT measured from the tip of shoulder. Similarly, the length of yoke is measured from the highest point on the shoulder and down to where yoke is split into body and sleeves.

On a jacket measures are never taken along bands, unless specifically stated. Always measure inside band stitches when measuring the length.

See DROPS lesson: How to read a schematic drawing

Diagrams are often repeated on the round or in height. 1 repeat is the diagram the way it appears in the pattern. If it says to work 5 repeats of A.1 in the round, then you work A.1 a total of 5 times after/next to each other in the round. If it says to work 2 repeats of A.1 vertically/in height you work the entire diagram once, then begin again at the start and work the entire diagram one more time.

Chain stitches are slightly narrower than other stitches and to avoid working the cast-on edge too tight, we simply chain more stitches to begin with. The stitch count will be adjusted on the following row to fit the pattern and measurement sketch.

The rib edge is more elastic and will contract slightly compared to, for example, stocking stitch. By increasing before the rib edge, you avoid a visible difference in width between the rib edge and the rest of the body.

It’s very easy to cast off too tightly, and by making yarn overs while casting off (and simultaneously casting these off) you avoid a too tight cast off edge.

See DROPS video: How to bind off with yarn overs (yo)

To achieve an even increase (or decrease) you can increase on, for example: every 3rd and 4th row alternately, like so: work 2 rows and increase on the 3rd row, work 3 rows and increase on the 4th. Repeat this until the increase is complete.

See DROPS lesson: Increase or decrease 1 st on every 3rd and 4th row alternately

Should you prefer to work in the round instead of back and forth, you may of course adjust the pattern. You’ll need to add steeks mid-front (usually 5 stitches), and follow the instructions. When you would normally turn and work from the wrong side, simply work across the steek and continue in the round. At the end you’ll cut the piece open, pick up stitches to work bands, and cover the cut edges.

See DROPS video: How to knit steeks and cut open

Should you prefer to work back and forth instead of in the round, you may of course adjust the pattern so you work the pieces separately and then assemble them at the end. Divide the stitches for the body in 2, add 1 edge stitch in each side (for sewing) and work the front and back pieces separately.

See DROPS lesson: Can I adapt a pattern for circular needles into straight needles?

Pattern repeats can vary slightly in the different sizes, in order to get the correct proportions. If you’re not working the exact same size as the garment in the photo, yours might deviate slightly. This has been carefully developed and adjusted so that the complete impression of the garment is the same in all sizes.

Make sure to follow instructions and diagrams for your size!

If you have found a pattern you like which is available in women’s size it’s not very difficult to convert it to men’s size. The biggest difference will be the length of sleeves and body. Start working on the women size that you think would fit across the chest. The additional length will be worked right before you cast off for the armhole/sleeve cap. If the pattern is worked top-down you can add the length right after the armhole or before the first decrease on sleeve.

Regarding additional yarn amount, this will depend on how much length you add, but it is better with a skein too many than too few.

All yarns will have excess fibres (from production) that might come off as lint or shedding. Brushed yarns (ie hairier yarns) have more of these loose, excess fibres, causing more shedding.

Shedding also depends on what is worn under or over the garment, and whether this pulls at the yarn fibres. It’s therefore not possible to guarantee that there will be no shedding

Below are some tips on how to get the best result when working with hairier yarns:

1. When the garment is finished (before you wash it) shake it vigorously so the looser hairs come off. NOTE: do NOT use a lint roller, brush or any method that pulls at the yarn.

2. Place the garment in a plastic bag and put it in your freezer - the temperature will cause the fibres to become less attached to each other, and excess fibres will come off easier.

3. Leave in the freezer for a few hours before taking it out and shaking it again.

4. Wash the garment according to the instructions on the yarn label.

Pilling is a natural process that happens to even the most exclusive of fibers. It's a natural sign of wear and tear that is hard to avoid, and that is most visible in high friction areas of your garment like a sweater's arms and cuffs.

You can make your garment look as new by removing the pilling, using a fabric comb or a pill/lint remover.

Pořád se nemůžete dobrat odpovědi, kterou hledáte? Pak posuňte stránku dolů a napište nám svůj dotaz, naši specialisté se vám pokusí poradit. Obvykle to zvládneme během 5 až 10 pracovních dnů..
Mezitím si můžete pročíst otázky a odpovědi, které k tomuto modelu položili ostatní, nebo navštívit skupinu DROPS Workshop na Facebooku, kde vám může poradit některá spřízněná duše!

Přidejte komentář k návodu DROPS 131-1

Rádi bychom věděli, co si o tomto modelu myslíte!

Pokud se chcete na něco zeptat, dbejte prosím na to, abyste ve formuláři níže vybrali správnou kategorii - díky tomu se dříve dozvíte, co potřebujete vědět. Povinná pole jsou označena *.

Komentáře / Otázky (212)

country flag Anne Gara wrote:

Bonjour J’ai réalisé ce pull en taille s mais le col est trop large et me tombe sur les bras Êtes vous sur qu’après l’empiècement et le rang de diminution pour ajuster à 96 mailles il faille augmenter 40 mailles au prochain tour endroit pour obtenir 136 mailles ? Merci de votre réponse

21.04.2021 - 18:10

DROPS Design answered:

Bonjour Mme Gara, tout à fait, tout est bien correct ainsi. Après ces augmentations, vous tricotez en côtes, ce qui va resserrer l'ouvrage (même si on augmente dans les côtes ensuite). Bon tricot!

22.04.2021 - 07:43

country flag Catherine Martin wrote:

Bonjour, je souhaiterai tricoter le modèle Jackie avec la drops Air, pensez vous qu il y aura un beau rendu ?! Merci pour votre réponse Cordialement. Catherine

18.02.2021 - 19:06

DROPS Design answered:

Bonjour Catherine, tricotez un échantillon avec la tension recommandée pour voir si vous aimez la texture obtenue, le résultat sera automatiquement différent car les laines ont des caractéristiques différentes. N'hésitez pas à demander conseil à votre magasin, on saura vous aider. Bon tricot!

19.02.2021 - 07:42

country flag Sandra wrote:

Hei. Jeg lurer på hvorfor det er pinne 7. Jeg trodde Nepal stikkes med pinne 5?

26.02.2020 - 09:17

DROPS Design answered:

Hej Sandra, den her model strikkes lidt løsere. Strikkefastheden er på 14 masker = 10 cm. :)

26.02.2020 - 09:55

country flag Elena Ortalli wrote:

Siete veramente fantastici! Avevo lasciato questo splendido maglione a metà alcuni mesi fa perché non sapevo come andare avanti e mi sono decisa a scrivervi; immediatamente mi avete risolto il problema. Ricomincio a lavorarlo con rinnovato entusiasmo. Grazie di cuore!

15.09.2019 - 10:40

country flag Elena Ortalli wrote:

Buonasera, bellissimo modello ma non ho ben capito le diminuzioni per le maniche: \"diminuire la m più esterna da ciascun lato delle maniche\" vuol dire da ogni lato dei 4 segni ( e quindi 8 diminuzioni) oppure solo all\' interno delle maniche (4 diminuzioni)? E quando arrivo alla treccia la devo interrompere per fare le diminuzioni? Grazie

14.09.2019 - 19:57

DROPS Design answered:

Buongiorno Elena. Abbiamo modificato leggermente il testo: deve diminuire la prima e l’ultima maglia delle maniche (quindi 2 maglie diminuite su ogni manica). Quando arriva alle trecce, deve interromperle per le diminuzioni. Buon lavoro!

14.09.2019 - 22:04

country flag Gerda Pedersen wrote:

Hej. Har strikket modellen, men syns den er meget slasket omkring kraven. Hvor finder jeg samme opskrift, i blusemoddel. ? Så det blir med rund halskant, i stedet for den hængekrave. ?

02.03.2019 - 15:05

DROPS Design answered:

Hei Gerda. Denne modellen kommer kun med vid og høy hals. Det som skiller tunikaen fra genseren er lengden (tunikaen er lenger). Du kan selvfølgelig strikke den med en annen halskant om du ønsker det, men du blir nødt til å tilpasse den selv. Eventuelt kan du vurdere andre modeller, med rund halskant. Som feks: 179-3 eller 184-12. God fornøyelse

04.03.2019 - 14:02

country flag Giusi wrote:

Buongiorno! È possibile realizzare questo modello in Big Merino? Grazie

18.02.2019 - 18:00

DROPS Design answered:

Buongiorno Giusy. Sì può sostituire Nepal con Big Merino: appartengono entrambi allo stesso gruppo di filati. Buon lavoro!

18.02.2019 - 18:11

country flag Zdeńka Matoušková wrote:

Svetr se mi velmi líbí, ale nenašla jsem návod na límec. S pozdravem Z. Matoušková

05.02.2019 - 09:00

DROPS Design answered:

Dobrý den, paní Matoušková, límec není popsán zvlášť v samostatné části návodu, ale je součástí SEDLA (viz cca poslední odstavec). Hodně zdaru! Hana

11.02.2019 - 17:33

country flag Sandrine wrote:

J'ai réalisé des échantillons pour être sûre, en 7 puis 6,5 puis 6! et là au bout de 7cm de hauteur je me rends compte que c'est beaucoup trop large, est-ce normal? Merci

02.02.2019 - 11:47

DROPS Design answered:

Bonjour Sandrine, veillez à bien conserver la même tension que celle que vous avez utilisé pour votre échantillon. À 5 cm, vous commencez M.1 (= torsades), les torsades vont resserrer l'ouvrage en largeur, donc si votre échantillon jersey est juste et que vous gardez bien la même tension, vous devriez avoir les bonnes mesures. Bon tricot!

04.02.2019 - 11:04

country flag Krijan wrote:

Danke für die tolle Anleitung. Wunderschön und (für mich) einfach zu stricken.

29.01.2019 - 11:10