Clicking the ORDER button will redirect you to Wool Warehouse Direct Ltd website
The yarn cost is calculated from the pattern’s smallest size and the yarn’s cheapest product type. Looking for an even better price? You might find it on the DROPS Deals!
-------------------------------------------------------
Alternative Yarn – See how to change yarns here
Yarn Groups A to F – Use the same pattern and change the yarn here
Yarn usage using an alternative yarn – Use our yarn converter here
-------------------------------------------------------
Clicking the ORDER button will redirect you to Wool Warehouse Direct Ltd website
The yarn cost is calculated from the pattern’s smallest size and the yarn’s cheapest product type. Looking for an even better price? You might find it on the DROPS Deals!
This pattern has been corrected. Click here to see the correction/s.
= K from RS, P from WS | |
= slip 2 sts on cable needle in front of piece, K2, K2 from cable needle |
Each of our patterns has specific tutorial videos to help you.
These step-by-step tutorials might also help you:
Why is the knitting/crochet tension so important?
Knitting tension is what determines the final measurements of your work, and is usually measured per 10 x 10 cm. It is provided like so: number of stitches in width x number of rows in height - eg: 19 stitches x 26 rows = 10 x 10 cm.
The knitting tension is very individual; some people knit/crochet loosely while others work tightly. You adjust the knitting tension with the needle size, which is why the suggested needle size is only meant as a guide! You need to adjust this (up or down) to ensure that YOUR knitting tension matches the knitting tension provided in the pattern. If you work with a different knitting tension than provided you will have a different yarn consumption, and your work will have different measurements than what the pattern suggests.
The knitting tension also determines which yarns can replace each other. As long as you achieve the same knitting tension you can replace one yarn with another.
See DROPS lesson: How to measure your tension/gauge
See DROPS video: How to make a gauge tension swatch
How do I know how many balls of yarn I need?
The required amount of yarn is provided in grams, eg: 450 g. To calculate how many balls you’ll need you first need to know how many grams are in 1 ball (25g, 50g or 100g). This information is available if you click on the individual yarn quality on our pages. Divide the amount required with the amount of each ball. For example, if each ball is 50g (the most common amount), the calculation will be as follows: 450 / 50 = 9 balls.
Can I use a different yarn than what the pattern suggests?
The important thing when changing from one yarn to another is that the knitting/crochet tension remains the same. This is so that the measurements of the finished piece will be the same as on the sketch provided. It is easier to achieve the same knitting tension using yarns from the same yarn group. It is also possible to work with multiple strands of a thinner yarn to achieve the knitting tension of a thicker one. Please try our yarn converter. We recommend you to always work a test swatch.
Please NOTE: when changing yarn the garment might have a different look and feel to the garment in the photo, due to individual properties and qualities of each yarn.
See DROPS lesson: Can I use a different yarn than the one mentioned in the pattern?
What are the yarn groups?
All our yarns are categorised into yarn groups (from A to F) according to thickness and knitting tension – group A contains the thinnest yarns and group F the thickest. This makes it easier for you to find alternative yarns to our patterns, should you wish to switch yarn. All yarns within the same group have a similar knitting tension and can easily replace each other. However, different yarn qualities have different structures and properties which will give the finished work a unique look and feel.
How do I use the yarn calculator?
At the top of all our patterns you’ll find a link to our yarn calculator, which is a helpful tool should you wish to use a different yarn than suggested. By filling in the yarn quality you wish to replace, the amount (in your size) and number of strands, the calculator will present good alternative yarns with the same knitting tension. Additionally it will tell you how much you’ll require in the new qualities and whether you’ll need to work with multiple strands. Most skeins are 50g (some are 25g or 100g).
If the pattern is worked with multiple colours, every colour will have to be calculated separately. Similarly, if the pattern is worked with several strands of different yarns (for example 1 strand Alpaca and 1 strand Kid-Silk) you will have to find alternatives for each, individually.
Why do you show discontinued yarns in the patterns?
Since different yarns have different qualities and textures we have chosen to keep the original yarn in our patterns. However, you can easily find options among our available qualities by using our yarn calculator, or simply pick a yarn from the same yarn group.
It is possible that some retailers still have discontinued yarns in stock, or that someone has a few skeins at home that they would like to find patterns for.
The yarn calculator will provide both alternative yarn as well as required amount in the new quality.
What size should I knit?
If you think it's hard to decide what size to make, it can be a good idea to measure a garment you own already and like the size of. Then you can pick the size by comparing those measures with the ones available in the pattern's size chart.
You'll find the size chart at the bottom of the pattern.
See DROPS lesson: How to read size chart
Why do I get the wrong knitting tension with the suggested needle size?
The needle size provided in the pattern serves only as a guide, the important thing is to follow the knitting tension. And since knitting tension is very individual, you will have to adjust the needle size to ensure that YOUR tension is the same as in the pattern – maybe you’ll have to adjust 1, or even 2 needle sizes, up or down to achieve the correct tension. For this, we recommend that you work test swatches.
Should you work with a different knitting tension than the one provided, the measurements of the finished garment might deviate from the measurement sketch.
See DROPS lesson: How to measure your tension/gauge
See DROPS video: How to make a tension/gauge swatch
Why is the pattern worked top-down?
Working a garment top-down provides more flexibility and room for personal adjustment. For example it is easier to try the garment on while working, as well as making adjustments to length of yoke and shoulder caps.
The instructions are carefully explaining every step, in the correct order. Diagrams are adjusted to the knitting direction and are worked as usual.
How do I work according to a knitting diagram?
The diagram depicts all rows/rounds, and every stitch seen from the right side. It is read from bottom to top, from right to left. 1 square = 1 stitch.
When working back and forth, every other row is worked from the right side and every other row is worked from the wrong side. When working from the wrong side, the diagram will have to be worked reversed: from left to right, knit stitches are purled, purl stitches are knit etc.
When working in the round every round is worked from the right side and the diagram are worked from right to left on all rounds.
See DROPS lesson: How to read knitting diagrams
How do I work according to a crochet diagram?
The diagram depicts all rows/rounds, and every stitch seen from the right side. It is worked from bottom to top, from right to left.
When working back and forth every other row is worked from the right side: from right to left and every other row is worked from the wrong side: from left to right.
When working in the round, every row in the diagram are worked from the right side, from right to left.
When working a circular diagram you start in the middle and work your way outwards, counter clockwise, row by row.
The rows usually start with a given number of chain stitches (equivalent to the height of the following stitch), this will either be depicted in the diagram or explained in the pattern.
See DROPS lesson: How to read crochet diagrams
How do I work several diagrams simultaneously on the same row/round?
Instructions for working several diagrams after each other on the same row/round, will often be written like so: “work A.1, A.2, A.3 a total of 0-0-2-3-4 times". This means you work A.1 once, then A.2 is worked once, and A.3 is repeated (in width) the number of times provided for your size – in this case like so: S = 0 times, M = 0 times, L=2 times, XL= 3 times and XXL = 4 times.
The diagrams are worked as usual: begin with the first row in A.1, then work the first row in A.2 etc.
See DROPS lesson: How to read knitting diagrams
See DROPS lesson: How to read crochet diagrams
Why are the sleeves shorter in larger sizes?
The total width of the garment (from wrist-to-wrist) will be larger in the larger sizes, despite the actual sleeves being shorter. The larger sizes have longer sleeve caps and wider shoulders, so there will be a good fit in all sizes.
Where on the garment is the length measured?
The measurement sketch/schematic drawing provides information regarding the full length of the garment. If it’s a jumper or a jacket the length is measured from the highest point on the shoulder closest to the neckline, and straight down to the bottom of the garment. It is NOT measured from the tip of shoulder. Similarly, the length of yoke is measured from the highest point on the shoulder and down to where yoke is split into body and sleeves.
On a jacket measures are never taken along bands, unless specifically stated. Always measure inside band stitches when measuring the length.
See DROPS lesson: How to read a schematic drawing
What is a repeat?
Diagrams are often repeated on the round or in height. 1 repeat is the diagram the way it appears in the pattern. If it says to work 5 repeats of A.1 in the round, then you work A.1 a total of 5 times after/next to each other in the round. If it says to work 2 repeats of A.1 vertically/in height you work the entire diagram once, then begin again at the start and work the entire diagram one more time.
Why does the piece start with more chain stitches than it’s worked with?
Chain stitches are slightly narrower than other stitches and to avoid working the cast-on edge too tight, we simply chain more stitches to begin with. The stitch count will be adjusted on the following row to fit the pattern and measurement sketch.
Why increase before the rib edge when the piece is worked top-down?
The rib edge is more elastic and will contract slightly compared to, for example, stocking stitch. By increasing before the rib edge, you avoid a visible difference in width between the rib edge and the rest of the body.
Why increase in the cast-off edge?
It’s very easy to cast off too tightly, and by making yarn overs while casting off (and simultaneously casting these off) you avoid a too tight cast off edge.
See DROPS video: How to bind off with yarn overs (yo)
How do I increase/decrease on every 3rd and 4th row/round alternately?
To achieve an even increase (or decrease) you can increase on, for example: every 3rd and 4th row alternately, like so: work 2 rows and increase on the 3rd row, work 3 rows and increase on the 4th. Repeat this until the increase is complete.
See DROPS lesson: Increase or decrease 1 st on every 3rd and 4th row alternately
How can I work a jacket in the round instead of back and forth?
Should you prefer to work in the round instead of back and forth, you may of course adjust the pattern. You’ll need to add steeks mid-front (usually 5 stitches), and follow the instructions. When you would normally turn and work from the wrong side, simply work across the steek and continue in the round. At the end you’ll cut the piece open, pick up stitches to work bands, and cover the cut edges.
See DROPS video: How to knit steeks and cut open
Can I work a jumper back and forth instead of in the round?
Should you prefer to work back and forth instead of in the round, you may of course adjust the pattern so you work the pieces separately and then assemble them at the end. Divide the stitches for the body in 2, add 1 edge stitch in each side (for sewing) and work the front and back pieces separately.
See DROPS lesson: Can I adapt a pattern for circular needles into straight needles?
Why is the pattern slightly different than what I see in the photo?
Pattern repeats can vary slightly in the different sizes, in order to get the correct proportions. If you’re not working the exact same size as the garment in the photo, yours might deviate slightly. This has been carefully developed and adjusted so that the complete impression of the garment is the same in all sizes.
Make sure to follow instructions and diagrams for your size!
How do I make a women’s size garment into a men’s size one?
If you have found a pattern you like which is available in women’s size it’s not very difficult to convert it to men’s size. The biggest difference will be the length of sleeves and body. Start working on the women size that you think would fit across the chest. The additional length will be worked right before you cast off for the armhole/sleeve cap. If the pattern is worked top-down you can add the length right after the armhole or before the first decrease on sleeve.
Regarding additional yarn amount, this will depend on how much length you add, but it is better with a skein too many than too few.
How do I prevent a hairy garment from shedding?
All yarns will have excess fibres (from production) that might come off as lint or shedding. Brushed yarns (ie hairier yarns) have more of these loose, excess fibres, causing more shedding.
Shedding also depends on what is worn under or over the garment, and whether this pulls at the yarn fibres. It’s therefore not possible to guarantee that there will be no shedding
Below are some tips on how to get the best result when working with hairier yarns:
1. When the garment is finished (before you wash it) shake it vigorously so the looser hairs come off. NOTE: do NOT use a lint roller, brush or any method that pulls at the yarn.
2. Place the garment in a plastic bag and put it in your freezer - the temperature will cause the fibres to become less attached to each other, and excess fibres will come off easier.
3. Leave in the freezer for a few hours before taking it out and shaking it again.
4. Wash the garment according to the instructions on the yarn label.
Why does my garment pill?
Pilling is a natural process that happens to even the most exclusive of fibers. It's a natural sign of wear and tear that is hard to avoid, and that is most visible in high friction areas of your garment like a sweater's arms and cuffs.
You can make your garment look as new by removing the pilling, using a fabric comb or a pill/lint remover.
Little Gent |
|||||||
|
|
||||||
Set of knitted vest and socks with cables for baby and children in DROPS Merino Extra Fine
DROPS Baby 17-9 |
|||||||
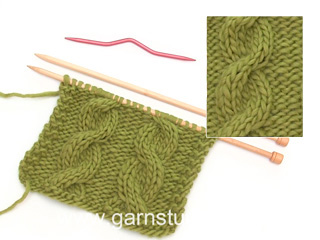
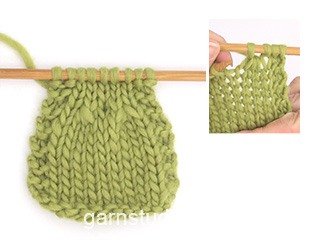
PATTERN: See diagram M.1. The diagram is seen from the RS. GARTER ST (back and forth on needle): K all rows. GARTER ST (in the round): K 1 round, P 1 round. DECREASING TIP (applies to armhole on top): Dec from RS inside 3 garter sts by P2 tog. ---------------------------------------------------------- SLEEVELESS TOP: FRONT PIECE: Worked back and forth on needle. Cast on 50-56-62 (70-76) sts (includes 1 edge st each side, worked in garter st throughout) on needle size 4 mm with Merino Extra Fine. Work 4 rows garter st – SEE ABOVE. Work next row as follows from RS: 1 edge st, P 11-14-17 (21-24), * K2 in each of the next 2 sts, P4 *, repeat from *-* 4 times, K2 in each of the next 2 sts, P 11-14-17 (21-24), 1 edge st = 60-66-72 (80-86) sts. Work next row as follows from WS: 1 edge st, K 11-14-17 (21-24), * M.1, K 4 *, repeat from *-* 4 times, M.1, K 11-14-17 (21-24), 1 edge st. Work next row as follows from RS: 1 edge st, P 11-14-17 (21-24), * M.1, P 4 *, repeat from *-* 4 times, M.1, P 11-14-17 (21-24), 1 edge st. Continue in pattern like this. REMEMBER THE KNITTING TENSION! When piece measures 15-16-18 (19-21) cm work 4 rows garter st on 6 sts each side (work remaining sts as before), AT THE SAME TIME on last row cast off 3 sts at beg of row, work remaining sts on row as before, and cast off 3 sts at beg of next row, work remaining sts on row as before. Continue with 3 garter sts each side, AT THE SAME TIME cast off to shape the armhole each side – SEE DECREASING TIP: 1 st on every other row 4-4-4 (5-5) times = 46-52-58 (64-70) sts. When piece measures 22-23-26 (28-31) cm slip the middle 12-12-14 (14-14) sts on a stitch holder for neck and complete each side separately. Cast off to shape the neckline at the beg of every row from mid front: 2 sts 1 time and 1 st 3-4-4 (4-4) times = 12-14-16 (19-22) sts left on shoulder. When piece measures 26-28-31 (33-36) cm work the 4 sts over cable tog 2 by 2 = 10-12-14 (17-20) sts left on shoulder. Slip shoulder sts on a stitch holder. NECKLINE: Pick up approx 30 to 40 sts round neckline (includes sts on stitch holder) on needle size 4 mm with Merino Extra Fine. K 1 row from WS, AT THE SAME TIME adjust no of sts to 26-28-30 (32-34). K 2 rows and cast off. LEFT SHOULDER: Work sts from stitch holder back on needle and pick up 2 sts on neckline = 12-14-16 (19-22) sts. K 1 row from WS and work next row as follows: K 1-1-1 (2-2), K2 tog, 1 YO, K 5-7-9 (10-13), K2 tog, 1 YO, K 2-2-2 (3-3). K 1 row and cast off on next row. RIGHT SHOULDER: Pick up 2 sts on neckline and work sts from stitch holder back on needle = 12-14-16 (19-22) sts. Work like left shoulder. BACK PIECE: Worked back and forth on needle. Cast on 50-56-62 (70-76) sts (includes 1 edge st each side, worked in garter st throughout) on needle size 4 mm with Merino Extra Fine. Work 4 rows garter st and continue in reverse stocking st. Cast off for armhole each side as described for front piece and continue until piece measures 24-26-29 (31-34) cm. Now cast off the middle 14-16-18 (18-18) sts for neck and complete each side separately. Cast off 1 st on neckline on next row = 10-12-14 (17-20) sts left on shoulder. When piece measures 26-28-31 (33-36) cm slip shoulder sts on a stitch holder. NECKLINE: Pick up approx 18 til 26 sts round neckline on needle size 4 mm with Merino Extra Fine. K 3 rows and cast off. LEFT SHOULDER: Work sts from stitch holder back on needle and pick up 2 sts on neckline = 12-14-16 (19-22) sts. K 3 rows and cast off. RIGHT SHOULDER: Like left shoulder. ASSEMBLY: Sew side seams inside 1 edge st and sew on buttons on shoulders. ---------------------------------------------------------- BOOTIES: Worked in the round on double pointed needles. Cast on 48-52-52 (56-56) sts on double pointed needles size 2.5 mm with Merino Extra Fine. Work rib, K1/P1 – round beg mid back. When piece measures 4-5-5 (5-6) cm K 3 tog (= K1. P1, K1) mid back, work 4 rounds and then K3 tog again (= P1, K1, P1) mid back = 44-48-48 (52-52) sts. When piece measures 10-11-12 (13-14) cm change to double pointed needles size 3.5 mm. K 1 round, AT THE SAME TIME dec 6-6-6 (6-6) sts evenly = 38-42-42 (46-46) sts. REMEMBER THE KNITTING TENSION! Slip the first 14-15-15 (16-16) sts on a stitch holder, keep the next 10-12-12 (14-14) sts on needle (= upper foot), and slip remaining 14-15-15 (16-16) sts on a stitch holder. Work sts on upper foot back and forth on needle as follows: 2-3-3 (4-4) garter sts – SEE ABOVE, 1 st in reverse stocking st, M.1 (beg on row 4 in diagram), 1 st in reverse stocking st, and 2-3-3 (4-4) garter sts. When piece on upper foot measures 3½-4-5 (6½-7½) cm pick up 8-9-11 (14-16) sts on both sides and slip sts from stitch holders back on needle = 54-60-64 (74-78) sts. Continue in garter st on all sts for 1½-2-2½ (3-3½) cm, now P 1 round and cast off all sts except the 10-12-12 (14-14) sts mid front. Work 9-10-11 (13-15) cm garter sts on these sts for sole and cast off. Sew sole to bootie, edge to edge to avoid a chunky seam. Knit the other bootie in the same way. |
|||||||
Diagram explanations |
|||||||
|
|||||||
Have you made this or any other of our designs? Tag your pictures in social media with #dropsdesign so we can see them! Do you need help with this pattern?You'll find tutorial videos, a Comments/Questions area and more by visiting the pattern on garnstudio.com. © 1982-2024 DROPS Design A/S. We reserve all rights. This document, including all its sub-sections, has copyrights. Read more about what you can do with our patterns at the bottom of each pattern on our site. |
With over 40 years in knitting and crochet design, DROPS Design offers one of the most extensive collections of free patterns on the internet - translated to 17 languages. As of today we count 304 catalogues and 11422 patterns - 11422 of which are translated into English (UK/cm).
We work hard to bring you the best knitting and crochet have to offer, inspiration and advice as well as great quality yarns at incredible prices! Would you like to use our patterns for other than personal use? You can read what you are allowed to do in the Copyright text at the bottom of all our patterns. Happy crafting!
Comments / Questions (86)
Marie Violaine Monier wrote:
Bonjour, lorsqu'on commence les diminutions des emmanchures il est indiqué de diminuer 3 mailles après le point mousse à 3 mailles du bord. Qu'en est-il de la maille lisière ? est-ce qu'elle est toujours là et non comptabilisée dans les explications ?
17.04.2024 - 09:24DROPS Design answered:
Bonjour Mme Monier, on a rabattu les mailles des emmanchures et on continue avec 3 mailles point mousse de chaque côté, il n'y a pas de maille lisière supplémentaire, autrement dit, diminuez après les 3 premières mailles du rang (tricotées au point mousse) et avant les 3 dernières mailles du rang (tricotées également au point mousse) comme indiqué sous DIMINUTIONS. Bon tricot!
17.04.2024 - 11:15Sylwia wrote:
Wydaje mi się, że w opisie wykończenia dekoltu tyłu kamizelki jest błąd. Podane jest by nabrać oczka, przerobić 3 rzędy i zakończyć. Żeby ładnie nabrać oczka trzeba by to zrobić z prawej strony robótki, potem więc przerobiłbym 3 rzędy i zakańczałabym z prawej strony robótki. Ale w takim wypadku wzór dekoltu inaczej wychodzi niż z przodu. Tam przerabia się tylko 2 rzędy i zakańcza - z lewej strony robótki.
05.11.2023 - 19:59Anna wrote:
Całkiem wygodnie mi się korzystało z tego wzoru, aż dotarłam do fragmentu: "przer. 4 rz. ściegiem francuskim ponad 6 o. z każdej strony". Zupełnie go nie rozumiem. Czy to oznacza, że przez następne 4 rzędy przerabiam 6 o. z każdej strony (łącznie 12 o. w rzędzie) ściegiem francuskim? A co oznacza "ponad"? Będę uprzejmie wdzięczna za podpowiedź!
24.09.2023 - 23:27DROPS Design answered:
Witaj Aniu, 6 pierwszych i ostatnich oczek w rzędzie przerabiasz na prawo w 4 kolejnych rzędach. Pozostałe oczka przerabiasz jak wcześniej. Pozdrawiamy!
25.09.2023 - 07:56Dorthe Steenholdt wrote:
Hvor er knaphullerne i denne opskrift?
21.05.2023 - 16:59DROPS Design answered:
Hei Dorthe De er beskrevet under VENSTRE SKULDER. Du strikker 2 rett sammen, 1 kast. Kastet strikkes rett på neste pinne = knappehull. mvh DROPS Design
22.05.2023 - 14:16Marica wrote:
Salve, è possibile avere la traduzione in italiano del modello? Grazie
04.05.2023 - 08:45DROPS Design answered:
Buonasera Marica, certo, potrà trovare la traduzione online la prossima settimana. Buon lavoro!
04.05.2023 - 23:40Andrea Telaar wrote:
Bin gerade mit dem Rückenteil angefangen, es rollt sich schon jetzt ganz stark nach innen ! Was tun?
03.03.2023 - 22:10DROPS Design answered:
Liebe Frau Telaar, die Weste können Sie danach mit Stecknadeln auf einer geeigneten Unterlage spannen, anfeuchten (z.B. mit einer Sprühflasche für Blumen) und trocknen lassen, danach entfernen Sie die Stecknadeln, dann sollte sich der Rand nicht mehr rollen. Viel Spaß beim stricken!
06.03.2023 - 09:04Marianne wrote:
Str. 1-3 mdr. FORSTYKKE (og ryg): Jeg kan ikke se, hvordan man kan få 46 m tilbage ud af 50, når man først lukker 3 m af i hver side (50-6=44) og derefter tager en maske ind i hver side 4 gange (44-8=36!) ??? Mvh. Marianne, Danmark
30.09.2022 - 12:46Hanne Schuch wrote:
Hej. Skal der ikke tages ud til 66 masker på rygstykket, som på forstykket? Hilsen Hanne
28.06.2022 - 13:48DROPS Design answered:
Hej Hanne, du tager ud på forstykket for at få nok masker til snoningerne. Du strikker ikke snoninger på rygstykket, derfor behøver du ikke tage ud :)
29.06.2022 - 10:04Anita Bøjland wrote:
Jeg kan ikke få opskriften til at passe.. Jeg skal slå 50 masker op, men efter første mønstergang skal jeg have 60 masker!! Jeg kan ikke se noget om udtagning nogen steder?
31.01.2022 - 14:32DROPS Design answered:
Hei Anita. I dette avsnittet står det at du skal strikke 2 masker i 1 maske (har skrevet det med store bokstaver, slik at man lettere kan se). Næste p strikkes således (fra retsiden): 1 kantm i retstrik, strik 11 vrang, * STRIK 2 R I HVER AF DE NÆSTE 2 M, 4 vr *, gentag fra *-* 4 gange, STRIK 2 R I HVER AF DE NÆSTE 2 M, strik 11 vrang og 1 kantm i retstrik = 60 m. mvh DROPS Design
31.01.2022 - 15:08Karin wrote:
Bij afwerking staat “ Naai de zijnaden in de kant st en naai de knopen op de schouders” . Zitten de knopen er voor de sier of moeten ze open kunnen? Ik heb maar hele kleine gaten in de schouders door de omslag in het voorpand, niet groot genoeg voor een knoop. Of naai ik ze gewoon vast aan voor en achterpand?
14.11.2021 - 22:13DROPS Design answered:
Dag Karin,
Excuses voor het late antwoord. Als het goed is heb je bij de linker schouder op het voorpand knoopsgaten gemaakt. (2 st samen breien en 1 omslag.) De knopen naai je op de bies van het achterpand en je knoopt ze door de gaatjes op de linker bies van de schouder.
09.12.2021 - 13:50