
Catégories populaires
Vous cherchez un fil?


Poster un commentaire sur le modèle DROPS 164-33
Nous aimerions connaître votre avis sur ce modèle !
Si vous souhaitez poser une question, merci de bien vouloir vérifier que vous avez choisi la bonne catégorie dans le formulaire ci-dessous afin d'accélérer la réponse. Les champs obligatoires sont indiqués par une *.
|
|||||||||||||||||||||||||
Lakeside Cardigan |
|||||||||||||||||||||||||
|
|
|||||||||||||||||||||||||
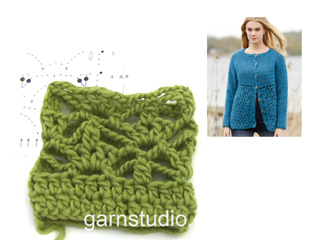
Veste DROPS au crochet avec empiècement arrondi, brides et point ajouré, crocheté de haut en bas (top down), en ”Air”. Du S au XXXL.
DROPS 164-33 |
|||||||||||||||||||||||||
|
INFO CROCHET: Au début de chaque rang de ms, crocheter 1 ml pour tourner. La ml ne remplace pas la 1ère ms. Remplacer la 1ère B au début de chaque rang de B par 3 ml. Manches: Quand on crochète en rond, terminer tous les tours par 1 mc dans la 3ème ml du début du tour. POINT FANTAISIE: Voir diagrammes A.1 à A.3. ÉCOULER 2 B ENS (dans une B): Crocheter 1 B dans la B suivante mais ne pas faire le dernier jeté, crocheter 1 autre B dans la même B, mais au dernier jeté, écouler toutes les boucles sur le crochet. ÉCOULER 2 B ENS (autour d'une ml): Crocheter 1 B autour de la ml au milieu du groupe de B mais ne pas faire le dernier jeté, crocheter 1 autre B autour de la même ml, mais au dernier jeté, écouler toutes les boucles sur le crochet. GROUPE DE B: Crocheter un groupe de B autour de l'arceau ainsi: *1 B, 1 ml*, répéter de *-* encore 2 fois autour du même arceau, 1 B autour du même arceau,. AUGMENTATIONS: Pour augmenter 1 B, crocheter 2 B dans 1 ms/B. DIMINUTIONS: Diminuer 1 B au début et à la fin du tour ainsi: Crocheter 1 B (= 3 ml en début de rang), *1 B, mais ne pas faire le dernier jeté (= 2 boucles sur le crochet), crocheter ensuite la B suiv mais au dernier jeté, écouler toutes les boucles sur le crochet*, répéter de *-* quand il reste 3 B avant la fin du tour = 1 m diminuée de chaque côté du marqueur. ---------------------------------------------------------- VESTE: Se crochète de haut en bas, en allers et retours à partir du milieu devant. EMPIÈCEMENT: Monter une chaînette de 75-78-84-89-93-98 ml (y compris 1 ml pour tourner) avec le crochet 6 en Air. Crocheter le rang suivant ainsi - VOIR INFO CROCHET: RANG 1: 1 ms dans la 2ème ml à partir du crochet, 1 ms dans chacune des 1-4-2-7-3-8 ml suivantes, *sauter 1 ml, 1 ms dans chacune des 7 ml suivantes*, répéter de *-* 8-8-9-9-10-encore 10 fois = 65-68-73-78-81-86 ms. RANG 2: 1 B dans chacune des 4 premières ms (= bordure devant), 1 B dans chaque ms jusqu'à ce qu'il reste 4 ms, EN MÊME TEMPS, augmenter 6-8-8-10-12-23 B à intervalles réguliers - VOIR AUGMENTATIONS, 1 B dans chacune des 4 dernières ms = 71-76-81-88-93-109 B. Placer maintenant un total de 8 marqueurs ainsi, sans crocheter en même temps: Placer 4 marqueurs de chaque côté ainsi: 1 marqueur après 13-13-14-14-16-19 B, le marqueur suivant après 2 B, puis le marqueur suivant après 9-11-12-14-14-17 B, et terminer par le dernier marqueur après 2 B. On a maintenant 19-20-21-24-25-29 B entre les 2 marqueurs du milieu, côté dos de la veste. Continuer maintenant en B (= 1 B dans chaque B), EN MÊME TEMPS, augmenter 1 B à droite de chacun des 8 marqueurs. Augmenter ensuite alternativement à droite et à gauche de chaque marqueur (vu sur l'endroit). Répéter ces augmentations encore 9-9-11-12-13-16 fois tous les rangs, et 2-3-2-2-2-0 fois tous les 2 rangs = 167-180-193-208-221-245 B. L'ouvrage mesure environ 20-23-23-24-26-27 cm. PENSER À BIEN CONSERVER LA MÊME TENSION QUE POUR L'ÉCHANTILLON! Au rang suivant, crocheter ainsi: 25-27-29-31-34-38 B (devant), 8 ml (sous la manche), sauter 38-40-42-45-47-50 B du rang précédent (= manche), 41-46-51-56-59-69 B (dos), 8 ml (sous la manche), sauter 38-40-42-45-47-50 B du rang précédent (= manche) et 25-27-29-31-34-38 B (devant). Placer 1 marqueur, mesurer désormais à partir d'ici! DOS & DEVANTS: On a maintenant 107-116-125-134-143-161 m pour le dos et les devants. Mesurer désormais à partir d'ici. Crocheter maintenant 1 B dans chaque B/ml, tourner et crocheter ensuite le rang suivant en POINT FANTAISIE - voir ci-dessus, ainsi: RANG 1: 1 B dans chacune des 4 premières B (= A.1), crocheter ensuite A.2 ainsi: *écouler 2 B ENS (dans une B) - voir ci-dessus, 5 ml, sauter 2 B, 1 ms dans la B suivante, 3 ml, sauter 2 B, 1 ms dans la B suivante, 5 ml, sauter 2 B*, répéter de *-* encore 10-11-12-13-14-16 fois, 1 B dans chacune des B restantes (= A.3). RANG 2: 1 ms dans chacune des 4 premières B, *3 ml, sauter 1 arceau, crocheter 1 GROUPE DE B - voir ci-dessus, autour de l'arceau suivant, 3 ml, sauter 1 arceau, 1 ms dans les 2 B écoulées ens *, répéter de *-* encore 10-11-12-13-14-16 fois, 1 ms dans chacune des 4 dernières B. RANG 3: 1 ms dans chacune des 4 premières ms, *2 ml, 1 ms autour de l'arceau suivant, 5 ml, écouler 2 B ENS (autour de l'arceau) - voir ci-dessus, 5 ml, 1 ms autour de l'arceau suivant après le groupe de B, 1 ml*, répéter de *-* encore 10-11-12-13-14-16 fois, 1 ms dans chacune des 4 dernières ms. RANG 4: 1 B dans chacune des 4 premières ms, (1 B, 1 ml, 1 B) autour du 1er arceau, 3 ml, sauter 1 arceau, 1 ms dans les 2 B écoulées ens, 3 ml, sauter 1 arceau, * (1 B, 1 ml, 1 B, 1 ml, 1 B, 1 ml, 1 B) autour de l'arceau suivant, 3 ml, sauter 1 arceau, 1 ms dans les 2 B écoulées ens, 3 ml, sauter 1 arceau*, répéter de *-* encore 9-10-11-12-13-15 fois, (1 B, 1 ml, 1 B, 1 ml) autour du dernier arceau, 1 B dans chacune des 4 dernières ms. RANG 5: 1 B dans chacune des 4 premières B, *écouler 2 B ENS (autour de l'arceau), 5 ml, 1 ms autour de l'arceau après le groupe de B, 3 ml, 1 ms autour de l'arceau suivant, 5 ml*, répéter de *-* encore 10-11-12-13-14-16 fois, 1 B dans chacune des 4 dernières B. Continuer ainsi et répéter A.X (= rangs 2 -5) en allers et retours jusqu'à ce que l'ouvrage mesure environ 32 cm pour toutes les tailles – ajuster pour terminer après un rang 2 ou 4 de A.1-A.3. L'ouvrage mesure 56-60-60-62-64-66 cm au total. MANCHES: Se crochètent en rond, de haut en bas. Placer 1 marqueur au milieu des 8 ml sous la manche et mesurer désormais à partir d'ici – faire suivre le marqueur jusqu'à la fin. Joindre le fil avec 1 mc dans la 5ème des 8 ml de l'emmanchure et crocheter: 3 ml (= 1 B), 1 B dans chacune des 3 ml suiv, 1 B dans chacune des B de la manche et 1 B dans les 4 dernières ml sous la manche = 46-48-50-53-55-58 B - voir INFO CROCHET! Continuer en B, EN MÊME TEMPS, quand la manche mesure environ 4 cm, commencer à diminuer - VOIR DIMINUTIONS. Répéter ces diminutions encore 8-9-10-10-11-12 fois tous les 3-2-2-2-2-1 tours = il reste 28-28-28-31-31-32 B. Arrêter quand la manche mesure 46-44-44-43-42-40 cm. Crocheter l'autre manche de la même façon. ASSEMBLAGE: Coudre les boutons sur le devant gauche, celui du haut à environ 1 cm du col, espacer les suivants d'environ 8-8-9-9-9-10 cm. Boutonner entre 2 B du devant droit. |
|||||||||||||||||||||||||
Légende diagramme(s) |
|||||||||||||||||||||||||
|
|||||||||||||||||||||||||

|
|||||||||||||||||||||||||

|
|||||||||||||||||||||||||
|
Vous avez réalisé ce modèle ou un autre de nos collections? Taguez vos photos dans les réseaux sociaux avec #dropsdesign pour que nous puissions les voir! Vous avez besoin d'aide pour ce modèle ?Vous trouverez tutoriels vidéo, une rubrique commentaires/questions et plus encore en vous rendant sur la page du modèle sur garnstudio.com © 1982-2024 DROPS Design A/S. Tous droits réservés. Ce document, y compris ces sous-sections, est protégé par les droits d'auteur (copyright). Apprenez-en davantage sur ce que vous pouvez faire avec nos modèles en bas de chacune des pages de notre site. |
|||||||||||||||||||||||||


Avec plus de 40 ans dans la conception de modèles tricot et crochet, DROPS Design offre l'une des plus vastes collections de modèles gratuits sur internet - traduits dans 17 langues. À ce jour, on compte 304 catalogues et 11422 modèles en français.
Nous nous efforçons de vous apporter le meilleur de ce que le tricot et le crochet peuvent vous offrir, inspiration et conseils mais également des fils de haute qualité à des prix incroyables! Vous souhaiteriez utiliser nos modèles autrement que pour un usage personnel? Vous pouvez lire ce que vous êtes autorisés à faire dans le Copyright en bas de page de chacun de nos modèles. Bon tricot!
Commentaires / Questions (43)
Sorry me again I’m still confused When it says alternate increase right and left side of the markers dose that mean ? Increase on the right side of each 8 markers each row and then on the left side on the next row and then back to right side again next row ? Because if you increase both right and left side of the 8 markers that’s 16 stitch’s increase each row not 8 and that’s where I’m getting confused because I don’t understand the wording ?
12.09.2019 - 09:17DROPS Design answered:
Dear Stacey, as shown in the video linked below, when you have to increase alternately on the right side and left side of each marker, work fist increase row increasing on the right side of each marker, then work the next increase row increasing on the left side of each marker and continue like this = you increase 8 stitches on each increase row. Happy crocheting!
12.09.2019 - 09:24Im confused by the pattern Where is says increase left and right of the markers seen on RS side Dose this mean only increase either side of the 8 marks every other row ? So one row increase and then the other just crochet into each stitch and the first row where it says just on the right does it mean increase only on the right on the first row and then just crochet the next row and then increase both sides on the next and then crochet every stitch no increase?
11.09.2019 - 22:00DROPS Design answered:
Dear Stacey, this video shows how to increase alternately on the right and left side of markers ; there are 8 markers and you increase 8 stitches per increase row. Happy crocheting!
12.09.2019 - 08:52I've done a test piece for increasing right and left of the markers. However one side the dcs increase and the other side stays at 4dc before the first 2dc increase. Ive followed the video, surely the number of dcs should increase on both sides/ends? Evenly When working the pattern are you doing 2 rows of right side marker increase before alternating right/left?
14.03.2019 - 20:34DROPS Design answered:
Dear Heather, you should increase alternately on right and left side of the markers - seen from RS, ie seen from RS the increase will be worked atlernately before and after the markers so that the number of sts increases on each side of markers. Happy crocheting!
15.03.2019 - 08:34Hallo, bedankt voor het antwoord op mijn vorige vraag! Ik vind nog iets niet duidelijk. In de tekst over de pas staat : “Meerder hierna afwisselend links en rechts van elke markeerder (gezien aan de goede kant). “. Klopt het dat de vermeerderingen vanuit de buitenkant van het vest telkens aan de zelfde kant van de markeerder komen omdat het werk elke toer gedraaid wordt? Zo ziet het eruit in de video, maar de toevoeging in de tekst tussen () schept verwarring. Mvg
25.11.2018 - 13:17DROPS Design answered:
Dag Mirte
Je meerdert de ene keer aan de linker kant en de andere keer aan de rechter kant van de markeerders, gezien vanaf de goede kant. Dus als het werk klaar is, zie je op de goede kant dat er de ene toer aan de ene kant en de andere toer aan de andere kant gemeerderd is. Als je op de verkeerde kant aan het haken bent moet je hier dus rekening mee houden (want rechts op de goede kant is op de verkeerde kant links en vice verca). Hoop dat het zo duidelijk is :)
28.11.2018 - 12:54Zijn de rijen stokjes identiek of er in de rondte wordt gehaakt (mouwen) of heen en weer (pas). Op de mouwen heb je dan alleen de “voorkant”, terwijl je op de pas voor- en achterkant afwisselt. Hoe kun je ervoor zorgen dat er geen verschil is? Groeten, Mirte
20.11.2018 - 15:58DROPS Design answered:
Dag Mirte
Om de mouwen en de panden er gelijk uit te laten zien, kan je de mouwen ook heen en weer haken vanaf de scheiding door steeds het werk te keren nadat je een halve vaste in de derde losse het begin van de toer hebt gehaakt.
21.11.2018 - 10:46Hi, I am working the body and can\'t seem to make it add up. In row 1 of the body I start with 116 stitches for the medium but I\'m not left with 4 stitches at the end to make it even. I see on the diagram it shows the pattern uses 9 stitches but 2tog+sk2+sc+sk2+sc+sk2 is 10 stitches. I can\'t work out where I\'m going wrong, if anyone can offer any insight that would be great! Thank you
13.06.2018 - 22:28Charley answered:
After posting my question I have now seen my error. I was crocheting 2dc tog from previous row but have read properly now and it's 2dc tog in the same stitch. Thank you for the pattern x
13.06.2018 - 22:35Ik haak maat XXL. Een vraagje bij de pas: Ik vermeerder afwisselend links en rechts van de markeerders en om de toer 2 keer. Doe ik deze 2 keer ook thv de markeerders en zoja de welke en in welke toer? Vb toer 2 en 4? Of meer verspreid in de pas?
10.10.2017 - 19:55DROPS Design answered:
Hallo Nancy, Het is de bedoeling dat je het meerderen steeds afwisselend rechts en links van de markeerders doet. Als je om de twee naalden meerdert, meerder je de ene keer bijvoorbeeld links van de markeerders en 2 naalden later rechts van de markeerders. Je wisselt dus steeds af: als je de vorige keer links van de markeerders hebt gemeerderd, doe je het de volgende keer rechts van de markeerders en zo ga je steeds heen en weer.
04.11.2017 - 14:26Rebekka wrote:
Is row 4 also increasing on the right side of the marker or is this the left? The video for me is not clear enough on how to increase on the left and right of the markers. Is there a graph/diagram of how to achieve this? Does the marker move down the work in the middle of the increase? OR to each side of the increased stitch as you move down the work?
12.06.2017 - 14:53DROPS Design answered:
Dear Rebekka, the video below show how to increase alternately on the left and on the right of markers for a rounded yoke as in this pattern. Happy crocheting!
12.06.2017 - 15:42Hoi, ik moet nu de eerste regel van het lijf haken , mijn vraag is nu,,er staat , ga nu verder met 1 stk in elke stk/L op de toer , wil dat zeggen dat iK op die2 maal 8L die ik heb moeten haken in de vorige toer ook stokjes op moet haken? alvast bedankt ,Petra
26.05.2017 - 10:18DROPS Design answered:
Hallo Petra, Ja, dat klopt helemaal. Op iedere losse haak je een stokje en op ieder stokje haak je een stokje.
26.05.2017 - 16:13Hallo, ik begrijp bij de mouw niet zo goed wat wordt bedoeld met: naai de opening onder de mouw dicht (bij de afwerking) Moet je deze steken niet meenemen met het in het rond haken van de mouw? Dank alvast!
21.01.2017 - 15:43DROPS Design answered:
Hoi Stanneke. Je hebt gelijk. Je hoeft geen naad te sluiten. Wij zullen het weghalen.
26.01.2017 - 12:00