
Populära kategorier
Letar du efter ett garn?


Kommentarer / Frågor (11)
![]() Claudine skrev:
Claudine skrev:
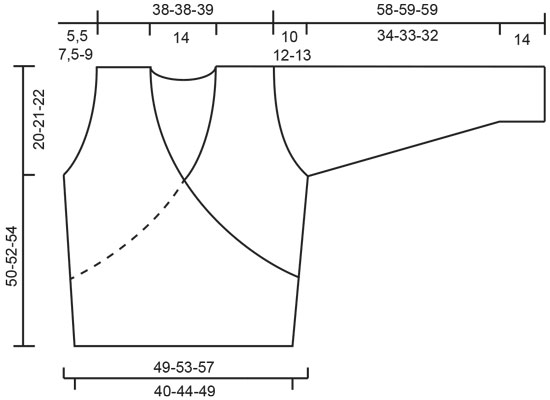
I have issues with the top right & left front with extra stitches and cannot do the assembly correctly. Reading the comments below I agree the increases should be decreases. I am about to frog both tops of the front pieces.
03.01.2025 - 18:32DROPS Design svarede:
Dear Claudine, the pattern is correct; these increases are only for the neck which is raised kind of like a lapel, as seen in the picture. If you have a different thread or gauge than that of the pattern the resulting effect may be too loose and it will fall instead of staying straight. Happy knitting!
05.01.2025 - 19:33
![]() DROPS Design skrev:
DROPS Design skrev:
Molly, your are right that the shawl collar piece that goes around the neck will have a height measure of approx 5 inch. This drapes up along your neck, and you fold the upper edge only. Depending on which yarn you are using the collar might drape differently. In SilkeTweed which is very drapey and crisp this works beautifully. SilkeTweed used in this design holds it's shape and doesn't "fall" down.
17.04.2009 - 18:10
![]() Molly skrev:
Molly skrev:
Correction to my last comment: The gauge for this project is more like 6 sts per inch (which is what I'm getting) so that 32-34 stitch collar is over 5 inches in width (height).
17.04.2009 - 08:31
![]() Molly skrev:
Molly skrev:
If 9 stitches is 1 inch in Silke-Tweed (and that is what I'm getting) then the collar, which is 33 stitches, is over 3.5 inches before the 2 thread part. This does seem quite tall-- does it scrunch up behind under the more rigid 2 thread detail? Is it possible there is a detail picture of the back of the collar? Or perhaps a clearer close-up of the collar on the existing picture? I've done the front right panel and, other than my back collar questions, it looks like the picture.
17.04.2009 - 05:56
![]() DROPS Design skrev:
DROPS Design skrev:
The inc for collar is also made at the center front edge. Pattern is edited.
14.04.2009 - 19:27
![]() Molly skrev:
Molly skrev:
Could you clarify this: "At the same time when the piece measures 32-33-34 cm [12-5/8" - 13" - 13-3/8"] inc 1 st at the center front 8-9-10 times every 7-6-6 rows = 60-61-63 sts." Elsewhere in the pattern it says specifically "center front edge" yet the instruction above says only "center front." Does that mean the increases should no longer be on the edge? That I should put them in the middle, like a bust dart?
14.04.2009 - 18:05
![]() Karen skrev:
Karen skrev:
We did post a reply on the 11 November 2006, please check further down this page. As we said in our reply, 66-11 is a 5-year-old pattern and no errors have been found to date. Also we have double checked the translation and this follows the original pattern. It may be that the photo doesn't reflect the true shape/design of the cardigan, and if you want a different look, your suggestions seem a good idea. Again if the instructions
05.01.2007 - 10:16
![]() MKelly skrev:
MKelly skrev:
Hi this is the 2nd time that I've written to you regarding 66-11 but noone has emailed me back and I don't see any corrections posted. I have knit this pattern and found numerous errors in it. A novice knitter or even an intermediate knitter would not be able to maneuver this pattern. The front has errors where it says" When piece measures 13" inc.1 st. at the center front 9 times. This should be a decrease not an increas as by the time you get to the collar you have a big lapel shape. It needs to be consistently decreasing at the front to give the v shaping needed. Not increasing and getting larger. The way the collar is described makes absolutely no sense whatso ever if the instructions for the front are not changed. It only will work if the front decreases to end with only the 28 st at the shoulder. As well knitting 2.75 " for the collar is too long and will not stand up as shown in the picture on the website. 35 stitches is not enough for the collar either. I used 95 sts.on a smaller (2.25) needle and double yarn and it then had the length and weith needed to stand up. I also made it 1.5 " instead of 2.75.There is no shaping included in this pattern to allow for the gradual sloping from the front edge to the stand up collar so that it is incorporated smoothly. The sleeves work fine until the underarm decrease of 3 st. either side of marker, but then it says to just knit back and forthe which is not adequate instruction because it doesn't say for how long. also it moves directly to the cap shaping and if I had not knit before I would end up with a 6" arm opening when a 9" arm opening to fit the body is needed. I ended up at the underarm decrease shaping it myself aas for the arm shaping on the body and then added 6 extra rows and then the cap shaping then it worked out a novice would be unable to figure all this out. In the end this is going to be fine but it is a painful pattern and I think there needs to be corrections made.
30.12.2006 - 19:54
![]() karen skrev:
karen skrev:
Hi Ya Ya, The Scandinavian version of this pattern is 5 years old and no errors have been found or noted to date. I've checked the translation against the original pattern and Frederikka's translation is word perfect and the instructions in full accordance with the original pattern. The jacket is meant to have a collar/lapel. You increase 9 sts for the collar which in Silketweed amounts to just over 1 inch (the width of the collar on front pieces) and continue over 33 sts for the collar to be sewn tog at the back. Silketweed is a rather rugged quality and the collar will "stand" rather than fall when you have completed the edge in 2 threads and folded it double. I hope this helps. If you don't get the desired look by following the pattern, your alternative sounds a good idea. Kind regards Karen
19.11.2006 - 23:34
![]() Ya Ya skrev:
Ya Ya skrev:
I am writing regarding pattern 66-11 the wrap around cardigan in Silke Tweed. There is an error in the pattern for the left and right fronts. Where the pattern reads,"At the same time when the piece measures 13 " inc. 1 st. at the centre front 9 times every 6 rows. This adds far too much material which then actually crosses over at the top instead of angling back towards the shoulder as it shows in the picture and the diagram.As well the next section tells us to leave 33 st on the needle for the collar and knit it an additional 2.75 " When the project is knit in this exact fashion it ends up being huge at the front with a lapel effect. I have since ripped it out and am now doing dec. every 6 rows instead of increases and will continue this until I reach 28 st. and will then put the front and back together and do a 3 needle bind off of the 28sts. to form the shoulder instead of casting off and then sewing it together. I then plan to pick up the cast off 28 sts. on the back for the neck and pick up enough stitches to begin making a collar that looks like the picture using short rows to achieve this. Then I will pick up the stitches all the way around the front and knit in reverse stockinette stitch the last 5 rows. If You have already found the errors and have a correction sheet for this would you please send it to me. I would appreciate hearing back from you either way regarding this pattern. Thanks so much have a good day....Ya Ya
17.11.2006 - 05:42
|
|
Kathmandu |
|
|
|
|
DROPS Kofta i «Silke-Tweed» med omlott-knytning och skärp.
DROPS 66-11 |
|
|
Stickfasthet: 23 m x 30 v på st 3,5 och slätst = 10 x 10 cm. Kom att ihåg st.nr endast är vägledande! Resår: * 1 rm, 1 am *. Upprepa från *-*. Mönster: Mönstret går över 6 v i höjden. * Sticka 3 v slätst med 1 tråd grön på st 2,5, byt till st 3,5 och sticka 3 v slätst med avigan ut med 1 tråd grön och 1 tråd gräsgrön *, upprepa från *-*. Sticktips: När det hänvisas till höger och vänster sida i beskrivningen, menas den sidan som är höger/vänster när plagget sitter på. Höger Framst: Lägg upp 94-104-114 m (inkl 1 kantm i varje sida) på st 2,5 med grön. Sticka resår i 7 cm - se förkl ovan - med 1 rätst m i varje sida. Byt till st 3,5 och sticka slätst uppöver samtidigt som det ökas 1 m i höger sida - se Sticktips 10-10-10 ggr på vart 7e-7e-8e v och 1 m i vänster sida 2-2-2 ggr på vart 7e-7e-8e v. Kontrollera stickfastheten. När arb mäter ca 13,5 cm (det är nu 98-108-118 m på st) avm det i vänster sida (ökningen fortsätts i höger sida) på vartannat v: 8 m 2-2-2 ggr, 2 m 6-9-12 ggr, 1 m 11-10-9 ggr och sedan på vart 4e v: 1 m 2-2-2 ggr = 65-70-75 m. När arb mäter 30-31-32 cm avm det för ärmhål i sidan på vartannat v: 3 m 1-2-3 ggr, 2 m 3-3-4 ggr och 1 m 4-6-5 ggr. Samtidigt när arb mäter 32-33-34 cm ökas det 1 m mot mitt fram 8-9-10 ggr på vart 7e-6e-6e v = 60-61-63 m. När arb mäter 50-52-54 cm avm det i sidan (från axeln och innåt mot halsen) 28-28-29 m = 32-33-34 m kvar på st. Dessa stickas vidare i slätst till krage. När kragen mäter 7 cm maskas det av. Vänster framst: Lägg upp och sticka som höger, men motsatt. Bakst: Lägg upp 94-104-114 m (inkl 1 kantm i varje sida) på st 2,5 med grön. Sticka 7 cm resår med 1 rätst m i varje sida. Byt till st 3,5 och sticka slätst uppöver samtidigt som det ökas 1 m i varje sida 10-10-10 ggr på vart 7e-7e-8e v = 114-124-134 m. Kontrollera stickfastheten. När arb mäter 30-31-32 cm avm för ärmhål i varje sida som på framst = 88-88-90 m. När arb mäter 49-51-53 cm maskas de mittersta 28-28-28 m av till hals. Vidare avm det 2 m på nästa v mot halsen = 28-28-29 m kvar på varje axel. Maska av när arb mäter 50-52-54 cm. Ärm: Lägg upp 58-60-62 m på strumpst 2,5 med grön, sticka 4 v rätst. Fortsätt med Mönster - se förkl ovan - till arb mäter ca 14-14-14 cm. Byt till strumpst 3,5, och sticka slätst till färdig mått - samtidigt efter Mönstret ökas det 2 m mitt under ärmen 13-15-16 ggr på stl S: vart 8e v, stl M: växelvis vart 6e och 7e v, stl L: vart 6e v = 84-90-94 m. När arb mäter 48-47-46 cm avm det 6-6-6 m mitt under och ärmen stickas färdig fram och tillbaka på st. Vidare avm det till ärmkulle i varje sida på vartannat v: 3 m 1-1-1 gång, 2 m 2-2-2 ggr, 1 m 7-10-12 ggr, 2 m 2-2-2 ggr och 3 m 2-2-2 ggr. Maska av, arb mäter ca 58-59-59 cm. Montering: Sy axelsömmarna. Plocka upp från rätsidan på st 3,5 med grön: ca 140-160 m längs höger framst till mitt bak. Byt till 1 tråd grön + 1 tråd gräsgrön, sticka 5 v slätst med avigan ut, maska av. Upprepa längs vänster framst. Vik framkanterna dubbla mot avigan och sy fast. Sy ihop kragen mitt bak och sy den mot halskanten bak. Montering: Sy sidsömmarna på fram- och bakst, men i höger sidsöm lämnas ett hål på 4 cm rätt över resåren (till att trä knytbandet genom), sy med knapphålstygn runt hålet. Sy i ärmarna mot fram- och bakst. Knytband: Plocka upp 19 m på st 2,5 med grön längs höger framst-sida (plocka inte upp m längs resåren). Sticka resår med 1 rätst m i varje sida. Samtidigt när bandet mäter 3, 6 och 9 cm avm det 1 m i varje sida (innanför 1 kantm) = 13 m. Sticka till knytbandet mäter ca 70 cm, maska av med rm över rm och am över am. Plocka upp och sticka ett likadant band på vänster framst. |
|
 |
|
Har du gjort detta mönster?Tagga då dina bilder med #dropspattern eller skicka in de till #dropsfan galleriet. Behöver du hjälp med mönstret?Du hittar 19 instruktionsvideoer, kommentarer/frågor och mer i mönstret på www.garnstudio.com © 1982-2026 DROPS Design A/S. Alla rättigheter är reserverade. Detta dokument med tillhörande underdokument har copyright. Läs mer om vad du kan göra med våra mönster längst ner på vår hemsida. |


Med över 40 år i stick- och virkbranschen erbjuder DROPS Design en av de mest omfattande samlingarna av gratis mönster på internet - översatt till 17 språk. Per idag har vi 324 kataloger och 12290 mönster på och alla är översatta till Svenska.
Vi arbetar hårt för att kunna erbjuda det bästa inom stickning och virkning, inspiration och goda råd, men också kvalitetsgarn till fantastiska priser! Vill du använda våra mönster till annat än personligt användande? Du kan läsa om vilka regler som gäller i texten Copyright längst ner på sidan på alla våra mönster. Lycka till!
Kommentera mönster DROPS 66-11
Vi vill gärna ha din åsikt om denna modell!
Om du har en fråga kring den, kom ihåg att välja rätt kategori i menyn under, så får du snabbare svar! Obligatoriska fält är markerade med *.