
Popular categories
Looking for a yarn?


Comments / Questions (63)
![]() Päivi wrote:
Päivi wrote:
Gello, wondering when crocheting the decoration, is there really a 1cm gap in between? Looking at the picture it does not look like it?
01.10.2025 - 13:38
![]() Sofia wrote:
Sofia wrote:
Nybörjare som jag är så måste jag fråga. Jag tänkte sticka denna i strl 62/68 och det står att man ska använda rundstickor strl 4,5 60 cm + 40 cm. Behöver jag både rundstickor 60cm och 40 cm? Eller hur menas det?
19.03.2022 - 21:25DROPS Design answered:
Hei Sofia. I de to minste str. er det anbefalt du har både 60 cm og 40 cm. Etter du har felt 10 ganger i sidene på kjolen og har 120 masker på pinnen, det er det vanskelig å ha maskene på en 60 cm pinne, derfor er det oppgitt 40 cm pinne også. mvh DROPS Design
21.03.2022 - 14:12
![]() Michelle wrote:
Michelle wrote:
Hei! Jeg har kommet til felling av halskanten og skjønner ikke hvordan man feller «5-6-7 (7-8) m 1 gang, 2 m 2 ganger og 1 m 2 ganger» Skal det felles av eller skal man bare forminske antall masker?
25.11.2021 - 21:16DROPS Design answered:
Hei Michelle, Du skal felle av maskene. God fornøyelse!
26.11.2021 - 06:59
![]() Anna wrote:
Anna wrote:
Hei Teen mekkoa pienimmässä koossa ja en ymmärrä ensimmäistä kavennusta, jossa käsketään kaventamaan 5 krs välein 10x1 s merkkilangan molemmin puolin. Montako silmukkaa kaventuu yhdellä kierroksella?
18.09.2021 - 10:17
![]() Pia-Elise wrote:
Pia-Elise wrote:
Hei. Jeg forstår ikke hvordan jeg skal plukke opp masker til venstre forstykke. Det står " strikk opp 4 ma på baksiden av de 4 første m mot midt foran på høyre forstk". Med bakside, menes det vrangsiden av forstykket? Og hva menes med de 4 første m mot midt foran på høyre forstk? Synes dette sto veldig vanskelig skrevet.
13.10.2020 - 16:02DROPS Design answered:
Hej Pia-Elise. Det är bak de 4 maskorna mitt fram (på vrangsidan), som du plockar upp maskor. Det är för att du ska få en stolpe där du sedan ska sy fast knappar. Mvh DROPS Design
14.10.2020 - 12:05
![]() Cecilia wrote:
Cecilia wrote:
SE puede hacer hacer este vestido con dos agujas en vez de agujas circulares? muchas gracias
03.08.2020 - 14:35DROPS Design answered:
Hola Cecilia. Por su elevado número de puntos y porque es un modelo sin costura, se recomienda usar una aguja circular. Con la aguja circular, los puntos se trabajan de la misma manera que con las agujas rectas. Si no tienes posibilidad de comprar una aguja circular, puedes intentar hacer el modelo con agujas rectas (en este caso hay que dividir los puntos para los delanteros y la espalda y añadir los puntos orillo para las costuras). Aquí tienes un tutorial: https://www.garnstudio.com/lesson.php?id=13&cid=23
16.08.2020 - 17:04
![]() Eva wrote:
Eva wrote:
Jag skulle vilja byta garn till Baby Merino på denna klänning. Detta garn nämns inte som alternativ i konverteraren men det ser lika tjockt ut som Cotton Light (som däremot nämns) som jag har jämfört med. Funkar det att byta till Baby Merino i mönstret tro?
16.07.2020 - 12:09DROPS Design answered:
Hej Eva, DROPS Baby Merino tilhører garngruppe A og er tyndere end DROPS Merino Extra Fine som tilhører garngruppe B. Men du kan søge på kjoler, baby og baby merino, så får du flere kjoler op til baby. God fornøjelse!
30.07.2020 - 14:48
![]() Regina wrote:
Regina wrote:
Hallo, möcht gerne das Kleid "Baby Harriet" in 2 verschiedenen Größen stricken, in 74/80 und 86/92. Habe aber eine Wolle, die eine andere Lauflänge hat als in der Anleitung angegeben. Meine Wolle hat eine Lauflänge von 150m pro 50g. Maschenprobe : 25M.x34R.glatt gestrickt= 10x10cm Können Sie mir bitte helfen bei der Umrechnung? Ich würde mich sehr darüber freuen.
25.03.2020 - 21:23DROPS Design answered:
Liebe Regina, leider können wir jeder Anleitung nach jedem individuellen Frage anpassen und einzelne Modelle auf individuellen Wunsch hin umrechnen. Wenn sie Hilfe damit brauchen, wenden Sie sich bitte an dem Laden wo Sie die Wolle gekauft haben, dort hilft man Ihnen gerne weiter. Sie können auch mal nach einem anderen Modell aussuchen, das Ihre Mascheprobe passt. Viel Spaß beim stricken!
26.03.2020 - 09:39
![]() Simona Campus wrote:
Simona Campus wrote:
Gentilissimi, ho concluso la parte a maglia rasata. Ora sto lavorando in tondo, a grana di riso e dovrei fare le riduzioni per gli scalfi. Non riesco a procedere lavorando in tondo. Dove sbaglio? Sono arrivata alla conclusione di dover lavorare su ferri tradizionale il davanti e il dietro e solo a quel punto procedere con la riduzione in due ferri successivi. Potete darmi qualche suggerimento? Grazie come sempre.
14.09.2019 - 00:50DROPS Design answered:
Buongiorno Simona, se ci spiega nel dettaglio qual è il problema con la lavorazione in tondo, potremo aiutarla in modo più preciso. In ogni caso può lavorare anche in piano mantenendo 1 maglia di vivagno a ogni lato. Buon lavoro!
14.09.2019 - 15:13
![]() Simona Campus wrote:
Simona Campus wrote:
Buonasera, quando si parla di cavo connettore per ferri circolari, si intende 60 cm per tutti e 100 cm (60+ 40) per le due misure più grandi (non più piccole)? Oppure cavo da 40 cm per le due misure più piccole (ma da utilizzare con punte corte però?). Grazie
10.09.2019 - 18:21DROPS Design answered:
Buonasera Simona, le servirà un cavo da 60 cm per le misure più grandi e da 40 cm per quelle più piccole. I cavi non vanno uniti e di solito le misure sono comprensive di punte. Buon lavoro!
10.09.2019 - 18:50
|
|
Baby Harriet#babyharrietdress |
|
 |
 |
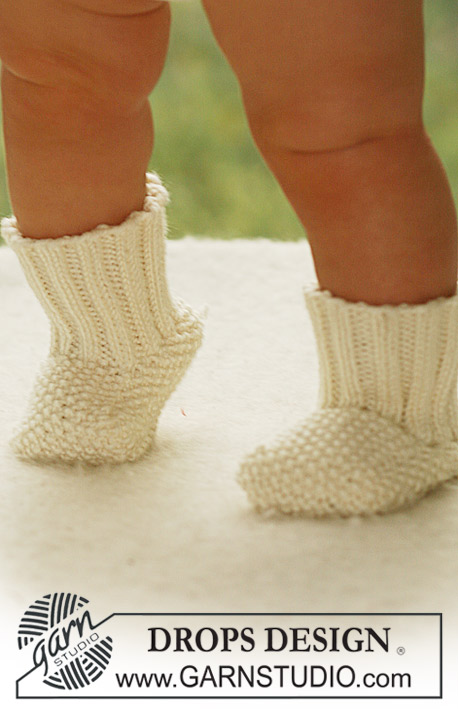
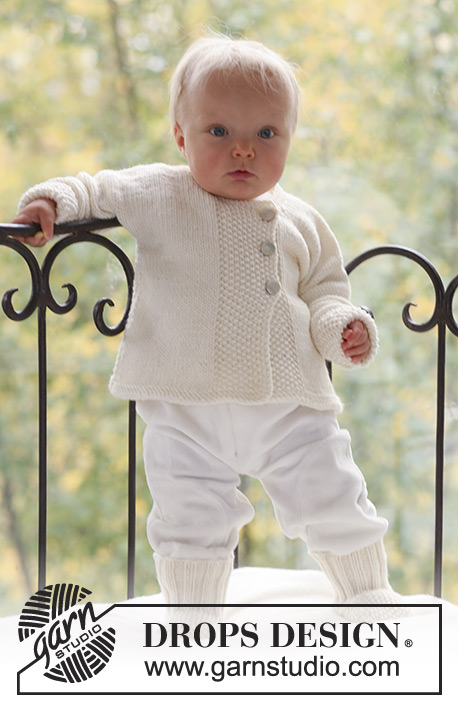
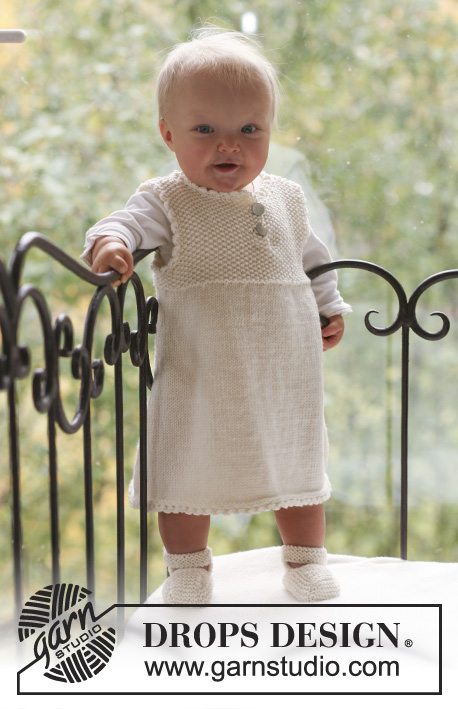
Set of knitted booties and dress with yoke in moss st for baby and children, in DROPS Merino Extra Fine
DROPS Baby 18-9 |
|
|
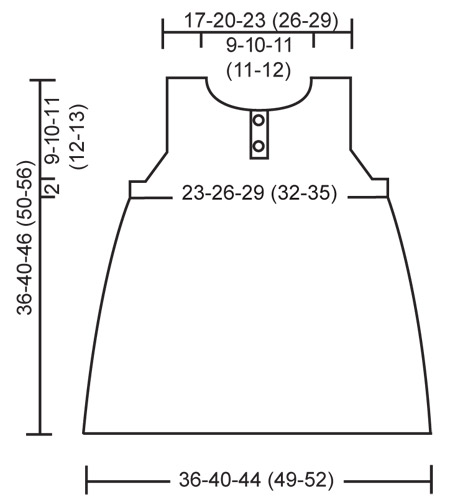
DRESS DECREASING TIP: Dec as follows before marker: K2 tog. Dec as follows after marker: Slip 1 st as if to K, K1, psso. MOSS ST: Row 1: * K1, P1 *, repeat from *-*. Row 2: K over P and P over K. Repeat row 2. BUTTONHOLES: Make buttonholes on right front piece. 1 buttonhole = K tog 2nd and 3rd st from mid front and make 1 YO. Make buttonholes when piece measures 29-32-37 (40-45) cm and 32-36-41 (45-50) cm. ---------------------------------------------------------- DRESS: Worked in the round on circular needle. Cast on 144-160-176 (196-208) sts on circular needle size 4.5 mm with Merino Extra Fine. Insert 1 marker each side (= 72-80-88 (98-104) sts between markers on front and back piece). K 1 round, P 1 round and continue in stocking st. REMEMBER THE KNITTING TENSION! When piece measures 5 cm dec 1 st on each side of both markers – SEE DECREASING TIP – and repeat the dec on every 5-6-7 (8-9) round a total of 10 times = 104-120-136 (156-168) sts. When piece measures 25-28-33 (36-41) cm dec 12-16-20 (28-28) sts evenly on round (dec an equal amount of sts on front and back piece) = 92-104-116 (128-140) sts. P 1 round and now continue in moss st – SEE ABOVE. When piece measures 27-30-35 (38-43) cm cast off 6 sts each side (= 3 sts on each side of both markers), and complete front and back pieces separately. BACK PIECE: = 40-46-52 (58-64) sts. Continue in moss st, AT THE SAME TIME cast off to shape the armhole each side at the beg of every row: 1 st 3 times = 34-40-46 (52-58) sts. When piece measures 34-38-44 (48-54) cm cast off the middle 16-18-20 (20-22) sts for neck and complete each side separately. Cast off 1 st on neckline on next row = 8-10-12 (15-17) sts left on shoulder. Cast off when piece measures 36-40-46 (50-56) cm. FRONT PIECE: = 40-46-52 (58-64) sts. Insert a marker between the 2 middle sts. Continue in moss st and cast off for armholes each side as described for back piece. AT THE SAME TIME when piece measures 28-31-36 (39-44) cm divide piece in two from RS as follows: Slip sts from the side and up to 2 sts before marker mid front on a stitch holder, and continue on remaining sts for right front piece. RIGHT FRONT PIECE: = sts on left side of piece as seen from RS + 2 sts to the right of marker mid front. Continue in moss st and continue dec for armhole. When dec for armhole are complete there are 19-22-25 (28-31) sts on row. When piece measures 29-32-37 (40-45) cm make buttonhole – SEE ABOVE. When piece measures 33-37-42 (46-51) cm cast off to shape the neckline at the beg of every row from mid front as follows: 5-6-7 (7-8) sts 1 time, 2 sts 2 times and 1 st 2 times = 8-10-12 (15-17) sts left on shoulder. Cast off when piece measures 36-40-46 (50-56) cm. LEFT FRONT PIECE: Slip sts from stitch holder back on needle and pick up 4 sts on the back of the first 4 sts towards mid front on right front piece. Continue as described for right front piece, but without the buttonholes. ASSEMBLY: Sew shoulder seams and sew on buttons to fit buttonholes. CROCHET BORDER: Crochet a border round neckline, armholes and along bottom edge with crochet hook size 3.5 mm as follows: * 1 dc, 3 ch, 1 tr in the first of these 3 ch, skip 1 cm *, repeat from *-*, and finish with 1 sl st in first dc from beg of round. ---------------------------------------------------------- BOOTIES: Foot length: 10-11-12 (14-16) cm. GARTER ST (back and forth on needle): K all rows. GARTER ST (in the round): K 1 round, P 1 round. ---------------------------------------------------------- RIGHT BOOTIE: Worked in garter st. Beg with the sole as follows: Cast on 14-17-19 (23-27) sts on double pointed needles size 4 mm with Merino Extra Fine and work garter st back and forth on needle – SEE ABOVE – for 4-4-4½ (5-5) cm. Now pick up sts round the sole as follows: 6-8-9 (10-11) sts along each short side and 14-17-19 (23-27) sts along cast on row = 40-50-56 (66-76) sts. Round begins at the beg of cast on row. Work garter st in the round – SEE ABOVE – for 2-2-2 (3-3) cm. Work next round as follows: Cast off the first 10-12-13 (15-16) sts, work the next 14-18-21 (26-33) sts and then slip them on a stitch holder (= heel), cast off the next 10-12-13 (15-16) sts and keep the last 6-8-9 (10-11) sts on needle (= upper foot). Work garter st back and forth on needle for 4½-5-5½ (6-6½) cm, and then cast off. Slip sts from stitch holder back on needle = 14-18-21 (26-33) sts. Work 2 cm garter st back and forth on needle. At the end of next row from RS cast on 14 new sts for strap = 28-32-35 (40-47) sts. Work garter st on all sts, AT THE SAME TIME after 1 cm make 1 buttonhole at the end of strap as follows: K tog 3rd and 4th st from edge and make 1 YO. Continue in garter st until strap measures 2 cm and cast off. ASSEMBLY: Sew the upper piece to bootie both sides, edge to edge with small, neat sts – leave an opening measuring approx ½-½-½ (1-1) cm between upper piece and edge at the back. Sew on button to fit buttonhole on strap. LEFT BOOTIE: Like right bootie, but when casting on new sts for strap, cast on at the end of row from WS in order to have the strap at the opposite side . |
|
 |
|
Have you finished this pattern?Tag your pictures with #dropspattern #babyharrietdress or submit them to the #dropsfan gallery. Do you need help with this pattern?You'll find 17 tutorial videos, a Comments/Questions area and more by visiting the pattern on garnstudio.com. © 1982-2026 DROPS Design A/S. We reserve all rights. This document, including all its sub-sections, has copyrights. Read more about what you can do with our patterns at the bottom of each pattern on our site. |
|


With over 40 years in knitting and crochet design, DROPS Design offers one of the most extensive collections of free patterns on the internet - translated to 17 languages. As of today we count 324 catalogues and 12290 patterns translated into English (UK/cm).
We work hard to bring you the best knitting and crochet have to offer, inspiration and advice as well as great quality yarns at incredible prices! Would you like to use our patterns for other than personal use? You can read what you are allowed to do in the Copyright text at the bottom of all our patterns. Happy crafting!
Post a comment to pattern DROPS Baby 18-9
We would love to hear what you have to say about this pattern!
If you want to leave a question, please make sure you select the correct category in the form below, to speed up the answering process. Required fields are marked *.