
Popular categories
Looking for a yarn?


Comments / Questions (85)
![]() Fia wrote:
Fia wrote:
Jag stickar wfter storlek L och ska nu börja med rätstickningen. Det står att jag ska göra sju maskor mitt fram, ska jag då först sticka 47 rm innan jag börjar med rärstickningen? Med tanke på att jag börjar varvet under en arm.
26.09.2025 - 07:34DROPS Design answered:
Hei Fia. Ja, det stemmer. mvh DROPS Design
06.10.2025 - 14:46
![]() Eveline Elens wrote:
Eveline Elens wrote:
Beste, ik ben dit patroon in XS aan het breien. Hoe begin ik met de tekening op hoogte van 42cm als het pijltje in midden voor moet komen? Begin van de rij is aan de zijkant en het aantal steken tot middenvoor bedraagt 31? Alvast bedankt voor jullie antwoord! Met vriendelijke groeten Eveline
03.10.2024 - 09:37DROPS Design answered:
Dag Eveline,
Als je steeds de naald midden voor begint en eindigt, dan kun je gewoon het patroon midden voor starten en zou je ook midden voor uit moeten komen met de pijl dus op de juiste plek.
19.10.2024 - 12:37
![]() Annelise wrote:
Annelise wrote:
Jeg fik løst problemet, som jeg beskrev i nedenstående kommentar.
15.07.2024 - 12:54
![]() Annelise Dahlbæk wrote:
Annelise Dahlbæk wrote:
Efter M1, M2 og M3 er strikket første gang er der 208 masker på pinden. Når der skal sættes mærketråde efter de 25 cm, skal der sættes mellem 33, 37, 33, 33, 37 og 33 masker. Det bliver i alt 206 masker. Hvorfor har jeg to masker i overskud? Sætter jeg mærketrådene forkert? Jeg tætter dem mellem to masker ikke omkring en maske, da jeg i så fald vil komme til at mangle 4 masker.
14.07.2024 - 12:28DROPS Design answered:
Hej Annelise. Mærketråd-3 och mærketråd-6 sätter du i (omkring) nästa maske, då ska det stämma. Mvh DROPS Design
16.07.2024 - 14:58
![]() Tamara wrote:
Tamara wrote:
Frage zu Antwort am 29.05.24 um 08:05: Nach dem Rippenmuster habe ich ja ausschließlich linke M. auf der Nadel. Laut Diagramm kommen leere Kästchen (links auf links). Somit kommen zwischen den Umschlägen linke Maschen. Verstehe ich das falsch? Oder sollte das Rippenmuster mit rechten M. enden? Vielen Dank für eure Hilfe
29.05.2024 - 09:30DROPS Design answered:
Liebe Tamara, am Anfang, dh ganz unten wird die Arbeit in der Runde gestrickt, dh alle Reihen sind Hin-Reihen, und die Maschen werden in M. 1 bi der 1., 2. und 3. Reihe rechts gestrickt (also mit Abnahmen/Umschläge bei der 3. Reihe) und bei der 4. Reihe in M.1 (3 M links, 11 M rechts, 4 M links) gestrickt, da immer noch in der Runde, dh wie die Maschen bei der Vorderseite aussehen sollen. Viel Spaß beim Stricken!
29.05.2024 - 17:18
![]() Tamara wrote:
Tamara wrote:
Hallo, ich benötige Hilfe bei m1. Bei der 4. Reihe wird der mittlere Teil ja so gestrickt wie die Maschen erscheinen. Wie stricke ich denn dann die Umschläge? Vielen Dank im voraus.
28.05.2024 - 22:15DROPS Design answered:
Liebe Tamara, stricken Sie die 18 M von jedem M.1 genauso wie im Diagram, dh: *3 Maschen links, 11 Maschen rechts (dh einschl. Umschläge) und 4 Maschen links*, von *bis* wiederholen. Viel Spaß beim Stricken!
29.05.2024 - 08:05
![]() Aisa wrote:
Aisa wrote:
Hvor mange garnnøster (Karisma) trenger jeg til en tunika i str. XS, 10 cm kortere enn i oppskriften?
03.12.2023 - 10:00DROPS Design answered:
Hei Aisa. Vi har ikke strikket den 10 cm kortere så en nøyaktig garnmengde har vi ikke. Men vil tippe 1-2 nøster mindre. mvh DROPS Design
04.12.2023 - 10:19
![]() Christelle R wrote:
Christelle R wrote:
Bonjour. Merci pour ces précisions mais après M4, j'ai toujours 144 m puisque les 2 jetés compensent les 2 dim de M3...J'ai du louper quelque chose
20.04.2022 - 14:30Christelle R answered:
Gloups ! Je viens de voir mon erreur : j'ai tricoté M3 par erreur. Ceci explique cela. Encore merci et bravo pour tous ces magnifiques modèles. Bien cdlt
20.04.2022 - 14:33
![]() Christelle R wrote:
Christelle R wrote:
Bonjour. Je fais le modèle en taille S. A 57cm, je dois augmenter 1m de chaque côté des marqueurs des côtés soit 4 aug. par rg. Je dois le faire 2x. Soit 8 aug. + 144 m initiales= 152 or vous indiquez un total de 172 m ! Je ne comprends pas. Merci de votre retour. Bien cordialement
15.04.2022 - 21:32DROPS Design answered:
Bonjour Christelle, sur vos 144 mailles, vous tricotez d'abord M.1, puis M.2 et enfin M.4 - et, dans M.4, vous augmentez 2 mailles x 8 fois M.4 tout le tour = 16 soit 160 mailles. Vous augmentez ensuite 3 fois 2 mailles de chaque côté (l'augmentation + les 2 répétitions) soit 160 + 3x4 = 172 mailles. Bon tricot!
19.04.2022 - 14:07
![]() Frauke HENZE wrote:
Frauke HENZE wrote:
Hallo, ich habe noch eine Frage. Ich bin jetzt beim Halsausschnitt. Bleiben alle Maschen auf der Rundnadel, oder sollte ich die einzelnen Teile auf eine Hilfsnadel ziehen.? Da ja nach dem Armausschnitt jedes Teil einzeln gestrickt wird. Würde mich freuen über eine rasche Antwort. Mit frdl. Gruß.
13.09.2020 - 20:45DROPS Design answered:
Liebe Frau Henze, wenn Sie die Arbeit teilen, können Sie nur die Maschen, die Sie stricken sollen, auf den Nadeln bleiben und die anderen stilllegen, die werden dann später aufgefassen und gestrickt. Viel Spaß beim stricken!
14.09.2020 - 09:12
|
|||||||||||||||||||||||||
Dancing Jewels |
|||||||||||||||||||||||||
 |
 |
||||||||||||||||||||||||
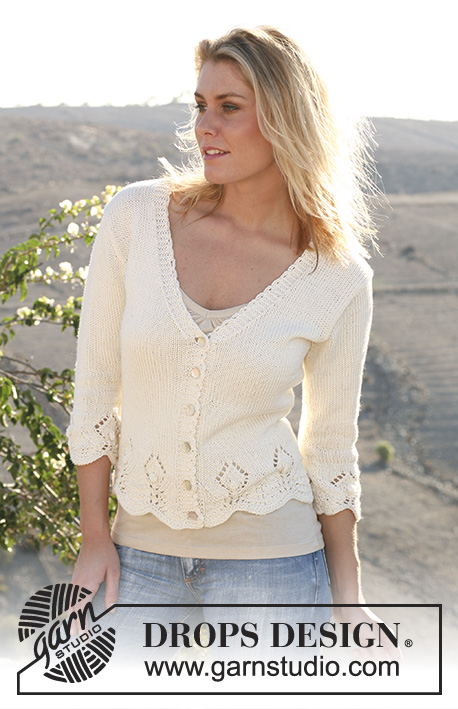
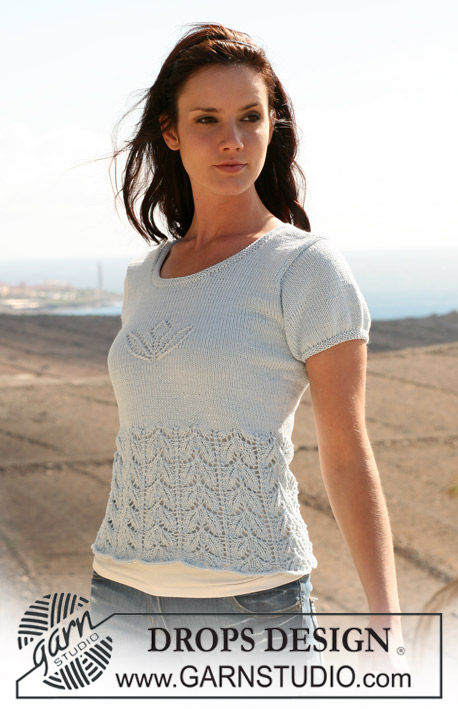
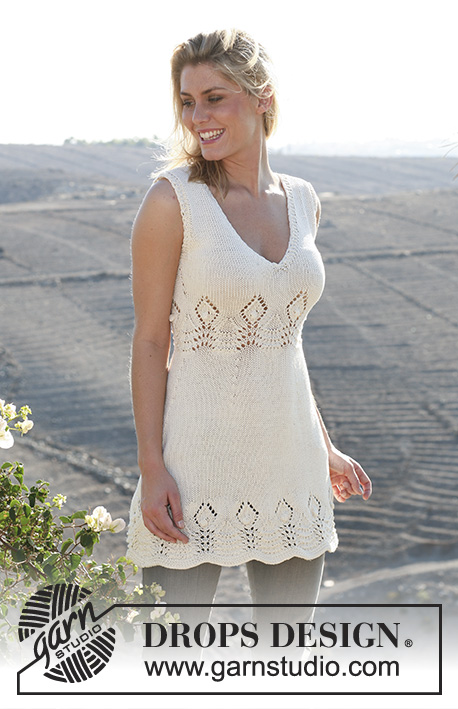
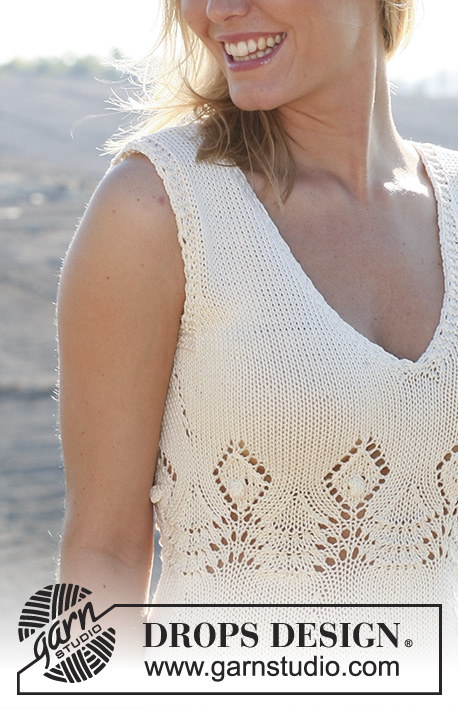
DROPS dress in textured pattern in “Muskat”.
DROPS 106-2 |
|||||||||||||||||||||||||
|
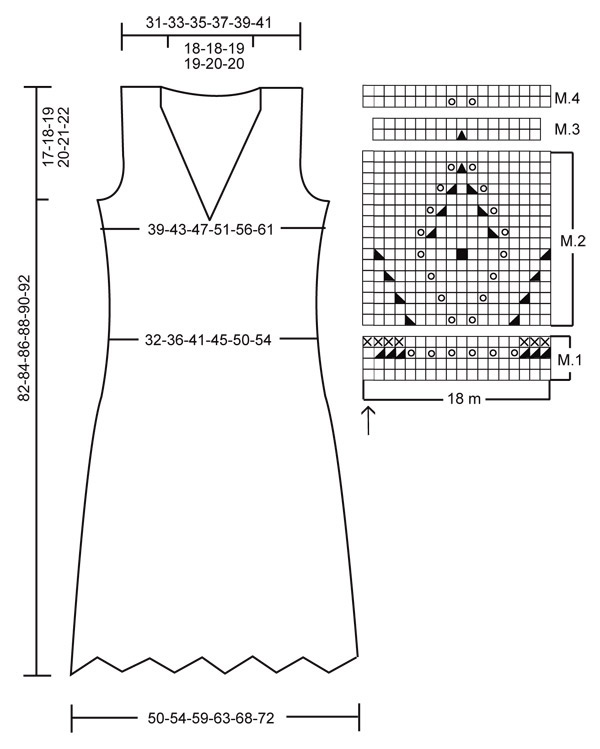
Garter st, back and forth on needle: K all rows Garter st, in the round: K 1 round, P 1 round. Pattern: See diagram M.1 to M.4. The diagram shows the pattern from the RS side.. Decreasing tip 1, apply to neckline: Dec as follows before Marking Thread (MT): K2 tog Dec as follows after Marking Thread (MT): slip 1 st as if to knit, K1, psso. Decreasing tip 2: All dec done from RS. Dec inside 3 garter sts. Dec as follows after 3 sts: slip 1 st as if to knit, K1, psso. Dec as follows before 3 sts: K2 tog Measuring tip: Because of the weight of the yarn, make all measurements while the garment is hanging, otherwise it will be too long when worn. Dress, front and back piece: Knitted in the round from bottom up. See Measuring tip! Loosely cast on 198-216-234-252-270-288 sts on circular needle size 4.5 mm with Muskat. P 1 round, K 1 round, P 1 round, K 1 round, P 1 round. Continue in M.1, work 4 vertical repeats of M.1, and then work M.2 and M.3. Piece now measures approx 15 cm and there are 176-192-208-224-240-256 st s on needle. Continue in stocking st. Remember the knitting tension. When piece measures 24-24-25-25-26-26 cm insert 6 Marking Threads (MT) as follows: work 27-30-33-36-38-41 sts, MT-1, work 33-35-37-39-43-45 sts, MT-2, work 27-30-33-36-38-41 sts, MT-3 in next st (= side), work 27-30-33-36-38-41 sts, MT-4, work 33-35-37-39-43-45 sts, MT-5, work 27-30-33-36-38-41 sts, MT-6 in next st (= side). On next round dec 1 st on both sides of st with MT-3 and MT-6 (i.e. at sides) – see Dec tip 1. Repeat this dec on every 6-6-7-7-9-9 round a total of 8-8-7-7-6-6 times. At the same time, when doing the 4-4-3-3-2-2 dec, also dec 1 st by the remaining MT as follows: after MT-1 and MT-4 and before MT-2 and MT-5 – see Dec tip 1. Repeat this dec on every 6-6-7-7-9-9 round (same rounds as dec at sides) a total of 4 times. After all dec are complete there are 128-144-164-180-200-216 sts on round and piece measures approx 40-40-41-41-42-42 cm. Continue in stocking st, remove MT-1, 2, 4 and 5, at the same time for size XS + XL: dec 2 sts evenly on front piece on first round, size M: dec 2 sts evenly on back piece on first round, (in order to have 1 st mid front and mid back and to make number of sts fit M.2) = 126-144-162-180-198-216 sts (no dec in size S, L and XXL). When piece measures 42-43-44-45-46-47 cm work 3 vertical repeats of M.1 – NB! Make sure arrow in diagram is mid front. Continue in M.2 and M.4 - make sure to place pattern with middle st over middle of M.1 as shown in diagram. After M.4 there are again an equal number of sts front and back because of the additional inc in M.4 for size XS + M + XL. Continue in stocking st. At the same time when piece measures 56-57-58-60-61-62 cm inc 1 st on both sides of MT at sides, and repeat this inc for the 3 smaller sizes on every 2-2-3 cm 3-2-1 times = 156-172-188-204-224-244 sts (= 77-85-93-101-111-121 sts on front and back piece + 1 st each side). Neckline: At the same time, when piece measures 62-63-64-65-66-67 cm work 4 rows garter st on the 7 sts mid front. Now dec the middle st and continue back and forth on needle. Continue with 3 garter st towards neckline and dec to shape the neckline on every other row – see Dec tip 1: 1 st 11-12-12-12-13-13 times, and then on every 4th row: 1 st 6 times. . Armhole: At the same time, when piece measures 64-65-66-67-68-69 cm work 4 rows garter st on 13-13-15-17-19-21 sts each side (i.e. st with MT + 6-6-7-8-9-10 sts either side), work remaining sts as before. Now cast off the middle 7-7-9-11-13-15 sts each side for armhole, and complete front and back pieces separately. Left front piece: Continue dec for neckline and dec to shape the armhole – see Dec tip 2 – inside 3 garter sts on every other row: 1 st 5-7-8-9-11-13 times. After all dec are complete there are 13-15-16-18-19-21 sts left on shoulder. Continue in stocking st with 3 garter sts each side and cast off when piece measures 82-84-86-88-90-92 cm. Right front piece: Like left front piece, but mirrored. Back piece: = 71-79-85-91-99-107 sts. Dec to shape the armhole as described for front piece = 61-65-69-73-77-81 sts. Continue in stocking st with 3 garter sts each side. When piece measures 76-78-80-82-84-86 cm work 4 rows garter st on the middle 31-31-33-33-35-35 sts, and now cast off the middle 25-25-27-27-29-29 sts for neck. Continue with 3 garter sts each side and dec to shape the neckline on every other row: 1 st 5 times – see Dec tip 2 = 13-15-16-18-19-21 sts left on each shoulder. Cast off when piece measures 82-84-86-88-90-92 cm. Assembly Sew shoulder seam. Crochet border: Crochet a border on crochet hook size 4 mm with Muskat round neckline and armholes as follows: 1 dc in first st, *3 ch, skip 1 cm, 1 dc*, repeat from *-*. |
|||||||||||||||||||||||||
Diagram explanations |
|||||||||||||||||||||||||
|
|||||||||||||||||||||||||
 |
|||||||||||||||||||||||||
Have you finished this pattern?Tag your pictures with #dropspattern or submit them to the #dropsfan gallery. Do you need help with this pattern?You'll find 24 tutorial videos, a Comments/Questions area and more by visiting the pattern on garnstudio.com. © 1982-2026 DROPS Design A/S. We reserve all rights. This document, including all its sub-sections, has copyrights. Read more about what you can do with our patterns at the bottom of each pattern on our site. |
|||||||||||||||||||||||||


With over 40 years in knitting and crochet design, DROPS Design offers one of the most extensive collections of free patterns on the internet - translated to 17 languages. As of today we count 325 catalogues and 12298 patterns translated into English (UK/cm).
We work hard to bring you the best knitting and crochet have to offer, inspiration and advice as well as great quality yarns at incredible prices! Would you like to use our patterns for other than personal use? You can read what you are allowed to do in the Copyright text at the bottom of all our patterns. Happy crafting!
Post a comment to pattern DROPS 106-2
We would love to hear what you have to say about this pattern!
If you want to leave a question, please make sure you select the correct category in the form below, to speed up the answering process. Required fields are marked *.