
Popular categories
Looking for a yarn?


Comments / Questions (70)
![]() Lisa wrote:
Lisa wrote:
Kan jeg strikke denne ovenfra og ned?
28.03.2026 - 11:10DROPS Design answered:
Hei Lisa. Ja, men du må selv tilpasse oppskriften (både tekst og diagram). mvh DROPS Design
07.04.2026 - 08:14
![]() Annie Albér wrote:
Annie Albér wrote:
Er opskriften rettet når man printer den ud ¿ jeg kan ikke rigtig se forskellen på det rettet og det jeg har printet ud. Hilsen annie
31.01.2025 - 00:08DROPS Design answered:
Hei Annie. Ja den er rettet når du printer den ud. Mvh DROPS Design
31.01.2025 - 11:04
![]() Marianne MøllerNielsen wrote:
Marianne MøllerNielsen wrote:
1.pind i M1 jeg får for mange masker. Der er 4 omslag men kun 2 masker indtaget. Efterfølgende rækker, passer mønsteret så ikke i, og hver gang jeg strikker 1. Række øger jeg maskeantallet. Hvad er det jeg misser i dette diagram?
27.07.2022 - 10:13DROPS Design answered:
Hej Marianne, jo på 3.pind i diagrammet strikker du mønsteret over 16 masker og på 5.pind tager du ind fra 16 masker til 14 masker igen, de sidste pinde i diagrammet strikkes over 14 masker. Sæt gerne et mærke imellem hver rapport. God fornøjelse!
04.08.2022 - 09:28
![]() Aase Bolvig Sørensen wrote:
Aase Bolvig Sørensen wrote:
Hvorfor har jeg for lidt masker når jeg har strikket mønster 2
17.06.2022 - 11:21
![]() Aase Bolvig Sørensen wrote:
Aase Bolvig Sørensen wrote:
Jeg har problemer med M1 række 9. Når jeg strikker den er der 1 maske for meget på hver side af "midter" masken
08.06.2022 - 13:16DROPS Design answered:
Hej Aase, på pind nr 9 har du 14 masker (ifølge diagrammet) de skal strikkes således: 1r, omslag, 3r, omslag, 3 tages ind til 1, 1r, 3 tages ind til 1, omslag, 3r, omslag = ialt 4 omslag og 4 m taget ind. Sæt gerne 1 mærke imellem hver rapport af diagrammet. God fornøjelse!
08.06.2022 - 15:14
![]() Clasina wrote:
Clasina wrote:
Wat moet ik doen bij een zwarr vakje: dit is geen steek, sla dit hokje over? In de toer eronder zijn gewone rechte steken gebreid, wat moet ik daarmee doen?
20.05.2022 - 08:44DROPS Design answered:
Dag Clasina,
In de eerstvolgende steek van de toer eronder brei je de steek die na het zwarte vakje komt. Als het je het telpatroon uit zou knippen dan zou je ook de zwarte vakjes eruit knippen.
21.05.2022 - 16:01
![]() Gea Laninga wrote:
Gea Laninga wrote:
Ik heb dit patroon vroeger al eens gebreid op 2 naalden.dat zou ik nu ook graag weer doen komt het dan wel uit hoe moet je de achterkant dan breien. Averecht?
14.02.2022 - 18:33DROPS Design answered:
Dag Gea,
Als je heen en weer breit, brei je inderdaad averecht op de verkeerde kant en recht op de goede kant. Zorg ervoor dat je steeds de even naalden in het telpatroon op de verkeerde kant breit en de oneven naalden op de goede kant.
17.02.2022 - 11:07
![]() Gea Laninga wrote:
Gea Laninga wrote:
Kun je dit patroon ook op 2 naalden breien.
14.02.2022 - 18:28DROPS Design answered:
Dag Gea,
Ja, dat is wel mogelijk met dit patroon. Om een patroon aan te passen om op rechte naalden te breien hebben we een instructie gemaakt. Deze vind je hier.
17.02.2022 - 11:08Harriet wrote:
What does sizes S, M, L, XL mean? What is the bust size for these letter sizing?
12.05.2016 - 09:05DROPS Design answered:
Dear Harriet, you will find at the bottom of the pattern when scrolling down the page a measurement chart with all measurements for each size, in cm, taken flat from side to side. Compare these to a similar garment you have and like the shape to find out the matching size. Read more here. Happy knitting!
12.05.2016 - 09:21
![]() Edith Stein wrote:
Edith Stein wrote:
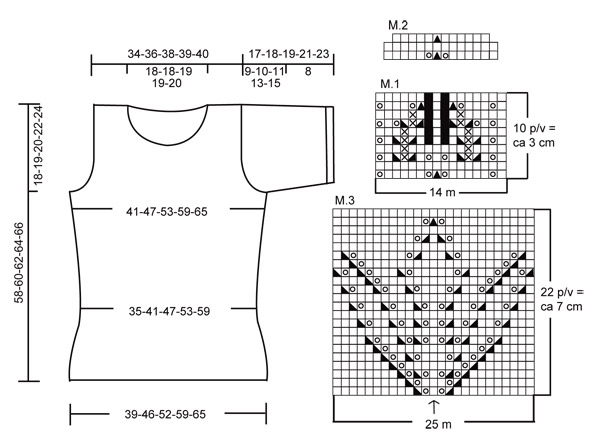
The photo does not show 14 sts after each repeat of M.2. In a medium,you can't get from 182 stitches after the third row of M.2 to 206 stitches after increasing 4 stitches every 5th row, 5 more times for a total of 6 times. 182 is 13 stitches times 14 repeats which means the third row of M.2 should be decreased to 13 stitches not 12. Add 4 times 6 or 24 to 182 = 206 which is your ending stitch count. The 3rd row should be k6,yo, k2tog,k5 for a total of 13. The chart is incorrect.
20.06.2015 - 19:32
|
||||||||||||||||||||||
DROPS 105-11 |
||||||||||||||||||||||
|
|
||||||||||||||||||||||
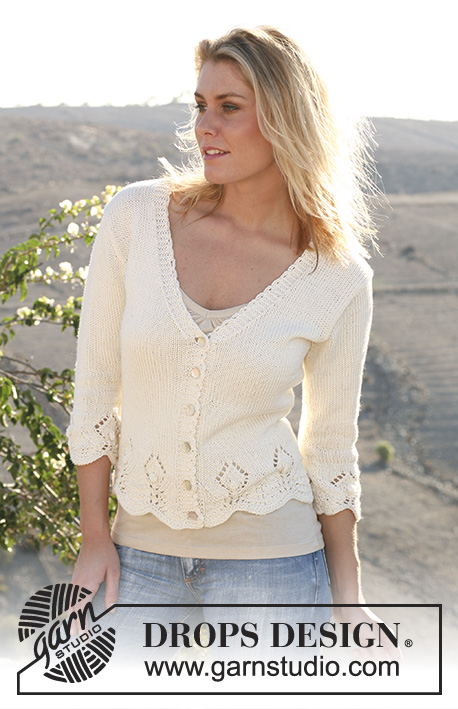
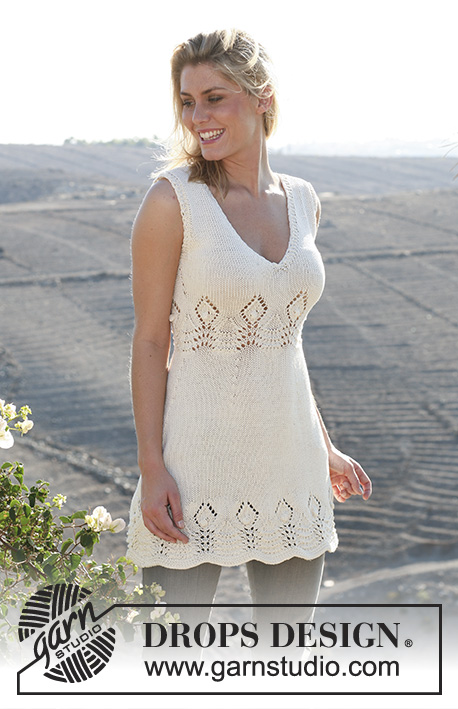
DROPS top with short sleeve and lace pattern in “Muskat”. Size XS - XXXL
DROPS 105-11 |
||||||||||||||||||||||
|
Garter st, back and forth on needle: K all rows Pattern: See diagram M.1, M.2 and M.3. The diagram shows the pattern from the RS side. Front and back piece: Knitted in the round. Loosely cast on 168-196-224-252-280 sts on circular needle size 3.5 mm. P 1 round, K 1 round. Continue in M.1 for approx 24-26-26-28-28 cm (adjust to a full pattern repeat) and then work the next 3 rounds as follows: *M.2 (= 14 sts), 14 stocking sts*, repeat from *-*. After M.2 there are 156-182-208-234-260 sts on round. Insert a Marking Thread (MT) each side as follows: Size XS/S: in first st on round + in st 79 Size M: in between first and last st on round + between st 91 and 92. Size L: in first st on round + in st 105 Size XL/XXL: in between first and last st on round + between st 117 and 118 Size XXXL: in first st on round + in st 131 (some MT in sts, some in between sts in order to have a st mid front) Now read all of the following section before knitting it! Continue in stocking st. Remember the knitting tension. At the same time when piece measures 26-27-28-29-30 cm inc 1 st on both sides of all MT on every 5th row a total of 6 times = 180-206-232-258-284 sts. At the same time when piece measures 34-35-36-37-38 cm work M.3 mid front – make sure to place middle st in diagram mid front – work remaining sts in stocking st. After M.3 continue in stocking st on all sts. At the same time when piece measures 40-41-42-42-42 cm cast off 5-6-7-8-9 sts each side for armhole as follows: Size XS/S: st with MT + 2 sts either side Size M: 3 sts on either side of MT Size L: st with MT + 3 sts either side Size XL/XXL: 4 sts on either side of MT Size XXXL: st with Mt + 4 sts on either side. Now complete front and back pieces separately. Front piece: = 85-97-109-121-133 sts. Continue M.3 and stocking st and dec to shape the armhole on every other row: 3 sts 0-1-2-2-3 times, 2 sts 1-1-2-4-5 times and 1 st 3-4-3-4-4 times. At the same time when piece measures 45-46-47-48-49 cm put the middle 15-15-17-17-19 sts on a thread and dec to shape the neckline on every other row: 3 sts 1 time, 2 sts 2 times and 1 st 5 times. After all dec for armhole and neck are complete there are 18-20-21-22-22 sts left on each shoulder. Continue in stocking st with 1 garter st each side. Cast off when piece measures 58-60-62-64-66 cm. Back piece: Dec to shape the armhole as described for front piece = 75-79-83-85-87 sts. Continue in stocking st with 1 garter st each side. When piece measures 54-56-58-60-62 cm cast off the middle 31-31-33-33-35 sts and dec to shape the neckline on every other row: 2 sts 1 time, 1 st 2 times = 18-20-21-22-22 sts left on each shoulder. Cast off when piece measures 58-60-62-64-66 cm. Sleeve: Knitted back and forth on needle. Loosely cast on 51-54-57-63-66 sts on needle size 3.5 mm. Work 6 rows garter st and work next row as follows from RS: *K1, K2 in next st, K2 in next st*, repeat from *-* = 85-90-95-105-110 sts on row. Continue in stocking st. After 2 rows dec 1 st each side on every other row 5 times = 75-80-85-95-100 sts. When piece measures 8 cm dec each side for sleeve cap on every other row: 3 sts 1 time, 2 sts 4 times, 1 st 3-5-7-9-12 times, then dec 2 sts each side until piece measures 16-17-18-20-22 cm, dec 3 sts 1 time each side and cast off. Sleeve measures approx 17-18-19-21-23 cm. Assembly: Sew shoulder seams. Sew side and sleeve seams. Set in sleeves. Neckline: Pick up approx 120 to 140 sts (incl sts on thread) on needle size 3.5 mm round the neck, P 1 round, K 1 round, K 1 round, P 1 round and cast off. |
||||||||||||||||||||||
Diagram explanations |
||||||||||||||||||||||
|
||||||||||||||||||||||
 |
||||||||||||||||||||||
Have you finished this pattern?Tag your pictures with #dropspattern or submit them to the #dropsfan gallery. Do you need help with this pattern?You'll find 24 tutorial videos, a Comments/Questions area and more by visiting the pattern on garnstudio.com. © 1982-2026 DROPS Design A/S. We reserve all rights. This document, including all its sub-sections, has copyrights. Read more about what you can do with our patterns at the bottom of each pattern on our site. |
||||||||||||||||||||||


With over 40 years in knitting and crochet design, DROPS Design offers one of the most extensive collections of free patterns on the internet - translated to 17 languages. As of today we count 324 catalogues and 12290 patterns translated into English (UK/cm).
We work hard to bring you the best knitting and crochet have to offer, inspiration and advice as well as great quality yarns at incredible prices! Would you like to use our patterns for other than personal use? You can read what you are allowed to do in the Copyright text at the bottom of all our patterns. Happy crafting!
Post a comment to pattern DROPS 105-11
We would love to hear what you have to say about this pattern!
If you want to leave a question, please make sure you select the correct category in the form below, to speed up the answering process. Required fields are marked *.