
Popular categories
Looking for a yarn?


Comments / Questions (52)
![]() Maura wrote:
Maura wrote:
The pattern says "900 ... Lima". Is that in grams?
24.06.2023 - 22:21DROPS Design answered:
Dear Maura, yes, it's a typo, it's grams of Lima. Happy knitting!
25.06.2023 - 13:31
![]() Edeltraut wrote:
Edeltraut wrote:
Hallo, liebes Drops Design. Vielen Dank für die Antwort. Ich meine dieses Muster welches nach jedem Bogen entsteht. Bei mir sieht rechts und links verschieden aus. Auf dem Foto des Model sieht es gleich aus. Ich habe schon alles mögliche probiert, immer verschieden.
23.05.2023 - 11:19DROPS Design answered:
Liebe Edeltraut, meinen Sie die Linien, die an den Vorderteilen entlang laufen? Diese Linien können am rechten und am linken Vorderteil ganz leicht unterschiedlich aussehen, da Sie die verkürzten Reihen an dem einen Vorderteil in Hin-Reihen und an dem anderen Vorderteil in Rück-Reihen arbeiten.
24.05.2023 - 10:58
![]() Edeltraut wrote:
Edeltraut wrote:
Hallo, ich habe genau nach Anleitung gestrickt, aber ich bekomme es nicht hin, das in der Rundung das gleiche Muster entsteht. Ich habe eine rechte und linke Seite, das stimmt. Was mache ich falsch?
22.05.2023 - 21:47DROPS Design answered:
Liebe Edeltraut, Entschuldigung ich verstehe Ihre Frage nicht ganz richtig, was meinen Sie mit der Rundung und rechte/linke Seite? Meinen Sie die verkürzten Reihen beim rechten und linken Vorderteil? Diese verkürzten Reihen beginnen mit einer Hinreihe beim rechten Vorderteil und mit einer Rückreihe beim linken Vorderteil. Dann stricken Sie die verkürzten Reihen wie erklärt, der ausser Rand wird dann länger als der innere. Kann das Ihnen helfen?
23.05.2023 - 08:46
![]() Cindy wrote:
Cindy wrote:
Stickfasthet i mönstret uppges vara 21 v x 42 v = 10 x 10, på Lima garn uppges 21 v x 28 varv = 10 x 10. Undrar om det bodde stå som på garnet?
06.11.2019 - 19:27DROPS Design answered:
Hej. Stickfastheten som uppges på garnet är i slätstickning, men det på mönstret är i rätstickning (där man får in fler varv på höjden) så det är därför det är olika. Mvh DROPS Design
07.11.2019 - 06:49
![]() Anne Marit Sletbakken wrote:
Anne Marit Sletbakken wrote:
Hei ! hva betyr at man skal strikke "motsatt" etter en p. rett på venstre forstykke? jeg får bare høyreforstykker får det ikke til å stemme med vrange og rette !
11.05.2019 - 13:37DROPS Design answered:
Hei Anne Marit. På høyre forstykket begynte du med vendinger på 1. pinne, og denne pinnen strikket du fra retten, 2. pinne med vendinger strikket du fra vrangen osv. Når du skal strikke venstre forstykket må dette speilvendes slik at buene går den andre veien. Derfor strikker du først en pinne fra retten, og så begynner du med vendinger med 1. pinne fra vrangen. 2. pinne blir da fra retten osv. Du følger ellers instruksjonene som vanlig. Når du feller til ermhull gjøres dette på starten av pinnen fra retten, og de forkortede pinnene på skulderen begynner med 1. pinne fra vrangen. God fornøyelse
14.05.2019 - 07:39
![]() Marcia wrote:
Marcia wrote:
Would this pattern work if I used stocking stitch instead of garter stitch? I find garter stitch makes the garment too thick and too hot. Could you give me an idea how much less yarn (%) stocking stitch would take? Thanks.
26.03.2019 - 23:26DROPS Design answered:
Dear Marcia, this pattern is worked and calculated with garter stitch, if you work the short rows with stocking stitch, this wouldn't be the expected result because of the different of tension in height between stocking st and garter stitch. You will find all our jacket patterns with rounded front edges here, you may find another pattern worked with stocking stitch. Happy knitting!
27.03.2019 - 08:12
![]() Jenny wrote:
Jenny wrote:
Hej, jag stickar nu första framstycket och undrar. Ska jag, innan jag börjar med första vändningen, sticka 38 varv rätstickning (för strl small)? Det ser nämligen jättekonstigt ut när jag har gjort det + de fem vändningarna. Det blir ju som om jag stickar en 90 graders vinkel. MVH //Jenny
11.03.2019 - 17:45DROPS Design answered:
Hej, du ska börja med vändningarna direkt.
18.03.2019 - 17:45
![]() Colleen Pierrynowski wrote:
Colleen Pierrynowski wrote:
I just saw my name come up in a previous comment. I did not make any previous comments and was shocked to read the comment. I am making my 3rd sweater with the pattern and I am very pleased with the ease of understanding the pattern.
22.02.2019 - 19:43
![]() Monika wrote:
Monika wrote:
Hi! An der Skizze kann ich nicht erkennen, ob diese Jacke tailliert gearbeitet ist. Und wenn nicht, an welcher Stelle kann ich sie für die Taillie enger stricken?
21.11.2018 - 11:35DROPS Design answered:
Liebe Monika, diese Jacke wird nicht tailliert gearbeitet - leider können wir nich jede Anleitung nach jeder Anfrage anpassen - gerne können Sie von einem ähnlichen taillierten Modell inspirieren - Ihr Laden wird damit auch gerne mal weiterhelfen, auch telefonisch oder per E-Mail. Viel Spaß beim stricken!
21.11.2018 - 12:16
![]() Delacroix Dominique wrote:
Delacroix Dominique wrote:
Bonjour Je ne vois pas combien de pelotes il me faut Pour chaque taille je vois un chiffre 700 par exemple cela correspond il au nombre de gramme ou à la longueur qu il me faut ?
03.10.2017 - 11:17DROPS Design answered:
Bonjour Mme Delacroix, la quantité est toujours indiquée au poids (le "g" a été ajouté). Il vous faudra donc 700 g en taille L soit 700/50 g la pelote de Lima = 14 pelotes Lima. Merci, bon tricot!
03.10.2017 - 13:16
|
|||||||||||||
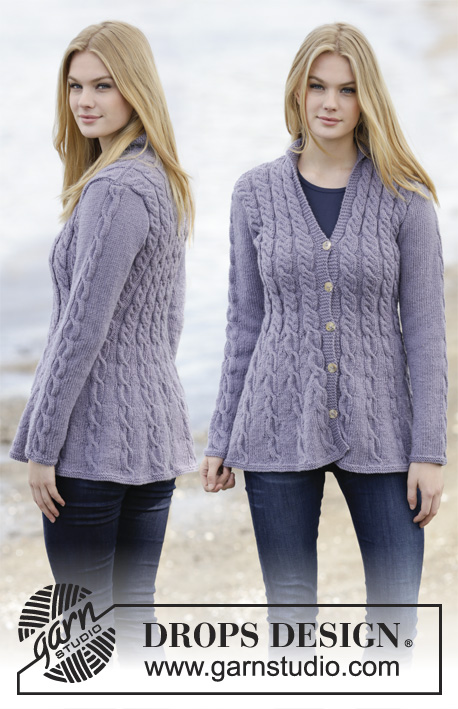
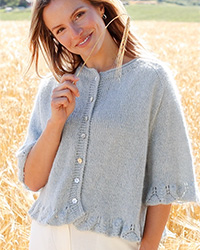
Dinner Date#dinnerdatecardigan |
|||||||||||||
 |
 |
||||||||||||
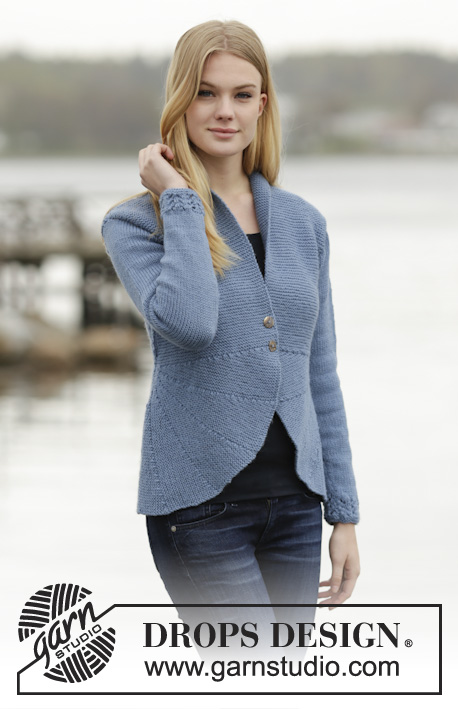
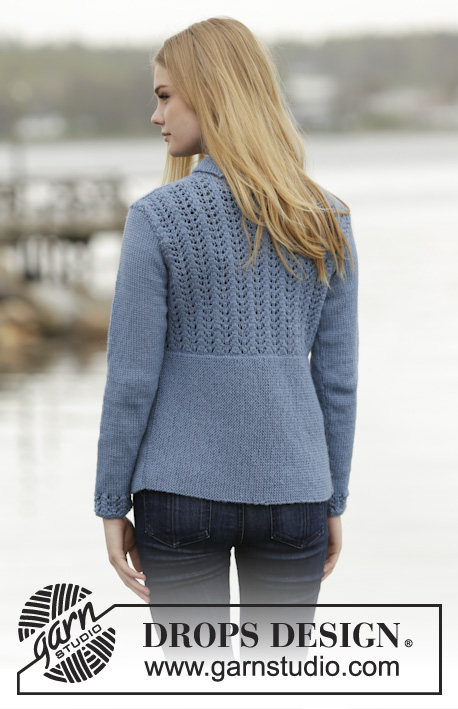
Knitted DROPS jacket with short rows, lace pattern and shawl collar in ”Lima”. Size: S - XXXL.
DROPS 165-24 |
|||||||||||||
|
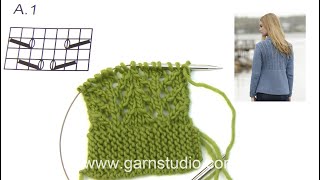
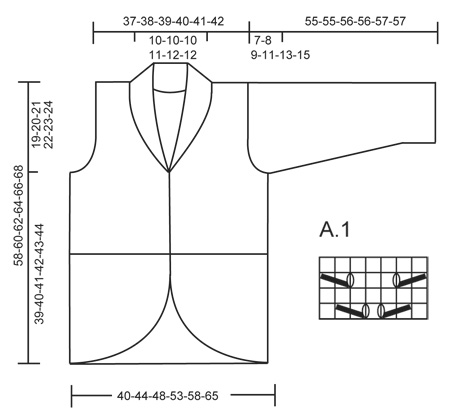
GARTER ST (back and forth): K all rows. 1 ridge = 2 rows K. PATTERN: See diagram A.1. Diagram shows all rows in pattern from RS. SHORT ROWS: Work short rows on front piece to get a rounded edge on the piece. Work short rows as follows: Row 1-2: Work 45-50-55-60-65-70 sts, turn piece and work back. Row 3-4: Work 42-47-52-57-62-67 sts, turn piece and work back. Row 5-6: Work 40-45-50-55-60-65 sts, turn piece and work back. Row 7-8: Work 37-42-47-52-57-62 sts, turn piece and work back. Row 9-10: Work 35-40-45-50-55-60 sts, turn piece and work back. Continue like this by working alternately 2 and 3 sts less on every turn until: SIZE S: Row 35-36: Work 2 sts, turn and work back. Repeat from row 1. Row 37-38: Work over all 47 sts, turn and work back. SIZE M: Row 39-40: Work 2 sts, turn and work back. Row 41-42: Work over all 52 sts, turn and work back. Repeat from row 1. SIZE L: Row 43-44: Work 2 sts, turn and work back. Row 45-46: Work over all 57 sts, turn and work back. Repeat from row 1. SIZE XL: Row 47-48: Work 2 sts, turn and work back. Row 49-50: Work over all 62 sts, turn and work back. Repeat from row 1. SIZE XXL: Row 51-52: Work 2 sts, turn and work back. Row 53-54: Work over all 67 sts, turn and work back. Repeat from row 1. SIZE XXXL: Row 55-56: Work 2 sts, turn and work back. Row 57-58: Work over all 72 sts, turn and work back. Repeat from row 1. BUTTONHOLES: Dec for buttonholes on right band. 1 buttonhole = K tog 2nd and 3rd st from mid front, then make 1 YO. Dec for buttonholes when piece measures 1 and 5 cm in all sizes (after short rows are done). ---------------------------------------------------------- BACK PIECE: Worked in 2 parts. BOTTOM PART: Cast on 47-52-57-62-67-72 sts on circular needle size 4 mm with Lima. Work ridges in GARTER ST – see explanation above – back and forth over all sts until piece measures 40-44-48-53-58-65 cm. REMEMBER THE KNITTING TENSION Cast off. TOP PART: Pick up 1 st in every ridge along on long side on bottom part. On next row (K from WS) adjust no of sts to 86-93-100-114-121-135. Continue to work as follows (from RS): 1 edge st in garter st, A.1 over the next 84-91-98-112-119-133 sts, 1 edge st in garter st. Work until piece measures 39-40-41-42-43-44 cm in total (measured in the side from bottom of jacket). Now cast off in each side for armholes. Cast off at beg of every row: 3 sts 1-1-1-2-2-2 times, 2 sts 0-1-2-3-4-6 times and 1 st 1-1-2-3-3-5 times = 78-81-82-84-87-89 sts. Continue to work until piece measures 56-58-60-62-64-66 cm. Now cast off the middle 18-19-20-20-21-23 sts for neck. On next row cast off 1 st towards the neck = 29-30-30-31-32-32 sts remain on each shoulder. Continue to work until piece measures 58-60-62-64-66-68 cm. Cast off. RIGHT FRONT PIECE: Worked back and forth on needle in garter st, i.e. K all rows. Cast on 47-52-57-62-67-72 sts on circular needle size 4 mm with Lima. Work SHORT ROWS - see explanation above (1st row = RS). Work Short rows (1st to 38th-42nd-46th-50th-54th-58th row) 5 times in total, the curved edge measures approx. 45-50-55-60-64-69 cm at the edge. Then work back and forth over all sts. Dec for BUTTONHOLES - see explanation above. Work until piece measures 39-40-41-42-43-44 cm (measured in the side from bottom of jacket). On next row from WS beg cast off for armhole in the side as on back piece = 43-46-48-47-50-49 sts. Continue to work until piece measures 58-60-62-64-66-68 cm. Now cast off the outermost 29-30-30-31-32-32 sts in the side for shoulder = 14-16-18-16-18-17 sts remain on needle for collar. Work rest of row. Then work short rows as follows (1st row = RS): * Work back and forth over all sts, work back and forth over 7-8-9-8-9-8 sts towards mid front *, repeat from *-* until collar measures approx. 7-7-7-8-8-9 cm (measured in the shorter side) from where shoulder was cast off. Cast off. LEFT FRONT PIECE: Cast on 47-52-57-62-67-72 sts on circular needle size 4 mm with Lima. K 1 row from RS. Then work as right front piece but reversed (1st row in short rows is from WS). SLEEVE: The sleeve is worked back and forth on circular needle. Cast on 44-44-51-51-58-58 sts (incl 1 edge st in each side) on circular needle size 4 mm with Lima. Work 2 ridges, then work as follows: 1 edge st in garter st, A.1 over the next 42-42-49-49-56-56 sts, finish with 1 edge st in garter st. Work A.1 3 times vertically, then work in stocking st with 1 st in garter st in each side. When piece measures 8 cm, inc 1 st in each side, repeat inc every 3-2½-2½-2-2-1½ cm 11-14-13-16-16-19 more times = 68-74-79-85-92-98 sts. When piece measures 48-47-47-46-46-44 cm (NOTE! Shorter measurements in the larger sizes because of longer sleeve cap and wider shoulders), cast off in each side for sleeve cap. Cast off at beg of every row as follows: 3 sts 1 time and 2 sts 4-4-5-5-6-6 times and 1 st 0-1-1-1-1-3 times. Then cast off 2 sts in each side until piece measures 54-54-55-55-56-56 cm, cast off 3 sts in each side 1 time. Cast off the remaining sts, piece measures approx. 55-55-56-56-57-57 cm. Make another sleeve. ASSEMBLY: Sew the shoulder seams. Sew in sleeves. Sew sleeve and side seams in one inside 1 edge st. Sew collar tog mid back and sew the neck dec on back piece. Sew the buttons on to left front piece. |
|||||||||||||
Diagram explanations |
|||||||||||||
|
|||||||||||||
 |
|||||||||||||
Have you finished this pattern?Tag your pictures with #dropspattern #dinnerdatecardigan or submit them to the #dropsfan gallery. Do you need help with this pattern?You'll find 19 tutorial videos, a Comments/Questions area and more by visiting the pattern on garnstudio.com. © 1982-2026 DROPS Design A/S. We reserve all rights. This document, including all its sub-sections, has copyrights. Read more about what you can do with our patterns at the bottom of each pattern on our site. |
|||||||||||||


With over 40 years in knitting and crochet design, DROPS Design offers one of the most extensive collections of free patterns on the internet - translated to 17 languages. As of today we count 324 catalogues and 12177 patterns translated into English (UK/cm).
We work hard to bring you the best knitting and crochet have to offer, inspiration and advice as well as great quality yarns at incredible prices! Would you like to use our patterns for other than personal use? You can read what you are allowed to do in the Copyright text at the bottom of all our patterns. Happy crafting!
Post a comment to pattern DROPS 165-24
We would love to hear what you have to say about this pattern!
If you want to leave a question, please make sure you select the correct category in the form below, to speed up the answering process. Required fields are marked *.