DROPS Cotton Merino
DROPS Cotton Merino
50% Wool, 50% Cotton
from 3.55 £ /50g
Get the yarn to make this pattern from 31.95£.

The yarn cost is calculated from the pattern’s smallest size and the yarn’s cheapest product type. Looking for an even better price? You might find it on the DROPS Deals!

DROPS Super Sale

Green Forest

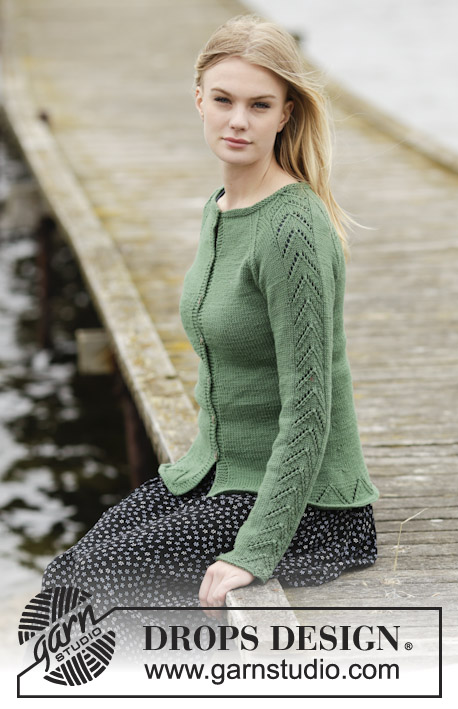
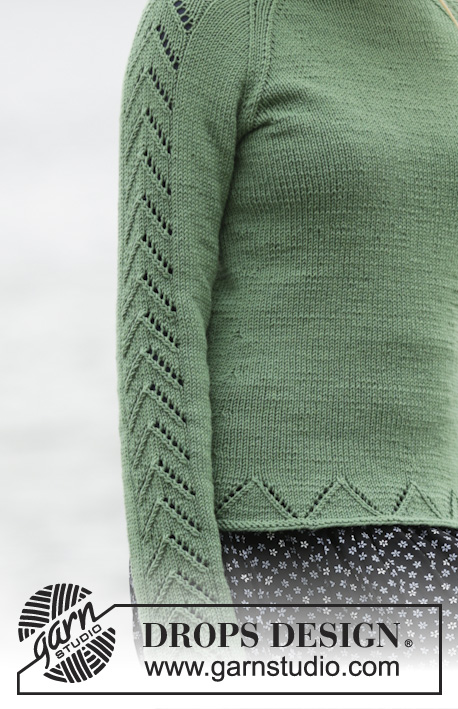
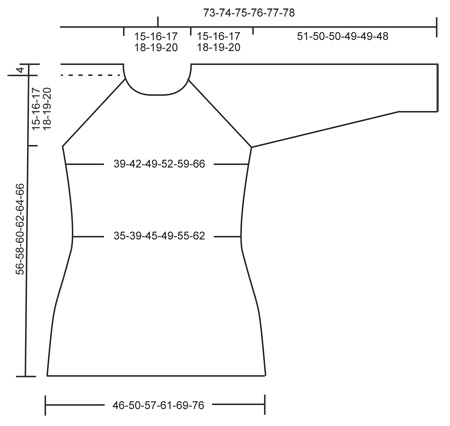
Knitted DROPS jumper with raglan and lace pattern in ”Cotton Merino” or "Belle". Size: S - XXXL.

DROPS 164-14
DROPS design: Pattern no cm-037
Yarn group B
----------------------------------------------------------
Size: S - M - L - XL - XXL - XXXL
Materials:
DROPS COTTON MERINO from Garnstudio
450-500-550-600-650-750 g colour no 11, forest green

Or use:
DROPS BELLE from Garnstudio
450-500-550-550-600-700 g colour no 10, moss green

DROPS DOUBLE POINTED NEEDLES AND CIRCULAR NEEDLE (40 and 80 cm) SIZE 4 mm - or size needed to get 21 sts x 28 rows in stocking st = 10 x 10 cm.

-------------------------------------------------------

Alternative Yarn – See how to change yarns here
Yarn Groups A to F – Use the same pattern and change the yarn here
Yarn usage using an alternative yarn – Use our yarn converter here

-------------------------------------------------------

DROPS Cotton Merino
DROPS Cotton Merino
50% Wool, 50% Cotton
from 3.55 £ /50g
Get the yarn to make this pattern from 31.95£.

The yarn cost is calculated from the pattern’s smallest size and the yarn’s cheapest product type. Looking for an even better price? You might find it on the DROPS Deals!

DROPS Super Sale

SAVE 30% on 6 cotton favourites!
Valid until 12.04.2024

Pattern instructions

NOTE: This pattern is written in British English. All measurements in charts are in cm. For conversion from cm to inches - click here. There are different terms for crocheting in British and American English. If this pattern includes crochet, click for "crochet terms" here. For this pattern in American English, please click here.
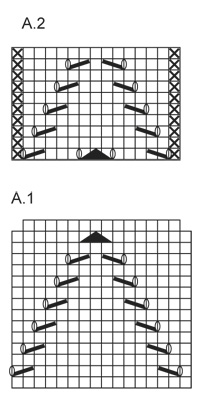
GARTER ST (in the round on circular needle):
* K 1 round and P 1 round *, repeat from *-*. 1 ridge = 2 rounds.

PATTERN:
See diagrams A.1 and A.2.

RAGLAN:
Dec 2 sts in every transition between body and sleeves.
Dec as follows from RS:
Beg 3 sts before marker and work as follows: K 2 tog, K 2 (marker is between these 2 sts), slip 1 st as if to K, K 1, psso.
----------------------------------------------------------

JUMPER:
Worked in the round on circular needle.
Cast on 192-208-240-256-288-320 sts on circular needle size 4 mm with Cotton Merino or Belle. Work 1 ridge in GARTER ST - see explanation above. On next round work A.1 (= 16 sts) over all sts (12-13-15-16-18-20 repetitions). When A.1 has been worked 1 time vertically, there are 168-182-210-224-252-280 sts on round. Insert 2 markers in the piece; 1 at the beg of round and one after 84-91-105-112-126-140 sts (= sides). Continue in stocking st. REMEMBER THE KNITTING TENSION When piece measures 8 cm, dec 1 st on each side of markers (= 4 sts dec), repeat dec every 3 cm 4 more times = 148-162-190-204-232-260 sts. When piece measures 26 cm, inc 1 st on each side of each marker (= 4 sts inc), repeat inc every 4-4½-4½-5-5-5½ cm 3 more times = 164-178-206-220-248-276 sts. When piece measures 41-42-43-44-45-46 cm, cast off for armholes in each side as follows: Cast off the first 4 sts on round, work until 4 sts remain before the other marker, cast off the next 8 sts, work until 4 sts remain, cast off these 4 sts. There are 74-81-95-102-116-130 sts on back piece and front piece. Put piece aside and knit the sleeves.

SLEEVE:
Worked in the round on double pointed needles. Cast on 45-47-49-51-53-55 sts on double pointed needles size 4 mm with Cotton Merino or Belle. Work 2 ridges. Insert 1 marker at the beg of round. Then work as follows: K 15-16-17-18-19-20, A.2 (= 15 sts), K 15-16-17-18-19-20. Continue this pattern upwards AT THE SAME TIME when piece measures 8 cm, inc 1 st on each side of marker. Inc every 3½-3-3-2½-2-2 cm 11-12-13-14-16-17 more times = 69-73-77-81-87-91 sts. Work inc sts in stocking st. When piece measures 51-50-50-49-49-48 cm (NOTE! Shorter measurements in the larger sizes because of longer raglan dec and larger neck width) cast off the 4 sts on each side of marker = 61-65-69-73-79-83 sts. Put piece aside and knit another sleeve.

YOKE:
Slip sleeves on to same circular needle as body where armholes were cast off = 270-292-328-350-390-426 sts. Insert 1 marker in all transitions between sleeves and body (= 4 markers). Continue in stocking st over sts on body and pattern and in stocking st as before on sleeves, AT THE SAME TIME on next round beg dec for RAGLAN – see explanation above (= 8 sts dec). Repeat dec on every other round 20-22-23-23-23-24 more times and then on every round 0-0-1-3-6-7 times. After all dec for raglan 102-108-128-134-150-170 sts remain on round. Work 2 ridges while AT THE SAME TIME on first round dec 7-7-23-25-37-53 sts evenly = 95-101-105-109-113-117 sts. Cast off.

ASSEMBLY: Sew the opening under the sleeves.

Diagram

symbols = K
symbols = P
symbols = slip 1 st as if to K, K 1, psso
symbols = K 2 tog
symbols = slip 1 st as if to K, K 2 tog, psso
symbols = 1 YO between 2 sts
diagram
diagram

Each of our patterns has specific tutorial videos to help you.

Do you have a question? See a list of frequently asked questions (FAQ)

Knitting tension is what determines the final measurements of your work, and is usually measured per 10 x 10 cm. It is provided like so: number of stitches in width x number of rows in height - eg: 19 stitches x 26 rows = 10 x 10 cm.

The knitting tension is very individual; some people knit/crochet loosely while others work tightly. You adjust the knitting tension with the needle size, which is why the suggested needle size is only meant as a guide! You need to adjust this (up or down) to ensure that YOUR knitting tension matches the knitting tension provided in the pattern. If you work with a different knitting tension than provided you will have a different yarn consumption, and your work will have different measurements than what the pattern suggests.

The knitting tension also determines which yarns can replace each other. As long as you achieve the same knitting tension you can replace one yarn with another.

See DROPS lesson: How to measure your tension/gauge

See DROPS video: How to make a gauge tension swatch

The required amount of yarn is provided in grams, eg: 450 g. To calculate how many balls you’ll need you first need to know how many grams are in 1 ball (25g, 50g or 100g). This information is available if you click on the individual yarn quality on our pages. Divide the amount required with the amount of each ball. For example, if each ball is 50g (the most common amount), the calculation will be as follows: 450 / 50 = 9 balls.

The important thing when changing from one yarn to another is that the knitting/crochet tension remains the same. This is so that the measurements of the finished piece will be the same as on the sketch provided. It is easier to achieve the same knitting tension using yarns from the same yarn group. It is also possible to work with multiple strands of a thinner yarn to achieve the knitting tension of a thicker one. Please try our yarn converter. We recommend you to always work a test swatch.

Please NOTE: when changing yarn the garment might have a different look and feel to the garment in the photo, due to individual properties and qualities of each yarn.

See DROPS lesson: Can I use a different yarn than the one mentioned in the pattern?

All our yarns are categorised into yarn groups (from A to F) according to thickness and knitting tension – group A contains the thinnest yarns and group F the thickest. This makes it easier for you to find alternative yarns to our patterns, should you wish to switch yarn. All yarns within the same group have a similar knitting tension and can easily replace each other. However, different yarn qualities have different structures and properties which will give the finished work a unique look and feel.

Click here for an overview of the yarns in each yarn group

At the top of all our patterns you’ll find a link to our yarn calculator, which is a helpful tool should you wish to use a different yarn than suggested. By filling in the yarn quality you wish to replace, the amount (in your size) and number of strands, the calculator will present good alternative yarns with the same knitting tension. Additionally it will tell you how much you’ll require in the new qualities and whether you’ll need to work with multiple strands. Most skeins are 50g (some are 25g or 100g).

If the pattern is worked with multiple colours, every colour will have to be calculated separately. Similarly, if the pattern is worked with several strands of different yarns (for example 1 strand Alpaca and 1 strand Kid-Silk) you will have to find alternatives for each, individually.

Click here to see our yarn calculator

Since different yarns have different qualities and textures we have chosen to keep the original yarn in our patterns. However, you can easily find options among our available qualities by using our yarn calculator, or simply pick a yarn from the same yarn group.

It is possible that some retailers still have discontinued yarns in stock, or that someone has a few skeins at home that they would like to find patterns for.

The yarn calculator will provide both alternative yarn as well as required amount in the new quality.

If you think it's hard to decide what size to make, it can be a good idea to measure a garment you own already and like the size of. Then you can pick the size by comparing those measures with the ones available in the pattern's size chart.

You'll find the size chart at the bottom of the pattern.

See DROPS lesson: How to read size chart

The needle size provided in the pattern serves only as a guide, the important thing is to follow the knitting tension. And since knitting tension is very individual, you will have to adjust the needle size to ensure that YOUR tension is the same as in the pattern – maybe you’ll have to adjust 1, or even 2 needle sizes, up or down to achieve the correct tension. For this, we recommend that you work test swatches.

Should you work with a different knitting tension than the one provided, the measurements of the finished garment might deviate from the measurement sketch.

See DROPS lesson: How to measure your tension/gauge

See DROPS video: How to make a tension/gauge swatch

Working a garment top-down provides more flexibility and room for personal adjustment. For example it is easier to try the garment on while working, as well as making adjustments to length of yoke and shoulder caps.

The instructions are carefully explaining every step, in the correct order. Diagrams are adjusted to the knitting direction and are worked as usual.

The diagram depicts all rows/rounds, and every stitch seen from the right side. It is read from bottom to top, from right to left. 1 square = 1 stitch.

When working back and forth, every other row is worked from the right side and every other row is worked from the wrong side. When working from the wrong side, the diagram will have to be worked reversed: from left to right, knit stitches are purled, purl stitches are knit etc.

When working in the round every round is worked from the right side and the diagram are worked from right to left on all rounds.

See DROPS lesson: How to read knitting diagrams

The diagram depicts all rows/rounds, and every stitch seen from the right side. It is worked from bottom to top, from right to left.

When working back and forth every other row is worked from the right side: from right to left and every other row is worked from the wrong side: from left to right.

When working in the round, every row in the diagram are worked from the right side, from right to left.

When working a circular diagram you start in the middle and work your way outwards, counter clockwise, row by row.

The rows usually start with a given number of chain stitches (equivalent to the height of the following stitch), this will either be depicted in the diagram or explained in the pattern.

See DROPS lesson: How to read crochet diagrams

Instructions for working several diagrams after each other on the same row/round, will often be written like so: “work A.1, A.2, A.3 a total of 0-0-2-3-4 times". This means you work A.1 once, then A.2 is worked once, and A.3 is repeated (in width) the number of times provided for your size – in this case like so: S = 0 times, M = 0 times, L=2 times, XL= 3 times and XXL = 4 times.

The diagrams are worked as usual: begin with the first row in A.1, then work the first row in A.2 etc.

See DROPS lesson: How to read knitting diagrams

See DROPS lesson: How to read crochet diagrams

The total width of the garment (from wrist-to-wrist) will be larger in the larger sizes, despite the actual sleeves being shorter. The larger sizes have longer sleeve caps and wider shoulders, so there will be a good fit in all sizes.

The measurement sketch/schematic drawing provides information regarding the full length of the garment. If it’s a jumper or a jacket the length is measured from the highest point on the shoulder closest to the neckline, and straight down to the bottom of the garment. It is NOT measured from the tip of shoulder. Similarly, the length of yoke is measured from the highest point on the shoulder and down to where yoke is split into body and sleeves.

On a jacket measures are never taken along bands, unless specifically stated. Always measure inside band stitches when measuring the length.

See DROPS lesson: How to read a schematic drawing

Diagrams are often repeated on the round or in height. 1 repeat is the diagram the way it appears in the pattern. If it says to work 5 repeats of A.1 in the round, then you work A.1 a total of 5 times after/next to each other in the round. If it says to work 2 repeats of A.1 vertically/in height you work the entire diagram once, then begin again at the start and work the entire diagram one more time.

Chain stitches are slightly narrower than other stitches and to avoid working the cast-on edge too tight, we simply chain more stitches to begin with. The stitch count will be adjusted on the following row to fit the pattern and measurement sketch.

The rib edge is more elastic and will contract slightly compared to, for example, stocking stitch. By increasing before the rib edge, you avoid a visible difference in width between the rib edge and the rest of the body.

It’s very easy to cast off too tightly, and by making yarn overs while casting off (and simultaneously casting these off) you avoid a too tight cast off edge.

See DROPS video: How to bind off with yarn overs (yo)

To achieve an even increase (or decrease) you can increase on, for example: every 3rd and 4th row alternately, like so: work 2 rows and increase on the 3rd row, work 3 rows and increase on the 4th. Repeat this until the increase is complete.

See DROPS lesson: Increase or decrease 1 st on every 3rd and 4th row alternately

Should you prefer to work in the round instead of back and forth, you may of course adjust the pattern. You’ll need to add steeks mid-front (usually 5 stitches), and follow the instructions. When you would normally turn and work from the wrong side, simply work across the steek and continue in the round. At the end you’ll cut the piece open, pick up stitches to work bands, and cover the cut edges.

See DROPS video: How to knit steeks and cut open

Should you prefer to work back and forth instead of in the round, you may of course adjust the pattern so you work the pieces separately and then assemble them at the end. Divide the stitches for the body in 2, add 1 edge stitch in each side (for sewing) and work the front and back pieces separately.

See DROPS lesson: Can I adapt a pattern for circular needles into straight needles?

Pattern repeats can vary slightly in the different sizes, in order to get the correct proportions. If you’re not working the exact same size as the garment in the photo, yours might deviate slightly. This has been carefully developed and adjusted so that the complete impression of the garment is the same in all sizes.

Make sure to follow instructions and diagrams for your size!

If you have found a pattern you like which is available in women’s size it’s not very difficult to convert it to men’s size. The biggest difference will be the length of sleeves and body. Start working on the women size that you think would fit across the chest. The additional length will be worked right before you cast off for the armhole/sleeve cap. If the pattern is worked top-down you can add the length right after the armhole or before the first decrease on sleeve.

Regarding additional yarn amount, this will depend on how much length you add, but it is better with a skein too many than too few.

All yarns will have excess fibres (from production) that might come off as lint or shedding. Brushed yarns (ie hairier yarns) have more of these loose, excess fibres, causing more shedding.

Shedding also depends on what is worn under or over the garment, and whether this pulls at the yarn fibres. It’s therefore not possible to guarantee that there will be no shedding

Below are some tips on how to get the best result when working with hairier yarns:

1. When the garment is finished (before you wash it) shake it vigorously so the looser hairs come off. NOTE: do NOT use a lint roller, brush or any method that pulls at the yarn.

2. Place the garment in a plastic bag and put it in your freezer - the temperature will cause the fibres to become less attached to each other, and excess fibres will come off easier.

3. Leave in the freezer for a few hours before taking it out and shaking it again.

4. Wash the garment according to the instructions on the yarn label.

Pilling is a natural process that happens to even the most exclusive of fibers. It's a natural sign of wear and tear that is hard to avoid, and that is most visible in high friction areas of your garment like a sweater's arms and cuffs.

You can make your garment look as new by removing the pilling, using a fabric comb or a pill/lint remover.

Still can't find the answer you need? Then scroll down and leave your question so one of our experts can try to help you. This will be done normally within 5 to 10 working days.
In the meantime, you can read the questions and answers that others have left to this pattern or join the DROPS Workshop on Facebook to get help from fellow knitters/crocheters!

You might also like...

Post a comment to pattern DROPS 164-14

We would love to hear what you have to say about this pattern!

If you want to leave a question, please make sure you select the correct category in the form below, to speed up the answering process. Required fields are marked *.

Comments / Questions (31)

country flag Christina Lohmeier wrote:

Hallo, ich finde die Musteranleitungen A1 und A2 nicht. Wo finde ich sie? LG

28.09.2021 - 13:15

DROPS Design answered:

Liebe Frau Lohmeier, die finden Sie zwischen die schriftliche Anleitung und die Skizze - wir hatten im Wochenende Probleme beim Anzeigen von Bildern, aber dieses ist jetzt gelöst. Wenn Sie immer noch nicht die Bilder sehen können, versuchen Sie die Seite zu aktualisieren und/oder Ihren Cache zu leeren. Viel Spaß beim stricken!

28.09.2021 - 16:04

country flag Anja wrote:

Bij de mouwen staat wordt in de rondte gebreid op breinasld zonder knop… neem aan dat het dan om 4 breinaalden gaat. Moet ik de opzetsteken al gelijk verdelen over de 3 nld? Kan het evt ook gewoon op een rondbreinaald?

10.07.2021 - 12:27

DROPS Design answered:

Dag Anja,

Ja, je verdeeld de opgezette steken over 3 naalden en je breit met de 4e naald, maar je kan het inderdaad ook met een rondbreinaald doen, maar niet wat je het handigst vindt.

13.07.2021 - 19:34

country flag Marianne Klüglein wrote:

Spørgsmål, sød bluse, men kan ikke forstå, at jeg, efter at jeg har slået 208 m op og strikket det første mønster skal ende med 182 på pinden, hvad gør jeg galt, siden jeg ikke kan få det til at passe. Kan i hjælpe mig. På forhånd tak!!!

30.12.2020 - 20:41

DROPS Design answered:

Hej Marianne, Du tager 2 masker ind ifølge A.1 på næst sidste pind i diagrammet og det gør du for hver gang diagrammet gentages = 13x2=26 - 208-26=182 masker på pinden. God fornøjelse!

07.01.2021 - 15:10

country flag Ann wrote:

Ik zie het al. De 56 cm is de totale lengte van het voor- en achterpand.

14.07.2020 - 18:11

country flag Ann wrote:

Beetje verwarrend, volgens de beschrijving op 41 cm hoogte voor armsgat minderen , maar volgens tekening op 56 cm? Ik ga ervanuit dat het 41 cm moet zijn?

14.07.2020 - 17:51

DROPS Design answered:

Dag Ann,

Je kant inderdaad af voor de armsgaten op een hoogte van 41 cm. De total hoogte is 56 cm, dus met het gedeelte boven de armsgaten erbij.

15.07.2020 - 18:18

country flag Susi wrote:

Komme mir ein bisschen albern vor, aber: Warum sind denn in der obersten Reihe von A.1 zwei Maschen weniger?

22.05.2020 - 00:40

DROPS Design answered:

Liebe Susi, bei der vorletzten Reihe in A.1 werden 2 Maschen abgenommen, deshalb sind es 2 Maschen weniger in A.1 bei der letzten Reihe. Viel Spaß beim stricken!

22.05.2020 - 10:07

country flag Cristina wrote:

Buongiorno, Ho una domanda riguardo agli aumenti delle maniche: si inizia con 45 maglie e si deve arrivare a 69 maglie. La spiegazione dice che si aumentano 2 maglie dopo 8 cm dall’inizio e poi ogni 3 1/2- 3-3-2 1/2-2-2 per 11 volte. Non capisco queste 11 volte come sono distribuite visto che se aumento dopo 8-3 1/2-3-3-2 1/2-2-2 le volte sono solo 7 e quindi non arrivo a 69 maglie totali. Grazie mille

28.11.2019 - 08:34

DROPS Design answered:

Buongiorno Cristina. Per la taglia S, aumenta la prima volta quando il lavoro misura 8 cm; poi aumenta altre 11 volte distanziando questi aumenti di 3,5 cm l'uno dall'altro. In tutto aumenta 12 volte, arrivando così a 69 maglie. Buon lavoro!

28.11.2019 - 09:08

country flag Mette Sørensen wrote:

Når jeg har strikket A1 en gang i starten , så har jeg det sammen masker tal. Hvad gør jeg galt? Har på fornemmelsen, at det er “slå ommellem 2 M” jeg ikke har forstået ??? Hilsen Mette

17.03.2019 - 16:27

DROPS Design answered:

Hei Mette. På den neste siste omgangen i A.1 er det en felling midt i diagrammet (ta 1 m løs av p, 2 rett sammen, løft den løse m over), det vil si: du feller 2 masker i hver rapport av A.1. Avhengig av hvilken størrelse du strikker har du altså felt 24-26-30-32-36-40 masker. "slå om mellom 2 masker" er en økning, og gjøre i forbindelse med fellingene tidligere i diagrammet, for å laeg hullmønster. Disse påvirker ikke maskeantallet, siden hver felling har en tilsvarende økning. God fornøyelse.

19.03.2019 - 14:43

country flag Daniela wrote:

Hallöchen. Ich habe mit dem Muster (a1) angefangen und merke nun das M mir viel zu groß ist (wolle Drops belle) und fange nun neu an mit der Maschenanzahl für S. Nun merke ich auch, dass ich nach Abschluss von A1 aber immer noch 208 Maschen auf der Nadel hatte. Ich versteh nur nicht was ich falsch gemacht habe, bzw. wie ich die letzte A1 Reihe Stricken soll. Da sind ja links und rechts jeweils eine Masche weniger. Kann da mein Fehler liegen? Lg und vielen Dank schon mal

03.12.2017 - 21:47

DROPS Design answered:

Liebe Daniela, bei der vorletzte Reihe in A.1 werden 2 M pro Rapport abgenommen (= in der Mitte jeder A.1 stricken Sie (1 M abheben, 2 M re zusstr, die abgehobene M überziehen) = 2 M in jedem A.1 abegommen = 14 M bleiben in jedem A.1. Viel Spaß beim stricken!

04.12.2017 - 10:47

Lyubov wrote:

Hello. How to performdec dec 1 st on each side of markers (= 4 sts dec), thanks

29.03.2016 - 13:09

DROPS Design answered:

Dear Mrs Lyubov, you can dec 1 st on each side of each marker - with or without (your choice) K2 between both dec. Happy knitting!

29.03.2016 - 15:23