
Popular categories
Looking for a yarn?


Comments / Questions (42)
![]() Brunni Sahl wrote:
Brunni Sahl wrote:
Hallo es wird angegeben das nach 2 Krausrippen die mittleren Maschen für den Halsausschnitt stillegelegt werden, Laut Strickschrift werden aber nie 2Krausrippen hintereinander gestrickt, sondern es ist immer eine rechts gestrickte Reihe dazwischen, wie ist das also zu verstehen? Stricke ich eine Krausrippe, dann eine glatt rechts gestrickte Reihe, dann wieder eine Krausrippe und dann erfolgt die Abnahme? Danke
12.07.2024 - 17:01DROPS Design answered:
Liebe Frau Sahl, die rechts gestrickte Reihe ist Bestandteil einer Krausrippe, das Muster besteht zwischen den Lochmusterreihen nur aus Krausrippen - 1 Krausrippe sind 2 Reihen = 1 Hin-Reihe rechts und 1 Rück-Reihe rechts, glatt rechts wird gar nicht gestrickt. Sie legen die Maschen für den Halsausschnitt also still, wenn 4 Reihen rechts gestrickt wurden (= 2 Krausrippen). Viel Spaß beim Weiterstricken!
12.07.2024 - 23:04
![]() Fabienne Cluts wrote:
Fabienne Cluts wrote:
Bonjour, je suis au stade des manches. Comme elles se tricotent de haut en bas comment dois-je faire pour que les différentes lignes de dessin soient à la même hauteur que le pull en lui-même car si je commence comme les explications je suis décalée ? merci
21.12.2022 - 14:38DROPS Design answered:
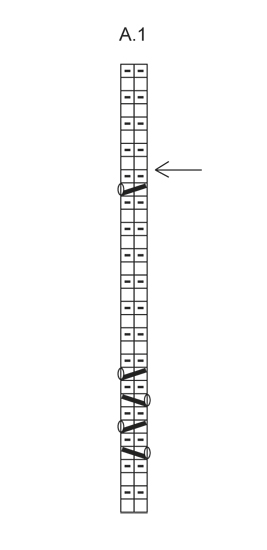
Bonjour Mme Cluts, le diagramme A.1 va se lire également de bas en haut pour les manches, même si elles se tricotent de haut en bas, comme on peut le voir sur la photo (la "rayure" de 4 rangs ajourés en bas de A.1 se trouve bien en haut de la manche). Maintenant, vous pouvez ajuster différemment si vous le souhaitez. Bon tricot!
21.12.2022 - 15:05
![]() Truchet Maria Angela wrote:
Truchet Maria Angela wrote:
Quisiera sacar el modelo imprimir laa foto pero no me deja
14.05.2019 - 18:40
![]() Eva wrote:
Eva wrote:
Ahoj, u schématu ve třetím řádku je: “1 oka spleteme hladce” - asi patří 2 oka, že? Děkuji
17.05.2018 - 22:44DROPS Design answered:
Milá Evo, díky za upozornění - ano, 2 oka spleteme hladce. Opraveno :-) Příjemné pletení! Hana
18.05.2018 - 17:05
![]() Helene Joosten wrote:
Helene Joosten wrote:
Hoi, ik brei nu het achterpand en volgens mij klopt er niets van. Als je alles uitrekent zijn de armsgaten 16 cm hoog , wel erg krap(maat xl) en begint na 6cm breien na het afkanten voor de armsgaten het afkanten voor de hals al, terwijl dat maar 2 naalden betreft als je het patroon lees. Op welke hoogte moet ik nu de hals voor het achterpand afkanten. (zie deze vraag ook al in 2015 waar gesteld wordt dat het patroon goed is, dat is dus niet zo, lees en tel)
25.01.2018 - 16:44DROPS Design answered:
Hallo Helene, Het patroon heeft een vrij lage hals achter en de armsgaten zijn zo smal omdat de mouwen laag zijn ingezet.
06.02.2018 - 15:24
![]() Melissa wrote:
Melissa wrote:
E continuo con lo schema A1? Inizio direttamente con 1m gettata ecc..?
30.11.2016 - 12:51DROPS Design answered:
Buongiorno Melissa. Quando il ferro inizia con 1 m gettata, non fa la gettata e lavora le prime 2 m a dir. Buon lavoro!
30.11.2016 - 14:16
![]() Melissa wrote:
Melissa wrote:
Buongiorno, dopo aver messo in attesa le 26 m centrali e aver intrecciato 1m come proseguo? Ripeto lo schema A1 su ogni spalla ma quanti vivagni devo fare? 2 per spalla (cioè 1 vicino allo scollo e 1 vicino alla manica)? Grazie
30.11.2016 - 12:10DROPS Design answered:
Buongiorno Melissa, non deve fare il vivagno verso lo scollo perchè le m saranno riprese per fare il collo. Buon lavoro!
30.11.2016 - 12:22
![]() Melissa wrote:
Melissa wrote:
Scusate, altra domanda: dopo aver aggiunto una m di vivagno per lato continuo a lavorare 2m a legaccio prima e dopo lo schema A1? Cioè 3m diritto, schema A1, 3m diritto? Grazie
24.11.2016 - 21:41DROPS Design answered:
Buonasera Melissa. Dopo aver aggiunto la m vivagno, lavora 1 sola m vivagno all'inizio e alla fine del ferro (quindi 1 m a dir e non 3); le altre m vanno lavorate seguendo A.1. Buon lavoro!
24.11.2016 - 21:52
![]() Melissa wrote:
Melissa wrote:
Buonasera, non mi è chiaro come inserire il diagramma A1: 2m legaccio, A1 fino a che non restano 2m, 2 m legaccio...è corretto? Praticamente viene una maglia rasata per i primi 4 ferri dello schema (escluse le 4 m legaccio)? Grazie
23.11.2016 - 17:30DROPS Design answered:
Buongiorno Melissa. E' corretta la disposizione del diag. A1. Le m del diag. A1 vengono però lavorate a dir sul diritto del lavoro e a dir sul rovescio del lavoro. Quindi il risultato è maglia legaccio sui primi 4 ferri del diag e non maglia rasata. Buon lavoro!
23.11.2016 - 17:34
![]() Melissa wrote:
Melissa wrote:
Buonasera, non mi è chiaro come inserire il diagramma A1: 2m legaccio, A1 fino a che non restano 2m, 2 m legaccio...è corretto? Praticamente viene una maglia rasata per i primi 4 ferri dello schema (escluse le 4 m legaccio)? Grazie
23.11.2016 - 17:02DROPS Design answered:
Buongiorno Melissa. E' corretta la disposizione del diag. A1. Le m del diag. A1 vengono però lavorate a dir sul diritto del lavoro e a dir sul rovescio del lavoro. Quindi il risultato è maglia legaccio sui primi 4 ferri del diag e non maglia rasata. Buon lavoro!
23.11.2016 - 17:16
|
||||||||||||||||
Morning Breeze#morningbreezesweater |
||||||||||||||||
 |
 |
|||||||||||||||
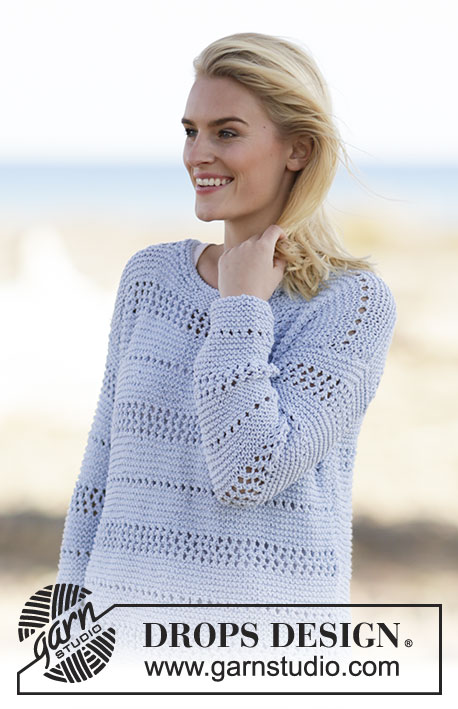
Knitted DROPS jumper in garter st with lace pattern in ”Paris”. Size: S - XXXL.
DROPS 161-29 |
||||||||||||||||
|
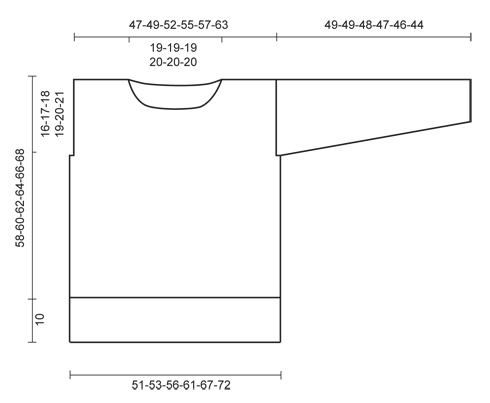
GARTER ST (back and forth): K all rows. 1 ridge = 2 rows K. GARTER ST (worked in the round): * K 1 round and P 1 round *, repeat from *-*. 1 ridge = 2 rounds. PATTERN: See diagram A.1. Diagram shows all rows seen from RS. DECREASE TIP (applies to sleeve): All dec are done from RS. Dec 1 st in each side of piece by K 2 tog inside 1 edge st in each side of piece. ---------------------------------------------------------- JUMPER: Back piece is long than front piece. BACK PIECE: Worked back and forth on circular needle. Cast on 76-80-84-92-100-108 sts on circular needle size 6 mm with Paris. Work 5 ridges in GARTER ST - see explanation above. Then work A.1 with 2 sts in garter st in each side of piece. When it has been worked up to arrow in diagram A.1, cast on 1 new st in each side of piece (= edge st) = 78-82-86-94-102-110 sts. Work edge sts in garter st until finished measurements. REMEMBER THE KNITTING TENSION Continue with A.1 and 1 edge st in garter st in each side of piece until finished measurements. When piece measures approx. 52-53-54-55-56-57 cm, cast off for armholes at the beg of the next 2 rows in each side of piece as follows: Cast off 4-4-4-6-8-8 sts 1 time = 70-74-78-82-86-94 sts. Continue with pattern with 1 edge st in garter st in each side until piece measures 55-57-59-61-63-65 cm - adjust after 2 ridges. Now slip the middle 26-26-26-28-28-28 sts on a stitch holder for neck and finish each shoulder separately (= 22-24-26-27-29-33 sts). On next row from the neck, cast off 1 st = 21-23-25-26-28-32 sts remain on shoulder. Cast off when piece measures approx. 65-67-69-71-73-75 cm - adjust after 2 ridges. Work the other shoulder the same way. FRONT PIECE: Cast on 78-82-86-94-102-110 sts (incl 1 edge st in each side). Work 4 ridges. Then work A.1 and 1 edge st in garter st in each side of piece until finished measurements. When piece measures 42-43-44-45-46-47 cm, cast off for armholes in each side as on back piece. When piece measures 48-50-52-54-56-58 cm, dec for neck as follows: Slip the middle 14-14-14-16-16-16 sts on a stitch holder for neck and finish each shoulder separately (= 28-30-32-33-35-39 sts). Then cast off on every row from neck as follows: 3 sts 1 time, 2 sts 1 time and 1 st 2 times = 21-23-25-26-28-32 sts remain on shoulder. Cast off when piece measures approx. 58-60-62-64-66-68 cm (adjust pattern with back piece). Work the other shoulder the same way. NECK EDGE: Worked in the round on circular needle. Pick up 70-85 sts (incl sts on stitch holders) on circular needle size 6 mm with Paris Work 2 ridges in GARTER ST - see explanation above. Cast off. SLEEVE: Worked back and forth on circular needle, top down. Cast on 50-52-56-58-62-66 sts (incl 1 edge st in each side) with Paris. Work 5 ridges. Then work A.1 with 1 edge st in garter st in each side of piece. When piece measures 3 cm, dec 1 st in each side inside 1 edge st - READ DECREASE TIP. Repeat dec every 6-5½-4½-4-4-3 cm 6-7-8-8-9-11 more times = 36-36-38-40-42-42 sts. Then work piece in garter st. Cast off when piece measures 49-49-48-47-46-44 cm (shorter measurements in the larger sizes because of wider shoulders). Knit another sleeve. ASSEMBLY: Sew shoulder seams in outer loops of edge sts, sew in sleeves, sew underarm and side seams in one down to where edge sts were cast on on back piece. |
||||||||||||||||
Diagram explanations |
||||||||||||||||
|
||||||||||||||||
 |
||||||||||||||||
 |
||||||||||||||||
Have you finished this pattern?Tag your pictures with #dropspattern #morningbreezesweater or submit them to the #dropsfan gallery. Do you need help with this pattern?You'll find 21 tutorial videos, a Comments/Questions area and more by visiting the pattern on garnstudio.com. © 1982-2026 DROPS Design A/S. We reserve all rights. This document, including all its sub-sections, has copyrights. Read more about what you can do with our patterns at the bottom of each pattern on our site. |
||||||||||||||||


With over 40 years in knitting and crochet design, DROPS Design offers one of the most extensive collections of free patterns on the internet - translated to 17 languages. As of today we count 325 catalogues and 12298 patterns translated into English (UK/cm).
We work hard to bring you the best knitting and crochet have to offer, inspiration and advice as well as great quality yarns at incredible prices! Would you like to use our patterns for other than personal use? You can read what you are allowed to do in the Copyright text at the bottom of all our patterns. Happy crafting!
Post a comment to pattern DROPS 161-29
We would love to hear what you have to say about this pattern!
If you want to leave a question, please make sure you select the correct category in the form below, to speed up the answering process. Required fields are marked *.