DROPS Muskat
DROPS Muskat
100% Cotton
from 1.85 £ /50g
Get the yarn to make this pattern from 16.65£.

The yarn cost is calculated from the pattern’s smallest size and the yarn’s cheapest product type. Looking for an even better price? You might find it on the DROPS Deals!

DROPS SS24

Angela

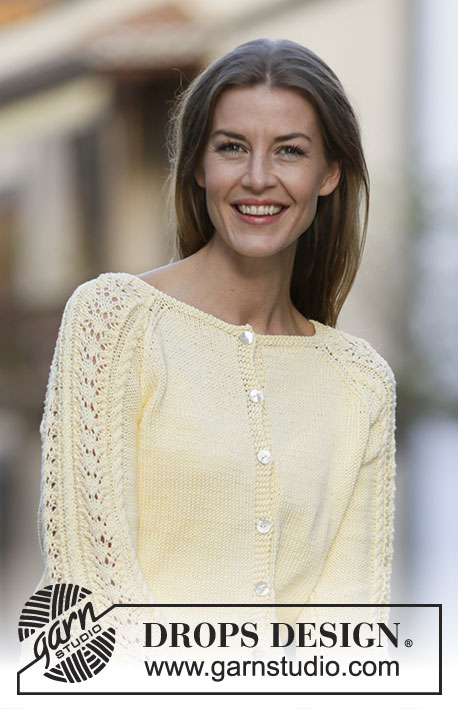
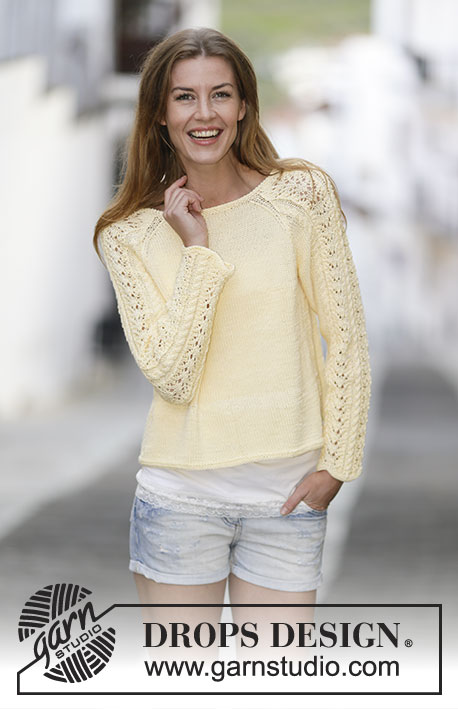
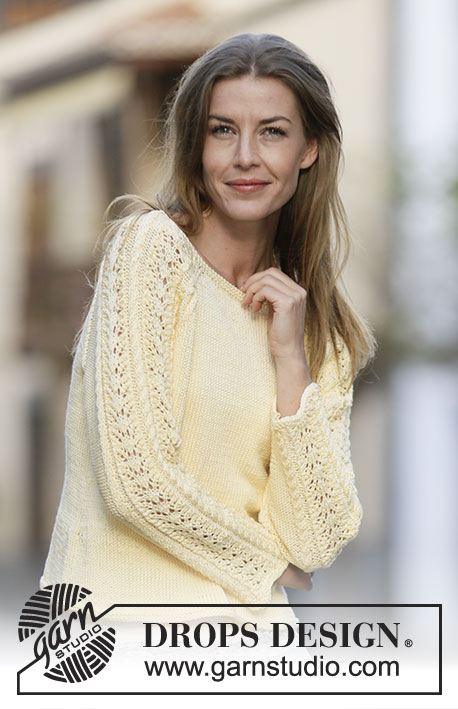
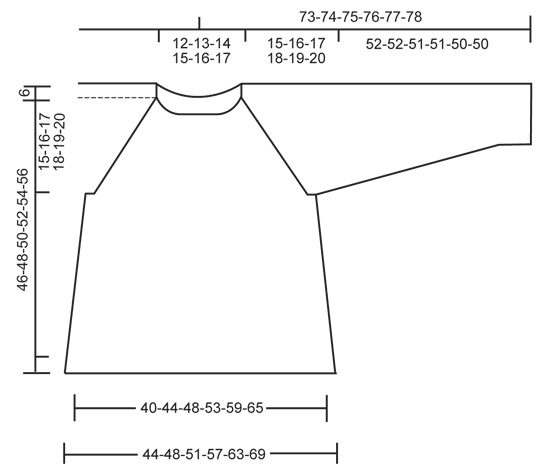
Knitted DROPS jumper with lace pattern and raglan in ”Muskat”. Size: S - XXXL.

DROPS 159-29
DROPS design: Pattern no r-669
Yarn group B
----------------------------------------------------------
Size: S - M - L - XL - XXL - XXXL
Materials:
DROPS MUSKAT from Garnstudio
450-500-550-600-650-750 g colour no 07, light yellow

DROPS DOUBLE POINTED NEEDLES and CIRCULAR NEEDLE (60 and 80 cm) SIZE 4 mm - or size needed to get 21 sts x 28 rows in stocking st or 24 sts x 28 rows in pattern = 10 x 10 cm.
DROPS DOUBLE POINTED NEEDLES and CIRCULAR NEEDLE (40 and 80 cm) SIZE 3.5 mm - for garter st.

-------------------------------------------------------

Alternative Yarn – See how to change yarns here
Yarn Groups A to F – Use the same pattern and change the yarn here
Yarn usage using an alternative yarn – Use our yarn converter here

-------------------------------------------------------

DROPS Muskat
DROPS Muskat
100% Cotton
from 1.85 £ /50g
Get the yarn to make this pattern from 16.65£.

The yarn cost is calculated from the pattern’s smallest size and the yarn’s cheapest product type. Looking for an even better price? You might find it on the DROPS Deals!

Pattern instructions

NOTE: This pattern is written in British English. All measurements in charts are in cm. For conversion from cm to inches - click here. There are different terms for crocheting in British and American English. If this pattern includes crochet, click for "crochet terms" here. For this pattern in American English, please click here.
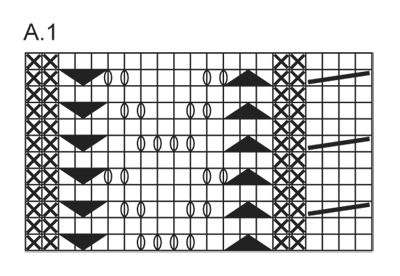
GARTER ST (worked in the round):
* K 1 round and P 1 round *, repeat from *-*. 1 ridge = 2 rounds.

PATTERN:
See diagram A.1. The diagram show all rows in pattern seen from RS.

RAGLAN:
Dec 2 sts in every transition between body and sleeves.
Dec as follows:
Beg 3 sts before marker and work as follows: K 2 tog, K 2 (marker is between these 2 sts), slip 1 st as if to K, K 1, psso.
----------------------------------------------------------

JUMPER:
Worked in the round on circular needle.
Cast on 184-200-216-240-264-288 sts on circular needle size 3.5 mm with Muskat. Work 2 ridges in GARTER ST - see explanation above. Switch to circular needle size 4 mm. Insert 2 markers in the piece; one at the beg of round and one after 92-100-108-120-132-144 sts. Continue in stocking st. When piece measures 6 cm, dec 1 st on each side of markers, repeat dec every 7-7-8-8-9-9 cm 3 times in total = 168-184-200-224-248-272 sts. When piece measures 31-32-33-34-35-36 cm, cast off 4 sts on each side of each marker for armholes (= 8 sts in each side). There are 76-84-92-104-116-128 sts on back piece and front piece.

SLEEVE:
Worked in the round on double pointed needles. Cast on 56-58-60-62-64-66 sts on double pointed needles size 3.5 mm with Muskat. Work 2 ridges. Switch to double pointed needles size 4 mm. Insert 1 marker at the beg of round. Then work as follows: P 5-6-7-8-9-10, A.1 (= 21 sts) 2 times, work the first 4 sts in A.1, P 5-6-7-8-9-10. Continue this pattern upwards AT THE SAME TIME when piece measures 8 cm, inc 1 st on each side of marker. Inc every 3-2½-2½-2-2-2 cm 15-16-17-18-19-20 times in total = 86-90-94-98-102-106 sts. P the inc sts. When piece measures 52-52-51-51-50-50 cm (NOTE! Shorter measurements in the larger sizes because of longer sleeve cap and wider shoulders) cast off the 4 sts on each side of marker = 78-82-86-90-94-98 sts. Put piece aside and knit another sleeve.

YOKE:
Slip sleeves on to same circular needle as body where armholes were cast off = 308-332-356-388-420-452 sts. Insert 1 marker in all transitions between sleeves and body (= 4 markers). Continue in stocking st over sts on body and pattern and P as before on sleeve, AT THE SAME TIME on next round beg dec for RAGLAN – see explanation above (= 8 sts dec). Repeat dec every other round 20-21-22-22-23-24 more times and then every round 3-4-5-7-8-9 times, on last dec for raglan also dec 8 sts evenly over A.1 on each sleeve. After all dec for raglan 108-116-124-140-156-172 sts remain on needle. Switch to a short circular needle size 3.5 mm. Work 2 ridges while AT THE SAME TIME on first round dec 8-14-18-28-40-52 sts evenly = 100-102-106-112-116-120 sts. Cast off.

ASSEMBLY: Sew the opening under the sleeves.

Diagram

symbols = K
symbols = P
symbols = K 3 tog
symbols = K 3 twisted tog
symbols = 1 YO between 2 sts
symbols = slip 2 sts on cable needle behind piece, K 2, K 2 from cable needle
diagram
diagram

Each of our patterns has specific tutorial videos to help you.

Do you have a question? See a list of frequently asked questions (FAQ)

Knitting tension is what determines the final measurements of your work, and is usually measured per 10 x 10 cm. It is provided like so: number of stitches in width x number of rows in height - eg: 19 stitches x 26 rows = 10 x 10 cm.

The knitting tension is very individual; some people knit/crochet loosely while others work tightly. You adjust the knitting tension with the needle size, which is why the suggested needle size is only meant as a guide! You need to adjust this (up or down) to ensure that YOUR knitting tension matches the knitting tension provided in the pattern. If you work with a different knitting tension than provided you will have a different yarn consumption, and your work will have different measurements than what the pattern suggests.

The knitting tension also determines which yarns can replace each other. As long as you achieve the same knitting tension you can replace one yarn with another.

See DROPS lesson: How to measure your tension/gauge

See DROPS video: How to make a gauge tension swatch

The required amount of yarn is provided in grams, eg: 450 g. To calculate how many balls you’ll need you first need to know how many grams are in 1 ball (25g, 50g or 100g). This information is available if you click on the individual yarn quality on our pages. Divide the amount required with the amount of each ball. For example, if each ball is 50g (the most common amount), the calculation will be as follows: 450 / 50 = 9 balls.

The important thing when changing from one yarn to another is that the knitting/crochet tension remains the same. This is so that the measurements of the finished piece will be the same as on the sketch provided. It is easier to achieve the same knitting tension using yarns from the same yarn group. It is also possible to work with multiple strands of a thinner yarn to achieve the knitting tension of a thicker one. Please try our yarn converter. We recommend you to always work a test swatch.

Please NOTE: when changing yarn the garment might have a different look and feel to the garment in the photo, due to individual properties and qualities of each yarn.

See DROPS lesson: Can I use a different yarn than the one mentioned in the pattern?

All our yarns are categorised into yarn groups (from A to F) according to thickness and knitting tension – group A contains the thinnest yarns and group F the thickest. This makes it easier for you to find alternative yarns to our patterns, should you wish to switch yarn. All yarns within the same group have a similar knitting tension and can easily replace each other. However, different yarn qualities have different structures and properties which will give the finished work a unique look and feel.

Click here for an overview of the yarns in each yarn group

At the top of all our patterns you’ll find a link to our yarn calculator, which is a helpful tool should you wish to use a different yarn than suggested. By filling in the yarn quality you wish to replace, the amount (in your size) and number of strands, the calculator will present good alternative yarns with the same knitting tension. Additionally it will tell you how much you’ll require in the new qualities and whether you’ll need to work with multiple strands. Most skeins are 50g (some are 25g or 100g).

If the pattern is worked with multiple colours, every colour will have to be calculated separately. Similarly, if the pattern is worked with several strands of different yarns (for example 1 strand Alpaca and 1 strand Kid-Silk) you will have to find alternatives for each, individually.

Click here to see our yarn calculator

Since different yarns have different qualities and textures we have chosen to keep the original yarn in our patterns. However, you can easily find options among our available qualities by using our yarn calculator, or simply pick a yarn from the same yarn group.

It is possible that some retailers still have discontinued yarns in stock, or that someone has a few skeins at home that they would like to find patterns for.

The yarn calculator will provide both alternative yarn as well as required amount in the new quality.

If you think it's hard to decide what size to make, it can be a good idea to measure a garment you own already and like the size of. Then you can pick the size by comparing those measures with the ones available in the pattern's size chart.

You'll find the size chart at the bottom of the pattern.

See DROPS lesson: How to read size chart

The needle size provided in the pattern serves only as a guide, the important thing is to follow the knitting tension. And since knitting tension is very individual, you will have to adjust the needle size to ensure that YOUR tension is the same as in the pattern – maybe you’ll have to adjust 1, or even 2 needle sizes, up or down to achieve the correct tension. For this, we recommend that you work test swatches.

Should you work with a different knitting tension than the one provided, the measurements of the finished garment might deviate from the measurement sketch.

See DROPS lesson: How to measure your tension/gauge

See DROPS video: How to make a tension/gauge swatch

Working a garment top-down provides more flexibility and room for personal adjustment. For example it is easier to try the garment on while working, as well as making adjustments to length of yoke and shoulder caps.

The instructions are carefully explaining every step, in the correct order. Diagrams are adjusted to the knitting direction and are worked as usual.

The diagram depicts all rows/rounds, and every stitch seen from the right side. It is read from bottom to top, from right to left. 1 square = 1 stitch.

When working back and forth, every other row is worked from the right side and every other row is worked from the wrong side. When working from the wrong side, the diagram will have to be worked reversed: from left to right, knit stitches are purled, purl stitches are knit etc.

When working in the round every round is worked from the right side and the diagram are worked from right to left on all rounds.

See DROPS lesson: How to read knitting diagrams

The diagram depicts all rows/rounds, and every stitch seen from the right side. It is worked from bottom to top, from right to left.

When working back and forth every other row is worked from the right side: from right to left and every other row is worked from the wrong side: from left to right.

When working in the round, every row in the diagram are worked from the right side, from right to left.

When working a circular diagram you start in the middle and work your way outwards, counter clockwise, row by row.

The rows usually start with a given number of chain stitches (equivalent to the height of the following stitch), this will either be depicted in the diagram or explained in the pattern.

See DROPS lesson: How to read crochet diagrams

Instructions for working several diagrams after each other on the same row/round, will often be written like so: “work A.1, A.2, A.3 a total of 0-0-2-3-4 times". This means you work A.1 once, then A.2 is worked once, and A.3 is repeated (in width) the number of times provided for your size – in this case like so: S = 0 times, M = 0 times, L=2 times, XL= 3 times and XXL = 4 times.

The diagrams are worked as usual: begin with the first row in A.1, then work the first row in A.2 etc.

See DROPS lesson: How to read knitting diagrams

See DROPS lesson: How to read crochet diagrams

The total width of the garment (from wrist-to-wrist) will be larger in the larger sizes, despite the actual sleeves being shorter. The larger sizes have longer sleeve caps and wider shoulders, so there will be a good fit in all sizes.

The measurement sketch/schematic drawing provides information regarding the full length of the garment. If it’s a jumper or a jacket the length is measured from the highest point on the shoulder closest to the neckline, and straight down to the bottom of the garment. It is NOT measured from the tip of shoulder. Similarly, the length of yoke is measured from the highest point on the shoulder and down to where yoke is split into body and sleeves.

On a jacket measures are never taken along bands, unless specifically stated. Always measure inside band stitches when measuring the length.

See DROPS lesson: How to read a schematic drawing

Diagrams are often repeated on the round or in height. 1 repeat is the diagram the way it appears in the pattern. If it says to work 5 repeats of A.1 in the round, then you work A.1 a total of 5 times after/next to each other in the round. If it says to work 2 repeats of A.1 vertically/in height you work the entire diagram once, then begin again at the start and work the entire diagram one more time.

Chain stitches are slightly narrower than other stitches and to avoid working the cast-on edge too tight, we simply chain more stitches to begin with. The stitch count will be adjusted on the following row to fit the pattern and measurement sketch.

The rib edge is more elastic and will contract slightly compared to, for example, stocking stitch. By increasing before the rib edge, you avoid a visible difference in width between the rib edge and the rest of the body.

It’s very easy to cast off too tightly, and by making yarn overs while casting off (and simultaneously casting these off) you avoid a too tight cast off edge.

See DROPS video: How to bind off with yarn overs (yo)

To achieve an even increase (or decrease) you can increase on, for example: every 3rd and 4th row alternately, like so: work 2 rows and increase on the 3rd row, work 3 rows and increase on the 4th. Repeat this until the increase is complete.

See DROPS lesson: Increase or decrease 1 st on every 3rd and 4th row alternately

Should you prefer to work in the round instead of back and forth, you may of course adjust the pattern. You’ll need to add steeks mid-front (usually 5 stitches), and follow the instructions. When you would normally turn and work from the wrong side, simply work across the steek and continue in the round. At the end you’ll cut the piece open, pick up stitches to work bands, and cover the cut edges.

See DROPS video: How to knit steeks and cut open

Should you prefer to work back and forth instead of in the round, you may of course adjust the pattern so you work the pieces separately and then assemble them at the end. Divide the stitches for the body in 2, add 1 edge stitch in each side (for sewing) and work the front and back pieces separately.

See DROPS lesson: Can I adapt a pattern for circular needles into straight needles?

Pattern repeats can vary slightly in the different sizes, in order to get the correct proportions. If you’re not working the exact same size as the garment in the photo, yours might deviate slightly. This has been carefully developed and adjusted so that the complete impression of the garment is the same in all sizes.

Make sure to follow instructions and diagrams for your size!

If you have found a pattern you like which is available in women’s size it’s not very difficult to convert it to men’s size. The biggest difference will be the length of sleeves and body. Start working on the women size that you think would fit across the chest. The additional length will be worked right before you cast off for the armhole/sleeve cap. If the pattern is worked top-down you can add the length right after the armhole or before the first decrease on sleeve.

Regarding additional yarn amount, this will depend on how much length you add, but it is better with a skein too many than too few.

All yarns will have excess fibres (from production) that might come off as lint or shedding. Brushed yarns (ie hairier yarns) have more of these loose, excess fibres, causing more shedding.

Shedding also depends on what is worn under or over the garment, and whether this pulls at the yarn fibres. It’s therefore not possible to guarantee that there will be no shedding

Below are some tips on how to get the best result when working with hairier yarns:

1. When the garment is finished (before you wash it) shake it vigorously so the looser hairs come off. NOTE: do NOT use a lint roller, brush or any method that pulls at the yarn.

2. Place the garment in a plastic bag and put it in your freezer - the temperature will cause the fibres to become less attached to each other, and excess fibres will come off easier.

3. Leave in the freezer for a few hours before taking it out and shaking it again.

4. Wash the garment according to the instructions on the yarn label.

Pilling is a natural process that happens to even the most exclusive of fibers. It's a natural sign of wear and tear that is hard to avoid, and that is most visible in high friction areas of your garment like a sweater's arms and cuffs.

You can make your garment look as new by removing the pilling, using a fabric comb or a pill/lint remover.

Still can't find the answer you need? Then scroll down and leave your question so one of our experts can try to help you. This will be done normally within 5 to 10 working days.
In the meantime, you can read the questions and answers that others have left to this pattern or join the DROPS Workshop on Facebook to get help from fellow knitters/crocheters!

You might also like...

159-29 Angela

Magali, United States

Angel

Oksana, Lithuania

Post a comment to pattern DROPS 159-29

We would love to hear what you have to say about this pattern!

If you want to leave a question, please make sure you select the correct category in the form below, to speed up the answering process. Required fields are marked *.

Comments / Questions (44)

country flag Pascale wrote:

Bonjour, pouvez vous me préciser la répartition des mailles pour les manches je ne comprends pas la fin de la quatrième ligne " tricoter les 4 premières mailles de A1...en mailles env "??? Merci pour votre réponse.

02.07.2023 - 15:48

DROPS Design answered:

Bonjour Pascale, tricotez les manches en rond à partir du milieu sous la manche ainsi: tricotez 5 à 10 m envers (cf taille), tricotez ensuite 2 fois les 21 mailles de A.1, tricotez maintenant les 4 premières mailles de A.1 (le motif est ainsi symétrique =on a une torsade de chaque côté du point ajouré); et terminez par 5 à 10 mailles envers. Bon tricot!

03.07.2023 - 10:40

country flag Mia wrote:

Hallo Drops-Team! Bin bei der Passe für größe M.Habe 22x in jeder 2.Runde die Raglanabnahme gearbeitet."Nun soll ich in jeder Runde 4x arb." Wie ist das gemeint?Soll ich 3 Runden ohne Abnahme stricken und dann die vierte Runde die Abnahme arbeiten und wenn ja,wieviel mal soll ich diese wiederholen? VG Mia

27.03.2022 - 19:27

DROPS Design answered:

Liebe Mia, Sie arbeiten die Zunahmen nicht mehr in jeder 2. Runde, sondern in JEDER Runde, d.h. es sind keine Zwischenrunden ohne Zunahmen mehr vorhanden. Das machen Sie insgesamt 4 x in der Höhe (also 4 Runden nacheinander mit Zunahmen). Gutes Gelingen weiterhin!

13.04.2022 - 10:35

country flag Mia wrote:

Hi! Bei dem Anfang für die Raglanabnahmen: müsste ich 1 Masche links ( Ärmelmaschen) stricken und dann 1 Masche wie zum links stricken abheben - 1 Masche links stricken - abgehobene Masche drüber ziehen? Weil es die links gestrickten Ärmelmaschen sind. Oder doch alles rechts stricken? Danke für eure Hilfe. VG Mia

12.03.2022 - 08:37

DROPS Design answered:

Liebe Mia, ja so können Sie auch abnehmen, wenn die linken Maschen von A.1 die Raglanabnahmen treffen. Viel Spaß beim stricken!

14.03.2022 - 10:10

country flag Mia wrote:

Hi! Die Abnahmen für die Taillierung ( nach den 6cm),ist die Ausarbeitung dafür dieselbe wie oben für die Raglanabnahmen gemeint? Ich danke euch für eure Hilfe und für die Geduld die ihr aufbringt.

20.01.2022 - 16:41

DROPS Design answered:

Liebe Mia, also ja gerne können Sie genauso gleich bei den Seiten abnehmen (also 2 Mal in der Runde wiederholen, damit 4 Maschen abgenommen werden). Viel Spaß beim stricken!

20.01.2022 - 17:30

country flag Amandine wrote:

Bonjour, pourriez-vous m'expliquer comment faire les mailles torses? Je vous remercie

08.01.2021 - 20:37

DROPS Design answered:

Bonjour Amandine, une maille torse se tricote dans le brin arrière au lieu du brin avant, cette vidéo montre comment tricoter le diagramme A.1 et donc les 3 mailles ensemble torse à l'endroit (que vous pouvez retrouver ici, en vidéo également). Bon tricot!

11.01.2021 - 07:35

country flag Britten wrote:

Jag har en fråga om raglanminskningen. Hur gör man då fram och bakstycket ska stickas rätt men under ärmarna är det aviga maskor, eftersom ärmmönstret börjar och slutar med avigt?

16.07.2020 - 21:30

DROPS Design answered:

Hej Britten, raglanminskningen strikkes altid som forklaret under RAGLAN øverst i mönstret. Lycka till :)

04.08.2020 - 11:02

country flag Manon wrote:

Bonjour, j'aimerais allonger le pull à quel moment me conseillez vous de le faire? Merci

11.05.2020 - 03:26

DROPS Design answered:

Bonjour Manon, vous pouvez probablement l'allonger avant de rabattre les mailles des emmanchures, ajustez l'espacement des diminutions en fonction de la hauteur choisie. Votre magasin pourra vous apporter toute l'assistance personnelle nécessaire, même par mail ou téléphone. Bon tricot!

11.05.2020 - 10:34

country flag Elisabeth Grahn wrote:

Jag förstår inte hur man ska sticka tröjan då man ska föra över alla maskor tillsammans, dvs då ärmarna och mittenpartiet ska föras i hop till ett ok och stickas klart. Det funkar Inge bra för mig! Känns som jag inte kan färdigställa tröjan. Det blir för trångt att sticka allt på en och samma rundsticka!! Hur är det tänkt?

07.05.2020 - 15:41

DROPS Design answered:

Hej. Det är tänkt att du ska sätta in alla maskor på en och samma rundsticka. Det kan bli lite trångt i övergångarna de första varven, du kan ev. använda en extra sticka där om du tycker det underlättar. Mvh DROPS Design

08.05.2020 - 07:43

country flag Marit Tvervåg wrote:

Hei! Det står at 8 masker skal felles over A1 øverst på armen. Nå gjentas A1 to ganger på armen, skal det da felles 8 masker over hver mønsterrapport?

19.09.2019 - 12:07

DROPS Design answered:

Hej Marit, Du skal felle 8 masker jævnt fordelt på hvert ærme. God fornøjelse!

02.10.2019 - 11:46

country flag Guez Gilda wrote:

Bonjour, je ne sais pas tricoter en circulaire. serait-il possible d'avoir ce modèle en aiguilles droites ? Dos et devant pour les manches je sais tricoter sur aiguilles doubles pointes mais du coup il faudrait l'explication pour les diminutions du raglan Merci beaucoup pour votre réponse

31.07.2019 - 19:53

DROPS Design answered:

Bonjour! Regardez la lecon qui traite de ce sujet: ICI. Bon tricot!

01.08.2019 - 21:57