
Looking for a yarn?


Comments / Questions (256)
![]() Tricia Gently wrote:
Tricia Gently wrote:
Hi, in the decrease-and-increase-at-the-same-time section, right after I created the arm hole, I increased "towards the side" - that turns into a rather large area of purl stitches. Was I mistaken, was I supposed to increase in between the two cables, that once were the raglan cables?
18.10.2025 - 22:56
![]() Christine Amrhein wrote:
Christine Amrhein wrote:
👍Danke 😘
30.09.2025 - 21:57
![]() Julie wrote:
Julie wrote:
Zu Beginn des Rumpfteils, bei den Zunahmen unterm Ärmel steht "Bei einer Gesamtlänge von 3 cm" (jeweils am Zopf ... zunehmen) - Bedeutet das, die erste Zunahme erfolgt, wenn der neu aufgenomme Teil unter den Ärmeln 3cm lang ist (ca 9 Reihen)? (Bitte entschuldigen Sie, sollte ich diese Frage bereits gestellt haben; in dem Fall handelt es sich um einen technischen Fehler)
29.09.2025 - 17:40DROPS Design answered:
Liebe Julie, ja, Sie messen ab den neuen Maschen, die unter den Armen angeschlagen wurden. Viel Spaß mit diesem tollen Pullover!
26.10.2025 - 22:57
![]() Christine Amrhein wrote:
Christine Amrhein wrote:
Guten Tag, ich habe alle Ab- und Zunahmen gemacht und bin bei 188 M (Grösse S) (Länge unter dem Arm: 11 cm) angelangt. Ich verstehe die Einteilung der Zöpfe nicht: Auf dem Foto wechseln sich schmale mit breiten Zöpfen ab. Wenn ich mich aber an die Anleitung halte, folgt auf A2 (schmal) A4 (ebenfalls schmal). Ausserdem ist mir nicht klar, wo der Rundenbeginn nach der Trennung von Rumpf und Ärmeln gesetzt wurde. Danke, dass Sie Licht in mein Dunkel bringen. Christine
29.09.2025 - 17:16DROPS Design answered:
Liebe Christine, die Runden beginnen in der Seite, und jetzt stricken Sie *A.5 über (5 M links + A.2 +5 M links), dann (A.4 über 2 M links, A.2, 2 M links)*, 2 Mal von *-*, dann nochmal A.5, dann links bis nächsten *A.5, A.4* und noch einmal 1x A.5. So mit A.5 wird jeder 2. schmalle Zopf immer breiter (schon mit 1.) und bei A.4 wird nur die Maschenanzahl von linken Maschen beidseitig von schmallen Zopf zunehmen. Viel Spaß beim Stricken!
30.09.2025 - 17:26
![]() Petra Henriksson wrote:
Petra Henriksson wrote:
Förstår inte varför jag skall öka för raglanärmarna. Har försökt på vardera sida om märkena men då blir det ju 2 efter varandra och då uppstår stora häl trots att jag stickar maskorna vridna
28.09.2025 - 18:55DROPS Design answered:
Hej, ökningen för raglan görs på varje sida om raglanmaskorna. Raglanmaskorna består av A.1/A.2, markör och A.2/A.1.
13.10.2025 - 17:04
![]() Julie wrote:
Julie wrote:
Zu Beginn des Rumpfteils, bei den Zunahmen unterm Ärmel steht "Bei einer Gesamtlänge von 3 cm" (jeweils am Zopf ... zunehmen) - Bedeutet das, die erste Zunahme erfolgt, wenn der neu aufgenomme Teil unter den Ärmeln 3cm lang ist (ca 9 Reihen)?
20.09.2025 - 12:19DROPS Design answered:
Liebe Julie, ja genau, das haben Sie richtig verstanden.
05.11.2025 - 10:00
![]() Marianne Kenny wrote:
Marianne Kenny wrote:
Hi when increasing for the raglan do you increase each side of each marker? Regards Marianne
02.08.2025 - 01:18DROPS Design answered:
Dear Marianne, the marker is indicating the middle of the raglan-line which, as indicated in the RAGLAN section above, is composed of: A.1/A.2, marker, A.2/A.1. So the increases are worked before the initial A.1 or A.2 and after the A.1/A.2 worked after the marker. So you increase before and after each marker (8 times in total) but not right next to the markers but in between the raglan-line charts. Happy knitting!
04.08.2025 - 00:21
![]() Dorien wrote:
Dorien wrote:
Hoeveel steken moeten er totaal in het boord van de panden worden gemeerderd voor maat S? Ik vind de omschrijving nu wat vaag: “Meerder als de boordsteek 2 cm meet door een omsl te maken voor de eerste av st in elk av deel.” Hoeveel steken zijn dat dan totaal voor maat S?
20.06.2025 - 17:06DROPS Design answered:
Dag Dorien,
De boordsteek bestaat uit rechte steken en averechte steken. Elke keer als je averechte steken breit, of het nu 1 averechte steek of bij wijze van 4 averechte steken achter elkaar zijn, dan meerder je door 1 omslag te maken voor de reeks averechte steken. Hoeveel dat precies zijn weet ik niet, maar dit zou je na kunnen tellen.
21.06.2025 - 10:42
![]() Dorien wrote:
Dorien wrote:
Op de foto lijkt het alsof ik een middennaad van 2 tricot steken zie in het midden van de 12 opgezette steken onder de mouw, na de opdeling van het werk bij 27 cm (maat S). Maar dat vind ik niet terug in de tekst. Ik ben inmiddels 10 cm verder en heb aan de zijkanten nu twee saaie vlakken van alleen maar averechtse steken. Is dat een fout (gemis) in het patroon?
10.06.2025 - 14:04DROPS Design answered:
Dag Dorien,
Je hebt inderdaad een stuk averecht in de mouw, dat komt ook overeen met wat er in de beschrijving staat.
22.06.2025 - 09:41
![]() Dorien wrote:
Dorien wrote:
Sorry, maar uw antwoord slaat kant noch wal. Ik stel een vraag over het meerderen en uw antwoord gaat over het minderen. Zoals ik eerder meldde, weet ik waar ik moet minderen. Helaas is uw hulp weinig behulpzaam. Leest u de vraag wel goed of komt de verwarring door de taal?
08.06.2025 - 21:38DROPS Design answered:
Dag Dorien,
Ja, excuses, ik ben blijkbaar in de war geweest. De laatste keer meerderen voor de raglan wat alleen gedaan wordt in maat S/M gebeurt voordat je het werk verdeelt voor het lijf en de mouwen. Deze meerderingen komen dus gewoon bij de raglanlijnen op de panden zoals je eerder ook meerderde voor de raglan. In een eerdere reactie gaf ik aan dat je deze de extra steken bij het voorpand en achterpand kunt zetten. Verder meerder je na 3 cm na het verdelen van het werk aan de zijkanten en dit is inderdaad naast de kabels op de plaats waar je 12 steken erbij hebt gezet onder de mouw.
09.06.2025 - 09:15
|
||||||||||||||||||||||||||||
Alana#alanasweater |
||||||||||||||||||||||||||||
 |
 |
|||||||||||||||||||||||||||
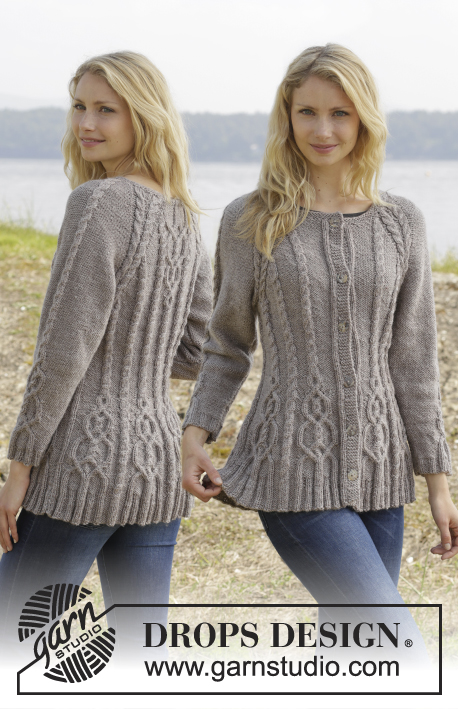
Knitted DROPS jumper with cables and raglan, worked top down in ”Karisma”. Size S-XXL
DROPS 156-19 |
||||||||||||||||||||||||||||
|
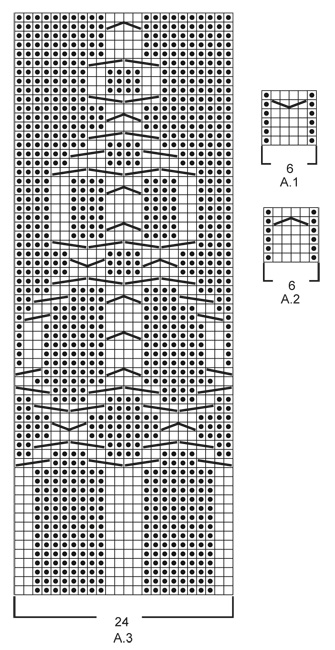
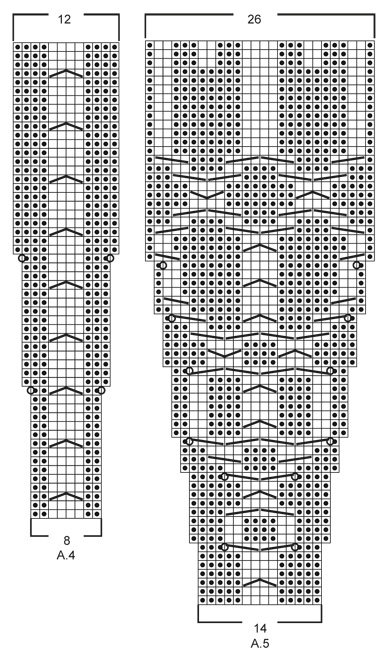
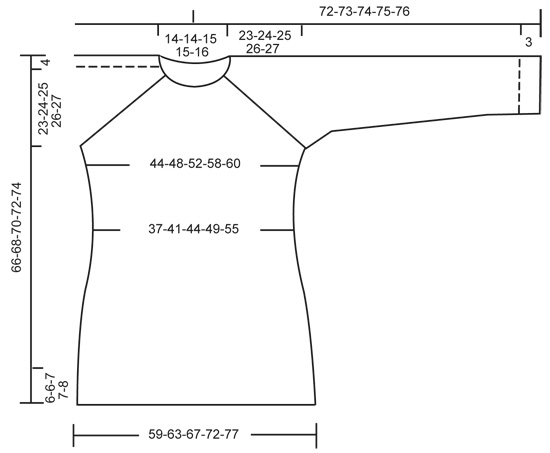
GARTER ST (in the round on circular needle): * K 1 round and P 1 round *, repeat from *-*. 1 ridge = 2 rounds. GARTER ST (back and forth on needle): K all rows. 1 ridge = 2 rows K. PATTERN: See diagrams A.1 - A.5. The diagrams show all rows in pattern seen from RS. RAGLAN: Inc on each side of raglan sts (A.1/A.2, marker, A.2/A.1) by making 1 YO = 8 inc on round. On next round K the YOs twisted to avoid holes. Then P the new sts on sleeves, and on front and back piece work the new sts in pattern as explained below. DECREASE TIP (applies to sleeves): Dec on each side of marker as follows: Work until 3 sts remain before marker, P 2 tog, P 2, P 2 tog = 2 sts dec. INCREASE TIP: Inc 1 st by making a YO. On next round P YOs twisted, i.e. work in the back loop of st instead of front to avoid holes. P the new sts. ---------------------------------------------------------- JUMPER: Worked top down in the round on circular needle. Work sleeve in the round on circular needle/double pointed needles. YOKE: Cast on 92-92-97-97-101 sts on circular needle size 4 mm with Karisma. Work 3 ridges in GARTER ST in the round on circular needle - see explanation above. Continue to work an elevation in GARTER ST back and forth -see explanation above, from mid back as follows (1st row = RS): Now work 5-5-7-7-9 sts, turn, work 10-10-14-14-18 sts, turn, work 15-15-19-19-23 sts, turn, work 20-20-24-24-28 sts, turn, work 25-25-29-29-33 sts, turn, work 30-30-34-34-38 sts, turn, work 35-35-39-39-43 sts, turn, work 40-40-43-43-48 sts, turn, work back to beg of round. Now K 1 round AT THE SAME TIME inc 24-24-23-23-27 sts evenly = 116-116-120-120-128 sts. P 18-18-19-19-21, insert 1st marker here (= this is now beg of round), A.2, P 2, A.2, P 2, A.1, insert 2nd marker here, A.2, P 0-0-1-1-3, A.3, P 0-0-1-1-3, A.1, insert 3rd marker here, A.2, P 2, A.2, P 2, A.1, insert 4th marker here, A.2, P 0-0-1-1-3, A.3, P 0-0-1-1-3, A.1. READ THE NEXT 2 SECTIONS BEFORE CONTINUING! REMEMBER THE KNITTING TENSION! On next round beg inc for RAGLAN – see explanation above, AT THE SAME TIME work pattern as follows: RAGLAN: Repeat inc every round 0-2-10-20-20 times in total. Then inc every other round 23-32-30-26-27 times and every 3rd round 6-0-0-0-0 times = 348-388-440-488-504 sts. PATTERN: Work pattern on body as follows (P the inc sts on sleeves): Work the first 6 sts inc in A.2, then P next 8-9-7-8-8 inc sts, work the next 6 inc sts in A.2, P the next 8-9-7-8-8 inc sts. NOTE: (Size M-L-XL-XXL): When A.3 has been worked 1 time vertically, continue with A.2 over cable and P the remaining sts from A.3 until start of body. S/M: Then inc as before on sleeve and inc inside A.1/A.2 (i.e. between A.1 and A.2, towards marker for raglan) on front and back piece 1-4 more times. P the new sts. L/XL/XXL: Continue with A.2 over the next 6 inc sts, P the next 7-8-8 inc sts, then inc as before on sleeve and inc inside A.1/A.2 (i.e. between A.1 and A.2, towards marker for raglan) on front and back piece 1-4-5 more times. P the last 1-4-5 inc sts. Piece now measures 27-28-29-30-31 cm from shoulder. Now work as follows: Slip the first 80-90-102-114-116 sts on a stitch holder for sleeve, cast on 12 new sts under sleeve, insert a blue marker in the middle of these new sts, work the next 94-104-118-130-136 sts (= front piece), slip the next 80-90-102-114-116 sts on a stitch holder for sleeve, cast on 12 new sts under sleeve, insert a blue marker in the middle of these new sts, work the remaining 94-104-118-130-136 sts on round (= back piece). NOW MEASURE THE PIECE FROM HERE. BODY: There are now 212-232-260-284-296 sts for body. Then continue pattern as follows: S/M: P 6-3, * A.2 0-1 time in width, P 7-7, A.2, P 8-9, insert a marker, A.2, P 8-9, insert a marker, A.2, P 9-9, A.2, P 9-9, A.2, insert a marker, P 8-9, A.2, insert a marker, P 8-9, A.1*, P 7-7, repeat from *-* 1 more time, P 1-4 L/XL/XXL: P 3-3-0, * A.2 1-1-2 times in width, P 4-6-5, A.2, P 7-8-8, insert a marker, A.2, P 7-8-8, insert a marker, A.2, P 7-8-8, insert a marker, A.2, P 10-11-12, A.2, P 10-11-12, A.2, insert a marker, P 7-8-8, A.2, insert a marker, P 7-8-8, A.2, insert a marker, P 7-8-8, A.1 *, P 4-6-5, repeat from *-* 1 more time, P 1-3-5. READ THE NEXT 2 SECTIONS BEFORE CONTINUING! Now dec and inc at the same time as follows: DECREASE: Dec differently as follows - READ DECREASE TIP: Dec 1 st on each side of the middle cable on front and back piece. Repeat dec every 2-2-1½-1½-1½ cm 3-3-4-4-6 more times. AT THE SAME TIME dec 1 st towards cable in every section with P sts with marker in (= 8-8-12-12-12 markers). Repeat dec every 3-2½-5-4-4 cm 2-3-1-2-2 more times. INCREASE (towards the sides): When piece measures 3 cm, inc along the cable towards the sleeve (i.e. cable from raglan) in P section towards the sides – READ INCREASE TIP! Inc 4 sts on round. Repeat inc every 1½-1½-2½-1½-1 cm 3-4-2-4-10 more times. When all dec and inc are done, 188-204-228-248-276 sts remain. When piece measures 11-12-12-13-14 cm, work pattern as follows: P 6-3-6-6-0, A.2 0-1-1-1-2 times in width, P 7-8-6-11-15, A.4 0-0-1-1-1 time in width, * A.5, A.4 *, repeat from *-* 2-2-3-3-3 more times in width, A.5 1-1-0-0-0 times in width, P 7-8-6-11-15, A.2 0-1-1-1-2 times in width, P 7-8-6-11-15, A.4 0-0-1-1-1 time in width, * A.5, A.4 *, repeat from *-* 2-2-3-3-3 more times in width, A.5 1-1-0-0-0 times in width, P 1-5-0-5-15. NOTE: Adjust the first cable in A.4 and A.5 to get a nice transition between diagrams. Continue with pattern and inc according to diagram. When A.4 and A.5 have been worked vertically and piece measures approx. 33-34-34-35-35 cm, there are 308-324-364-384-412 sts on round. Insert a marker here. NOW MEASURE THE PIECE FROM HERE. Now work rib as follows: S/M: * Work K over K and P over P until 7-11 sts remain before the blue marker in the side, P 2, K 2, P 3-4 *, repeat from *-* 1 more time and continue with K over K and P over P the rest of round. L/XL/XXL: * Work K over K and P over P until 8-14-21 sts remain before the blue marker in the side, K 2-2-2, P 3-4-3, K 0-2-2, P 0-3-3, K 0-0-2, P 0-0-3 *, repeat from *-* 1 more time and continue with K over K and P over P the rest of round. When rib has been worked for 2 cm from marker, inc by making 1 YO before first P st in every P section - remember INCREASE TIP. When rib has been worked for 5-5-6-6-6 cm, cast off with K over K and P over P. SLEEVES: Slip the 80-90-102-114-116 sts from stitch holder back on circular needle. K 1 row over all sts and cast on 12 new sts at the end of row = 92-102-114-126-128 sts. Insert a marker in the middle of the new sts (i.e. 6 sts on each side of marker). NOW MEASURE THE PIECE FROM HERE. Then work sleeve in the round on circular needle/double pointed needles. Continue the middle cable on sleeve as before but work P over cables in raglan. On 2nd round beg dec on each side of marker - READ DECREASE TIP. Repeat dec in every other round 6 more times = 78-88-100-112-114 sts. Then dec 1 st on each side of marker every 2-1½-1-1-1 cm 13-17-22-27-27 times = 52-54-56-58-60 sts. AT THE SAME TIME when piece measures 15 cm, work A.5 over cable in the middle of sleeve - adjust the first cable in A.5 to get a nice transition between diagrams. NOTE: Do not inc in A.5 on sleeve, i.e. do not work YOs in diagram. When A.5 is finished and sleeve measures 37 cm, work rib as follows from marker at beg of round: P 0-0-1-2-3, K 1-2-2-2-2, P 3, K 2, P 3, K 2, P 2, continue rib as on last row in A.5 (= 26 sts), P 2, K 2, P 3, K 2, P 3, K 1-2-2-2-2, P 0-0-1-2-3. Continue like this for 3 cm, cast off with K over K and P over P. ASSEMBLY: Sew the holes under the sleeves. |
||||||||||||||||||||||||||||
Diagram explanations |
||||||||||||||||||||||||||||
|
||||||||||||||||||||||||||||
 |
||||||||||||||||||||||||||||
 |
||||||||||||||||||||||||||||
 |
||||||||||||||||||||||||||||
Have you finished this pattern?Tag your pictures with #dropspattern #alanasweater or submit them to the #dropsfan gallery. Do you need help with this pattern?You'll find 24 tutorial videos, a Comments/Questions area and more by visiting the pattern on garnstudio.com. © 1982-2025 DROPS Design A/S. We reserve all rights. This document, including all its sub-sections, has copyrights. Read more about what you can do with our patterns at the bottom of each pattern on our site. |
||||||||||||||||||||||||||||


With over 40 years in knitting and crochet design, DROPS Design offers one of the most extensive collections of free patterns on the internet - translated to 17 languages. As of today we count 319 catalogues and 12048 patterns translated into English (UK/cm).
We work hard to bring you the best knitting and crochet have to offer, inspiration and advice as well as great quality yarns at incredible prices! Would you like to use our patterns for other than personal use? You can read what you are allowed to do in the Copyright text at the bottom of all our patterns. Happy crafting!
Post a comment to pattern DROPS 156-19
We would love to hear what you have to say about this pattern!
If you want to leave a question, please make sure you select the correct category in the form below, to speed up the answering process. Required fields are marked *.